[NestJS 带你飞!] DAY12 - Interceptor
什麽是 Interceptor?
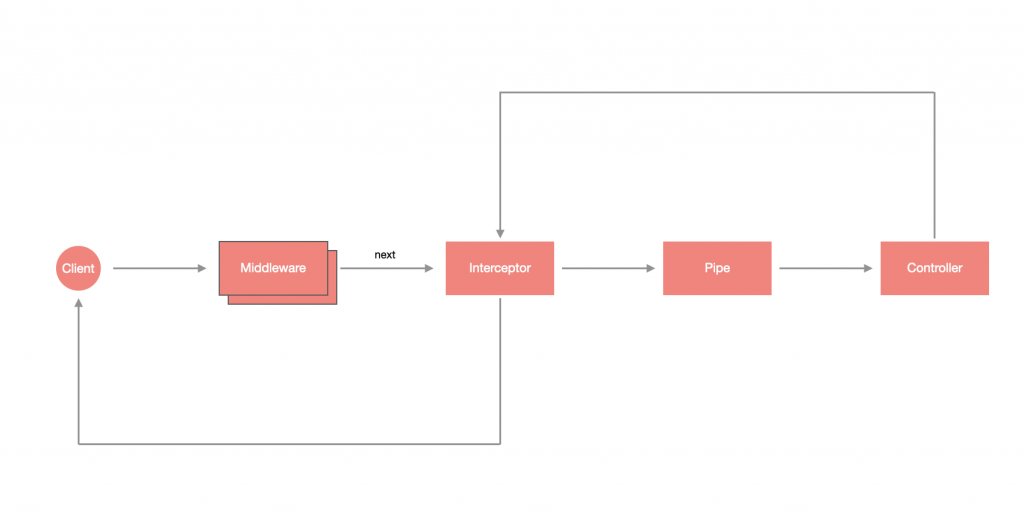
中文名称为拦截器,受到 剖面导向程序设计 (Aspect Oriented Programming) 的启发,为原功能的扩展逻辑,其特点如下:
- 可以在执行 Controller 的方法 之前 与 之後 设计逻辑。
- 执行於 Controller 的方法 之前 的 Interceptor 逻辑会在 Pipe 执行 之前 触发。
- 执行於 Middleware 之後。
- 可以更动资料与 Exception。
设计 Interceptor
Interceptor 可以透过 CLI 产生:
$ nest generate interceptor <INTERCEPTOR_NAME>
注意:
<INTERCEPTOR_NAME>可以含有路径,如:interceptors/hello-world,这样就会在src资料夹下建立该路径并含有 Interceptor。
这边我建立一个 HelloWorldInterceptor 在 interceptors 资料夹下:
$ nest generate interceptor interceptors/hello-world
在 src 底下会看见一个名为 interceptors 的资料夹,里面有 hello-world.interceptor.ts 以及 hello-world.interceptor.spec.ts:

建立出来的 Interceptor 骨架如下,会发现 Interceptor 其实也是带有 @Injectable 装饰器的 class,不过它必须实作 NestInterceptor 介面,并设计 intercept(context: ExecutionContext, next: CallHandler) 方法:
import { CallHandler, ExecutionContext, Injectable, NestInterceptor } from '@nestjs/common';
import { Observable } from 'rxjs';

@Injectable()
export class HelloWorldInterceptor implements NestInterceptor {
  intercept(context: ExecutionContext, next: CallHandler): Observable<any> {
    return next.handle();
  }
}
CallHandler
CallHandler 为 Interceptor 的重要成员,它实作了 handle() 来调用路由处理的方法,进而导入对应的 Controller 方法,也就是说,如果在 Interceptor 不回传 CallHandler 的 handle(),将会使路由处理失去运作。
由於 CallHandler 为 intercept 方法的参数,故其一定是在 intercept 中被呼叫,也就是说,可以在回传 handle() 之前 写一段逻辑,使其可以在进入 Controller 的方法前被执行,又因为 handle() 回传的是 Observable,故可以透过 pipe 的方式 对回传值做调整,使其可以在 Controller 的方法执行之後处理其他逻辑。
注意:
handle()是Observable,我们把它作为intercept的回传值是希望 Nest 可以去subscribe它,根据Observable的特性,若没有去subscribe它则不会执行其内部逻辑,这也是为什麽不回传handle()的话将会使路由处理失去运作的原因。
ExecutionContext
ExecutionContext 是继承 ArgumentsHost 的 class,其提供了更多关於此请求的相关讯息,下方为它提供的两个方法,透过这两个方法可以大幅提升应用的灵活性:
取得 Controller Class
透过 getClass() 取得当前请求对应的 Controller Class:
const Controller: TodoController = context.getClass<TodoController>();
取得 Controller method
透过 getHandler() 取得当前请求对应的 Controller method,假设当前请求会呼叫 TodoController 的 getAll(),那就会回传 getAll 这个函式:
const method: Function = context.getHandler();
使用 Interceptor
在使用之前,先将 hello-world.interceptor.ts 修改一下,在进入 Interceptor 时印出 Hello World! 并使用变数储存进入的时间,再透过 tap 印出结束的时间与进入的时间差:
import { CallHandler, ExecutionContext, Injectable, NestInterceptor } from '@nestjs/common';
import { Observable } from 'rxjs';
import { tap } from 'rxjs/operators';

@Injectable()
export class HelloWorldInterceptor implements NestInterceptor {
  intercept(context: ExecutionContext, next: CallHandler): Observable<any> {
    console.log('Hello World!');
    const input = Date.now();
    const handler = next.handle();
    return handler.pipe(
      tap(() => console.log(`${ Date.now() - input } ms`))
    );
  }
}
修改完以後就来使用此 Interceptor,透过 @UseInterceptors 装饰器即可轻松套用,使用的方式大致上可以分成两种:
- 单一资源:在 Controller 的方法中套用
@UseInterceptors装饰器,只会针对该资源套用。 - Controller:直接在 Controller 上套用
@UseInterceptors装饰器,会针对整个 Controller 中的资源套用。
下方以套用在 Controller 为例,修改 app.controller.ts:
import { Controller, Get, UseInterceptors } from '@nestjs/common';
import { AppService } from './app.service';
import { HelloWorldInterceptor } from './interceptors/hello-world.interceptor';

@Controller()
@UseInterceptors(HelloWorldInterceptor)
export class AppController {
  constructor(private readonly appService: AppService) {}

  @Get()
  getHello(): string {
    return this.appService.getHello();
  }
}
透过浏览器查看 http://localhost:3000 会发现终端机出现了下方结果:
Hello World!
3 ms
全域 Interceptor
如果设计了一个共用的 Interceptor 要套用在所有资源上的话,只需要修改 main.ts 即可,透过 useGlobalInterceptors 来配置全域 Interceptor:
import { NestFactory } from '@nestjs/core';
import { AppModule } from './app.module';
import { HelloWorldInterceptor } from './interceptors/hello-world.interceptor';

async function bootstrap() {
  const app = await NestFactory.create(AppModule);
  app.useGlobalInterceptors(new HelloWorldInterceptor());
  await app.listen(3000);
}
bootstrap();
用依赖注入实作全域 Interceptor
上面的方法是透过模组外部完成全域配置的,与 Pipe 一样可以用依赖注入的方式,透过指定 Provider 的 token 为 APP_INTERCEPTOR 来实现,这里是用 useClass 来指定要建立实例的类别:
import { Module } from '@nestjs/common';
import { APP_INTERCEPTOR } from '@nestjs/core';
import { AppController } from './app.controller';
import { AppService } from './app.service';
import { HelloWorldInterceptor } from './interceptors/hello-world.interceptor';

@Module({
  imports: [],
  controllers: [AppController],
  providers: [
    AppService,
    {
      provide: APP_INTERCEPTOR,
      useClass: HelloWorldInterceptor
    }
  ]
})
export class AppModule {}
小结
Interceptor 可以在不修改 Controller 的情况下去扩充逻辑,是十分方便的功能。这里附上今天的懒人包:
- Interceptor 执行於 Middleware 之後,但可执行於 Pipe 与 Controller 之前与之後。
- 可以在不变动原本逻辑的情况下去扩充逻辑。
-
CallHandler为重要成员,需要呼叫其handle()来让路由机制得以运行。 -
ExecutionContext提供了getClass()与getHandler()来提升灵活性。 - 全域 Interceptor 可以透过依赖注入的方式实作。
<<: Clean architecture in Android
Day29: Picker controller
前言 今天要在 RecipeDetailView 中添加 Picker controller, 使其...
Day27 Javascript元件库 Jquery介绍
今天要接触我们的Javascript,让网页更多动画,互动性,不是一个只有图片跟文字的死板网页,而J...
DAY1-为何要逼自己参加铁人赛
我是今年刚毕业的应届毕业生 不知道有没有男生跟我有一样的困扰,想要找Junior的缺,但因为还没当兵...
Use Alfresco APSCA Exam Questions and Save yourself From Exam Anxiety
**Get Ready to Clear Alfresco APSCA Exam by Choosi...
Day 9. 来Build游戏看看
哈哈,游戏什麽都没有,只有一个蓝天,一个会移动的视角,WASD也不能动...但我们还是来Build试...