Day25. Form 里面还有 Form 怎麽办?- 表单 part3
Day23 的弹跳视窗元件,送出表单按钮在form标签的外面,理当来说form 外面的送出表单按钮和里面无关,今天我们会讲如何处理这种状况。
<div class="modal-content">
  <div class="modal-header">
    <strong>新增文章</strong
    ><button
      name="button"
      type="button"
      class="close"
      data-dismiss="modal"
      aria-label="Close"
    >
      <span aria-hidden="true">×</span>
    </button>
  </div>
  <div class="modal-body">
    <form
      class="simple_form new_blog"
      id="new_modal"
      novalidate="novalidate"
      action="/admin/blogs"
      accept-charset="UTF-8"
      method="post"
    >
      <!-- 不重要内容省略 -->
    </form>
  </div>
  <div class="modal-footer">
     <button
      name="button"
      type="submit"
      class="btn btn-primary"
      form="new_modal"
      data-confirm="是否确定要送出编辑?
            请注意!送出後无法复原!"
      data-disable-with="载入中...">
      送出文章
    </button>
  </div>
</div>
w3c 提到可以用以下的用法,将按钮移到DOM外面执行,只要外面指定的form 的值等於表单id的值。
<form action="/action_page.php" method="get" id="form1">
  <label for="fname">First name:</label>
  <input type="text" id="fname" name="fname" /><br /><br />
  <label for="lname">Last name:</label>
  <input type="text" id="lname" name="lname" />
</form>

<button type="submit" form="form1" value="Submit">Submit</button>
w3c轻描淡写提到的这种解决方式,却解决相当多的问题
- Form 里面还有 Form
- Modal 送出按钮在
<form>外面 - 汇出表单 & Datatable 共用输入框
汇出表单 & Datatable 共用输入

上述的样式,利用表单form属性的用法,先指定form特定的id="export-orders",接着将上述的搜寻框、清除重填按钮、下拉式选单、时间选单利用form="export-orders" 的行为指向id="export-orders"的表单。
<form
  id="export-orders"
  action="/admin/orders/download_orders"
  accept-charset="UTF-8"
  method="post">
  <input
    type="hidden"
    name="authenticity_token"
    value="..."
  />
</form>

<div
  class="card shadow mb-4"
  data-controller="orders"
  data-orders-current-url-value="/admin/orders"
>
  <div class="card-header py-3">
    <h6 class="h6 m-0 font-weight-bold text-primary d-flex align-items-center">
      <span>汉汉老师的订单列表</span
      ><input
        type="submit"
        name="commit"
        value="订单汇出"
        class="btn btn-sm btn-primary float-right ml-auto"
        id="export-orders"
        data-confirm="确定要汇出吗?"
        form="export-orders"
      />
    </h6>
  </div>
  <div class="card-body">
    <div class="d-flex ml-1 mb-1 flex-nowrap">
      <div class="input-group mb-2" style="max-width: 350px">
        <input
          type="search"
          name="太长省略..."
          id="太长省略..."
          class="form-control"
          data-orders-target="keyword"
          form="export-orders"
          placeholder="搜寻订单编号/购买⼈姓名或⼿机"
        />
        <div class="input-group-append">
          <i
            class="fas fa-search input-group-text"
            style="padding-top: 10px"
          ></i>
        </div>
      </div>
      <button
        name="button"
        type="reset"
        form="export-orders"
        class="btn btn-secondary btn-sm ml-2 mb-2"
        data-action="click->orders#reset"
        data-orders-target="resetBtn"
      >
        清除重填
      </button>
    </div>
    <div class="d-flex flex-nowrap">
      <select
        name="ransack_search[status_eq]"
        id="status-select"
        class="form-control input-sm mx-1"
        style="max-width: 250px"
        form="export-orders"
        data-orders-target="status"
        data-action="orders#"
      >
        <option value="">所有订单状态</option>
        <option value="unpaid">未付款</option>
        <option value="processing">处理中</option>
        <option value="waiting">已出货</option>
        <option value="done">已完成</option>
        <option value="canceled">已取消</option>
        <option value="returned">退货/退款</option>
      </select>

      <!-- 省略... -->

      <div class="input-group mb-3">
        <input
          type="date"
          name="ransack_search[created_at_gteq]"
          id="ransack_search_created_at_gteq"
          value="2020-09-21"
          class="form-control"
          style="height: 100%; max-width: 220px"
          data-orders-target="startedAt"
          form="export-orders"
        />
        <div class="input-group-append" style="height: 100%">
          <label class="input-group-text">至</label>
        </div>
        <input
          type="date"
          name="ransack_search[created_at_lt]"
          id="ransack_search_created_at_lt"
          value="2021-09-22"
          class="form-control"
          style="height: 100%; max-width: 220px"
          data-orders-target="endedAt"
          form="export-orders"
        />
      </div>
    </div>

    <!-- 省略... -->

  </div>
</div>
使用w3c 提到的用法,我们可以将<form>拉出外面後,因此我们不用烦恼多了<form>以後的样式问题,写法可以更自由
<form
  id="export-orders"
  action="/admin/orders/download_orders"
  accept-charset="UTF-8"
  method="post">
  <input
    type="hidden"
    name="authenticity_token"
    value="..." />
</form>
Modal 送出按钮在<form> 外面
Day22 提到的弹跳视窗按钮在form标签外面的状况要如何处理?首先以下为自定义的弹跳视窗元件
module ApplicationHelper
    def modal(id: nil, confirm_wording: '确认', confirm_form:,
              confirm_target: nil, title: nil, controller: nil,
              close_btn: '取消')
    content_tag :div, id: id, class: 'modal fade',
                tabindex: -1, role: 'dialog', aria: { hidden: true },
                data: { "#{controller}-target": 'modal' } do
      content_tag :div, role: 'document', class: 'modal-dialog' do
        content_tag :div, class: 'modal-content' do
          # Header
          content_tag(:div, class: 'modal-header') do
            content_tag(:strong, title) +
            button_tag(type: 'button', class: 'close',
                       data: { dismiss: 'modal' }, aria: { label: 'Close' }) do
              content_tag :span, '×', aria: { hidden: true }
            end
          end +
            # Body: 自定义内容交给 yield
            content_tag(:div, class: 'modal-body') { yield if block_given? } +
            # Footer
            content_tag(:div, class: 'modal-footer') do
              button_tag(close_btn, type: 'button', class: 'btn btn-warning',
                               data: { dismiss: 'modal' }, aria: { label: 'Close' }) +
              (confirm_wording && button_tag(confirm_wording,
                type: 'submit', class: 'btn btn-primary',
                "data-#{controller}-target": confirm_target,
                 form: confirm_form,
                 data: { confirm: "是否确定要送出编辑?\n请注意!送出後无法复原!",
                         disable_with: "载入中..." }))
            end
        end
      end
    end
  end
end
弹跳视窗元件搭配自定义内容的结构
/ 弹跳视窗
= modal(id: 'new-blog-modal', confirm_wording: '送出文章',
        confirm_form: 'new_modal', title: '新增文章') do
  = simple_form_for [:admin, @blog], html: { method: :post, id: :new_modal } do |f|
    = f.input :title, label: tag.strong('标题')
    = f.input :content, label: tag.strong('内文')
    = f.input :genre, as: :radio_buttons, label: tag.strong('分类'),
              collection: [["生活", :life], ["休闲", :casual], ["科技", :technology]],
              selected: :casual, item_wrapper_class: 'form-check form-check-inline'
上述例子的结构特徵为送出表单的按钮在<form> 标签之外,因此也可以使用w3c所提到的用法,将外面的送出表单按钮指定到里面的<form>标签。此例与上一例用法理由相同,但因为知道了这种用法,所以联想到还可以像这样使用在自定义的弹跳视窗元件中。
Form 里面还有 Form
首先,我们要先知道按钮一共有三个属性reset, button, submit,而表单送出为type="submit"。
在某个情境是,<simple_form_for>(form1) 标签里面再写一个<simple_form_for>(form2),<simple_form_for>(form2) 里面和外面分别有送出按钮,则这两个送出按钮送出的都会是<simple_form_for>(form1) 的表单,而不会是<simple_form_for>(form2) 的。
<form id="form1">
  <!-- form2 -->
  <input />

  <form id="form2">
    <!-- form2 -->
    <input />
    <button type="submit">
  </form2>

  <button type="submit">
</form1>
举一个实际例子,首先我们先把ajax routes写出来
resources :blogs do
  #====== ajax
  post :search, on: :collection
end
并且将 controller , view 写出来
module Admin
  class BlogsController < ApplicationController
    def search
      blog = Blog.find_by_id params[:id]

      render partial: 'searched_blog', locals: { blog: blog }
    end
  end
end
在 app/views/admin/blogs/_searched_blog 中
br
= log_template do
  = log_item title: 'id' do
    = blog&.id || ''
  = log_item title: '标题' do
    = blog&.title || '找不到标题'
  = log_item title: '内文' do
    = blog&.content || '找不到内文'
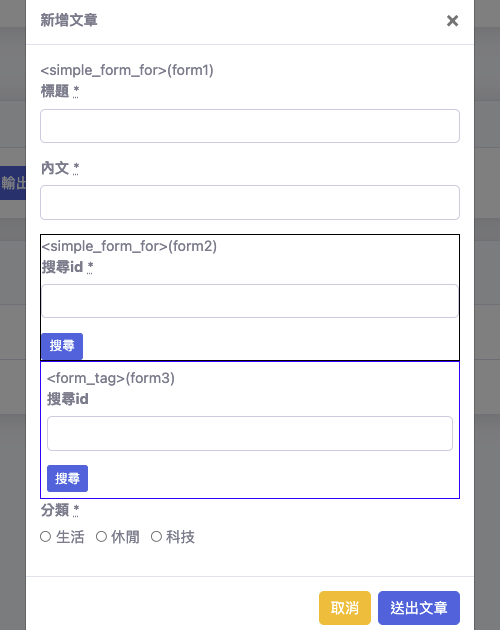
接着我们将Form 包着 Form的样式写出来
= modal(id: 'new-blog-modal', confirm_wording: '送出文章',
        confirm_form: 'new_modal', title: '新增文章') do
  = simple_form_for [:admin, @blog], html: { method: :post, id: :new_modal } do |f|
    = f.input :title, label: tag.strong('标题')
    = f.input :content, label: tag.strong('内文')
    = tag.div style: "border: 1px solid black"
      = simple_form_for(@blog, url: search_admin_blogs_path, method: :post,
                        html: { data: { remote: true } } do |g|
        = g.input :id, label: tag.strong('搜寻id')
        = g.submit '搜寻', class: 'btn btn-primary btn-sm'
    = f.input :genre, as: :radio_buttons, label: tag.strong('分类'),
              collection: [["生活", :life], ["休闲", :casual], ["科技", :technology]],
              selected: :casual, item_wrapper_class: 'form-check form-check-inline'

我们将里面的form (<simple_form_for>(form2)) 用黑色框包覆住。右键检查查看黑色框的原始码,可以看到<simple_form_for>(form2)的<form> 标签已经在被渲染阶段被消除,因此造成两个搜寻, 送出文章 按下去後,送出的表单都是<simple_form_for>(form1)表单。
<div style="border: 1px solid black">
  <input
    type="hidden"
    name="authenticity_token"
    value="eIBlHsbmL/tmFSMMYCtF3u1VSwo9XZDCCR4Vg2lW0WF3OzbbFmPIe8yBBmiZBgGcQALaEY55fnBIn7PVAV/+CA=="
  />
  <div class="form-group string required admin_blogs_search_id">
    <label class="string required" for="_admin_blogs_search_id"
      ><strong>搜寻id</strong> <abbr title="required">*</abbr></label
    ><input
      class="form-control string required"
      type="text"
      name="/admin/blogs/search[id]"
      id="_admin_blogs_search_id"
    />
  </div>
  <input
    type="submit"
    name="commit"
    value="搜寻"
    class="btn btn-primary btn-sm"
    data-disable-with="搜寻"
  />
</div>
接着我们再加入<form_tag>(form3),并且使用Ajax
/ 弹跳视窗
= modal(id: 'new-blog-modal', confirm_wording: '送出文章',
        confirm_form: 'new_modal', title: '新增文章') do
  = simple_form_for [:admin, @blog], html: { method: :post, id: :new_modal } do |f|
    = tag.div '<simple_form_for>(form1)'
    = f.input :title, label: tag.strong('标题')
    = f.input :content, label: tag.strong('内文')
    = tag.div style: "border: 1px solid black"
      = simple_form_for(@blog, url: search_admin_blogs_path, method: :post,
                        html: { data: { remote: true } } do |g|
        = tag.div '<simple_form_for>(form2)'
        = g.input :id, label: tag.strong('搜寻id')
        = g.submit '搜寻', class: 'btn btn-primary btn-sm'
    = tag.div style: "border: 1px solid blue; padding: 6px;" do
      - form_tag({ controller: "admin/blogs", action: "search" }, method: "post",
                data: { remote: true,
                        action: "ajax:success->admin--blogs#onBlogSuccess
                                 ajax:error->admin--blogs#onBlogError" })
        = tag.div '<form_tag>(form3)'
        = tag.div(class: 'form-group string required admin_blogs_search_id"')
          = tag.label tag.strong('搜寻id')
          = tag.input name: 'id', class: "form-control string required"
        input(type="submit" name="commit" value="搜寻"
              class="btn btn-primary btn-sm" data-disable-with="搜寻")
        = tag.div data: { 'admin--blogs-target': 'searchedContent' }
    = f.input :genre, as: :radio_buttons, label: tag.strong('分类'),
              collection: [["生活", :life], ["休闲", :casual], ["科技", :technology]],
              selected: :casual, item_wrapper_class: 'form-check form-check-inline'
黑色框框为使用simple_form_for实作,而下面的表单为form_tag 实作。

这里的ajax 是使用stimulus实现,我们会在明天讲到stimulus
import { Controller } from 'stimulus';

export default class extends Controller {
  static targets = ["searchedContent"]

  onBlogSuccess(event) {
    let [data, status, xhr] = event.detail;
    this.searchedContentTarget.innerHTML = xhr.response;
  }

  onBlogError(event) {
    let [data, status, xhr] = event.detail;
    console.log(xhr.response);
  }
}
目前用黑色框包覆住form (<simple_form_for>(form2)) 还是坏的,因此我们将其往上搬,并且为了不失焦,先把<form_tag>(form3)删除。
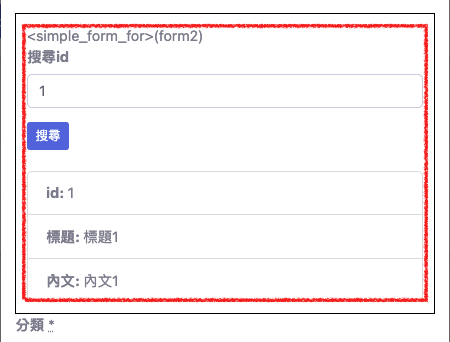
我们将simple_form_for(@blog, url: search_admin_blogs_path, method: :post拉至上方,并且赋予id=form2,并将用黑色框包覆的输入框&送出按钮给予form=form2,即可以打Ajax
  = modal(id: 'new-blog-modal', confirm_wording: '送出文章',
          confirm_form: 'new_modal', title: '新增文章') do
    = simple_form_for(@blog, url: search_admin_blogs_path, method: :post,
            html: { data: { remote: true,
                    action: "ajax:success->admin--blogs#onBlogSuccess
                             ajax:error->admin--blogs#onBlogError" },
                    id: 'form2' }) do
    = simple_form_for [:admin, @blog], html: { method: :post, id: :new_modal } do |f|
      = tag.div '<simple_form_for>(form1)'
      = f.input :title, label: tag.strong('标题')
      = f.input :content, label: tag.strong('内文')
      = tag.div style: "border: 1px solid black"
        = tag.div '<simple_form_for>(form2)'
        = tag.div(class: 'form-group string required admin_blogs_search_id"')
          = tag.label tag.strong('搜寻id')
          = tag.input name: 'id', class: "form-control string required", form: 'form2'
        = submit_tag "搜寻", class: "btn btn-primary btn-sm", form: 'form2',
                            data: { disable_with: '载入中...' }
        = tag.div data: { 'admin--blogs-target': 'searchedContent' }
      = f.input :genre, as: :radio_buttons, label: tag.strong('分类'),
                collection: [["生活", :life], ["休闲", :casual], ["科技", :technology]],
                selected: :casual, item_wrapper_class: 'form-check form-check-inline'

w3c 所介绍的属性,可以让我们解决simple_form_for/form_for包覆simple_form_for/form_for的问题!
最後我们黑色框框里头的元素都黏合黑色框框,而我们如何优化以上样式?只要加入内距即可。
我们对黑色框框的样式进行改写
= tag.div style: "border: 1px solid black; padding: 12px;"
这样一来,红框框(抽象的框框)与黑框框的距离为12px,因此黑色框框里头的元素就不会黏合黑色框框了喔。
结论
由於在网路上并没有特别的文章介绍form 属性的好处,因此今天特别立了今天这篇文章,将好用的属性搭配实例介绍给读者。
参考资料
<<: Day 10 :Longest Palindromic Substring
>>: WordPress WPS Hide Login 外挂教学,隐藏登入网址,防止暴力登入攻击
第33天~
这个得上一篇在https://ithelp.ithome.com.tw/articles/10257...
CRC-8-CCITT
CRC-8-CCITT SMBus PEC /* https://en.wikipedia.org/...
IT铁人DAY 28-Observer 观察者模式
今天要学习的是观察者模式,它主要的作用是设定一个订阅机制,当被订阅的物件有发生事件时就会去通知所...
Day-1 简介与参赛动机
简介 第一次参加铁人赛,大家好,ID的由来为相信任何一门技术,只要投注心力,与正确的学期方向,就能够...
9. 关於 this 的 5 题练习
这篇只包含我自己不熟悉的题型,建议有看到文章的人自己做做看题目! 题目来自 六角学院 的 观念测验:...