EP12 - 重构并模组化 Terraform 程序码
传统的架构上,
我们会使用独立机械建置 Git、Jenkins,
最後部署至目标环境,
到目前为止,
我们已经用 Terraform 将整个环境大致上架起来,
但是环境仅止於堪用的程度,
既然 Gitlab 和 Jenkins 不对外,
那理当不配置 IP,
但是不配置 IP 的同时又要能够上 Patch 本机环境又要能够连上,
又要设置 NAT Gateway 和 VPN,
撇开这些条件不提,
Terraform 写了几天,
是该适时重构一下,
或是将有重复用到的资源模组化,
今天我们会试着将之前帐号建立时的 default 设定纳管,
修正前几天建立资源时名称有错字的问题,
并且撰写模组来整理部分重复出现的资源,
让整体程序码看起来更简洁。
更正资源名称错误
前几天我们在建立 portal 时命名为 ithome_ironman_portla
不小心把 portal 拼错
但是 portal 确实已经建立好
如果我们在这时候直接更正 ithome_ironman_portal 并 apply
那前几天架设的 portal 就会被删除重建一个新的
这几天的努力都是一场误会
资源更名的时候我们需要做 state mv "来源" "目的"
将 tfstate 中我们建好的设定
搬移到另外一个地方
搬移资源
在 vagrant console 中下 state mv 指令
terraform state mv aws_instance.ithome_ironman_portla aws_instance.ithome_ironman_portal
程序码取代
搜寻 main.tf 中 ithome_ironman_portal
取代为正确名称的 ithome_ironman_portal
预设资源纳管
一开始我们建立 aws account 的时候
预设就建立 vpc、subnet、route table 和 internet gateway
我们需要把这些资源纳管
程序码添加资源
main.tf
resource "aws_default_vpc" "default" {
    tags = {
        Name = "Default VPC"
    }
}

resource "aws_default_subnet" "default_az1" {
    availability_zone = "ap-northeast-1a"

    tags = {
        Name = "Default subnet for ap-northeast-1a"
    }
}

resource "aws_default_subnet" "default_az2" {
    availability_zone = "ap-northeast-1c"

    tags = {
        Name = "Default subnet for ap-northeast-1c"
    }
}

resource "aws_default_subnet" "default_az3" {
    availability_zone = "ap-northeast-1d"

    tags = {
        Name = "Default subnet for ap-northeast-1d"
    }
}

resource "aws_default_subnet" "default_az4" {
    availability_zone = "ap-northeast-1d"

    tags = {
        Name = "Default subnet for ap-northeast-1d"
    }
}
汇入资源
在 vagrant 中的 console 下 import 指令
terraform import aws_default_vpc.default 你的VPC_ID
terraform import aws_default_subnet.default_az1 你的子网路1
terraform import aws_default_subnet.default_az2 你的子网路2
terraform import aws_default_subnet.default_az3 你的子网路3
调整 default 资源
眼尖的人应该会发现
其实建立 EC2 的时候有自动配发 DNS 和 IP
这是因为预设 VPC 有开启 DNS hostnames
预设的 subnet 有开启 Auto-assign public IPv4 address
大概是怕大家不会操作 AWS 所以预设都帮你开
大家只需要烦恼 security group 就好
但是我们建立的每个资源不见得都需要
甚至...我们可以全部不配发 public ip
透过 load balance 对外就可以了
但,这个就之後再做
我们先延续刚刚的 default 设定
将它们改成下面的写法後
就可以把 自动配发IP和自动配发 host 关闭
resource "aws_default_vpc" "default" {
    enable_dns_hostnames = false
    tags                 = {
        Name = "Default VPC"
    }
}

resource "aws_default_subnet" "default_az1" {
    availability_zone       = "ap-northeast-1a"
    map_public_ip_on_launch = false
    tags                    = {
        Name = "Default subnet for ap-northeast-1a"
    }
}

resource "aws_default_subnet" "default_az2" {
    availability_zone       = "ap-northeast-1c"
    map_public_ip_on_launch = false
    tags                    = {
        Name = "Default subnet for ap-northeast-1c"
    }
}

resource "aws_default_subnet" "default_az3" {
    availability_zone       = "ap-northeast-1d"
    map_public_ip_on_launch = false
    tags                    = {
        Name = "Default subnet for ap-northeast-1d"
    }
}
Key pair 包装成模组
经过几次建立程序码以後
我们发现我们要建立的 key 的时候
都需要同时建立 tls_private_key 和 aws_key_pair
建立 EC2 所需要的属性也差不多
此时我们就可以把这些包装成模组
建立模组
我们需要在专案的根目录建立 modules
并在 modules 底下建立 key 资料夹
资料夹底下还是照标准规格 main.tf、outputs.tf、variables.tf 摆放
outputs.tf 一般在执行的时候
当作单纯印在画面上输出使用
而在模组里面
则当作回传值使用
模组中 outputs 有定义的值
引用模组的地方才可以拿来做使用
modules/key/main.tf
resource "tls_private_key" "private_key" {
    algorithm = "RSA"
    rsa_bits  = 4096
}

resource "aws_key_pair" "key_pair" {
    key_name   = var.key_name
    public_key = tls_private_key.private_key.public_key_openssh
}
modules/key/variables.tf
variable "key_name" {
    description = "Name to be used on all the resources as identifiers"
    default     = ""
}
modules/key/outputs.tf
output "private_key" {
    value       = tls_private_key.private_key.private_key_pem
    description = "private key"
    sensitive   = true
}

output "key_name" {
    value       = aws_key_pair.key_pair.key_name
    description = "key pair name"
}
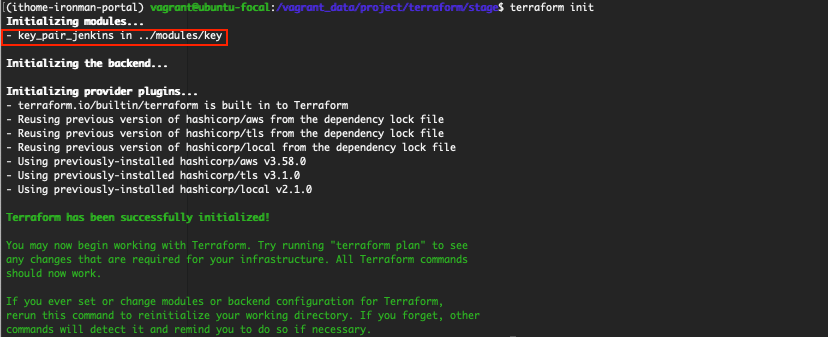
安装模组
先在 main.tf 中引用模组後
在 console 介面初始化
就算完成安装
stage/main.tf
module "key_pair_jenkins" {
    source   = "../modules/key"
    key_name = "jenkins"
}
terraform init
调整 tfstate
记得先别急着执行配置
如果执行 terraform apply
它会不认得这个资源而建立新的 key
因为在 tfstate 里面
我们的 key 是来自 tls_private_key 和 aws_key_pair
而不是 module
因此我们还需要再做一次 mv state
terraform state mv aws_key_pair.jenkins module.key_pair_jenkins.aws_key_pair.key_pair
terraform state mv tls_private_key.jenkins module.key_pair_jenkins.tls_private_key.private_key

移除旧资料并修改之前引用的 key_name
刚刚我们搬移完了
此时除了要删除旧的 resource 以外
把 Key 包装成模组以後
还要修改 EC2 和 local file 使用 key pair 的设定
不然执行配置时也同样会出错
aws_key_pair.jenkins.key_name 改成 module.key_pair_jenkins.key_name
stage/main.tf
resource "local_file" "jenkins" {
    content  = module.key_pair_jenkins.private_key
    filename = format("%s.pem", module.key_pair_jenkins.key_name)
}

resource "aws_instance" "jenkins" {
    ami                     = data.aws_ami.ubuntu.id
    instance_type           = "t3.medium"
    subnet_id               = sort(data.aws_subnet_ids.subnet_ids.ids)[0]
    key_name                = module.key_pair_jenkins.key_name
    vpc_security_group_ids  = [ aws_security_group.jenkins.id ]
    disable_api_termination = false
    ebs_optimized           = true
    hibernation             = false

    tags = {
        Name  = "Jenkins Server"
        Usage = "CI Tools"
        Creator = "Terraform"
    }

    root_block_device {
        delete_on_termination = true
        encrypted             = false
        throughput            = 0
        volume_size           = 30
        volume_type           = "gp2"
        tags                  = {
            Name     = "Jenkins Server"
            Attached = "Jenkins Server"
        }
    }
}
执行配置
terraform apply
如果刚刚的动作执行无误
则会显示无任何变更才对

调整 Gitlab 和 Portal 的 key
同样的配置套用在 Gitlab 和 Portal 上
stage/main.tf
module "key_pair_ithome_ironman_portal" {
    source   = "../modules/key"
    key_name = "portal"
}

resource "local_file" "ithome_ironman_portal" {
    content  = module.key_pair_ithome_ironman_portal.private_key
    filename = format("%s.pem", module.key_pair_ithome_ironman_portal.key_name)
}

resource "aws_instance" "ithome_ironman_portal" {
    ami                     = data.aws_ami.ubuntu.id
    instance_type           = "t3.small"
    subnet_id               = sort(data.aws_subnet_ids.subnet_ids.ids)[0]
    key_name                = module.key_pair_ithome_ironman_portal.key_name
    vpc_security_group_ids  = [ aws_security_group.ithome_ironman_portal.id ]
    disable_api_termination = false
    ebs_optimized           = true
    hibernation             = false
    iam_instance_profile    = aws_iam_instance_profile.ec2_profile.name

    tags = {
        Name  = "ithome ironman 2021 portal"
        Usage = "portal"
        Creator = "Terraform"
    }

    root_block_device {
        delete_on_termination = true
        encrypted             = false
        throughput            = 0
        volume_size           = 9
        volume_type           = "gp2"
        tags                  = {
            Name     = "ithome ironman 2021 portal"
            Attached = "ithome ironman 2021 portal"
        }
    }
}

module "key_pair_gitlab" {
    source   = "../modules/key"
    key_name = "gitlab"
}

resource "local_file" "gitlab" {
    content  = module.key_pair_gitlab.private_key
    filename = format("%s.pem", module.key_pair_gitlab.key_name)
}

resource "aws_instance" "gitlab" {
    ami                     = data.aws_ami.ubuntu.id
    instance_type           = "t3.xlarge"
    subnet_id               = sort(data.aws_subnet_ids.subnet_ids.ids)[0]
    key_name                = module.key_pair_gitlab.key_name
    vpc_security_group_ids  = [ aws_security_group.gitlab.id ]
    disable_api_termination = false
    ebs_optimized           = true
    hibernation             = false

    tags = {
        Name  = "Gitlab Server"
        Usage = "For SCM"
        Creator = "Terraform"
    }

    root_block_device {
        delete_on_termination = true
        encrypted             = false
        throughput            = 0
        volume_size           = 30
        volume_type           = "gp2"
        tags                  = {
            Name     = "Gitlab Server"
            Attached = "Gitlab Server"
        }
    }
}
terraform state mv aws_key_pair.ithome_ironman_portal module.key_pair_ithome_ironman_portal.aws_key_pair.key_pair

terraform state mv tls_private_key.ithome_ironman_portal module.key_pair_ithome_ironman_portal.tls_private_key.private_key

terraform state mv aws_key_pair.gitlab module.key_pair_gitlab.aws_key_pair.key_pair

terraform state mv tls_private_key.gitlab module.key_pair_gitlab.tls_private_key.private_key
固定 EC2 ami
EC2 的 ami 可以理解成固定出 SP 更新的 ISO 档
创建时需要指定我们从哪个 ami 建立这台 EC2
但一开始的时候我们是使用 data 去寻找最新版本
这意味着当 ami 版本更新後
在执行配置时
我们的版本可能会因为 ami 版本更新而把旧的机械 terminate
stage/main.tf
resource "aws_instance" "gitlab" {
    ami                     = "ami-09ac3ab1b7a1e9444"
    .
    .
    .
}

resource "aws_instance" "jenkins" {
    ami                     = "ami-09ac3ab1b7a1e9444"
    .
    .
    .
}

resource "aws_instance" "ithome_ironman_portal" {
    ami                     = "ami-09ac3ab1b7a1e9444"
    .
    .
    .
}
EC2 包装成模组
有了 key pair 小试身手
我们可以再接再厉
将常用到的 EC2 封装成模组来使用
建立模组
这里需要注意的是 tags 的型态是 map(string)
其他部分有用到 bool 和 list
可以在建立模组的过程中
更熟悉 terraform 的型别
modules/ec2/main.tf
resource "aws_instance" "this" {
    ami                     = var.ami
    instance_type           = var.instance_type
    subnet_id               = var.subnet_id
    key_name                = var.key_name
    vpc_security_group_ids  = var.security_groups_id
    disable_api_termination = var.disable_api_termination
    ebs_optimized           = var.ebs_optimized
    hibernation             = var.hibernation
    iam_instance_profile    = var.iam_instance_profile
    tags                    = var.tags

    root_block_device {
        delete_on_termination = true
        encrypted             = false
        throughput            = 0
        volume_size           = var.volume_size
        volume_type           = var.volume_type
        tags                  = {
            Name     = var.name
            Attached = var.name
        }
    }
}
modules/ec2/outputs.tf
output "private_ip" {
    value       = aws_instance.this.private_ip
    description = "The private ip of aws instance"
}
modules/ec2/variables.tf
variable "name" {
    description = "The instance name"
}

variable "ami" {
    description = "AWS instance ami verion"
}

variable "instance_type" {
    description = "The default ec2 instance type"
    default      = "t3.small"
}

variable "subnet_id" { }
variable "key_name" { }

variable "security_groups_id" {
    type    = list
    default = []
}

variable "disable_api_termination" {
    type    = bool
    default = false
}

variable "ebs_optimized" {
    type    = bool
    default = true
}

variable "hibernation" {
    type    = bool
    default = false
}

variable "iam_instance_profile" { }

variable "tags" {
    type    = map(string)
    default = {}
}

variable "volume_size" {
    default = 9
}

variable "volume_type" {
    default = "gp2"
}
安装模组
在 main.tf 底下放 module 後
要先下 terraform init 安装模组
stage/main.tf
module "ec2_ithome_ironman_portal" {
    source                  = "../modules/ec2"
    name                    = "ithome ironman 2021 portal"
    ami                     = "ami-09ac3ab1b7a1e9444"
    subnet_id               = sort(data.aws_subnet_ids.subnet_ids.ids)[0]
    key_name                = module.key_pair_ithome_ironman_portal.key_name
    security_groups_id      = [ aws_security_group.ithome_ironman_portal.id ]
    iam_instance_profile    = aws_iam_instance_profile.ec2_profile.name
    tags                    = {
        Name  = "ithome ironman 2021 portal"
        Usage = "portal"
        Creator = "Terraform"
    }
}
搬移状态
最後别忘了再将 tfstate 上的设定做搬移
terraform state mv aws_instance.ithome_ironman_portal module.ec2_ithome_ironman_portal.aws_instance.this
terraform apply
剩下交给各位了
实际示范 key pair 和 ec2 模组的写法和重构
剩下的 Gitlab Server 和 Jenkins Server 有兴趣大家就自己写了
把 Security Group 和 Security Group Rule 包成模组也是个不错的方式
我就不在这里骗文章行数
今天我们尝试重构了一下 terraform 程序码
并且实际示范怎麽撰写模组
不得不说 AWS 预设提供的 default vpc 和 default subnet 绑蛮多设定的
不仔细查看後关闭
还真的不知道该怎麽「配置好环境」
明天本来预计是要调整 Infra 架构
虽然我们目前把 host 功能关闭
让 EC2 不会预设建立 host
但 EC2 一开始如果有 assign ip
要 terminate 後重建才能将配置的 ip 移除
重新启动 EC2,计算 IP 没移除也会改变
这样对於整体架构并不是很理想
这部分我目前还在考量要怎麽进行
明天大家再期待一下我会怎麽调整架构吧
参考资料:
- Resource: aws_default_vpc
- Resource: aws_default_subnet
- Option to have no public IP address assigned in a subnet that defaults to having one assigned #1484
舍弃伪双向绑定 v-model
每个人的学习方法各有差异。 这只是我的选择。 Why v-model 在 S3E5 | Vue.j...
EP 09 - [TDD] Message 加密及解密 (1/2)
Youtube 频道:https://www.youtube.com/c/kaochenlong ...
鬼故事 - 糟了,是世界奇观
鬼故事 - 糟了,是世界奇观 Credit: Unkonwn (Skritch, Skritch) ...
Kotlin Android 第13天,从 0 到 ML - Activity 和 Activity 生命周期
前言: ConstraintLayout讲完了,画面画好了那是用在那呢? 那就是要放在 Activi...
来做一个色码转换器吧!
前言 今天来做一个色码转换器~ 我们先认识色码之间的关系,拆解步骤後再一步步完成吧! 颜色表示的方法...