第 6 天 调整 HeroDetail 的显示方式|AppRoutingModule、ActivatedRoute
前情提要
昨天我们完成了英雄细节元件 HeroDetailComponent,并且使用属性系结(property binding)的方式来显示所选取的英雄细节资料。今天,我们将使用另外一个方式来实作浏览英雄细节的机制——我们将使用路由导航的方式。此外,我也将过去完成的程序码放到 Github 上,需要浏览程序码整体的话可以参考,之後的文章中的程序码仅会服务於说明用途,希望这样可以让版面的重点更容易凸显出来。
规划路由配置
现在专案中共使用三个元件:
- AppComponent
- HeroListComponent
- HeroDetailComponent
目前并没有配置任何路由,唯一做为页面显示的是根元件 AppComponent。我们希望完成下列的路由配置:
- /heroes 导航到 HeroListComponent
- 如果空路由则导航到 /heroes
- 在 /heros 中若使用参数,如
/heros/:heroId则导航到 HeroDeatilComponent
以下为实作步骤:
- 新增 AppRoutingModule,输入下列指令:
ng generate module app-routing --flat --module=app
// --flat 将这个档案放尽 src/app 中。
// --module=app 让 AppModule 自动汇入 AppRoutingModule
- 在 AppRoutingModule 中设定路由配置:
import { NgModule } from '@angular/core';
import { RouterModule, Routes } from '@angular/router';

import { HeroDetailComponent } from './hero-detail/hero-detail.component';
import { HeroListComponent } from './hero-list/hero-list.component';

const routes: Routes = [
  {
    path: '',
    redirectTo: '/heroes',
    pathMatch: 'full'
  },
  {
    path: 'heroes',
    children: [
      {
        path: '',
        component: HeroListComponent
      },
      {
        path: ':id',
        component: HeroDetailComponent,
      }
    ]
  },
]

@NgModule({
  imports: [
    RouterModule.forRoot(routes)
  ],
  exports: [
    RouterModule
  ]
})
export class AppRoutingModule { }
这个路由配置的规划是,原本我们将 HeroListComponent(所有英雄的列表)和 HeroDetailComponent(单一英雄资讯)放在同一个画面上显示。现在,我们将他们拆分为两个页面,'/heroes' 可以浏览英雄列表,而'/heroes/:id' 将显示单个英雄的详细资讯。为了完成这件事,首先,我们移除原本在 HeroListComponent 使用 HeroDetailComponent 的程序码:
<-- TODO: 删除使用 HeroDetailComponent -->
<-- <app-hero-detail [hero]="selectedHero"></app-hero-detail> -->
接着我们要改变原先透过属性系结(property binding)将英雄资料传递给 HeroDetailComponent 的机制,改为向後端请求特定英雄的资料。
调整 HeroDetailComponent
!!先前在建构 mock db 资料时,将 heroes 误拼为 heros,现已调整 db.json 为正确拼法。
我们先回顾一下,在 AppRoutingModule 是如何配置 HeroDetailComponent 的路由:
  {
    path: 'heroes',
    children: [
      {
        path: '',
        component: HeroListComponent
      },
      {
        path: ':id',
        component: HeroDetailComponent,
      }
    ]
  },
在 'heroes' 下配置了子路由(children):
- 如果是空路由的话(path: '',连同父路由就是'/heroes')则显示 HeroListComponent。
- 如果有指定 id 的话(path: ':id',连同父路由就是'/heroes/{heroId}') 则显示 HeroDetailComponent。
了解路由配置後,来看看我们是如何导向 '/heroes/{heroId}' 的。打开 HeroListComponent 档案,将原本的"浏览细节"按钮程序码改为下面这样:
    <mat-card-actions>
      <button mat-button [routerLink]="'/heroes/' + hero.id">浏览细节</button>
      <button mat-button>SHARE</button>
    </mat-card-actions>
[routerLink] 是 AppRoutingModule 提供的指令(directive),因为我们已在 AppModule 汇入 AppRoutingModule,所以可以使用这个指令。如果没有汇入的话,这里的程序码就会报错。
我们可以看到,这里的程序码告诉 [routerLink],点击这个按钮的话,要前往 '/heroes/ + hero.id' 路由,这与刚刚所设定的 HeroDetailComponent 的 Path 是相符的,因此就会切换到该路由去。而 hero.id 就是取自英雄列表的资料当中,因此,接下来的任务就是:
- HeroDetailComponent 如何从路由取得 id 参数。
- JSON-server 如何使用参数取得资料。
调整後的完整 Hero-detail.component.ts 程序码如下:
import { HttpClient } from '@angular/common/http';
import { Component, OnInit } from '@angular/core';

import { ActivatedRoute } from '@angular/router';

import { Hero } from '../shared/models/hero.model';

@Component({
  selector: 'app-hero-detail',
  templateUrl: './hero-detail.component.html',
  styleUrls: ['./hero-detail.component.css']
})
export class HeroDetailComponent implements OnInit {

 hero: Hero | null = null;

  constructor(
    private http: HttpClient,
    private route: ActivatedRoute
  ) { }

  ngOnInit(): void {
    const heroId = this.route.snapshot.paramMap.get('id')!;
    this.getHero(heroId);
  }

  private getHero(id: string): void {
    this.http.get<Hero>(`api/heroes/${id}`).subscribe((selectedHero) => {
      this.hero = selectedHero;
    })
  }

}
可以看到在 ngOnInit 生命周期中,从路由取得参数 id 的方式是这样:
  constructor(
    private http: HttpClient,
    private route: ActivatedRoute
  ) { }

  ngOninit(): void {
      const heroId = this.route.snapshot.paramMap.get('id')!;
      this.getHero(heroId);
  }
在建构式中注入 ActivatedRoute,这让我们可以取得当前路由的相关资讯。因此,我们使用 snapshot(当前路由的快照)里的 paramMap提供的方法 get 来取得 id。
取得 id 後,将其作为参数,发送 Http 请求取得特定的英雄资料:
  private getHero(id: string): void {
    this.http.get<Hero>(`api/heroes/${id}`).subscribe((selectedHero) => {
      this.hero = selectedHero;
    })
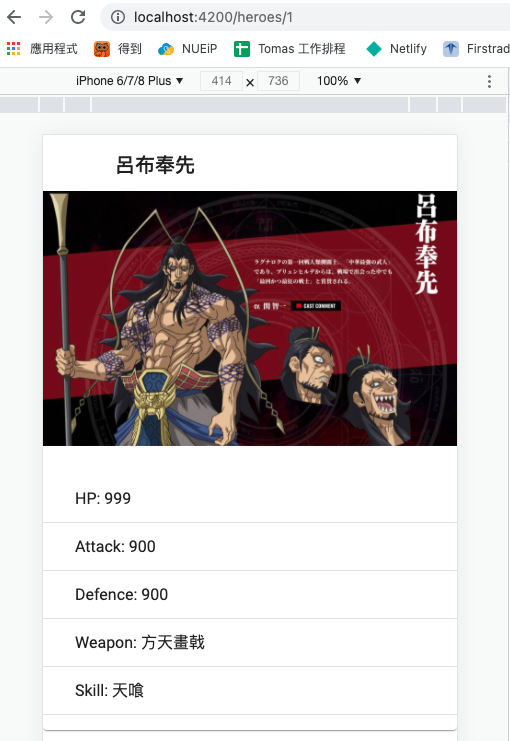
这样当我们点击 "浏览细节" 按钮时,就可以访问新的英雄细节路由了:

程序码已放上Github。
<<: Day6 宣告元件 - Class Component
>>: [Day06 - UI/UX] 建立 APP Design Guideline
[day-7] 在正式开始写程序之前,先来认识电脑本身吧!(Part .2)
前情提要 昨天 [day-6] 大致介绍了,电脑的起源与相关发展史,相信各位读资讯或是商业领域的人应...
Swift 新手-物联网与 iOS App的整合运用
APPIOT 指物联网应用程序,是应用在物联网上的智慧型手机应用程序,APP 是应用程序(appli...
30天学习笔记 -day 30 -感言
LAST Day 终於到了铁人赛的最後一天,过程中复习了不少的东西,对某些用法有了更加的认识,过程中...
Chapter5 - 轻松用Canvas实现转场动画和运镜处理
接下来时间真的很紧,也顾不上结构了,只能就目前想到的功能,先以直觉的方式编写了,如果讲不太清楚还多多...
Day 03 - 动态调整的PM职涯规划(2)
图片来源 继续上一篇的目标设定, 有时候我觉得是因为你心中已有一个"既定的目标"...