开始写CRUD的 C 吧! - day04
在前一篇文里提到,VoK希望开发者专注於 Kotlin code 的开发,所以Karibu-DSL 封装了 Vaadin 渲染 View 的部份,以下将介绍如何显示及输入资料。
写一个自己的显示页
开新档,名为 MainView.kt
package com.example.vok

import com.github.mvysny.karibudsl.v10.*
import com.vaadin.flow.router.Route

@Route("")
class MainView: KComposite() {
    private val root = ui{
        verticalLayout {
            content { align(center, top) }
            h1("2021 iThome铁人赛")
            h2("使用 Kotlin 快速开发 Web 程序 -- Vaadin系列")
        }
    }
}
MainView.kt 继承 KComposite,实作 ui() 方法并取名为 root 是官方推荐的方式,整个画面由 ui{} 区段包起来,verticalLayout 为垂直排列。content、h1、h2...都是 Karibu-DSL 一员。
相信写过 TornadoFX、Ktor HTML DSL、Flutter、Android Jetpack Compose 等框架的开发者对这样的页面编写模式或许不陌生,仅管背後运作机制不尽相同。
同样的程序,若使用 Vaadin 写起来会像这样:
package com.example.vok

import com.vaadin.flow.component.dependency.CssImport
import com.vaadin.flow.component.html.H1
import com.vaadin.flow.component.html.H2
import com.vaadin.flow.component.orderedlayout.VerticalLayout
import com.vaadin.flow.router.Route

@Route("")
@CssImport ( "./styles/shared-styles.css" )
class MainView : VerticalLayout() {
    init {
        add(H1("2021 iThome铁人赛"))
        add(H2("使用 Kotlin 快速开发 Web 程序 -- Vaadin系列"))
    }
}
看似差不多,但画面一旦更复杂些,可想而知会更繁杂,且不若DSL阶层式容易除错,更不用说还要自订css了。
第6行中定义 @Route("") ,别忘了原来的首页,请记得修改 WelcomView.kt
@Route("old")
class WelcomeView: KComposite() {
   :
   :
}
在Terminal视窗执行 ./gradlew clean web:appRun,打开 http://localhost:8080 出现下列画面

目前画面看起来还很阳春,接下来将会一步步逐渐改善,首先建立 MainLayout.kt
package com.example.vok

import com.github.mvysny.karibudsl.v10.KComposite
import com.github.mvysny.karibudsl.v10.div
import com.vaadin.flow.component.page.Viewport
import com.vaadin.flow.router.RouterLayout

@Viewport(Viewport.DEVICE_DIMENSIONS)
class MainLayout: KComposite(), RouterLayout {
    private val root = ui {
        div {
            setSizeFull()
        }
    }
}
此为整个画面的布局,日後要加入选单或修改画面样式,皆可在此调整。
画面输入
1. 建立学生资料
新增学生资料 data class Student.kt
package com.example.vok

import com.github.vokorm.KEntity
import com.gitlab.mvysny.jdbiorm.Dao
import java.util.*

data class Student(
    override var id: Long? = null,
    var name: String? = null,
    var birthday: LocalDate? = null,
    var created: Date? = null,
    var gender : Gender? = null,
    var height: Double? = null,
    var weight: Double? = null,
    var student_id : String? = null
): KEntity<Long>{
    companion object :Dao<Student, Long>(Student::class.java)
}
KEntity 是 vok-orm 套件里关於资料表的 interface,上述定义了学生资料表的实体类(entity class) Student。
2. 新增学生资料画面
开新档 CreateStudentView.kt
package com.example.vok
import com.github.mvysny.karibudsl.v10.*
import com.vaadin.flow.router.Route
@Route("create-student", layout = MainLayout::class)
class CreateStudentView: KComposite() {
private val binder = beanValidationBinder<Student>()
private val root = ui {
verticalLayout {
h1("新增学生资料")
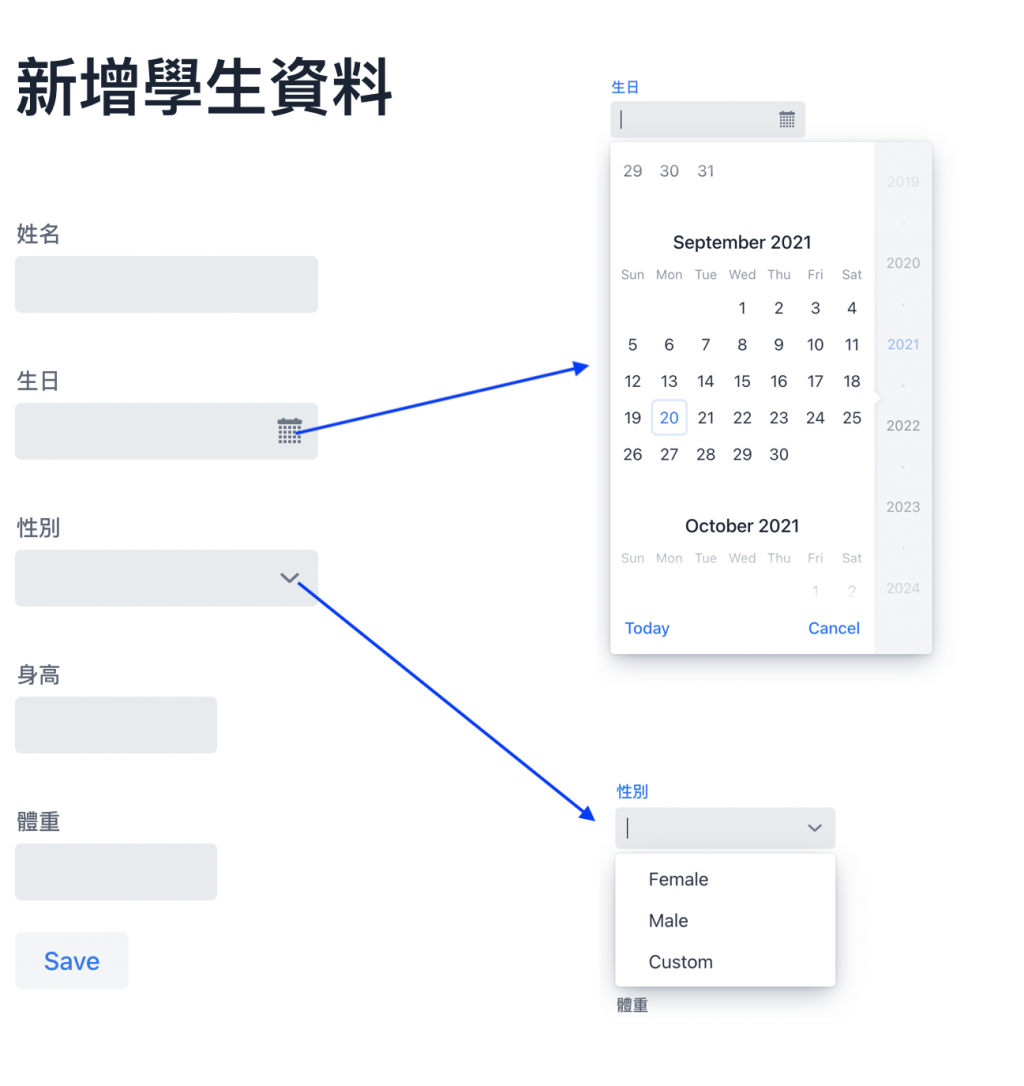
textField("姓名"){
focus()
bind(binder).bind(Student::name)
}
datePicker("生日"){
bind(binder).bind(Student::birthday)
}
comboBox<Gender>("性别"){
setItems(*Gender.values())
bind(binder).bind(Student::gender)
}
numberField("身高"){
bind(binder).bind(Student::height)
}
numberField("体重"){
bind(binder).bind(Student::weight)
}
button("Save")
}
}
}
第6行,Route除了指定此画面路径外,後面多了个参数,即是先前建立的主要布局
第8行,使用 beanValidationBinder 方法,将实体类 Student bind 进来
第12行开始,因应需求使用不同 UI Component 供使用者输入
第20行 性别栏为combobox,在这里使用 enum 填充选项,请在Student.kt最後加上
    enum class Gender {
        Female,
        Male,
        Custom
    }
到目前为止,执行画面如下
但按下Save键尚无反应
4. 建立资料表
build.gradle.kts 关於 DB 的依赖设定,在此使用H2 database、flyway migration
    implementation("org.flywaydb:flyway-core:7.1.1")
    implementation("com.h2database:h2:1.4.200")
请在 /web/src/main/resources/db/migration/ 路径下建立一个 create table 的 SQL DDL script,命名为 V01__CreateStudent.sql,档名格式为 V[编号]__[档名].sql,若有多个migration档,将按照版本(编号)依序执行,且只执行一次。
但目前使用的是H2 database,Server一旦停止资料库就消失了,此范例每次重新执行,所有migrations 都会被依序执行
    create TABLE Student(
      id bigint auto_increment PRIMARY KEY,
      name VARCHAR(200) NOT NULL,
      birthday DATE,
      created TIMESTAMP,
      gender VARCHAR(20) NOT NULL,
      height DOUBLE NOT NULL,
      weight DOUBLE NOT NULL,
      student_id VARCHAR(20)
    );
5. 储存
定义好资料表後,资料即可实际被储存,请修改 CreateStudentView.kt
                button("Save"){
                    onLeftClick {
                        val student = Student()
                        if (binder.writeBeanIfValid(student)){
                            student.save()
                        }
                    }
                }
增加 onLeftClick listener,writeBeanIfValid() 方法会检查 student 是否可储存再回传boolean 值
显示资料
透过显示单笔资料页显示已储存资料,
package com.example.vok

import com.github.mvysny.karibudsl.v10.*
import com.vaadin.flow.component.Text
import com.vaadin.flow.router.BeforeEvent
import com.vaadin.flow.router.HasUrlParameter
import com.vaadin.flow.router.Route

@Route("student", layout = MainLayout::class)
class StudentView: KComposite(), HasUrlParameter<Long> {
    private lateinit var name: Text
    private lateinit var gender: Text
    private lateinit var birthday: Text
    private val root = ui {
        verticalLayout {
            div {
                strong("姓名 : "); [email protected] = text("")
            }
            div {
                strong("性别 : "); [email protected] = text("")
            }
            div {
                strong("生日 : "); [email protected] = text("")
            }
        }
    }

    override fun setParameter(event: BeforeEvent?, studentId: Long?) {
        val student = Student.getById(studentId!!)
        name.text = student.name
        gender.text = student.gender.toString()
        birthday.text = student.birthday.toString()
    }

    companion object {
        fun navigateTo(studentId: Long) = navigateToView(StudentView::class, studentId)
    }
}
在 ui{ } 内画出欲显示栏位,给定预设值空字串
再实作 interface HasUrlParameter setParameter() 方法,用来解析url 带的参数。此例中,url http://localhost:8080/student/1 studentID 即为 1
        override fun setParameter(event: BeforeEvent?, studentId: Long?) {
            val student = Student.getById(studentId!!)
            name.text = student.name
            gender.text = student.gender.toString()
            birthday.text = student.birthday.toString()
        }
第1行 接收参数 student id
第2行 使用getById()方法查询id=1的学生资料
第3-5行 分别将取得资料回写到 ui{} 区块内的 text()栏位显示
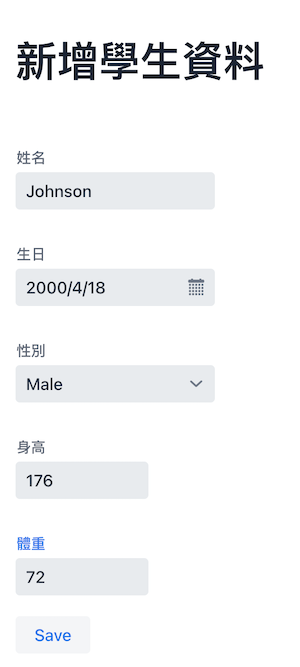
最後,在CreateStudentView.kt save()方法最後加上一行,传递参数 student.id 并跳转到 StudentView 页
            button("Save"){
                onLeftClick {
                    val student = Student()
                    if (binder.writeBeanIfValid(student)){
                        student.save()
                        StudentView.navigateTo(student.id!!)
                    }
                }
            }
最後执行结果如下

本日程序已上传Github
>>: NetSuite Order to Cash flow - Fulfill Sales Order
Day 29 - WooCommerce: 接收虚拟帐号付款成功通知
今天铁人赛的倒数第一天了 ^^,要和大家分享的是,如何接收永丰银行丰收款金流平台收到顾客的银行转帐汇...
Kotlin Android 第1天,从 0 到 ML - 前言与目标
前言: 在2011年7月,JetBrains就推出Kotlin专案,但一直到2017年5月Googl...
第28天-CSS-影像-(3-2)
重复影像 background-repeat 这个属性可以重复图像在背景 如果是使用小图做素材 可以...
Day 02-资源管理大师IAM
AWS Certified Solution Architect Associate之旅的第一站,我...
Day 28 - 范例动手做 - 安装 Monitor Agent
今天要在 app 的容器里安插我们的 agent,我们要装的是 Telegraf 和 Node Ex...