Day62 (Vue)
1.computed & Watch
Part_1 > Lab_Binding > Lab_Form_Text_1.HTML
(1)绑元件
<form class="form-horizontal" id="lab">
var labapp = new Vue({
el: "#lab",
data: { title: "abc", price: 100, desc: "line1\r\nline2" },
});
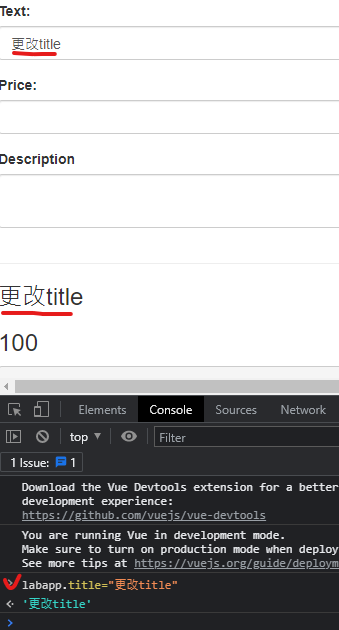
<h3>{{title}}</h3>
<h3>{{price}}</h3>
<pre>{{desc}}</pre>
(2)html标签里的属性,让属性值等於data(v-bind:)
          <label class="col-md-4 control-label" for="title">Text:</label>
          <div class="col-md-4">
            <input
              v-bind:value="title"  // =:value="title"
(3)测试
(4)更改成v-model代表双向绑定,可用在input、textarea、select上,用来同步你所输入的值
v-model:value="title" // =:value="title"
(5)加上.lazy,让游标移开後才开始判定输入
v-model:value.lazy="title"
(6)让输入的值吃到html(显示处)
<h3 v-html="title"></h3>
(7)介绍computed(衍伸性栏位,计算,资料变更後显示)
Part_1 > Lab_Binding > Lab_Form_Text_1.HTML
Part_1 > Demo > tryComputed_Watch_01.HTML
        computed: {
          fullName() {
            return this.firstName + " " + this.lastName + "--" + Date();
          },
        },
(8)介绍watch(盯着资料看,资料改变就改变)
Part_1 > Demo > tryComputed_Watch_02.HTML
        watch: {
          firstName: function () {
            this.fullName = this.firstName + " " + this.lastName;
          },
(7)(8)功能很像,常被拿来比较
(9)让显示处吃到Enter也会换行
Part_1 > Demo > tryComputed_Watch_01.HTML
        <!-- v-model代表双向绑定,可用在input、textarea、select上,用来同步你所输入的值 -->
        <textarea v-model="description"

        <!--输入框同步 + v-html吃到html -->
        <div v-html="htmlLineBreak"></div>

       var labapp = new Vue({
        el: "#lab",

        // 让input初始化
        data: { title: "abc", price: 100, description: "line1\nline2" },

        // computed衍伸性栏位,计算,资料变更後显示
        computed: {
          htmlLineBreak() {
            ///\r\n微软的Enter |或 \r苹果的Enter |或 \n/ Linux的Enter ,g不分大小小 都换成<br />
            return this.description.replace(/\r\n|\r|\n/g, "<br />");
          },
        },
      });
2.Radio + mounted
Part_1 > Lab_Binding > Lab_Form_Radio_1.HTML
(1)制作元件
        <form class="form-horizontal" id="lab">

        var labApp = new Vue({
          el: "#lab",
          data: {
            //直接会比对每个radio的value(点到谁谁就有checked),所以不用带变数
            bt: 1,
         },
(2)显示区绑定
text:{{bt}}
(3)代表双向绑定,可用在input、textarea、select上,用来同步你所输入的值
v-model="bt"
(4)mounted最後介入
        mounted() {
          this.bt = 4;
        },
所以网页显示会是4为起始
3.CheckBox
Part_1 > Lab_Binding > Lab_Form_CheckBox_1.HTML
(1)制作元件
    <form class="form-horizontal" id="lab">

      var labApp = new Vue({
        el: "#lab",
        data: {
          cities: ["2", "6"],
        },
      });
(2)显示区绑定
<h3>{{cities}}</h3>
(3)v-model代表双向绑定,可用在input、textarea、select上,用来同步你所输入的值
    <input v-model="cities"
     //直接会比对每个checkbox的value(点到谁谁就有checked),所以不用带变数
(4)把echo.php放到MAMP主目录内
    <body>
        <?php if (count($_GET) > 0) { ?>
            <h3>GET:</h3>
            <pre>
            <?php print_r($_GET); ?>
            </pre>
        <?php } ?>

        <?php if (count($_POST) > 0) { ?>
            <h3>POST:</h3>
            <pre>
            <?php print_r($_POST); ?>
            </pre>
        <?php } ?>
    </body>
(5)制作button并执行抓值网站
     <form method="post" action="http://localhost/echo.php" class="form-horizontal" id="lab">


        <div class="form-group">
          <label class="col-md-4 control-label" for="okButton"></label>
          <div class="col-md-4">
            <button id="okButton" name="okButton" class="btn btn-primary">OK</button>
          </div>
        </div>
(6)因传送值为阵列,收阵列[]
name="cities[]"
4.Select
Part_1 > Lab_Binding > Lab_Form_Select_1.HTML
(1)制作元件
     <form class="form-horizontal" id="lab">

      var labApp = new Vue({
        el: "#lab",
        data: {
          selectedCity: 4,
        },
      });
(2)显示区绑定
<h3>{{selectedCity}}</h3>
(3)v-model代表双向绑定,可用在input、textarea、select上,用来同步你所输入的值
<select v-model="selectedCity" id="city" name="city" class="form-control">
(4)网页显示会是台中(4)为起始
        data: {
          selectedCity: 4,
        },
(5)让option随着元件数量增减(for回圈)
v-for="aCity in cityList"
(6)绑上aCity物件
v-bind:value="aCity"
(7)制作button并执行抓值网站
<form class="form-horizontal" action="http://localhost/echo.php" id="lab">
(8)抓id
    <!-- 依据selectedCity.id 抓id="city" -->
    <input type="hidden" name="city" v-bind:value="selectedCity.id" />
抓取到这行
<select v-model="selectedCity" id="city" class="form-control">
(9)此时案OK钮可以抓到selectedCity.id
5.Component
Part_1 > Lab_Component > tryComponent_G.HTML
元件属性的命名
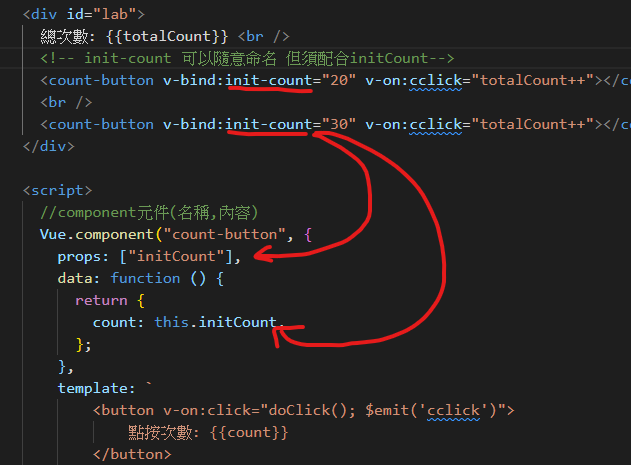
如果使用-,开头要改大写
init-count 物件属性 initCount
6.route + component
(按钮到另一个页面,并在网页上显示参数)
Part_2 > Lab_Route > route.html
解释见route.html内语法顺序
7.API + https://yesno.wtf + ajax抓资料
Part_2 > Lab_YesNo > Lab_YesNo_04.HTML
解释见Lab_YesNo_04.HTML内语法顺序
8.Vue CLI(Component、Axios + Route)
Part_2 > Lab_YesNo >
(1)右键点按 VueCLI 资料夹 | Open in Integrated Terminal
(2)建立 Vue.js 专案3
建议全小写,因node.js专案
vue create yes-no-route
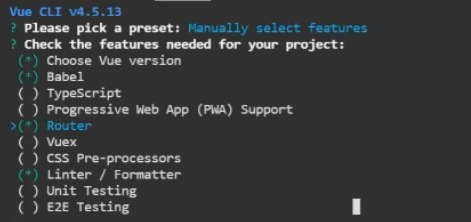
以上下键切换到:
Manually select features:
按下键盘Enter键
以上下键切换,以空白键加选 Router 选项, 按下键盘Enter键
後续选项都是直接按 Enter 键同意预设值
2.x > Y > ESLint with error prevention only > Lint on save > In dedicated config files
(後面都按下一步)
(3)等候专案资料夹 yes-no-route 建立完成
(4)输入 exit 关闭终端机视窗
exit
(5)右键点按 yes-no-route | Open in Integrated Termainal
npm run serve
跑package.json
如果浏览器没有自动启动,请手动在浏览器输入:
http://localhost:8080/
(6)静态档案与资源
(6-1)新增一个档案 src/components/YesNoComponent.vue
     <template lang="">
         <div class="container">

             <div class="row">
                 <div class="col-sm-4"></div>
                 <div class="col-sm-4">
                     <div class="page-header">
                             <h1>无所不问、无所不答</h1>
                     </div>
                 </div>
             </div>

             <form class="form-horizontal">
                 <fieldset>
                     <!-- Text input-->
                     <div class="form-group">
                         <label class="col-md-4 control-label" for="question">请输入问题:</label>
                         <div class="col-md-4">
                             <input id="question" name="question" type="text" placeholder="" class="form-control input-md">
                             <span class="help-block">问题请以问号结尾</span>
                         </div>
                     </div>
                 </fieldset>
             </form>

             <div class="row">
                 <div class="col-sm-4"></div>
                 <div class="col-sm-4">
                     <h2>Yes</h2>
                     <img src="../assets/logo.png">
                 </div>
             </div>

         </div>
     </template>
     <!-- http://localhost:8080/ -->
     <script>
     export default {
         name: 'YesNo'
     }
     </script>

     <style lang="">

     </style>
(6-2)修改 src/views/Home.vue
      <template>
     <!-- 要包起来 -->
     <div>
         <h3>这里是标题</h3>
          <hr />
         <YesNo /> <!-- 把YesNo元件放入 -->
      </div>

     </template>

     <script>
     import YesNo from '../components/YesNoComponent.vue'

     export default {
       name: 'App',    //App.vue
       components: {
           YesNo  //YesNoComponent.vue的YesNo元件
       }
     }
     </script>
(6-3)观察App.vue
  <div id="app">
    <div id="nav">
      <!-- 路由物件 Home.vue会抓 -->
      <router-link to="/">Home</router-link> |
      <router-link to="/about">About</router-link>
    </div>
    <router-view/>
  </div>
(6-4)观察main.js
    import router from './router'  //router查看 router内的index.js档案

    Vue.config.productionTip = false

    new Vue({
      router, //路由
      render: h => h(App)
    }).$mount('#app')
(6-5)观察router > index.js
//建立一个路由元件
    const router = new VueRouter({
      mode: 'history',
      base: process.env.BASE_URL,
      routes //由routes阵列决定
    })

    const routes = [
      // 第一个路由
      {
        path: '/',
        name: 'Home',
        component: Home
      },
       // 第二个路由
      {
        path: '/about',
        name: 'About',
        // route level code-splitting
        // this generates a separate chunk (about.[hash].js) for this route
        // which is lazy-loaded when the route is visited.
        component: () => import(/* webpackChunkName: "about" */ '../views/About.vue')
      }
    ]
(6-6)结论:所以要增加页面时,增加view内的页面档案.vue,并新增 router > index.js 内的路由
(8)关闭终端机,并安装使用Bs调整版面(整理HTML)
exit
(9)右键点按 yes-no-route | Open in Integrated Termainal
(10)安装BS
npm install bootstrap-vue bootstrap@3
(11)src/main.js内汇入BS3
   import BootstrapVue from 'bootstrap-vue'
   import 'bootstrap/dist/css/bootstrap.css'
   import 'bootstrap-vue/dist/bootstrap-vue.css'
   Vue.use(BootstrapVue)
(12)跑服务器
npm run serve
浏览http://localhost:8080/
此时BS介入,版面开始变化
(13)安装与使用 Axios
(13-1)按下 Ctrl + C 终止服务器
(13-2)安装Axios
npm install axios vue-axios
(13-3)修改src/main.js
    // 汇入axios
    import axios from 'axios'
    import VueAxios from 'vue-axios'
    Vue.use(VueAxios, axios)
(13-4)跑服务器
npm run serve
浏览http://localhost:8080/
(13-5)修改 src/components/YesNoComponent.vue
(似 Part_2 > Lab_YesNo > Lab_YesNo_04.HTML)
a.汇入Vue的程序
import Vue from 'vue'
b.src/main.js内Vue使用了axios外挂
Vue.use(VueAxios, axios)
c.使用axios外挂的方法
Vue.axios
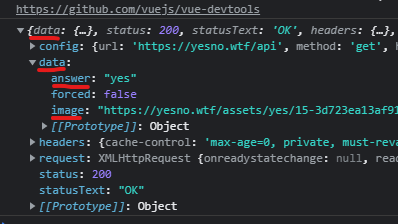
.get("https://yesno.wtf/api")
.then(function (response) {
console.log(response);
_this.answer = response.data.answer;
_this.image = response.data.image;
})
console.log(response)
(14)新增图片,让网页可以显示
Part_2\Lab_YesNo\VueCLI\yes-no-route\public\imagesinPublic
text1.jpg
Part_2\Lab_YesNo\VueCLI\yes-no-route\src\assets\imagesinAssets
text2.jpg
text3.jpg
(14-1)按下 Ctrl + C 终止服务器
(14-2)开始布署资料夹,并新增dist资料夹
npm run build
从Dist资料夹打开VScode,并执行index.html
(14-3)结论:只要是放在Public资料夹内的,未来布署後,都会显示在dist内
(15)assets内制作Css样式并套用在YesNoComponent.vue
(15-1)Part_2\Lab_YesNo\VueCLI\yes-no-route\src\assets\css\myStyle.css
    .test1 {
      background-color: blueviolet;
      color: blue;
    }
(15-2)YesNoComponent.vue
<div class="container test1">
(15-3)跑服务器
npm run serve
浏览http://localhost:8080/
没差异,因此
(15-4)修改Part_2\Lab_YesNo\VueCLI\yes-no-route\src\views\About.vue
    <template>
      <div class="about test1">
        <h1>This is an about page</h1>
      </div>
    </template>

    <script>
     import  "../assets/css/myStyle.css"; //非物件,无须from

     export default{
       name:'About' //让<div class="about test1">也吃到myStyle.css样式
     }
    </script>
记得点分页看样式
(16)制作js并使用在YesNoComponent.vue
(16-1)Part_2\Lab_YesNo\VueCLI\yes-no-route\src\assets\js\mylog.js
console.log("测试日期:" + Date());
(16-2)修改Part_2\Lab_YesNo\VueCLI\yes-no-route\src\views\About.vue
import "../assets/js/mylog.js"; //非物件,无须from
(16-3)检查
http://localhost:8080/about
(17)重新跑build布署
按下 Ctrl + C 终止服务器
npm run build
从Dist资料夹打开VScode,并执行index.html
刚刚做的css、js都会存在 但是都要有import才会存在
(18)大结论:Public资料夹内的东西会直接显示,但Assets内的会被打包後才会显示(参见js)
>>: Day 5 - [Zenbo开发系列] 02-建置与Zenbo规格相同的模拟器
Day19 简易资料库RealmSwift小实作6
提示框就不多说了! 最後就是按钮,判断是否编辑,是的话执行底下func执行完後按钮改回"输...
Day28 参加职训(机器学习与资料分析工程师培训班),网站设计与网页工程技术
今日练习爬虫,将爬下来的资料传到资料库(今日时间不够,下次上课再进行) BTC价格 import r...
Day18 Redis架构实战-持久化RDB
Redis持久化 Redis是一个in-memory的data store,在记忆体中操作与储存让其...
[Day5] 第一章贴图
今日目标 载入图片,画出第一张图 stb_image.h 第三天-驱动OpenGL这篇有稍稍提到这个...
D17/ 我要用的 View 没有支援 Compose 怎麽办? - AndroidView
今天大概会聊到的范围 Android View 前两天来回进出了公司楼下的 7-11 两三次,每次...