Android Studio初学笔记-Day3--RelativeLayout
承上一篇,今天要分享的是另一个比较常见也比较广泛使用的布局。
RelativeLayout(相对布局)
跟LinerLayout比起来,RelativeLayout更有弹性,在方向上不局限於水平和垂直,基本上已经是一个能完整运用到整个萤幕空间的一个布局了。
RelativeLayout的运作原理是透过元件之间的关联来设定的”相对位置”。
以下是一些重要的属性介绍:
- android:id
这个属性标示了这个元件的身分,好方便其他元件用这个id呼叫进而取得连接,也就是这个元件的身分证。 - android:layout_above
将此元件置於指定元件(透过元件id指定)的上方. - android:layout_below
将此元件置於指定元件(透过元件id指定)的下方. - android:layout_toLeftOf
将此元件置於指定元件(透过元件id指定)的左方. - android:layout_toRightOf
将此元件置於指定元件(透过元件id指定)的右方. - android:layout_alignParentTop
将此元件对齐布局画面的上边线,设定的值为true或false - android:layout_alignParentRight
将此元件对齐布局画面的右边线,设定的值为true或false - android:layout_alignParentLeft
将此元件对齐布局画面的左边线,设定的值为true或false - android:layout_alignParentButton
将此元件对齐布局画面的下边线,设定的值为true或false
这些属於最基本的一些属性,以下还有些微调的方法,我个人觉得也是最实用的属性设定,让文字或要显示的元件的位置能到自己更理想的位置(补充:这些属性LinerLayout也可以使用)。常用属性如下:
- android:layout_margin
指定与元件上下左右的间距. - android:layout_marginBottom
指定与下方元件的间距. - android:layout_marginEnd
指定与结束的方向的间距. - android:layout_marginHorizontal
指定与左右元件的间距 - android:layout_marginLeft
指定与左边元件的间距 - android:layout_marginRight
指定与右边元件的间距 - android:layout_marginStart
指定与开始方向的间距 - android:layout_marginTop
指定与上方元件的间距 - android:layout_marginVertical
指定与上下元件的间距,值的部分可以用”数字+(单位)”,常见单位包括sp、dp、px 可以试试不同单位的长度变化。
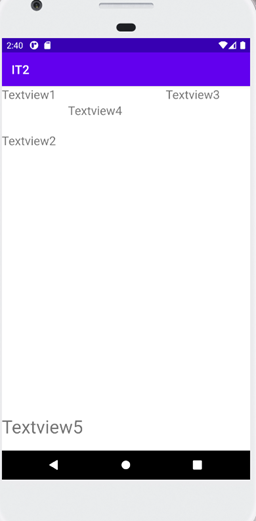
最後我有做一个参考范例
程序码和效果
<RelativeLayout xmlns:android="http://schemas.android.com/apk/res/android"
    android:layout_width="fill_parent"
    android:layout_height="fill_parent">

    <TextView
        android:id="@+id/tx1"
        android:layout_width="wrap_content"
        android:layout_height="wrap_content"
        android:text="Textview1"
        android:textSize="20dp" />
    <TextView
        android:id="@+id/tx2"
        android:layout_width="wrap_content"
        android:layout_height="wrap_content"
        android:layout_below="@+id/tx1"
        android:layout_marginTop="50dp"
        android:textSize="20dp"
        android:text="Textview2"/>

    <TextView
        android:id="@+id/tx3"
        android:layout_width="wrap_content"
        android:layout_height="wrap_content"
        android:layout_alignParentRight="true"
        android:layout_marginRight="50dp"
        android:textSize="20dp"
        android:text="Textview3" />
    <TextView
        android:id="@+id/tx4"
        android:layout_width="wrap_content"
        android:layout_height="wrap_content"
        android:layout_toRightOf="@+id/tx2"
        android:layout_below="@+id/tx1"
        android:textSize="20dp"
        android:layout_marginHorizontal="20dp"
        android:text="Textview4" />

    <TextView
        android:id="@+id/tx5"
        android:layout_width="wrap_content"
        android:layout_height="wrap_content"
        android:text="Textview5"
        android:textSize="30dp"
        android:layout_alignParentBottom="true"
        android:layout_marginBottom="20dp"/>
</RelativeLayout>
<<: #4 Array & Object in JavaScript
>>: Progressive Web App Manifest: 配置档属性深入介绍 (5)
[Day28] BERT(一)
一. 介绍 Bert全名为Bidirectional Encoder Representation ...
Day7 -104. Maximum Depth of Binary Tree
今日题目:104. Maximum Depth of Binary Tree 刚刚在群组看到在讨论 ...
IDS决策(IDS Decisions)
就IDS的准确性而言,观察到的每个活动都有四种可能的状态。 . 一个真正的积极状态(true pos...
[Day_12]资料储存容器 - 练习题
今天来为大家介绍资料储存容器的练习题, 过程跟解法可能跟大家不太一样还请大家见谅, 那就让我们开始吧...
[第十一天]从0开始的UnityAR手机游戏开发-开启新场景
开启新场景 有时会遇到要新增其他关卡或是有东西要测试时需要开另外一个新场景的情况就会需要开新场景,...