Microsoft Azure Pass 学习日志 Day 2
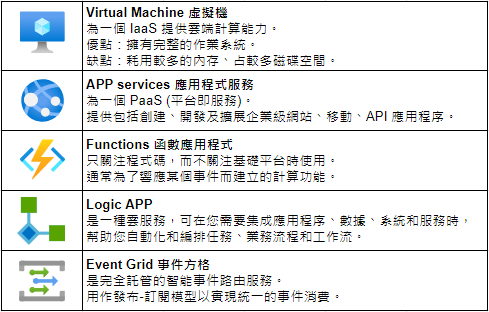
Chap.I Compute Services 计算服务
Part 1. Virtual Machine 虚拟主机
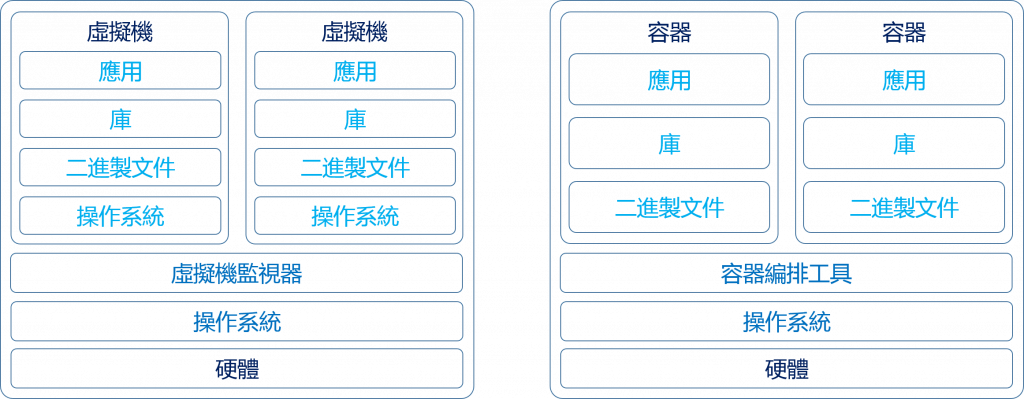
*虚拟主机与虚拟容器的差别
1. 建立你的虚拟主机
所有服务 → 计算 → 虚拟主机
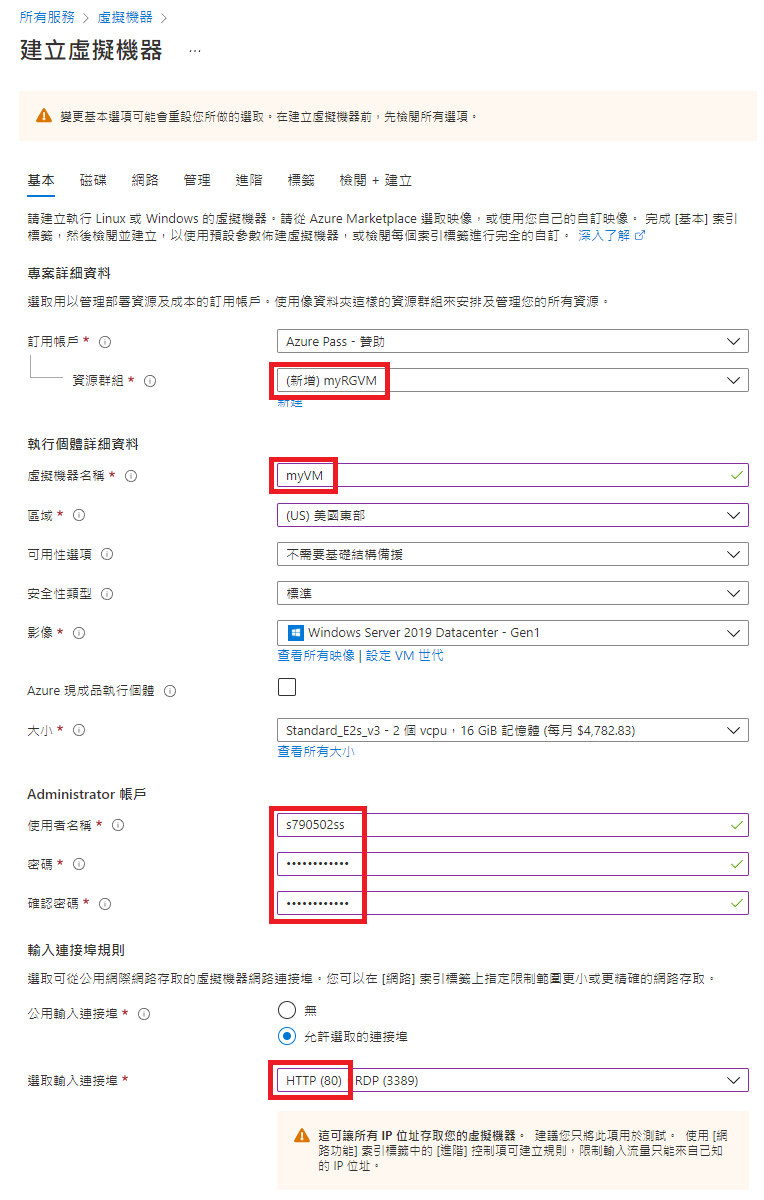
基本
资源群组:myRGVM(随便取)
虚拟机器名称:myVM(随便取)
影像:Windows Server 2019 Datacenter - Gen1
大小:(选可用)
帐户:(自创)
密码:(自创)
选取输入连接:把 "HTTP (80)" 打勾
网路
选取输入连接:把 "HTTP (80)" 打勾
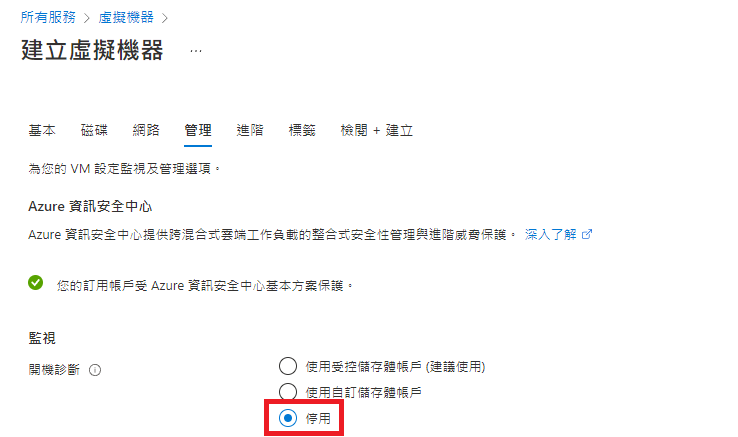
管理
开机诊断:停用
建立
2. 下载RDP档案 (远端桌面连线)
前往资源 → 连接 → RDP
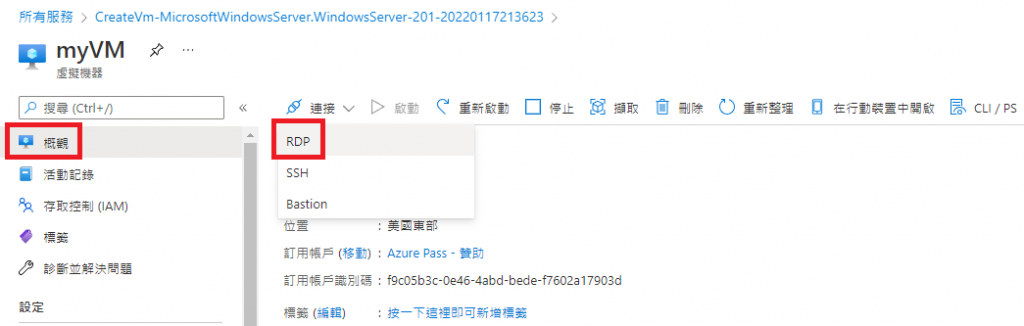
下载RDP档案
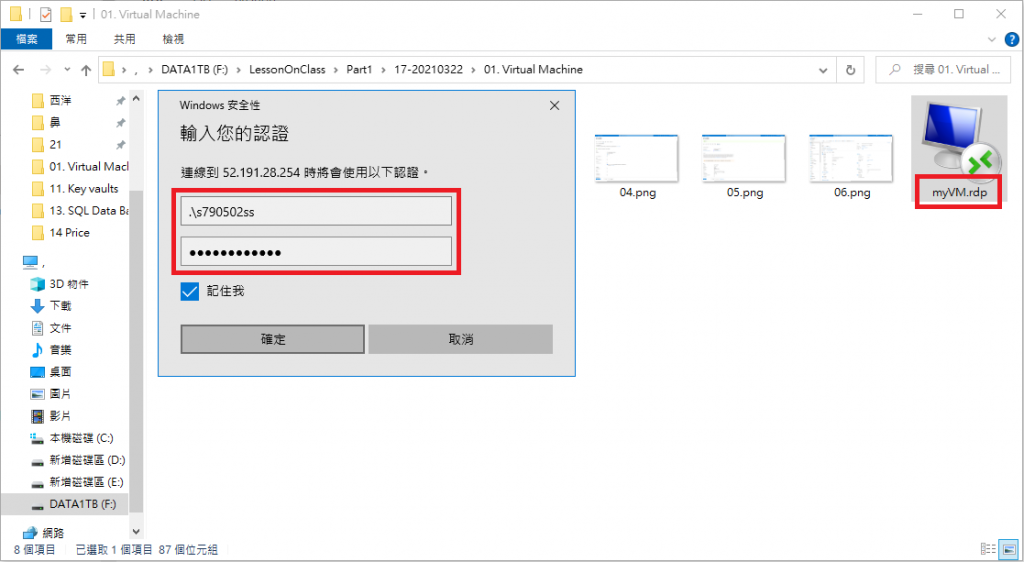
3. 远端连线
点击下载完成的档案 → 输入帐号密码 (为避免帐号找不到,可於前加 ".\" )
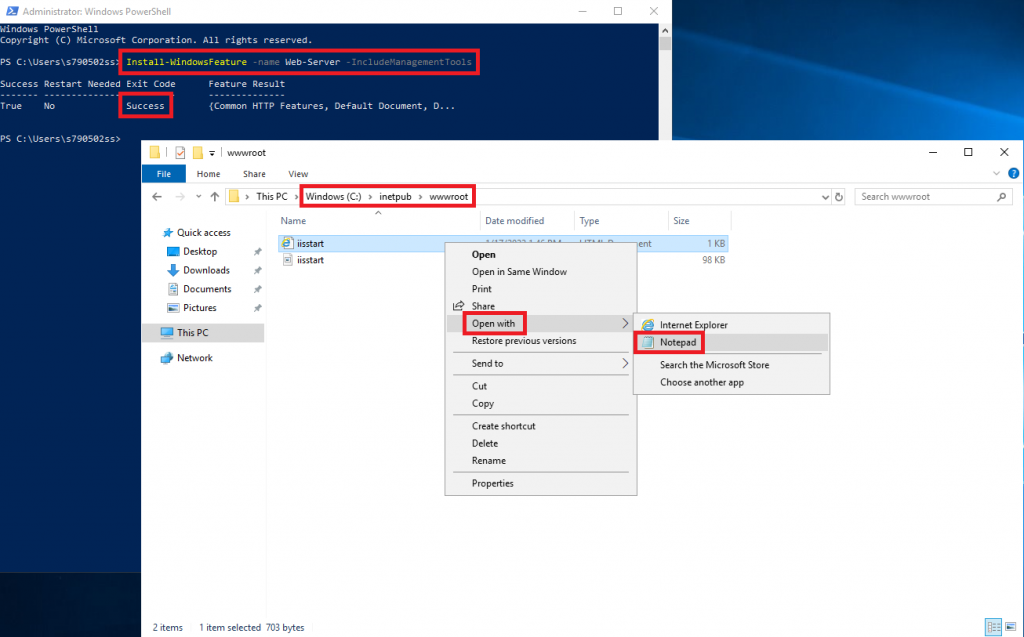
4. 建立/修改网页服务器
开始 → Windows PowerShell

输入:"Install-WindowsFeature -name Web-Server -IncludeManagementTools"
接着进入路径:"C:\inetpub\wwwroot"
iisstart 右键 → 以笔记本方式开启
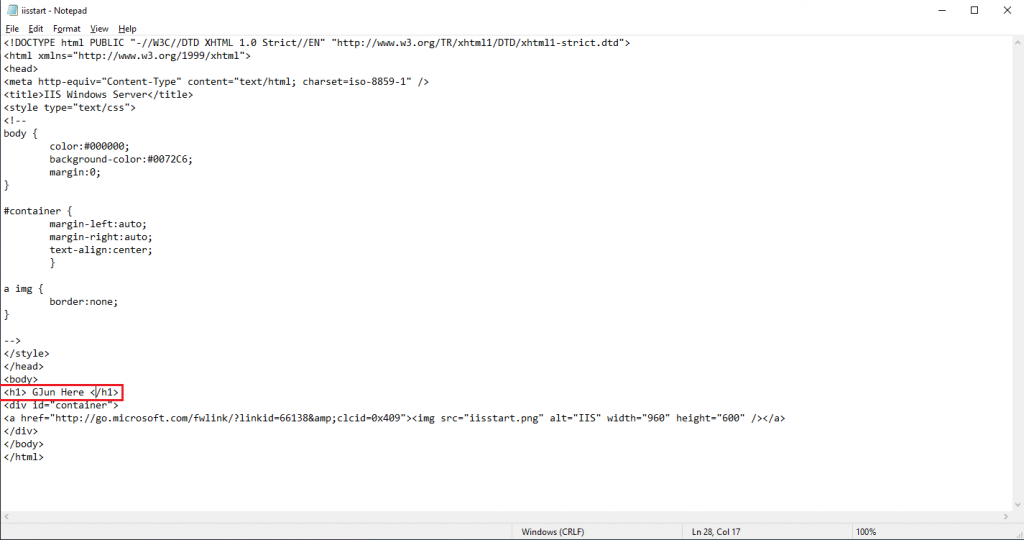
在 body 下方键入:<h1> GJun Here </h1>
5. 开启网页服务器
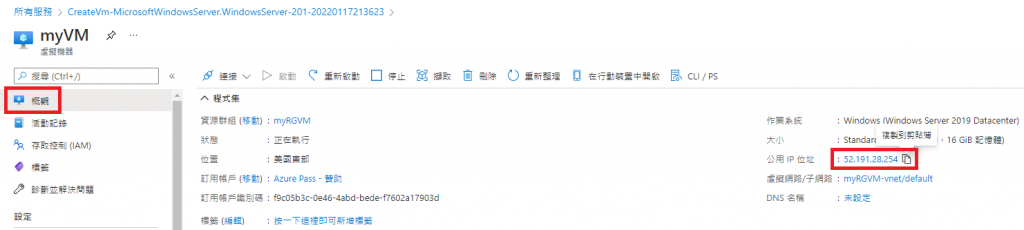
虚拟机器 → myVM → 概观
找到「公用IP位置」:52.191.28.254
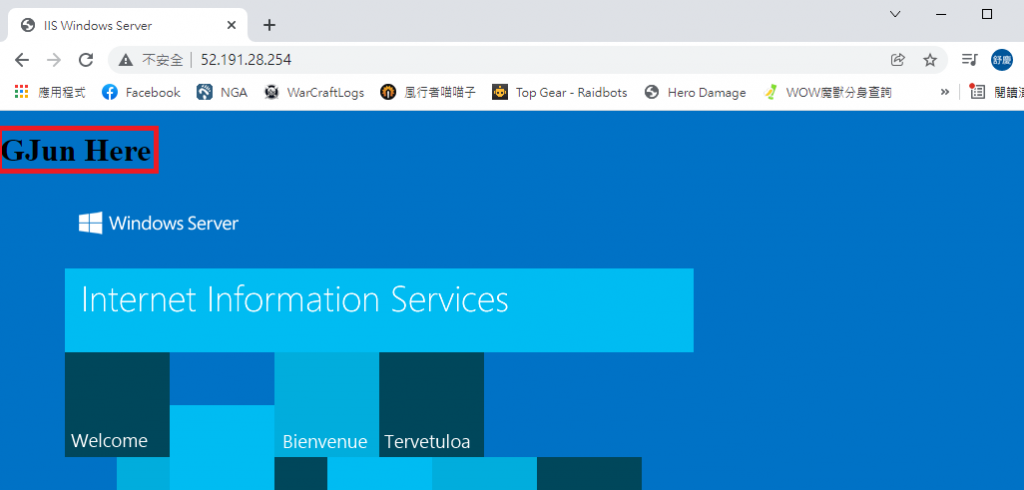
开启浏览器,键入网址:http://52.191.28.254
可看到我们修改的 GJun Here 出现在左上角
6. 删除资源群组
为避免不必要花费,故须删除资源群组
首页 → 资源群组 → myRGVM → 删除资源群组
Part 2. Deploy a simple VM
1. 建立你的简易虚拟机
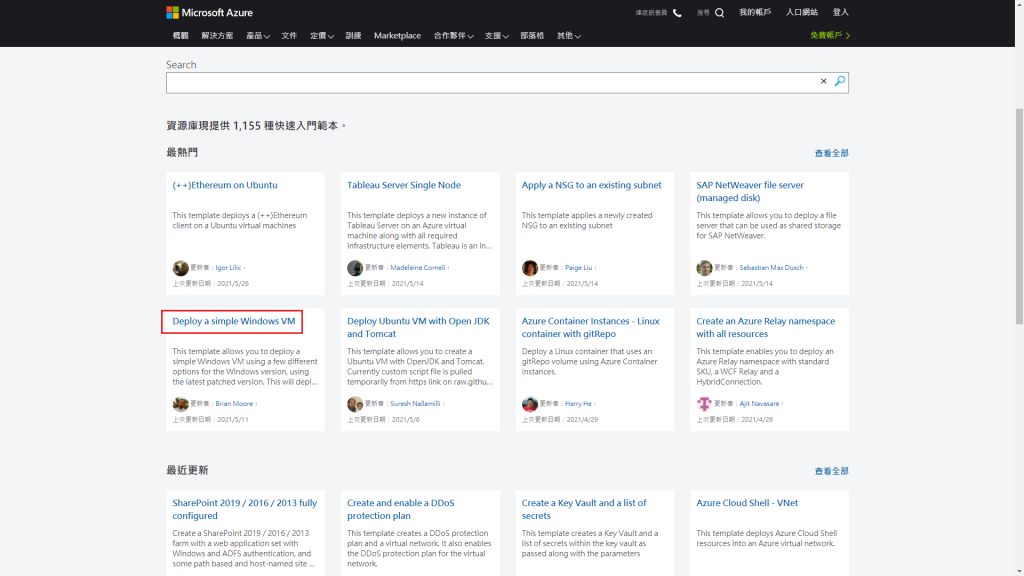
进入官方网站:https://azure.microsoft.com/zh-tw/resources/templates/?azure-portal=true
点选:Deploy a simple Windows VM
点选:部署到 Azure
基本
资源群组:myRGTemp (随便取)
区域:美国东部
帐户:(自创)
密码:(自创)
Dns Label Prefix:myVMTemp-790502
OS-Version:2019-Datecenter
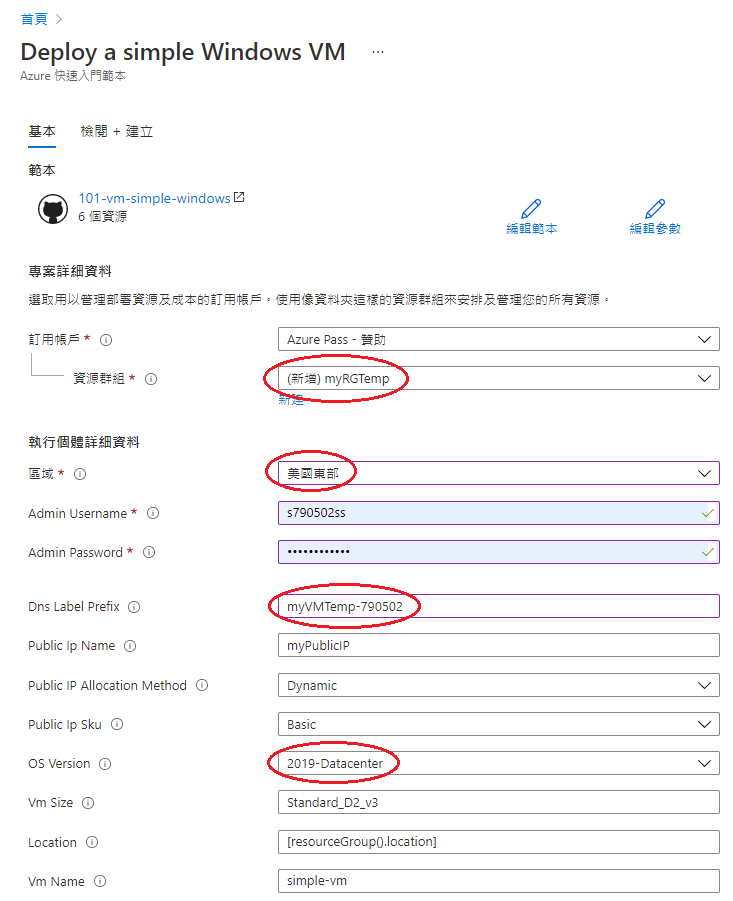
检阅 + 建立
2. 下载RDP档案 (远端桌面连线)
虚拟机器 → myVMTemp-790502 → 连接 → RDP
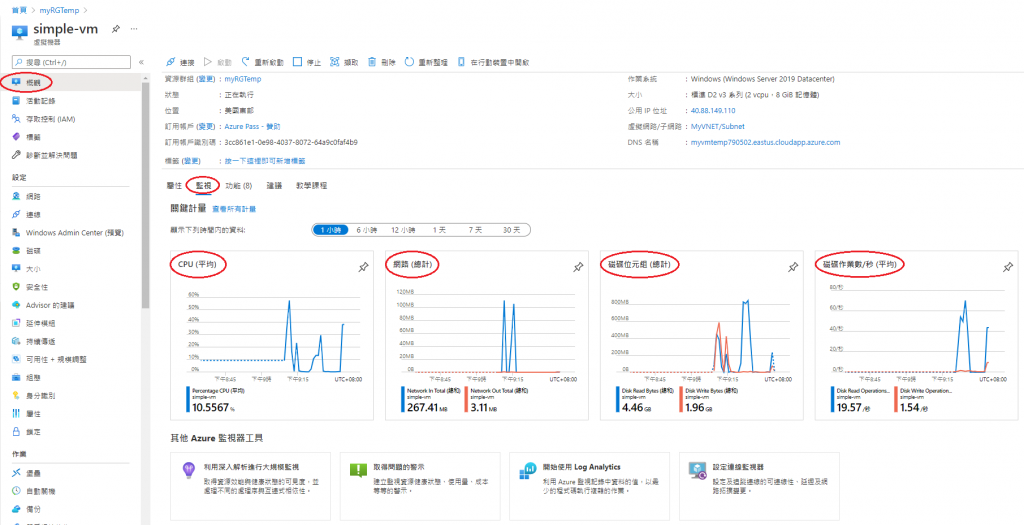
3. 虚拟机效能监控
资源群组 → myRGTemp → simple-vm → 概观 → 监视
4. 删除群组
Part 3. Deploy VM by Cloud Shell
3-1. By Power Shell
点选右上角 Cloud Shell → Power Shell
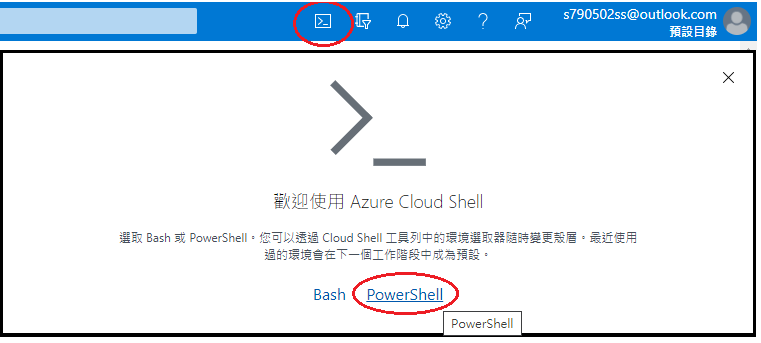
进入 Terminal
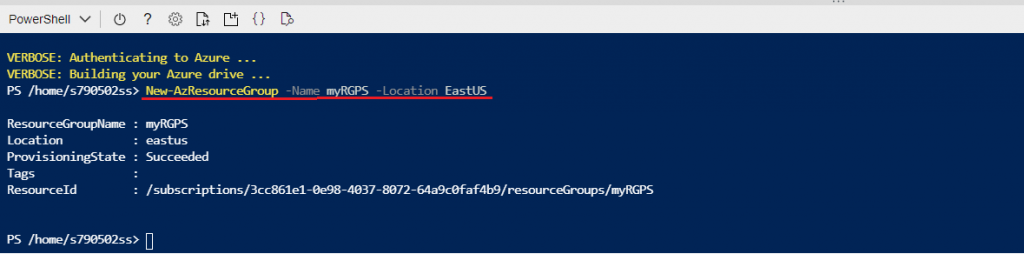
1. 新建一个 Resource Group:
New-AzResourceGroup -Name myRGPS -Location EastUS
2. 查看所有 Resource Group
Get-AzResourceGroup | Format-table

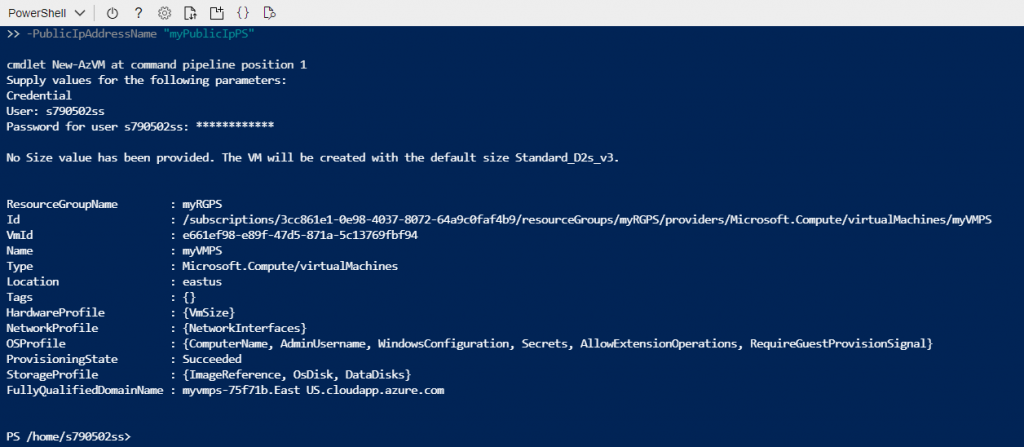
3. 新建一个 VM
New-AzVM `
-ResourceGroupName "myRGPS" `
-Name "myVMPS" `
-Location "East US" `
-VirtualNetworkName "myVNetPS" `
-SubnetName "mySubNPS" `
-SecurityGroupName "mySGNPS" `
-PublicIpAddressName "myPublicIpPS"

>> User: s790502ss
>> Password: ************
4. 查看 VM 状态
Get-AzVM -name myVMPS -status | Format-Table -autosize

5. 停止 VM
Stop-AzVM -ResourceGroupName myRGPS -Name myVMPS
# 选择 "Y"

6. 再次查看 VM 状态
Get-AzVM -name myVMPS -status | Format-Table -autosize

7. 删除群组
3-2. By Bash
0. 点选左上角 Power Shell → Bash

1. 新建一个 Resource Group:
az group create --name myRGCLI --location EastUS
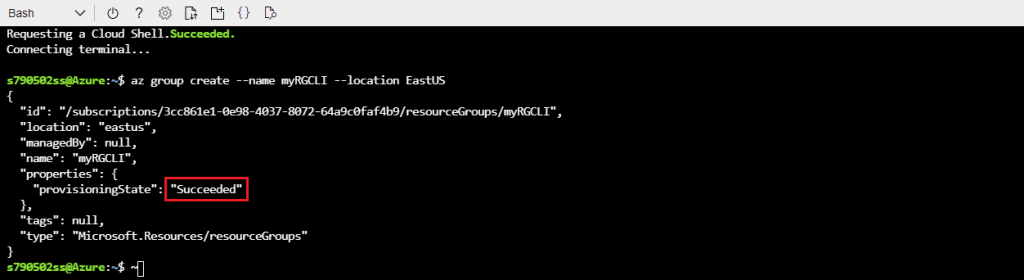
2. 查看所有 Resource Group
az group list --output table

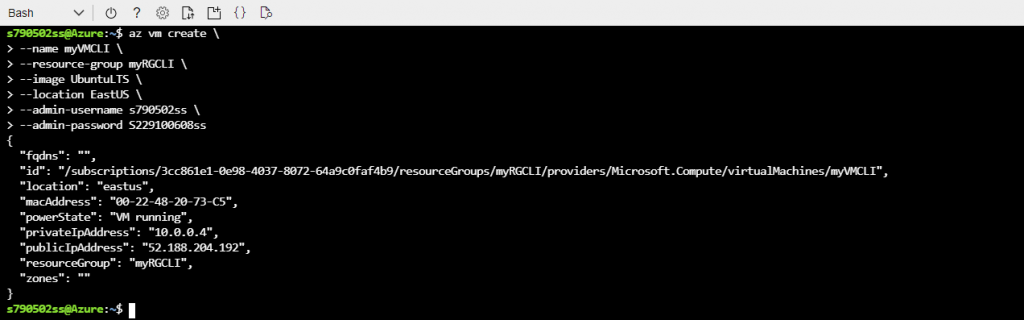
3. 新建一个 VM
az vm create \
--name myVMCLI \
--resource-group myRGCLI \
--image UbuntuLTS \
--location EastUS \
--admin-username s790502ss \   # 随便取
--admin-password S229100608ss  # 随便取
4. 查看 VM 状态
az vm show --resource-group myRGCLI --name myVMCLI --show-details --output table

5. 停止 VM
az vm stop --resource-group myRGCLI --name myVMCLI

6. 再次查看 VM 状态
az vm show --resource-group myRGCLI --name myVMCLI --show-details --output table

7. 删除群组
Part 4. APP Services 应用程序服务
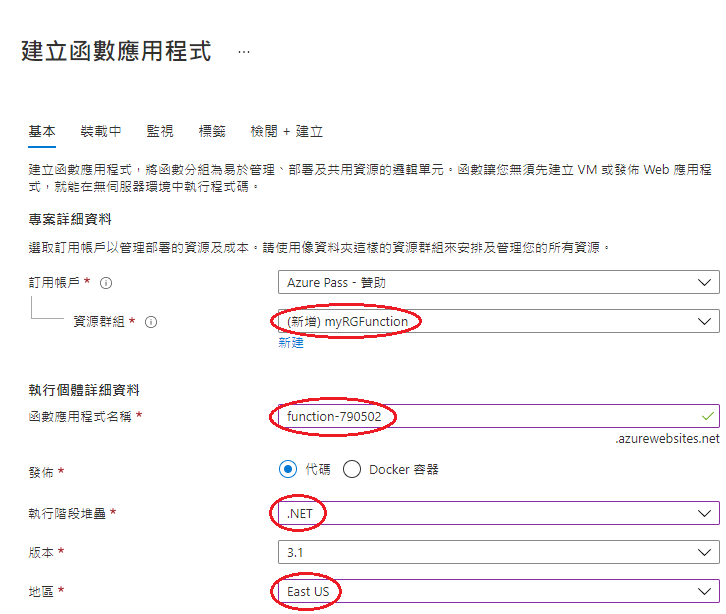
1. 建立你的应用程序
所有服务 → 计算 → 应用程序服务
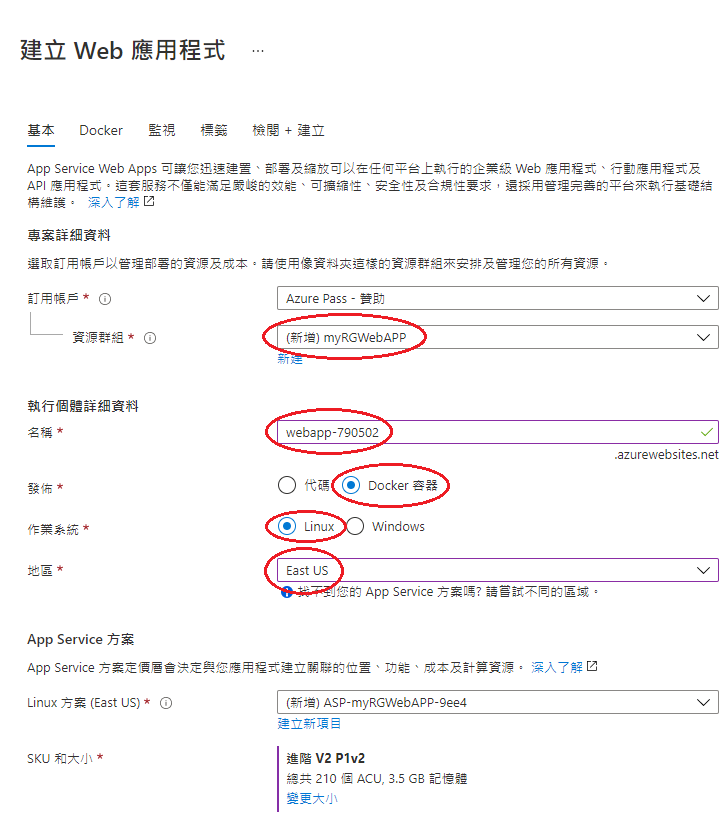
基本
资源群组:myRGWebAPP (随便取)
名称:webapp-790502 (随便取)
发布:Docker 容器
作业系统:Linux
地区:East US
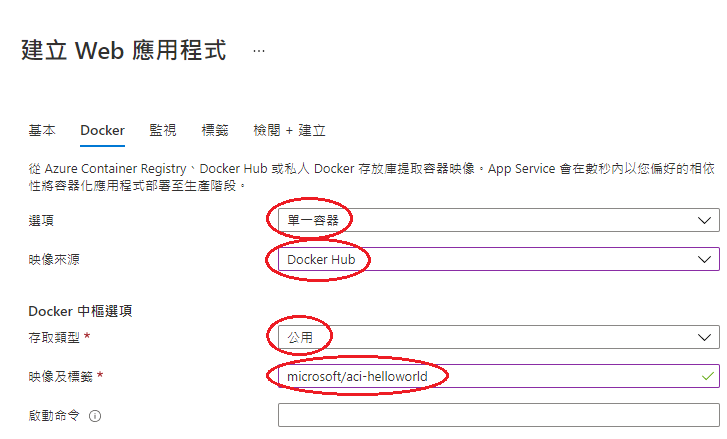
Docker
选项:单一容器
映像来源:Docker Hub
存取类型:公用
映像及标签:microsoft/aci-helloworld
2. 开启网页服务器
应用程序服务 → webapp-790502
复制 URL:https://webapp-790502.azurewebsites.net

开启网页,键入:https://webapp-790502.azurewebsites.net
3. 删除群组
Part 5. Functions App 函数应用程序
所有服务 → 计算 → 函数应用程序
1. 建立你的函数应用程序
所有服务 → Functions App 函数应用程序
资源群组:myRGFunction (随便取)
函数应用程序名称:function-790502 (随便取)
执行阶段堆叠:.NET
地区:East US
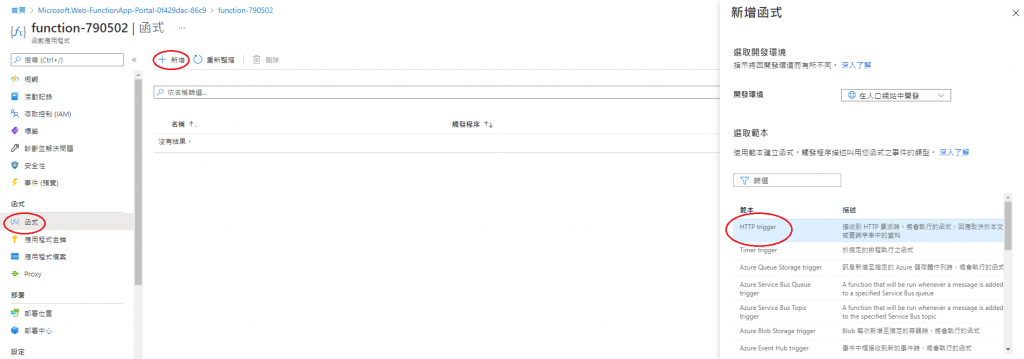
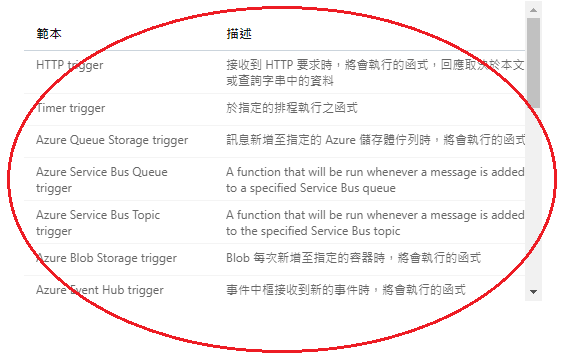
2. 新增函式
先选 HTTP trigger 试验
3. 使用函式
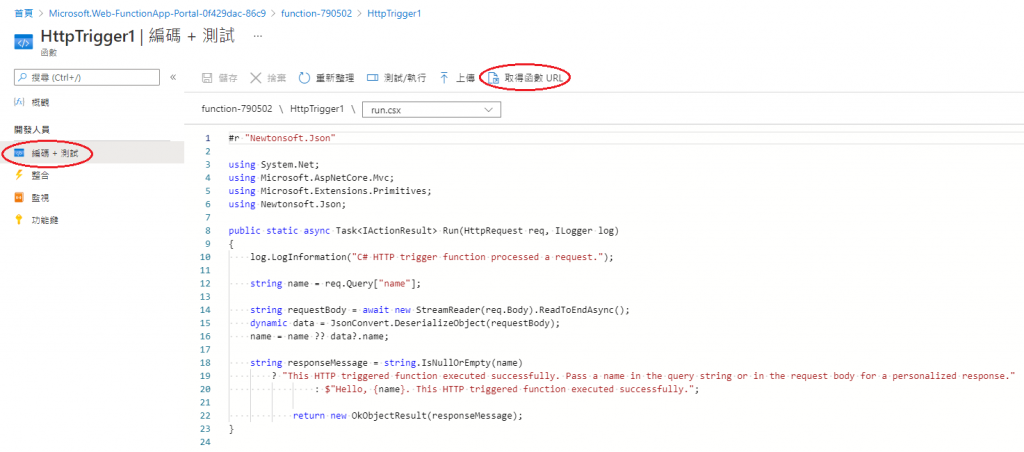
在网页区块打上:「复制网址」+「&name=Peter」

另外还有多种函式可供使用
4. 删除群组
<<: [python] TFT Display测试心得碎念(拿st7735的经验拯救ili9341)
>>: 椭圆曲线数字签名算法 (Elliptic Curve Digital Signature Algorithm:ECDSA)
为你自己学 Laravel - Day 27 专案练习 Part 7 - 文章删除
嘿~~ 各位好,我是菜市场阿龙! Youtube 频道:https://www.youtube.co...
Day15 - Shioaji X Backtesting -均线突破策略
Backtesting到底要怎麽用呢?这边我们会一步一步向大家介绍, 最简单的方式就是直接实做一个策...
javascript HTML DOM1
以下程序码是延续上一篇的概述 ...
Day 29 - Vanilla JS Countdown Timer
前言 JS 30 是由加拿大的全端工程师 Wes Bos 免费提供的 JavaScript 简单应用...
Day12 Vue Event Handing(v-on)
Event Handling是甚麽呢? Event Handing是可以用v-on指令监听DOM事件...