Day 30 : 第一个 MQTT 智慧装置
MQTT 通讯协定
最後一天就是要把大家领进门,
来把上回的智慧装置串接到 Home Assistant ,
过去我们都使用 HTTP 来做各种育儿 IoT 应用,
今天则来试试 MQTT 这个更适合 IoT 的应用层网路传输协定,
并且使用 MQTT Broker 服务器来收发工作。
架设 MQTT Broker
首先要架设一个名为 MQTT Broker 的服务器,
用来作为 智慧装置 与 智慧平台 沟通的桥梁,
在本文使用 Eclipse Mosquitto 这套代理工具:
它已经有人包好可以直接用 Docker 启动起来:
docker run -it -p 1883:1883 -p 9001:9001 eclipse-mosquitto
很简单的一行我们拥有 MQTT Broker 了。
PubSubClient 程序库
在撰写客户端韧体的部分也使用 MQTT 通讯,
需要使用 PubSubClient 来协助处理客户端:
https://github.com/knolleary/pubsubclient
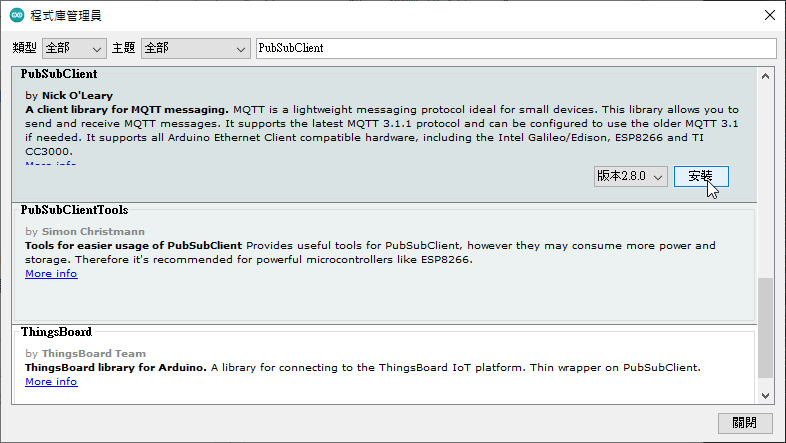
首先打开 Arduino IDE 选择 工具 > 管理程序库 ,
然後搜寻 PubSubClient 就可以找到程序库并安装:
撰写智慧装置韧体
笔者这里是使用 PubSubClient 的 ESP8266 来修改的:
https://github.com/knolleary/pubsubclient/blob/master/examples/mqtt_esp8266/mqtt_esp8266.ino
连线方面增加了 mqtt_name 、 mqtt_password 提供连线使用,
状态部分将 msg 设定为 1 或 0 提供 HA 灯号的状态:
snprintf(msg, MSG_BUFFER_SIZE, "%ld", 1);
同样的韧体程序语法在此不作细部说明,
完整程序码如下:
#include <ESP8266WiFi.h>
#include <PubSubClient.h>

// Update these with values suitable for your network.

const char *ssid = "SSID名称";
const char *password = "Wifi密码";
const char *mqtt_server = "MQTT服务器Host";
const char *mqtt_name = "连线名称";
const char *mqtt_password = "连线密码";

WiFiClient espClient;
PubSubClient client(espClient);
unsigned long lastMsg = 0;
#define MSG_BUFFER_SIZE (50)
char msg[MSG_BUFFER_SIZE];
int value = 0;

void setup_wifi()
{

    delay(10);
    // We start by connecting to a WiFi network
    Serial.println("");
    Serial.print("Connecting to ");
    Serial.println(ssid);

    WiFi.mode(WIFI_STA);
    WiFi.begin(ssid, password);

    while (WiFi.status() != WL_CONNECTED)
    {
        delay(500);
        Serial.print(".");
    }

    randomSeed(micros());

    Serial.println("");
    Serial.println("WiFi connected");
    Serial.println("IP address: ");
    Serial.println(WiFi.localIP());
}

void callback(char *topic, byte *payload, unsigned int length)
{
    Serial.print("Message arrived [");
    Serial.print(topic);
    Serial.print("] ");
    for (int i = 0; i < length; i++)
    {
        Serial.print((char)payload[i]);
    }
    Serial.println();

    // Switch on the LED if an 1 was received as first character
    if ((char)payload[0] == '1')
    {
        digitalWrite(BUILTIN_LED, LOW); // Turn the LED on (Note that LOW is the voltage level
        // but actually the LED is on; this is because
        // it is active low on the ESP-01)
        snprintf(msg, MSG_BUFFER_SIZE, "%ld", 1);
    }
    else
    {
        digitalWrite(BUILTIN_LED, HIGH); // Turn the LED off by making the voltage HIGH
        snprintf(msg, MSG_BUFFER_SIZE, "%ld", 0);
    }
}

void reconnect()
{
    // Loop until we're reconnected
    while (!client.connected())
    {
        Serial.print("Attempting MQTT connection...");
        // Create a random client ID
        String clientId = "ESP8266Client-";
        clientId += String(random(0xffff), HEX);
        // Attempt to connect
        if (client.connect(clientId.c_str(), mqtt_name, mqtt_password))
        {
            Serial.println("connected");
            // Once connected, publish an announcement...
            client.publish("outTopic", "0");
            // ... and resubscribe
            client.subscribe("inTopic");
        }
        else
        {
            Serial.print("failed, rc=");
            Serial.print(client.state());
            Serial.println(" try again in 5 seconds");
            // Wait 5 seconds before retrying
            delay(5000);
        }
    }
}

void setup()
{
    pinMode(BUILTIN_LED, OUTPUT); // Initialize the BUILTIN_LED pin as an output
    Serial.begin(115200);
    setup_wifi();
    client.setServer(mqtt_server, 1883);
    client.setCallback(callback);
}

void loop()
{
    if (!client.connected())
    {
        reconnect();
    }
    client.loop();

    unsigned long now = millis();
    if (now - lastMsg > 2000)
    {
        lastMsg = now;
        ++value;
        Serial.print("Publish message: ");
        Serial.println(msg);
        client.publish("outTopic", msg);
    }
}
YAML 设定
由於 Home Assistant 也需要连线至 MQTT Broker ,
因此在 configuration.yaml 设定好如下范例:
mqtt:
  broker: 192.168.1.108
  username: 连线名称
  password: 连线密码
设定好後 HA 就能自动与 Eclipse Mosquitto 连线。
最後是智慧装置的控制及介面设定,
这里建立一个 switch 用来控制灯号,
如下范例:
switch:
  - platform: mqtt
    name: "light"
    icon: mdi:lightbulb-outline
    command_topic: "inTopic"
    state_topic: "outTopic"
    qos: 1
    payload_on: "1"
    payload_off: "0"
    retain: true
都配置完毕後总览就会出现开关罗!
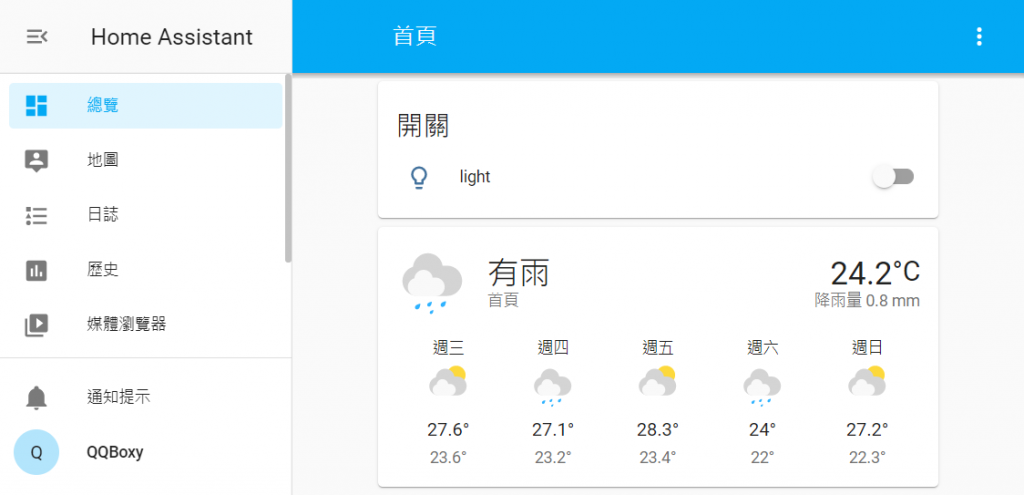
使用结果
完成了所有的配置之後,
这就是最後成功运作的画面啦

补充
由於我们使用的是 Windwos 的 Docker ,
架设的 HA 智慧家庭平台是没有 Supervisor 的,
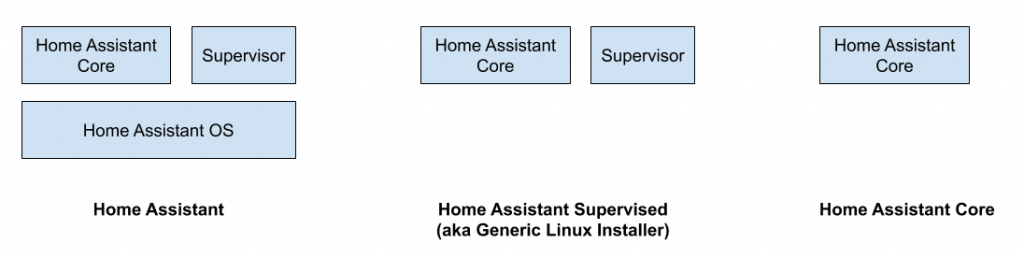
所以会无法使用 Add-on Store 来安装 Mosquitto,
因此本文直接使用 Docker 架设 Eclipse Mosquitto 。
<<: [Day 29] - 手把手跨出第一步!– 烧录闪烁程序到Arduino Part.2
Day10:程序码编辑器的实用扩充套件(2)
一、前言 上一篇文章介绍了 VSCode 好用的快捷键,此篇开始介绍其他扩充之实用功能罗。没意外...
用React刻自己的投资Dashboard Day15 - 投资Dashboard 2.0版 Wireframe
有了总体经济的图表之後,接下来就要来制作各国股市的资讯站,笔者最常看的就是台股的资讯,其次则是美股、...
Day 24 - 了解文字艺术
Rita.js Rita 使用范例 拆解字串:RiString() 取得词性 pos()(Part ...
好用的线上IDE分享
在开发程序时,有时候想要测试一点小功能,确认说这个功能可不可以使用,如果说每次都要为了测试这点功能就...
Day 8 - 社交工程 101
出於书本 Chapter 5. Social Engineering 常见的社交工程攻击 向使用者宣...