[Android Studio菜鸟的学习分享]我不是机器人-Google reCAPTCHA
Google reCAPTCHA是Google开发的防堵机器人验证API,
原本是设计给网页使用,
後来发现它也可以在APP上使用,
这样在一些例如申请帐号的流程上就能加上它,
防止一些机器人来办帐号唷~
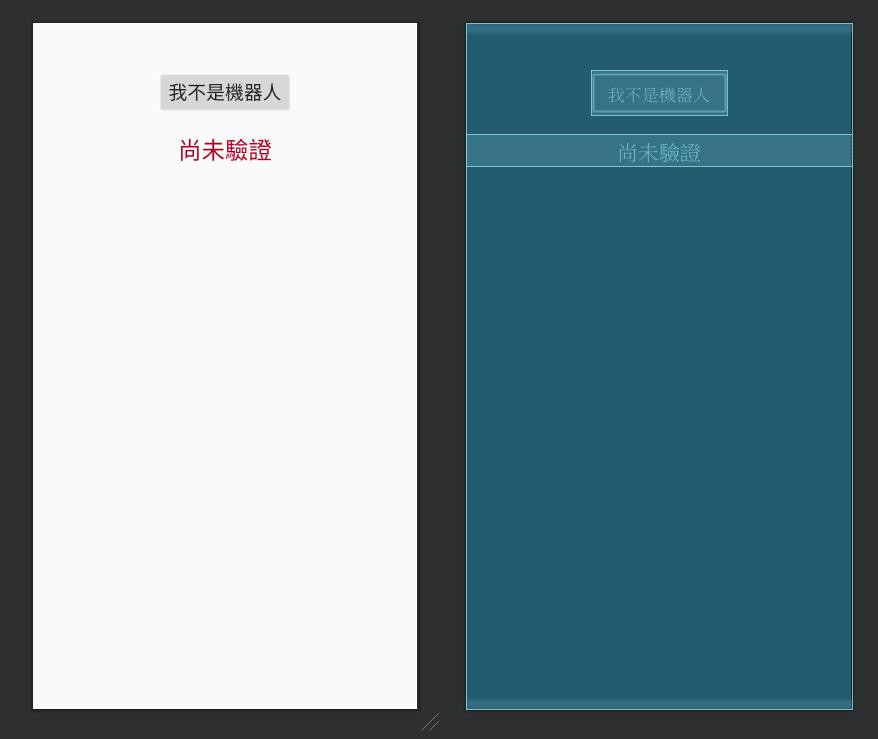
结果预览:
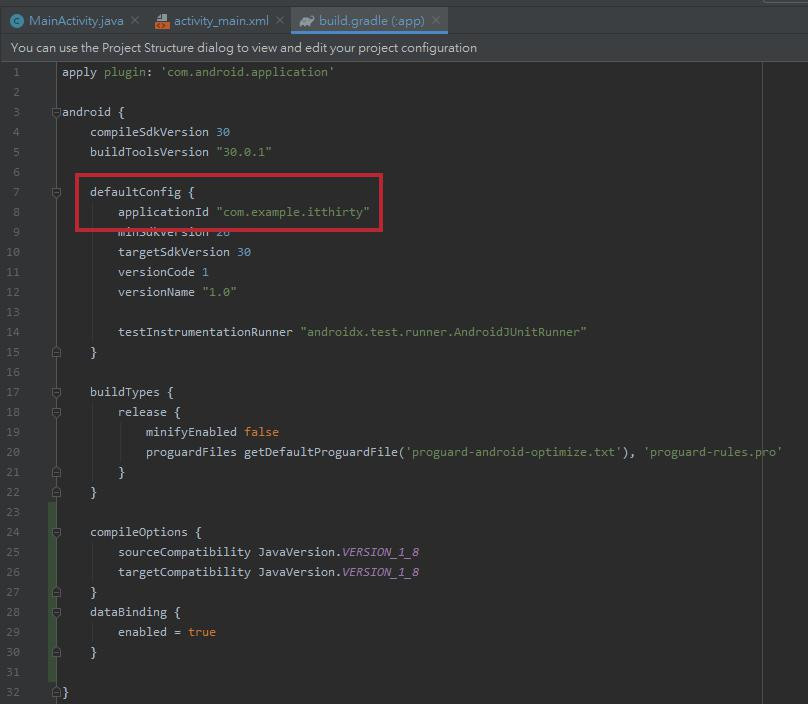
Gradle Scripts
加入play-services-safetynet套件
implementation 'com.google.android.gms:play-services-safetynet:17.0.0'
注册Google reCAPTCHA金钥
Step01:
开启网站
Google reCAPTCHA官方网站
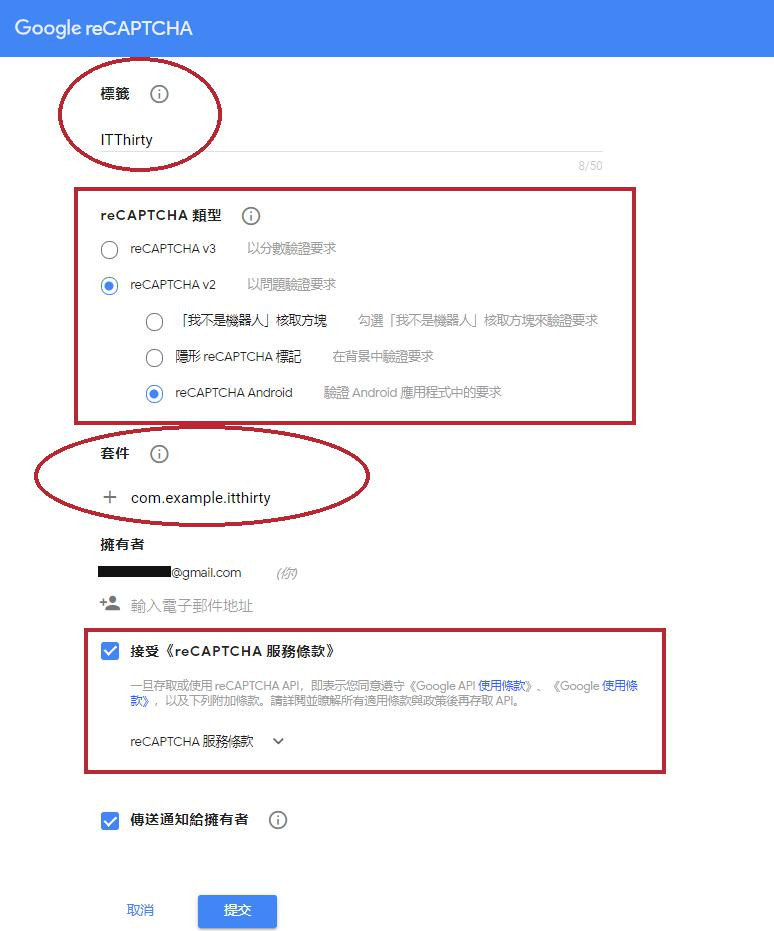
Step02:
(1)标签:自订你的专案名称
(2)类型:请选择V2的reCAPTCHA Android
(3)套件:我填的是build.gradle内的applicationId
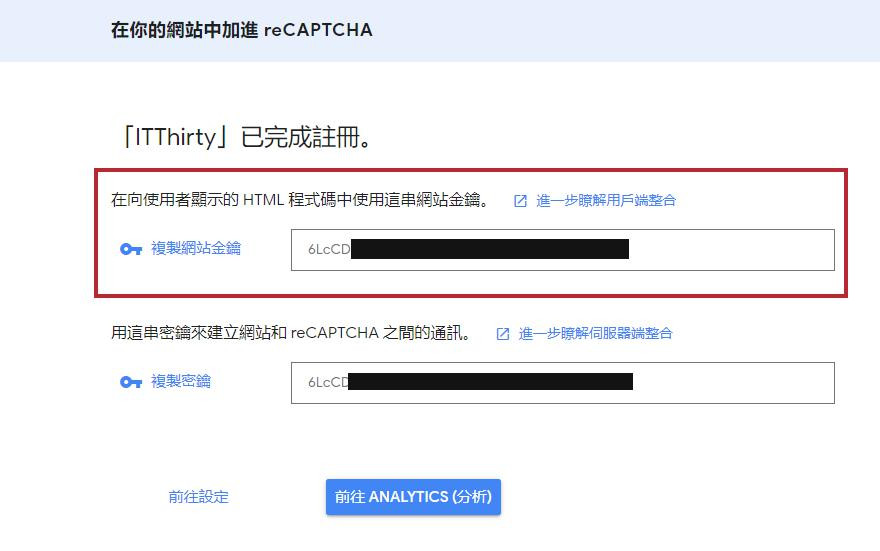
Step03-复制你的金钥:
activity_main.xml
<?xml version="1.0" encoding="utf-8"?>
<LinearLayout xmlns:android="http://schemas.android.com/apk/res/android"
    xmlns:app="http://schemas.android.com/apk/res-auto"
    xmlns:tools="http://schemas.android.com/tools"
    android:layout_width="match_parent"
    android:layout_height="match_parent"
    android:orientation="vertical"
    tools:context=".MainActivity">

    <Button
        android:layout_width="wrap_content"
        android:layout_height="wrap_content"
        android:text="我不是机器人"
        android:textSize="20dp"
        android:layout_gravity="center"
        android:layout_marginTop="50dp"
        android:id="@+id/btn_robot">

    </Button>

    <TextView
        android:layout_width="match_parent"
        android:layout_height="wrap_content"
        android:text="尚未验证"
        android:textSize="25dp"
        android:textAlignment="center"
        android:textColor="@color/design_default_color_error"
        android:layout_marginTop="20dp"
        android:id="@+id/text_robot">

    </TextView>

</LinearLayout>
MainActivity.java
Step01:
实作GoogleApiClient.ConnectionCallbacks和GoogleApiClient.OnConnectionFailedListener
对着红红的它们alt+enter实作出:
(1)onConnected - 连线成功
(2)onConnectionSuspended - 连线中断
(3)onConnectionFailed - 连线失败
public class MainActivity extends AppCompatActivity implements GoogleApiClient.ConnectionCallbacks,GoogleApiClient.OnConnectionFailedListener {

    @Override
    public void onConnected(@Nullable Bundle bundle) {
        Toast.makeText(this, "Google Services 连线成功", Toast.LENGTH_SHORT).show();
    }

    @Override
    public void onConnectionSuspended(int i) {
        Toast.makeText(this, "Google Services 连线中断,连线中断代号 :" + i, Toast.LENGTH_SHORT).show();
    }

    @Override
    public void onConnectionFailed(@NonNull ConnectionResult connectionResult) {
        Toast.makeText(this, "Google Services 连线失败,失败原因 :" + connectionResult.getErrorMessage(), Toast.LENGTH_SHORT).show();
    }

}
Step02:
    private Button btn_robot;
    private TextView text_robot;

    @Override
    protected void onCreate(Bundle savedInstanceState) {
        super.onCreate(savedInstanceState);
        setContentView(R.layout.activity_main);

        text_robot = findViewById(R.id.text_robot);
        btn_robot = findViewById(R.id.btn_robot);

        GoogleApiClient googleApiClient = new GoogleApiClient.Builder(this)
                .addApi(SafetyNet.API)
                .addConnectionCallbacks(this)
                .addOnConnectionFailedListener(this)
                .build();
        googleApiClient.connect();

        btn_robot.setOnClickListener(new View.OnClickListener() {
            @Override
            public void onClick(View view) {
                setText(0);
                SafetyNet.SafetyNetApi.verifyWithRecaptcha(googleApiClient,"你的金钥").setResultCallback(new ResultCallback<SafetyNetApi.RecaptchaTokenResult>() {
                    @Override
                    public void onResult(@NonNull SafetyNetApi.RecaptchaTokenResult recaptchaTokenResult) {
                        Status status = recaptchaTokenResult.getStatus();
                        runOnUiThread(new Runnable() {
                            @Override
                            public void run() {
                                if((status != null) && status.isSuccess()){
                                    //验证通过
                                    setText(1);
                                }
                                else {
                                    //验证失败
                                    setText(0);
                                }
                            }
                        });
                    }
                });
            }
        });
    }

    private void setText(int i) {
        if (i == 1){
            text_robot.setText("验证通过");
            text_robot.setTextColor(Color.GREEN);
        }
        else{
            text_robot.setText("验证失败");
            text_robot.setTextColor(Color.RED);
        }

    }
>>: RxJS 数学/聚合类型 Operators (1) - min / max / count / reduce
JS 30 - 将 JSON 资料应用到统计学!
大家好! 今天我们要实作解析 JSON 资料,并计算资料的变异数。 我们进入今天的主题吧! 公式 母...
【Day 21】卷积神经网路(Convolutional Neural Network, CNN)(上)
Why CNN for Image? 我们在训练Neural Network的时候,我们会期待在这个...
【在 iOS 开发路上的大小事-Day09】将常用的 Function 写成一个 class,让各个档案都能使用
在开发上,常常会有一些 Function 是会在各个档案中使用的,如果每次都要在需要用到这个 Fun...
[ Day 14 ] - 存取网页元素之变更指定内容
上一篇提到可以取得指定的 DOM 节点 今日来介绍可如何透过节点存取及变更文件节点 textCont...
DAY7: Node 的事件循环 (Event loop)
今日要介绍Node事件循环的概念,前面文章一直提到Node和JavaScipt虽然拖不了太大的关系,...