Day 22. slate × Operation × transform
今天的内容将延续 上一篇 文章中 Operation Process 里的 3. ,同时我们会非常深入地去解析实现整个 transform function 的程序码逻辑,对 Operation 的运作流程还不熟悉的读者们,笔者建议先回头看完上一篇的内容後再接着继续阅读本篇的内容。
我们在 Day18 介绍 Slate 如何使用 Immer.js 时有先简单提到这个 transform function 过,再丢一次 code 的内容帮读者回忆一下:
export const GeneralTransforms: GeneralTransforms = {
  /**
   * Transform the editor by an operation.
   */

  transform(editor: Editor, op: Operation): void {
    editor.children = createDraft(editor.children)
    let selection = editor.selection && createDraft(editor.selection)

    try {
      selection = applyToDraft(editor, selection, op)
    } finally {
      editor.children = finishDraft(editor.children)

      if (selection) {
        editor.selection = isDraft(selection)
          ? (finishDraft(selection) as Range)
          : selection
      } else {
        editor.selection = null
      }
    }
  },
}
transform function 的内容存放在 transforms/general.ts 这个 file 里面,跟其他 Transform methods 一起放在同一个 transforms/directory 底下。
这个 method 做的事情本身不多,主要就是将 editor 底下的 children 与 selection 丢入 Immer 的 createDraft 制作 Draft-State ,并在整个运算结束以後执行 finishDraft 而已。
主要的运算工作都是透过 applyToDraft 来执行,所以 ... 是的!我们今天会把所有的精力都放在这个 function 上,那麽以下就~正文开始!
applyToDraft
这个 function 基本上就是由一连串的 Switch case 所组成不同的 Operation type 执行不同的运算内容,并在最後回传计算完的 selection 。
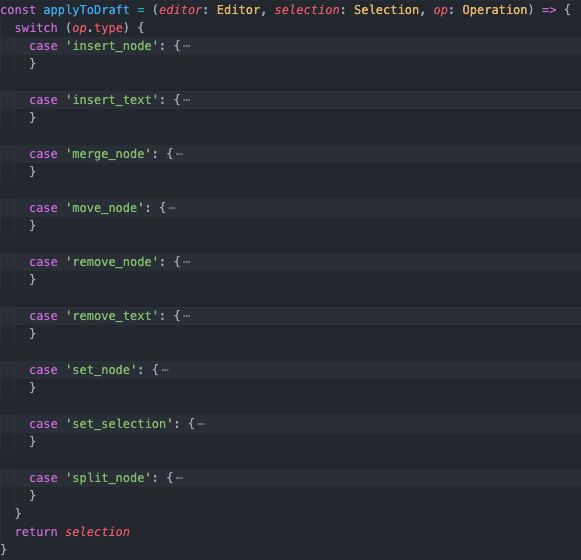
我们就照着图片上的顺序一一介绍吧!
insert_node
『插入节点』
先判断欲 insert 的 node 路径的最後一个值是否大於它的 parent node 的 children 数量,若大於则代表此路径超过了同一层 nodes 最尾端的 index ,因而是个不合法的操作
const { path, node } = op
const parent = Node.parent(editor, path)
const index = path[path.length - 1]

if (index > parent.children.length) {
  throw new Error(
    `Cannot apply an "insert_node" operation at path [${path}] because the destination is past the end of the node.`
  )
}
若小於或等於则直接 insert 进指定的位置:
parent.children.splice(index, 0, node)
接着透过 Range.points method Iterate anchor 与 focus point ,再丢入 Point.transform 转换:
if (selection) {
  for (const [point, key] of Range.points(selection)) {
    selection[key] = Point.transform(point, op)!
  }
}
insert_text
『插入文字节点』
如果要被 insert 的 text 为空值则直接 break 此次的 transform
const { path, offset, text } = op
if (text.length === 0) break
将 path 丢入 Node.leaf method 确保它是一个合法的 Text node
const node = Node.leaf(editor, path)

/** 顺便附上 Node.leaf method 内容 */
// node.ts
/**
 * Get the node at a specific path, ensuring it's a leaf text node.
 */

leaf(root: Node, path: Path): Text {
  const node = Node.get(root, path)

  if (!Text.isText(node)) {
    throw new Error(
      `Cannot get the leaf node at path [${path}] because it refers to a non-leaf node: ${node}`
    )
  }

  return node
}
结束事前的判断程序以後再将字串组在一起 &赋值
const before = node.text.slice(0, offset)
const after = node.text.slice(offset)
node.text = before + text + after
最後跟 insertNode 一样对 selection 做一模一样的操作,程序码是一样的我们就直接略过了。
merge_node
『合并节点』
它的做法是将 operation 里给定的 path 指向的 node 与它的『前一个 sibling node 合并』。
首先取得 path 指向的 node 资料、前一个 sibling node 资料、 parent node 资料以及 path 指向的 node 的 index
const { path } = op
const node = Node.get(editor, path)
const prevPath = Path.previous(path)
const prev = Node.get(editor, prevPath)
const parent = Node.parent(editor, path)
const index = path[path.length - 1]
接着判断它们可否合并,只有『同时为 Text node 』与『同时不为 Text node 』这两种情形可以进行合并。前者将两组字串合并在一起,後者则是将两个 Node 的 children 合并在一起
if (Text.isText(node) && Text.isText(prev)) {
  prev.text += node.text
} else if (!Text.isText(node) && !Text.isText(prev)) {
  prev.children.push(...node.children)
} else {
  throw new Error(
    `Cannot apply a "merge_node" operation at path [${path}] to nodes of different interfaces: ${node} ${prev}`
  )
}
然後再拔掉 path 指向的 node value
parent.children.splice(index, 1)
最後跟 insertNode 一样对 selection 做一模一样的操作,程序码是一样的我们就直接略过了。
move_node
『移动节点』
与字面上的意思一样,做的事情就是将节点旧的 path 移动到新的 path 。
首先先避开『旧路径为新路径的祖先』这个可能性并取得节点、父节点、 index 等资料:
const { path, newPath } = op

if (Path.isAncestor(path, newPath)) {
  throw new Error(
    `Cannot move a path [${path}] to new path [${newPath}] because the destination is inside itself.`
  )
}

const node = Node.get(editor, path)
const parent = Node.parent(editor, path)
const index = path[path.length - 1]
接着是更新节点资料的部分,因为在异动了原始的节点资料後会导致传入的 path 资料过期而变得不可用,所以这边的做法是取得 transform 後的新 path 以後再取得这个新 path 的父节点以及新的 index 资料,然後再对这些取得的新资料进行操作,而不是直接操作传入的 newPath 资料
// This is tricky, but since the `path` and `newPath` both refer to
// the same snapshot in time, there's a mismatch. After either
// removing the original position, the second step's path can be out
// of date. So instead of using the `op.newPath` directly, we
// transform `op.path` to ascertain what the `newPath` would be after
// the operation was applied.
parent.children.splice(index, 1)
const truePath = Path.transform(path, op)!
const newParent = Node.get(editor, Path.parent(truePath)) as Ancestor
const newIndex = truePath[truePath.length - 1]

newParent.children.splice(newIndex, 0, node)
最後跟 insertNode 一样对 selection 做一模一样的操作,程序码是一样的我们就直接略过了。
remove_node
『删除节点』
删除节点本身的操作非常的基本,就是直接透过 Array 的 splice method 来达成而已:
const { path } = op
const index = path[path.length - 1]
const parent = Node.parent(editor, path)
parent.children.splice(index, 1)
主要的内容都集中在处理 selection 的更新上,因为删除的节点有可能是 selection 里的 anchor 或 focus point 。
这边的作法是:
- 一样先更新
selection里的anchor与focuspoint - 如果更新後的节点并不存在(被删除了),就分别透过遍历的方式找到
op.path『之前』或是『之後』的文字节点 - 如果找到的是『之前』的节点就将
selectionpoint 更新为该节点的最後一个字,如果是『之後』的就更新为该节点的第一个字,都没找到就直接将selection设为null
// Transform all of the points in the value, but if the point was in the
// node that was removed we need to update the range or remove it.
if (selection) {
  for (const [point, key] of Range.points(selection)) {
    const result = Point.transform(point, op)

    if (selection != null && result != null) {
      selection[key] = result
    } else {
      let prev: NodeEntry<Text> | undefined
      let next: NodeEntry<Text> | undefined

      for (const [n, p] of Node.texts(editor)) {
        if (Path.compare(p, path) === -1) {
          prev = [n, p]
        } else {
          next = [n, p]
          break
        }
      }

      if (prev) {
        point.path = prev[1]
        point.offset = prev[0].text.length
      } else if (next) {
        point.path = next[1]
        point.offset = 0
      } else {
        selection = null
      }
    }
  }
}
remove_text
『移除节点内的文字』
因为是操作同一个节点内的文本内容所以很基本,就是取得字串後组合而已。
const { path, offset, text } = op
if (text.length === 0) break
const node = Node.leaf(editor, path)
const before = node.text.slice(0, offset)
const after = node.text.slice(offset + text.length)
node.text = before + after
最後跟 insertNode 一样对 selection 做一模一样的操作,程序码是一样的我们就直接略过了
set_node
『设定节点属性』
它会挡掉对 root node 的节点属性设定、对 children 或 text 等主要资料的设定
const { path, properties, newProperties } = op

  if (path.length === 0) {
    throw new Error(`Cannot set properties on the root node!`)
  }

  const node = Node.get(editor, path)

  for (const key in newProperties) {
    if (key === 'children' || key === 'text') {
      throw new Error(`Cannot set the "${key}" property of nodes!`)
    }

		// ...
	}
剩下的就是实作逻辑了, 属性 value 为 null ,或是原本有这项属性但更新後却没有的话,会删掉节点里的这项属性,否则会直接赋值到指定的属性上
for (const key in newProperties) {
	// ...

	const value = newProperties[key]

  if (value == null) {
    delete node[key]
  } else {
    node[key] = value
  }
}

// properties that were previously defined, but are now missing, must be deleted
for (const key in properties) {
  if (!newProperties.hasOwnProperty(key)) {
    delete node[key]
  }
}
set_selection
『设定 selection 属性』
功能很直观,里头的程序码主要也都是处理一些 edge cases ,例如: selection 原本为 null 的话,新设定的属性内容必须符合一个合法的 Range type 该有的 properties ,以及不能将 anchor 、 focus 的 value 设为 null 等等
case 'set_selection': {
  const { newProperties } = op

  if (newProperties == null) {
    selection = newProperties
  } else {
    if (selection == null) {
      if (!Range.isRange(newProperties)) {
        throw new Error(
          `Cannot apply an incomplete "set_selection" operation properties ${JSON.stringify(
            newProperties
          )} when there is no current selection.`
        )
      }

      selection = { ...newProperties }
    }

    for (const key in newProperties) {
      const value = newProperties[key]

      if (value == null) {
        if (key === 'anchor' || key === 'focus') {
          throw new Error(`Cannot remove the "${key}" selection property`)
        }

        delete selection[key]
      } else {
        selection[key] = value
      }
    }
  }

  break
}
split_node
『拆分节点』
就是一个将节点一分为二的功能,唯一的限制是不能对 Editor 做拆分
const { path, position, properties } = op

  if (path.length === 0) {
    throw new Error(
      `Cannot apply a "split_node" operation at path [${path}] because the root node cannot be split.`
    )
  }
将基本的资料取出来设为变数以後,会接着区分出 Text node 与 Element node 。
前者会对节点内的字串做操作:
const node = Node.get(editor, path)
const parent = Node.parent(editor, path)
const index = path[path.length - 1]
let newNode: Descendant

if (Text.isText(node)) {
  const before = node.text.slice(0, position)
  const after = node.text.slice(position)
  node.text = before
  newNode = {
    ...(properties as Partial<Text>),
    text: after,
  }
}
後者则是对 children node 做操作:
else {
	const before = node.children.slice(0, position)
	const after = node.children.slice(position)
	node.children = before

	newNode = {
	  ...(properties as Partial<Element>),
	  children: after,
	}
}
然後将新生成的 newNode 塞进对应的位置:
parent.children.splice(index + 1, 0, newNode)
最後跟 insertNode 一样对 selection 做一模一样的操作,程序码是一样的我们就直接略过了。
呼~一个接着一个介绍,总算是迎来尾声了。
虽说这篇介绍的 transform function 是 Slate 主要用於处理 Slate node tree 的资料更新的,但我们同时也能发现其实还是有部分的逻辑是被拆到其他的 function 去处理的。
也就是针对『 Location types 』更新的内容,只要是诸如 selection 的 point 更新,或是 path 更新等等的功能都是交由各自对应到的 type 的 transform method api 来处理( Point.transform 、 Path.transform )
下一篇我们就会将目光聚焦在这些 methods 上,来看看在这里头又是如何更新 Location type 的内容的。
明天见各位~
<<: 【设计+切版30天实作】|Day23 - Pros区块 - 看似无边框的三栏式卡片,到底要对准哪条栏位?
>>: Day23 [实作] 一对一视讯通话(3): Client
[重构倒数第22天] - 减少 watch,改用 computed
前言 该系列是为了让看过Vue官方文件或学过Vue但是却不知道怎麽下手去重构现在有的网站而去规画的系...
SQL JOIN 共七种
没有搞懂它前,似懂非懂的,东拚西凑,也能写出程序. 但搞懂它,更知道自己在写什麽. key word...
云端资安之GCP篇(Google Cloud Platform)
你终究要上云端的,那为什麽不一开始就上? 接下来三天是关於三大云端服务, 分别就是GCP(Googl...
DOM 实作 换背景图
<!DOCTYPE html> <html lang="en"...
【领域展开 14 式】 Favicon 的好助手!Canva 使用与 5 下搞定网站设定
今天需要疗癒的视觉效果,Menu 再等等.. 跳脱进度,想先做网站 Favicon 的设计 (其实是...