[Day21] 第二十一章 - 使用Ajax来做登入API界接
前言
昨天我们把登入页面套上了bootstrap
我们这次把jqury补上去
接者透过ajax做登入
回传到profile.blade.php 显示使用者资料
目标
- Jquery 套件使用
- Ajax 与前後端界接
- 前後端导向以及页面转换
实作
1. login.blade.php
我们先在上方新增jquery的资源link, 在head里面
<head>
    <script src="https://code.jquery.com/jquery-3.6.0.min.js"> </script>
    </style>
</head>
接者我们要修改**button的type **把submit改成button
非常重要!! 因为submit会强制跳转
button则可以依照自己的js操作来决定後续处理
<form class="form-signin" action="/test" method="POST">
        <!-- @csrf -->
        <img class="mb-4" src="https://images.unsplash.com/photo-1495360010541-f48722b34f7d?ixid=MnwxMjA3fDB8MHxwaG90by1wYWdlfHx8fGVufDB8fHx8&ixlib=rb-1.2.1&auto=format&fit=crop&w=436&q=80" alt="" width="72">
        <h1 class="h3 mb-3 font-weight-normal">请输入使用者名称及密码登入</h1>
        <label for="inputEmail" class="sr-only">Email address</label>
        <input type="email" id="inputEmail" name="email" class="form-control" placeholder="Email address" required autofocus>
        <label for="inputPassword" class="sr-only">Password</label>
        <input type="password" id="inputPassword" name="passowrd" class="form-control" placeholder="Password" required>
        <button class="btn btn-lg btn-primary btn-block" type="button" id="login">Sign in</button>
        <p class="mt-5 mb-3 text-muted">© 2021 iThome 铁人赛</p>
    </form>
最後我们在body後方补上script也就是ajax的code
<script>
        $(document).ready(function() {
            $("#login").on('click', function() {
                var data = {
                    email: $('#inputEmail').val(),
                    password: $('#inputPassword').val()
                }
                $.ajax({
                        method: "POST",
                        url: "/login",
                        dataType: 'json',
                        data
                    })
                    .done(function(msg) {
                        const d = new Date();
                        const exdays = 10;
                        d.setTime(d.getTime() + (exdays * 24 * 60 * 60 * 1000));
                        let expires = "expires=" + d.toUTCString();
                        document.cookie = "token" + "=" + msg.token + ";" + expires + ";" + "path=/";
                        // localStorage.setItem('accessToken', msg.token);
                        window.location.href = '/profile';
                    });
            });
        });
    </script>
这边有几个小重点可以跟大家说一下
- $(document).ready的用途
$(document).ready(function() 是为了让DOM物件载入完成後使用的function
简单来说就是当html都渲染完成後 我再决定要发生什麽事件!!
否则骨架都还没出来人要怎麽做动作辣
- $.ajax
这边我们可以照者官方的说明文件依序把url,data,method塞进去画葫芦就好
要注意的是在done这边是跟後端要完资料後要做什麽事情
- document.cookie
通常我们在登入後会把回传的token塞到localstorage或是cookie里使用
- window.location.href
完成後重新导向
2. route新增路径
我们在route的web.php档案里面新增
Route::get('profile', 'UserController@getProfile');
接者可以使用
php artisan make:controller UserController
来建立此Controller
这个步骤目的在於我们在login页面取得token後导向profile页面
并且把使用者资料呈现在profile画面上
3. UserController 来决定动作
在 app/http/controller/usercontroller里面
<?php

namespace App\Http\Controllers;

use Illuminate\Http\Request;
use PDO;

class UserController extends Controller
{
    //
    public function getProfile(Request $request)
    {
        $token = $request->headers->all();
        if (empty($token['cookie'][0])) {
            return redirect('/user/login');
            // dd($token);
        }

        $user = $request->user();
        return view('user.profile', ['user' => $user]);
    }
}
这边 是判断如果cookie没有token代表没有登入过
如果有就把user取得资料并且导向user.proflie的view里面
第二个参数是把user资料传进去
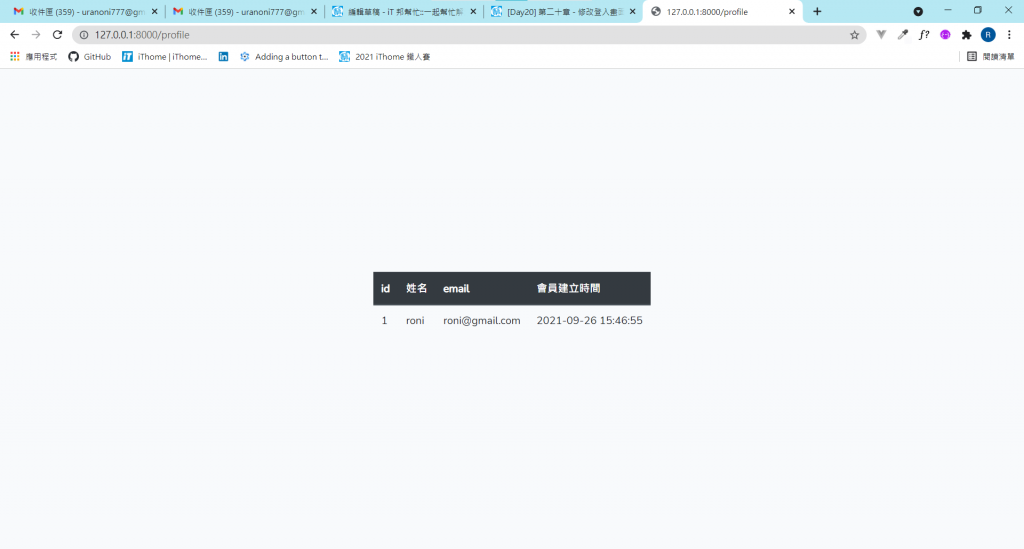
4. user.proflie 的blade
在views资料夹里面新增user资料夹并且建立profile.blade.php
<head>
    <script src="https://code.jquery.com/jquery-3.6.0.min.js"> </script>
    <!-- Styles -->
    <link href="{{ asset('css/app.css') }}" rel="stylesheet">
    <style>
        .box {
            display: flex;
            align-items: center;
            justify-content: center;
            height: 100%;
        }
    </style>
</head>

<div class="box">
    <div>
        <table class="table">
            <thead class="thead-dark">
                <tr>
                    <th scope="col">id</th>
                    <th scope="col">姓名</th>
                    <th scope="col">email</th>
                    <th scope="col">会员建立时间</th>
                </tr>
            </thead>
            <tbody>
                <tr>
                    <td>
                        {{$user->id}}
                    </td>
                    <td>
                        {{$user->name}}
                    </td>
                    <td>
                        {{$user->email}}
                    </td>
                    <td>
                        {{$user->created_at}}
                    </td>
                </tr>

            </tbody>
        </table>
    </div>
</div>
{{}}花括号 可以把物件印出来
我们把物件立面的属性一一取出来(name,id,email这些)
我们这边把登入者的
名字,ID,email印出来
并套上bootstrap出来吧
<<: [2021铁人赛 Day21] General Skills 18
网拍的创业回亿:管理与经营(一)
我很重视客户的意见与收货速度。 当时我是网路拍卖的创办人,与客户约定好了要五天内到货。为了达成目标,...
评估管理者的绩效
ALPHA Camp 的其中一个核心价值是 Outcome First。它有两层的意义。 针对 A...
【第 28 个第一次】 Prototype 好重要,Marvelapp 让点子瞬间视觉飞起来 !
Day 28 - 你们服务项目有 Prototype,通常会位於流程的哪一阶段呢? 在目前短暂的在外...
Day7 SQL
终於要进入到我熟悉的後端了,在Day5安装XAMPP时有勾选了PHP、MySQL、phpMyAdmi...