Day 20 - 物件导向与向量 - Class 粒子系统
今天要来做一下粒子系统 首先要来了解 为什麽要了解 class生成物件呢
-
大量快速建立同类型的物件
-
把常常针对物件执行的函式绑订在方法上面,简化程序码,例如图形的绘制 与 更新
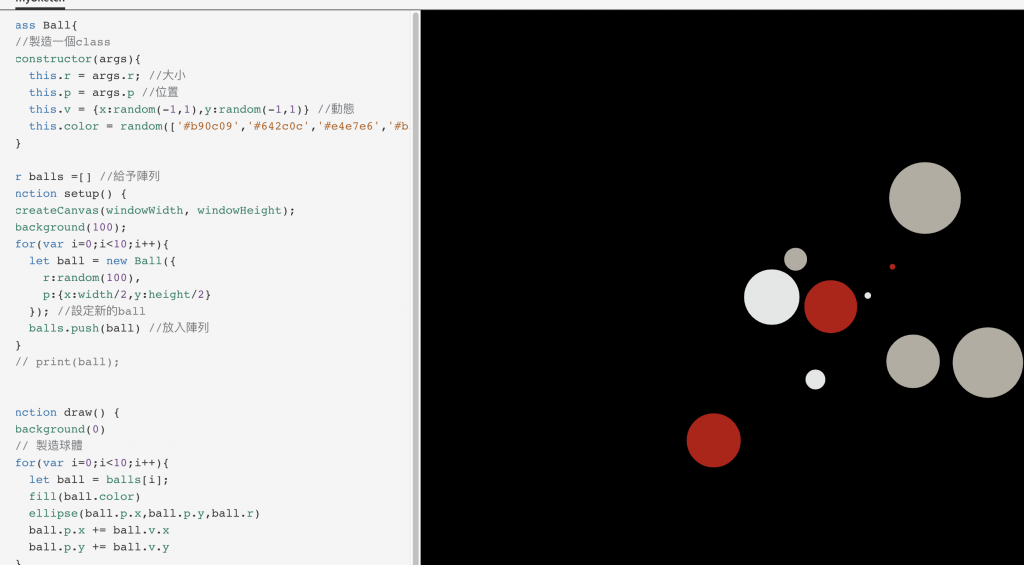
建立一个class设定 首先要做弹跳的球 再利用class可以带入参数的属性 制造出一个从中间散开的球
class Ball{
	//制造一个class
	constructor(args){
		this.r = args.r; //大小
		this.p = args.p //位置
		this.v = {x:random(-1,1),y:random(-1,1)} //动态
		this.color = random(['#b90c09','#642c0c','#e4e7e6','#b3ada2'])
	}
}
var balls =[] //给予阵列
function setup() {
	createCanvas(windowWidth, windowHeight);
	background(100);
	for(var i=0;i<10;i++){
		let ball = new Ball({
			r:random(100),
			p:{x:width/2,y:height/2}
		}); //设定新的ball
		balls.push(ball) //放入阵列
	}
	// print(ball);
}

function draw() {
	background(0)
	// 制造球体
	for(var i=0;i<10;i++){
		let ball = balls[i];
		fill(ball.color)
		ellipse(ball.p.x,ball.p.y,ball.r)
		ball.p.x += ball.v.x
		ball.p.y += ball.v.y
	}
}
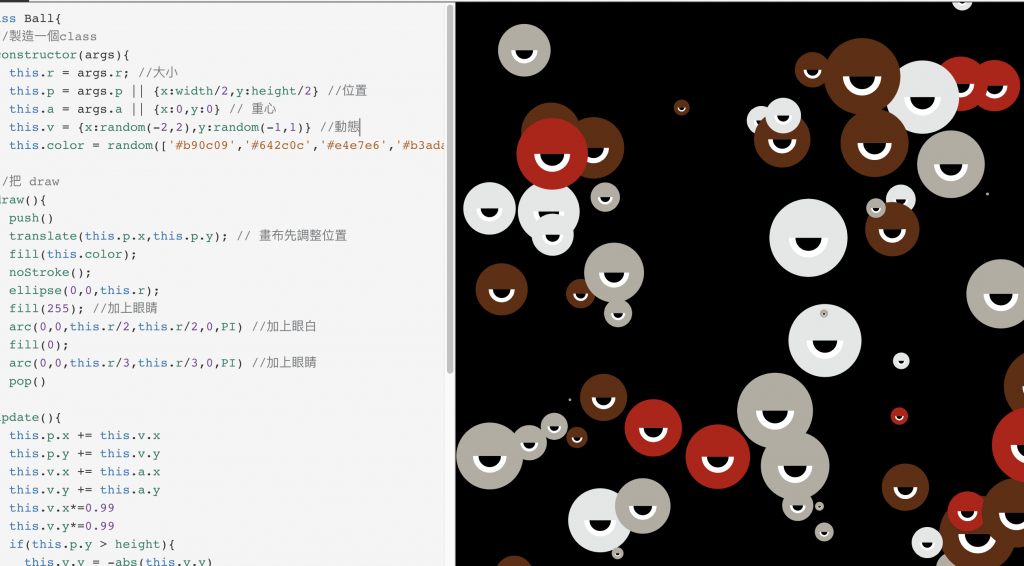
利用一设定你的class也要设定非常准确 直接在class立面做一个draw的function 另外 让重心调整以及随机排列 跟制作眼睛
这样你在draw() 里面就会变成非常乾净只有告知要做什麽物件而已
class Ball{
	//制造一个class
	constructor(args){
		this.r = args.r; //大小
		this.p = args.p || {x:width/2,y:height/2} //位置
		this.a = args.a || {x:0,y:0} // 重心
		this.v = {x:random(-2,2),y:random(-1,1)} //动态
		this.color = random(['#b90c09','#642c0c','#e4e7e6','#b3ada2'])
	}
	//把 draw
	draw(){
		push()
		translate(this.p.x,this.p.y); // 画布先调整位置
		fill(this.color);
		noStroke();
		ellipse(0,0,this.r);
		fill(255); //加上眼睛
		arc(0,0,this.r/2,this.r/2,0,PI) //加上眼白
		fill(0);
		arc(0,0,this.r/3,this.r/3,0,PI) //加上眼睛
		pop()
	}
	update(){
		this.p.x += this.v.x
		this.p.y += this.v.y
		this.v.x += this.a.x
		this.v.y += this.a.y
		this.v.x*=0.99
		this.v.y*=0.99
		if(this.p.y > height){
			this.v.y = -abs(this.v.y)
		}
	}
}
var balls =[] //给予阵列
function setup() {
	createCanvas(windowWidth, windowHeight);
	background(100);
	for(var i=0;i<100;i++){
		let ball = new Ball({
			r:random(100),
			p:{x:random(width),y:random(height)}
		}); //设定新的ball
		balls.push(ball) //放入阵列
	}
	// print(ball);
}

function draw() {
	background(0)
	// 制造球体
	for(var i=0;i<100;i++){
		let ball = balls[i];
		// 直接把ballupdate 跟 draw出来
		ball.update();
		ball.draw();
	}
}
接下来我们设定 来让细菌被滑鼠点到就会马上逃走
- 设定有一些模式
- 随机的动态
- event 设定
class Ball{
	//制造一个class
	constructor(args){
		this.r = args.r; //大小
		this.p = args.p //位置
		this.a = args.a || {x:0,y:0} // 重心
		this.v = {x:random(-2,2),y:random(-2,2)} //动态
		this.color = random(['#b90c09','#642c0c','#e4e7e6','#b3ada2'])
		this.mode = random(["happy","sad"])
		this.rId = random(10000)
	}
	//把 draw
	draw(){
		// 绘制细菌
			push()
			translate(this.p.x,this.p.y)
			fill(this.color)
			noStroke()
			ellipse(0,0,this.r)
			if (this.mode=="happy"){
				fill(255)
				ellipse(0,0,this.r/2,this.r/2)
				fill(0)
				ellipse(0,0,this.r/3,this.r/3)
			}else{
				fill(255)
				arc(0,0,this.r/2,this.r/2,0,PI)
				fill(0)
				arc(0,0,this.r/3,this.r/3,0,PI)

			}
			stroke(this.color)
			strokeWeight(6)
			noFill()
			for(var o=0;o<8;o++){
				rotate(PI/4)
				beginShape() // 开始画起始点
				for(var i=0;i<30;i+=4){
					vertex(this.r/2+i*2,sin(i/5 +-frameCount/5 +this.rId)*10 ) //制作触手
				}
				endShape() // 终点
			}
		pop()
	}
	update(){
		this.p.x += this.v.x
		this.p.y += this.v.y
		this.v.x += this.a.x
		this.v.y += this.a.y
		this.v.x*=0.99
		this.v.y*=0.99
		if (this.mode=="happy"){
			this.p.y+=sin(frameCount/(10+this.rId/100))*5
		}
		if (this.mode=="crazy"){
			this.v.x+=random(-5,5) // 如果变成crazy的 x,y
			this.v.y+=random(-5,5)
		}

		this.v.x*=0.99
		this.v.y*=0.99

		if (this.p.y>height){
			this.v.y = - abs(	this.v.y)
		}
	}
	escape(){
		this.v.x = random(-10,10)
	}
	setHappy(){
		this.mode = 'happy'
	}
	setMode(mode){
		this.mode=mode
	}
	isBallInRange(){
		let d = dist(mouseX,mouseY,this.p.x,this.p.y)
		if (d<this.r){
			return true
		}else{
			return false
		}
	}
}
var ball;
var balls =[] //给予阵列
function setup() {
	createCanvas(windowWidth, windowHeight);
	background(100);
	for(var i=0;i<10;i++){
		let ball = new Ball({
			r:random(100),
			p: {x: random(width), y:  random(height)}
		}); //设定新的ball
		balls.push(ball) //放入阵列
	}
	// print(ball);
}
function mousePressed(){
	//点击下去会增加一个细菌
	let ball = new Ball({
		r: random(100),
		p: {x:mouseX, y:  mouseY}
	})
	balls.push(ball)

	for(let ball of balls){
		ball.setHappy() // 设定眼睛开心模式
		ball.escape() //逃走设定
	}
}
function draw() {
	background(0)
	// 制造球体
	for(let ball of balls){
		ball.update()
		ball.draw()
		// 设定滑鼠在细胞附近
		if (ball.isBallInRange()){

			ball.color = "#41f25e" // 设定绿色
			ball.setMode("crazy") // 设定变成别的模式
		}
	}
}
https://openprocessing.org/sketch/1287977
<<: Day 20:设定 404 页面,不要让读者迷路了!
>>: 【从零开始的 C 语言笔记】第一篇-安装程序码编辑器
[Day 30] 会员登入及登出(二)
今天继续使用者登入的部分. 登入资料验证 当接收到表单送来的资讯之後, 首先我们要针对资料作验证. ...
硬碟上的资料是否有重量?
我的学生前些日子突然脑洞爆发,问我:“存满资料的硬碟是不是比空硬碟重?资料是否有重量?” 我也查了大...
不只懂 Vue 语法:什麽是 directive?请示范如何使用 directive?
问题回答 directive(指令)是我们在 Vue 自定义的指令。当我们要重复处理某些工作,例如转...
《DAY 30》天气 App 实作(完)
最後一天来把天气 App 的剩余部分给完成,冲啊! 当一开始进入 App 会直接显示宜兰县在第一个时...
[Day4] 执行环境与执行堆叠
在昨天内容中可以知道,JavaScript 采用了静态作用域,函式在定义时就已经确定作用域,而在产生...