[Angular] Day33. Communicating with backend services using HTTP
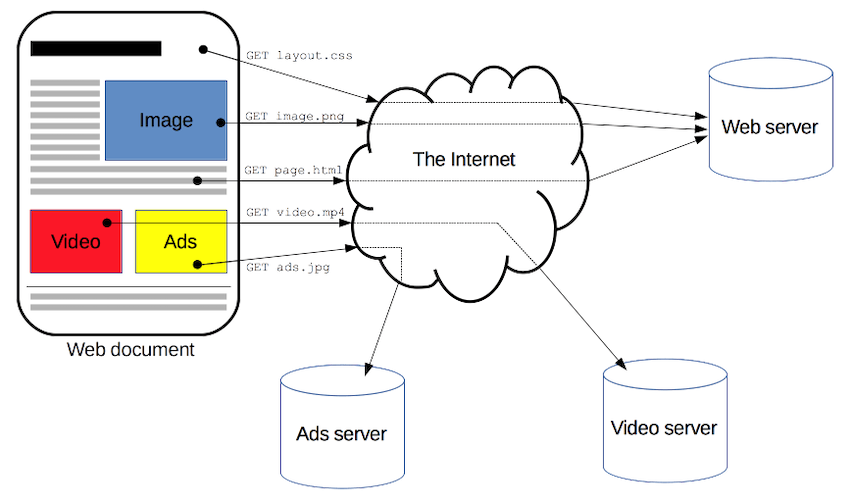
在现代的网页中绝大部分会需要与 server 互相沟通,无论是从 server 获取商品的资料用於显示在画面中,还是画面中的设定要储存回 server 的设定都需与後端 server 互相沟通,Angular 提供了一个 client 端的 HTTP API,那便是 @angular/common/http 中的 HttpClient service class,该怎麽使用就继续往下看吧 。
。

An overview of HTTP
HTTP 是一种允许获得数据(例如 HTML 文档)的协议,他是一种 client 端与 server 端的协议是数据交换的基础,这意味着通常 request 是由接收方( client 端)发起的,从而获得不同的数据或档案,从 client 发送的消息称为 request 而 server 端回传的数据称为 response。
HTTP request methods
HTTP 定义了一组 request method 用於 client 端对 server 端的所有操作,他们分别是
-
GET:GET request 用於
请求数据 - HEAD:和 GET request 一样用於请求数据,但 response 没有内容
- POST:用於向指定 server 提交数据,会导致状态更改或对 server 产称副作用(更改数据)
- PUT:用於将有效的数据替换掉目标资源的当前值
- DELETE:用於删除指定资源
- CONNECT:用於建立到目标资源的 server 通道
- OPTION:用於描述目标资源的通选项
Setup for server communication
大概介绍完 HTTP 与 HTTP method 後,接着回到 Angular 的内容,要在 Angular 中使用 HttpClient 之前需要先导入 HttpClientModule,大多数操作都会将他到入到 AppModule 中。
import { NgModule } from '@angular/core';
import { BrowserModule } from '@angular/platform-browser';
import { HttpClientModule } from '@angular/common/http';

@NgModule({
  imports: [
    BrowserModule,
    HttpClientModule,
  ],
  declarations: [
    AppComponent,
  ],
  bootstrap: [ AppComponent ]
})
export class AppModule {}
接着可以在需要使用到 httpClient 的地方将它注入到 component 中
import { Injectable } from '@angular/core';
import { HttpClient } from '@angular/common/http';

@Injectable()
export class ConfigService {
  constructor(private http: HttpClient) { }
}
Requesting data from a server
首先介绍的是使用 HttpClient.get() method 从 server 中获取数据,这个同步的 method 会发送一个 HTTP request,并在收到 responses 後会返回一个 Observable,responses 的类型会依据 request 中的 observe 和 responseType 决定,他接收两个参数,一个是 server 的路径 url 第二个是用於设置 request 的 option object。
options: {
  headers?: HttpHeaders | {[header: string]: string | string[]},
  observe?: 'body' | 'events' | 'response',
  params?: HttpParams|{[param: string]: string | number | boolean | ReadonlyArray<string | number | boolean>},
  reportProgress?: boolean,
  responseType?: 'arraybuffer'|'blob'|'json'|'text',
  withCredentials?: boolean,
}
其中重要的是 observe 与 responseType,observe 会决定要返回多少 response,responseType 会指定返回 response 的格式。
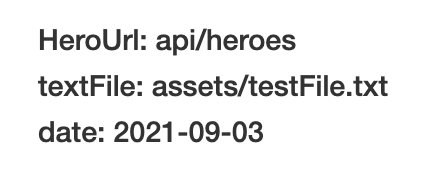
所以如果要接收一个 JSON 形式的数据的话,需要将 get() 的 option 设置为 { observe: 'body', responseType: 'json' } ,不过这些选项是预设值就算不加也会传递一样的设置,下面来举个例子,目标是获得这一组数据
{
  "heroesUrl": "api/heroes",
  "textfile": "assets/textfile.txt",
  "date": "2021-09-03"
}
-
在 app.component.ts 中注入 HttpClient service
import { Component, OnInit } from '@angular/core'; import { HttpClient } from '@angular/common/http'; @Component({ selector: 'app-root', templateUrl: './app.component.html', styleUrls: ['./app.component.css'] }) export class AppComponent implements OnInit { heros!: any; constructor(private http: HttpClient) {} ngOnInit() { } } -
接着在 app.component.ts 的
ngOnInit()中使用 get 获取数据,这边我是有建一个 server,如果不想建的话也可以跟官方文档一样把假数据放在专案的别的位置import { Component, OnInit } from '@angular/core'; import { HttpClient } from '@angular/common/http'; @Component({ selector: 'app-root', templateUrl: './app.component.html', styleUrls: ['./app.component.css'] }) export class AppComponent implements OnInit { heros!: any; constructor(private http: HttpClient) {} ngOnInit() { this.http.get('http://localhost:3000/heros').subscribe((res: any) => { this.heros = res[0]; }); } } -
接着在 template 中把获得的数据显示在上面
<div class="content">
  <h4>HeroUrl: {{heros.herosUrl}}</h4>
  <h4>textFile: {{heros.textFile}}</h4>
  <h4>date: {{heros.date}}</h4>
</div>
Requesting a typed response
可以构造 HttpClient request 来声明获得的 reponse 数据类型,可以更好的对获得的数据进行处理,收先先定义 responses 的资料型态
export interface Config {
  heroesUrl: string;
  textfile: string;
  date: any;
}
将这个资料型态定义给 HttpClient.get()
ngOnInit() {
  this.http.get<Config[]>('http://localhost:3000/heros').subscribe((res) => {
    this.heros = res[0];
  });
}
Reading the full response
在前面的范例中没有设定 HttpClient.get() 的 option object,因为他预设就会获得 JSON 格式的资料,不过有时候 server 会返回特殊的 header 或状态用於指定某些特殊的条件,可以使用 observe 设定需要获取完整的数据
 ngOnInit() {
  this.http
    .get<Config[]>('http://localhost:3000/heros', { observe: 'response' })
    .subscribe((res) => {
      console.log(res);
    });
}
如果要获取完整数据的话,就会连 header, status.... 都会获得

Requesting non-JSON data
除了向上面一样 get 一组 JSON 型态的档案之外,还可以随着後端 server 回传的数据类型不同 get 的 option 进行操作,比如今天後端传递的是一个 string 类型的数据,如果不去设定 request 的 option 的话就会出错,因为预设你是会获得 JSON 格式的数据但实际上拿到的却是 String,这时就需要更改 option
this.http
  .get('http://localhost:3000/heroName', { responseType: 'text' })
  .subscribe((res) => console.log(res));
将 responseType 更改为 text 代表获得的 responses 会是 string 形式。
Handling request errors
向 server 发送 request 的行为一定不会每一次都成功,所以当 request 失败的话 HttpClient 将会返回一个 error object 而不是成功的 response,所以在我们撰写处理 response 的 method 时也应该要同时加入处理错误的动作,所以当发生错误时可以获得失败的原因,这一方面可以让我们开发者知道哪里出了问题,也可以通知使用者发生了错误而不是空白画面给他,甚至某些情况下还得再次发送 request 等等的错误处理。
Getting error details
当 request 数据失败的话,应用程序应该向使用者提供有用的反馈告入使用这发生了什麽事,是不是操作不当或是系统有问题等等,通常必较常会发生两种错误:
- Server 後端可能会拒绝 client 的 request,这时会返回带有
状态的代码( 404, 500... )的 HTTP response,这就是 error response - Client 端可能会出错,比如说阻止 request 完成的网路错误或 RxJS 抛出的错误,这属於前端的错误,这类型的错误状态会是
0,error obejct 的 property 会包含一个ProgressEvent,他可以提供更多的错误信息。
HttpClient 在其 HttpErrorResponse 中会捕获这两种错误,可以检查错误的原因,所以将刚刚的 get() 加上错误处理
this.http
  .get('http://localhost:3000/heros', { observe: 'response' })
  .pipe(
    catchError(this.handleError)
).subscribe((res: any) => this.heros = res.body[0])
handleError(error: HttpErrorResponse) {
  if (error.status === 0) {
    console.error('An error occurred', error.error);
  } else {
    console.error(`Back-end returned code ${error.status}, body was: ${error.error}`);
  }
  return throwError ('Something bad happened; Please try again later.')
}
Retrying a failed request
有时候遇到 response 错误只是暂时的,可以再试一次说不定就会恢复正常,例如网路中断就会导致 request 失败,但是一但网路回归正常後便可以再次 request,这时就可以使用 RxJS 提供的重试操作符 retry() 将会自动重新 request,次数可以随意设定
this.http
  .get('http://localhost:3000/heros', { observe: 'response' })
  .pipe(
    catchError(this.handleError),
    retry(3)
).subscribe((res: any) => this.heros = res.body[0])
Sending data to a server
除了从 server 获得数据之外,HttpClinet 还支持其他 HTTP method,比如 PUT, POST 和 DELETE,可以使用它们来修改 server 的数据,下面将会做一个 Todo 的范例,UI 会填入代办事项并将待办事项写入 server 中,也可以对他进行更改与删除。
Post todo data to server
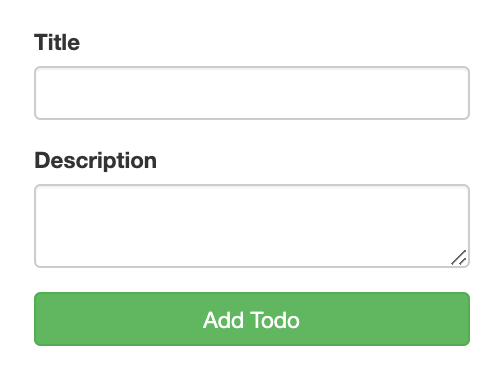
第一步要建立一个 Todo 的画面并将在画面中输入的内容利用 HttpClient.post 传递给 server
-
首先利用 Angular CLI 创建一个 component
ng generate component todo-form -
在 todo-form.component.ts 中建立 todo 的 form model(记得要在 AppModule 中添加
ReactiveFormsModule喔)import { Component, OnInit } from '@angular/core'; import { FormBuilder, Validators } from '@angular/forms'; @Component({ selector: 'app-todo-form', templateUrl: './todo-form.component.html', styleUrls: ['./todo-form.component.css'] }) export class TodoFormComponent implements OnInit { myForm = this.fb.group({ title: ['', Validators.required], description: ['', Validators.required] }) constructor(private fb: FormBuilder) { } ngOnInit(): void {} } -
接着在 todo-form.component.html 中添加输入元件并绑定 FormControl
<form [formGroup]="myForm" (submit)="onSubmit()">
  <div class="input-area">
    <label for="title">Title </label>
    <input
      id="name"
      type="text"
      class="form-control"
      formControlName="title"
    />
  </div>
  <div class="input-area">
    <label for="description">Description </label>
    <textarea
      id="name"
      type="text"
      class="form-control"
      formControlName="description"
    ></textarea>
  </div>

  <button class="btn btn-success" type="submit">Add Todo</button>
</form>
-
在 todo-form.component.ts 中注入 HttpClient 并新增 post methdo
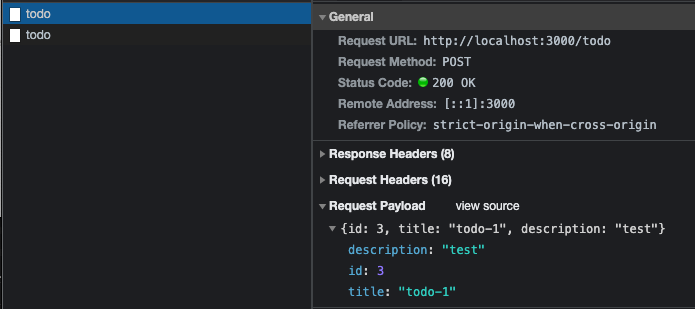
import { Component, OnInit } from '@angular/core';
import { FormBuilder, Validators } from '@angular/forms';
import { HttpClient, HttpHeaders } from '@angular/common/http';

@Component({
  selector: 'app-todo-form',
  templateUrl: './todo-form.component.html',
  styleUrls: ['./todo-form.component.css']
})
export class TodoFormComponent implements OnInit {
  myForm = this.fb.group({
    title: ['', Validators.required],
    description: ['', Validators.required]
  })
  id = 0;
  httpOptions = {
    headers: new HttpHeaders({
      'Access-Control-Allow-Origin': '*',
      'Content-Type': 'application/json'
    }),
  };

  constructor(private fb: FormBuilder, private http: HttpClient) { }

  ngOnInit(): void {}

  onSubmit() {
    const body = {
      id: this.id,
      title: this.myForm.value.title,
      description: this.myForm.value.description
    }

    this.http
      .post('http://localhost:3000/todo', body, this.httpOptions)
      .subscribe((todo: any) => this.todoList = todo);

    this.id++;
  }
}
在 onSubmit() 中添加
HttpClient.postmethod,将 Todo 中的数据传递给 Server,这边新增了一个 propertyid,用於後面要指定更改或删除哪一个 todo item,现在点击画面中的 Add todo 不会有任何动作,不过可以打开浏览器的 Network 确实可以看到有一个 POST 的 method。
Get todo list from server
要确认是否确实有将数据传送给 server,可以使用上面介绍的 HttpClient.get method 取得 todo 的资料
-
在 todo-form.component.ts 中的 OnInit() 中使用 HttpClient.get 获得数据
import { Component, OnInit } from '@angular/core'; import { FormBuilder, Validators } from '@angular/forms'; import { HttpClient, HttpHeaders } from '@angular/common/http'; @Component({ selector: 'app-todo-form', templateUrl: './todo-form.component.html', styleUrls: ['./todo-form.component.css'] }) export class TodoFormComponent implements OnInit { todoList: any[] = []; // (1) constructor(private fb: FormBuilder, private http: HttpClient) { } ngOnInit(): void { this.http.get('http://localhost:3000/todo').subscribe((todo: any) => { this.todoList = todo; // (2) }) } // ... }- (1): 新增一个 property 用於存放从 server 获得的数据
- (2): 在 ngOnInit 中使用 HttpClient.get 获得 server 数据并存放在 todoList 中
-
使用 Angular CLI 创建一个 component 用於显示获得的 todo 数据
ng generate component todo-list -
在 todo-list.component.ts 中使用
@Input()装饰 property 代表从父层传递的数据import { Component, Input } from '@angular/core'; @Component({ selector: 'app-todo-list', templateUrl: './todo-list.component.html', styleUrls: ['./todo-list.component.css'] }) export class TodoListComponent { @Input() todoList: any; constructor() { } } -
在 todo-list.component.html 中把获得的 todo 数据显示在画面中
<div *ngFor="let todo of todoList" class="todo-content">
    <div class="todo-item">
        <div class="title">Title: {{ todo.title }}</div>
        <div class="desc">Description: {{ todo.description }}</div>
    </div>
    <div class="optionBtn">
        <button type="button" class="btn btn-success">E</button>
        <button type="button" class="btn btn-danger">X</button>
    </div>
</div>
这边先新增了两个
<button>用於对单一 todo item 进行删除或更改 -
在 todo-form.component.html 中使用 todo-list 的 select 并使用 property binding 绑定 todo 数据
<div class="todo-list">
  <app-todo-list [todoList]="todoList"></app-todo-list>
</div>

Delete todo item
在画面中可以顺利看到传递给 server 的数据後,接着要对这些数据进行删除
-
将 todo-list.component.ts 中新增一个
@Output用於将点击删除事件传递给父层,这边我的设计是将所有 http 动作都放在同一个 component 中import { Component, Input, Output, EventEmitter } from '@angular/core'; @Component({ selector: 'app-todo-list', templateUrl: './todo-list.component.html', styleUrls: ['./todo-list.component.css'] }) export class TodoListComponent { @Input() todoList: any; @Output() deleteEvent = new EventEmitter<number>(); constructor() { } onDelete(todoItem: any) { this.deleteEvent.emit(todoItem.id); } }这边向父层传递被选中的 todo item 的 id,用於删除指定 id 的数据
-
在 todo-form.component.ts 中新增 onDelete() method 用於调用
HttpClient.deletemethodimport { Component, OnInit } from '@angular/core'; import { FormBuilder, Validators } from '@angular/forms'; import { HttpClient, HttpHeaders } from '@angular/common/http'; @Component({ selector: 'app-todo-form', templateUrl: './todo-form.component.html', styleUrls: ['./todo-form.component.css'] }) export class TodoFormComponent implements OnInit { httpOptions = { headers: new HttpHeaders({ 'Access-Control-Allow-Origin': '*', 'Content-Type': 'application/json' }), }; constructor(private fb: FormBuilder, private http: HttpClient) { } // ... onDelete(id: number) { this.http .delete(`http://localhost:3000/todo/${id}`, this.httpOptions) .subscribe((todo: any) => this.todoList = todo); } // ... }将被选中的 todo item 的 id 做为参数加在 url 上,让 server 端可以获得指定的 Id 并对删除指定的 todo item。
-
在 todo-form.component.html 中绑定
@Output()事件<div class="todo-list"> <app-todo-list [todoList]="todoList" (deleteEvent)="onDelete($event)" ></app-todo-list> </div>

Put todo data to update server
完成删除功能後,接着要利用 HttpClient.put method 更改 server 中的 todo 数据,不过要做到这一点首先要先建立一个画面,用来显示目前的 todo 内容,对他的内容更改後才能送出 PUT 更新 server 中的数据
-
利用 Angular CLI 创建一个 component 用於显示被选中的 todo item 内容
ng generate component edit-panel -
在 edit-panel.component.ts 中建立 Todo 的 form model
import { Component, OnInit, Input } from '@angular/core'; import { FormBuilder, Validators } from '@angular/forms'; @Component({ selector: 'app-edit-panel', templateUrl: './edit-panel.component.html', styleUrls: ['./edit-panel.component.css'] }) export class EditPanelComponent implements OnInit { myForm = this.fb.group({ id: [''], title: ['', Validators.required], description: ['', Validators.required] }) constructor(private fb: FormBuilder) { } ngOnInit(): void {} } -
在 todo-list.component.ts 中建立 onEdit() method,他和 onDelete() 一样传递被选中的 Todo id 给父层
import { Component, Input, Output, EventEmitter } from '@angular/core'; @Component({ selector: 'app-todo-list', templateUrl: './todo-list.component.html', styleUrls: ['./todo-list.component.css'] }) export class TodoListComponent { @Input() todoList: any; @Output() openPanelEvent = new EventEmitter<number>(); constructor() { } //... onEdit(todoItem: any) { this.openPanelEvent.emit(todoItem.id); } } -
在 todo-form.component.ts 中建立 onOpenEditPanel() method,这边使用
HttpClient.get获取被选中的 todo item 数据,这边多加入一个 property 用於决定是否开启 edit-panel 画面import { Component, OnInit } from '@angular/core'; import { FormBuilder, Validators } from '@angular/forms'; import { HttpClient, HttpHeaders } from '@angular/common/http'; @Component({ selector: 'app-todo-form', templateUrl: './todo-form.component.html', styleUrls: ['./todo-form.component.css'] }) export class TodoFormComponent implements OnInit { todoItem: any; // (1) isEditPanelOpen = false; // (2) constructor(private fb: FormBuilder, private http: HttpClient) { } // ... onOpenEditPanel(id: number) { // (3) this.http.get(`http://localhost:3000/todo/${id}`) .subscribe((todo: any) => { this.todoItem = todo; this.isEditPanelOpen = true; }); } }- (1): 新增一个 property 用於获得指定的 todo item 数据
- (2): 新增一个 property 用於决定是否开启 edit-panel 画面
- (3): 新增一个 method 用於调用
HttpClient.get,这边和 delete 一样将 id 传递给 url 做为参数,server 会利用 url 的参数回传指定 id 的数据
这边记得要在 todo-form.component.html 中将 Output event 绑定
<div class="todo-list"> <app-todo-list [todoList]="todoList" (deleteEvent)="onDelete($event)" (openPanelEvent)="onOpenEditPanel($event)" ></app-todo-list> </div> -
将获得的 todo 数据透过 property binding 绑定给 edit-panel
<div *ngIf="isEditPanelOpen && todoItem" class="edit-panel">
    <app-edit-panel [todoItem]="todoItem"></app-edit-panel>
</div>
这边加上
*ngIf只有在 isEditPanelOpen 为 true 和 todoItem 有数据时才会显示画面 -
由於需要将被选中的 todo 数据显示在画面中,所以要在 edit-panel.component.ts 的 ngOnInit() 中使用
setValue设定表单的预设值import { Component, OnInit, Input, Output, EventEmitter } from '@angular/core'; import { FormBuilder, Validators } from '@angular/forms'; @Component({ selector: 'app-edit-panel', templateUrl: './edit-panel.component.html', styleUrls: ['./edit-panel.component.css'] }) export class EditPanelComponent implements OnInit { @Input() todoItem: any; constructor(private fb: FormBuilder) { } ngOnInit(): void { this.myForm.setValue(this.todoItem); } }

-
和 delete 一样在 edit-panel.component.ts 中利用
Output()将更改後的数据传递给父层import { Component, OnInit, Input, Output, EventEmitter } from '@angular/core'; import { FormBuilder, Validators } from '@angular/forms'; @Component({ selector: 'app-edit-panel', templateUrl: './edit-panel.component.html', styleUrls: ['./edit-panel.component.css'] }) export class EditPanelComponent implements OnInit { @Output() editEvent = new EventEmitter<any>(); constructor(private fb: FormBuilder) { } // ... onSubmit() { this.editEvent.emit(this.myForm.value); } } -
在 todo-form.component.ts 中新增一个 method 用於调用
HttpClient.put将更新的数据传递给 server 更新数据import { Component, OnInit } from '@angular/core'; import { FormBuilder, Validators } from '@angular/forms'; import { HttpClient, HttpHeaders } from '@angular/common/http'; @Component({ selector: 'app-todo-form', templateUrl: './todo-form.component.html', styleUrls: ['./todo-form.component.css'] }) export class TodoFormComponent implements OnInit { isEditPanelOpen = false; constructor(private fb: FormBuilder, private http: HttpClient) { } // ... onEdit(todoItem: any) { this.http.put(`http://localhost:3000/todo/${todoItem.id}`, todoItem, this.httpOptions) .subscribe((todo: any) => { this.todoList = todo; this.isEditPanelOpen = false; }); } }这边和 delete 一样将 id 传递给 url 做为参数,server 会利用 url 的参数更改指定的数据内容

结论
本章介绍了基本的 HTTP 概念与 HTTP method 这是 client 与 server 沟通的方法,可以使用 get 从 server 端获得数据、可以使用 post 将 client 端的数据传给 server、可以使用 delete 删除 server 的数据也可以使用 Put 更改 server 的数据。
最後介绍了如何利用 Angular 提供的 HttpClient 达成上面提到的所有功能,由於上面提到的范例与官方文档的不一样,我是自己写 back-end server,所以有些地方可能会比较复杂,如果有看不懂的问题可以在下面留言问我喔!
Angular 的 HTTP 因为篇章也比较长,所以也会拆成两部分讲解,所以明天还会介绍 Angular Http 的一些其他功能与细节,那就明天见吧!
Reference
- Angular.io - Communicating with backend services using HTTP
- An overview of HTTP
- HTTP request methods
<<: 用React刻自己的投资Dashboard Day18 - 选单列active style功能
>>: Day 18:为你的 Hexo 部落格文章添加文章字数与所需阅读时间
Day 25 - redux-saga 文件范例
Q_Q 没学完啦 Redux-saga 范例 import { createStore, appl...
Proxmox VE 帐号管理及权限指派
Proxmox VE 平台功能丰富,随着建立的客体机服务越来越多,组织成长後势必需要进行分工管理,...
解决宝塔强制绑定账号
现在新版本的宝塔面板强制绑定宝塔官网账号,否则就无法继续使用面板。 临时的解决办法就是我们在URL目...
Day28 - Java常见面试考题
过去我面试了不少公司的软件工程师职位,涵盖前端、後端,所以今天以Java相关职缺中常考的面试考题作为...
[Day16]-应用模组
建立自己的函数与类别模组,两者应用都差不多,所以一起讲 先建立自己的函数与类别 导入模组 结果 随...