Microsoft Azure Machine Learning - Day 3
Chap.I Practical drill 实战演练
以下内容来自这里
Prat4. Run Experiments 执行实验
此处将会练习使用 Azure 内建的笔记本功能,来编写上篇提到的 Experiments、Script & ML flow (内容来自这里)
从处理资料、建模到预测,我们把这个作业流程称作一次实验(Experiment)。
Azure 机器学习中,一次实验常搭配脚本(Script)或管道(Pipeline)来输出,及记录实验结果。
本篇将使用 Azure 机器学习 SDK 来运行 Python 代码作为实验。
4-0. 下载笔记本资料
在 Jupyter notebook 环境中,创建一个新的终端机,输入以下指令:
git clone https://github.com/MicrosoftLearning/mslearn-dp100 mslearn-dp100
即可下载以下所有笔记本内容。
4-1. 验证是否已安装 Azure 机器学习 SDK
我们必须先检查当前环境的 SDK 版本。
在 Jupyter notebook 环境中,创建一个新的终端机,并分别输入以下指令:
pip show azureml-sdk

pip show azureml-widgets

理论上,Azure Notebook 预设是有安装这两个套件的。
4-2. 创建并执行一个内联实验(Inline Experiment)
直接在环境中创建并执行实验,称为内联实验。
import azureml.core
from azureml.core import Workspace, Experiment
import pandas as pd
import matplotlib.pyplot as plt

# 从保存的配置文件加载工作区
ws = Workspace.from_config()

# 重要 Experiment():创建(或呼叫)workspace 中的某个实验
experiment = Experiment(workspace=ws, name="mslearn-designer-predict-diabetes")

# 重要 start_logging():将实验过程讯息全纪录下
run = experiment.start_logging()
print("Starting experiment:", experiment.name)

data = pd.read_csv('data/diabetes.csv')
row_count = (len(data))

# 重要 run.log():写入工作日志档 run.log
# 'observations' 表示观察值,row_count 则是总共纪录多少笔资料
run.log('observations', row_count)
print(f'Analyzing {row_count} rows of data')

# 记录数字列的汇总统计信息
med_columns = ['PlasmaGlucose', 'DiastolicBloodPressure', 'TricepsThickness', 'SerumInsulin', 'BMI']
summary_stats = data[med_columns].describe().to_dict()
for col in summary_stats:
    keys = list(summary_stats[col].keys())
    values = list(summary_stats[col].values())
    for index in range(len(keys)):
        run.log_row(col, stat=keys[index], value = values[index])

# 抽样抽 100 笔,写进新的 csv 档案,放进容器内
data.sample(100).to_csv('sample.csv', index=False, header=True)

# 重要 run.upload_file():保存结果或更新 file 到云端机台
run.upload_file(name='outputs/sample.csv', path_or_stream='./sample.csv')

# 重要 run.complete():结束执行
run.complete()
>>  Starting experiment: mslearn-designer-predict-diabetes
    Analyzing 10000 rows of data
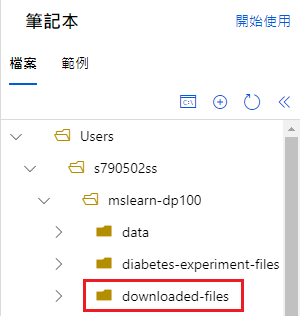
使用 download_file 方法单独下载实验生成的文件
import os

download_folder = 'downloaded-files'

# Download files in the "outputs" folder
run.download_files(prefix='outputs', output_directory=download_folder)

# Verify the files have been downloaded
for root, directories, filenames in os.walk(download_folder):
    for filename in filenames:
        print (os.path.join(root,filename))
4-3. 创建并执行实验脚本(Experiment Script)
在 4-2. 范例中,我们在笔记本中执行了一次内联实验。
实际上,更常使用的方法是为实验创建一个脚本,将实验所需的所有资料一起存储在资料夹中,并让 Azure ML 根据资料夹中的脚本运行试验。
建立一个资料夹,复制所有数据到里面
import os, shutil

# 创建一个资料夹
folder_name = 'diabetes-experiment-files'
experiment_folder = './' + folder_name
os.makedirs(folder_name, exist_ok=True)

# Copy 档案
shutil.copy('data/diabetes.csv', os.path.join(folder_name, "diabetes.csv"))
建立一个脚本(这边尚未呼叫,所以并不会执行)
%%writefile $folder_name/diabetes_experiment.py
# 上面魔术字串意义是:将所有下面内容写入 diabetes_experiment.py

from azureml.core import Run
import pandas as pd
import os

# 重要 Run.get_context():会检索脚本所在的文件夹加载糖尿病数据
run = Run.get_context()

# Load Data
data = pd.read_csv('diabetes.csv')

# 算总共有几个 row
row_count = (len(data))

# 重要 run.log():写入工作日志档 run.log
# 'observations' 表示观察值,row_count 则是总共纪录多少笔资料
run.log('observations', row_count)
print('Analyzing {} rows of data'.format(row_count))

# 计算并记录标签计数
diabetic_counts = data['Diabetic'].value_counts()
print(diabetic_counts)
for k, v in diabetic_counts.items():
    run.log('Label:' + str(k), v)

# 在输出文件夹中保存数据样本(自动上传)
os.makedirs('outputs', exist_ok=True)
# 抽样抽 100 笔,写进新的 csv 档案,放进容器内
data.sample(100).to_csv("outputs/sample.csv", index=False, header=True)

# 重要 run.complete():结束执行
run.complete()
真正执行脚本
要运行脚本,须创建一个 ScriptRunConfig 来标识要在实验中运行的 Python 脚本,用它去运行实验。
from azureml.core import Experiment, ScriptRunConfig, Environment
from azureml.widgets import RunDetails

# 指定 Python 的实验环境
env = Environment.from_conda_specification("experiment_env", "environment.yml")

# 重要 ScriptRunConfig():定义实验脚本的运行参数
script_config = ScriptRunConfig(
    source_directory=experiment_folder,

    # 把 diabetes_experiment.py 内容载入
    script='diabetes_experiment.py',

    # 虚拟机器环境
    environment=env
)

# 提交实验
experiment = Experiment(workspace=ws, name='mslearn-designer-predict-diabetes')
run = experiment.submit(config=script_config)
RunDetails(run).show()

# 等待跑完要下此指令,否则还没跑完会往下个跑
run.wait_for_completion()
查看实验运行时的资料
- 使用 get_details_with_logs 方法,该输出将包含日志数据。(不建议使用)
run.get_details_with_logs()
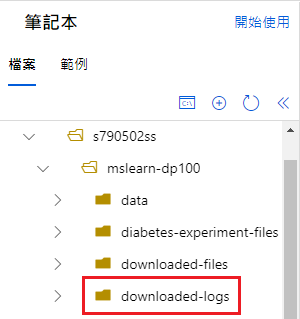
- 下载日志文件,并在编辑器中查看它们。(建议使用)
import os

log_folder = 'downloaded-logs'

# Download all files
run.get_all_logs(destination=log_folder)

# Verify the files have been downloaded
for root, directories, filenames in os.walk(log_folder):
    for filename in filenames:
        print (os.path.join(root,filename))
4-4. ML flow
MLflow 是一个用於管理机器学习过程的平台。
它通常(但不限於)在 Databricks 环境中用於协调实验和跟踪指标。
在 Azure 机器学习实验中,可使用 MLflow 追踪指标,去替代本机的日志功能。
白话文就是,ML flow 会将实验内容与结果转化为一个流程,以便在端点上执行计算。
确认版本
!pip show azureml-mlflow
Output:
>>  Name: azureml-mlflow
    Version: 1.37.0
    Summary: Contains the integration code of AzureML with Mlflow.
    Home-page: https://docs.microsoft.com/python/api/overview/azure/ml/?view=azure-ml-py
    Author: Microsoft Corp
    Author-email: None
    License: Proprietary https://aka.ms/azureml-preview-sdk-license
    Location: /anaconda/envs/azureml_py36/lib/python3.6/site-packages
    Requires: jsonpickle, mlflow-skinny, azureml-core
    Required-by: azureml-train-automl-runtime
4-5. Use MLflow w/ Inline Experiment
要使用 MLflow 追踪内联实验的指标,须将「MLflow tracking URI」设置到运行实验的 workspace。
这使您能够使用 mlflow tracking 方法,将实验运行中的数据记录下来。
MLflow
from azureml.core import Experiment
import pandas as pd
import mlflow

# 重要 mlflow.set_tracking_uri():将「MLflow tracking URI」设置到 workspace
mlflow.set_tracking_uri(ws.get_mlflow_tracking_uri())

# 重要 Experiment():创建(或呼叫)workspace 中的某个实验
experiment = Experiment(workspace=ws, name='mslearn-designer-predict-diabetes')
mlflow.set_experiment(experiment.name)

# 重要 with mlflow.start_run():开始 MLflow 实验
with mlflow.start_run():

    # 印出实验名称
    print("Starting experiment:", experiment.name)

    # Load data
    data = pd.read_csv('data/diabetes.csv')

    # 计算 row 数量与纪录结果
    row_count = (len(data))
    mlflow.log_metric('observations', row_count)
    print("Run complete")
Output:
>>  Starting experiment: mslearn-designer-predict-diabetes
    Run complete
获取最新运行的实验纪录
# 获取最新运行的实验
run = list(experiment.get_runs())[0]

# 获取记录的指标
print("\nMetrics:")
metrics = run.get_metrics()
for key in metrics.keys():
        print(key, metrics.get(key))

# 获取指向 Azure ML 工作室中的实验的链接
experiment_url = experiment.get_portal_url()
print('See details at', experiment_url)
Output:
Metrics:
observations 10000.0
See details at https://ml.azure.com/experiments/id/be0ba982-962a-4dc3-a2f3-5c6a86dfb86f?wsid=/subscriptions/f9c05b3c-0e46-4abd-bede-f7602a17903d/resourcegroups/rg1/workspaces/ws1&tid=f2ca3e4f-4773-4ef4-bcd0-bac34ac841e8
4-6. Use MLflow w/ Experiment Script
最後,我们还可以结合上述 Experiment Script 与 MLflow 两者来使用。
创建资料夹与复制档案
import os, shutil

# 创建资料夹
folder_name = 'mlflow-experiment-files'
experiment_folder = './' + folder_name
os.makedirs(folder_name, exist_ok=True)

# Copy 档案
shutil.copy('data/diabetes.csv', os.path.join(folder_name, "diabetes.csv"))
MLflow
%%writefile $folder_name/mlflow_diabetes.py
# 上面魔术字串意义是:将所有下面内容写入 mlflow_diabetes.py

from azureml.core import Run
import pandas as pd
import mlflow

# 重要 with mlflow.start_run():开始 MLflow 实验
with mlflow.start_run():

    # Load data
    data = pd.read_csv('diabetes.csv')

    # 计算 row 数量与纪录结果
    row_count = (len(data))
    print('observations:', row_count)
    mlflow.log_metric('observations', row_count)
Output:
Writing mlflow-experiment-files/mlflow_diabetes.py
Experiment Script
在 Azure ML 实验脚本中使用 MLflow tracking 时,MLflow tracking URI 会在开始运行实验时自动设置。
但是,要运行脚本的环境须包含所需的 mlflow package。
# 要运行脚本,须创建一个 ScriptRunConfig 来标识要在实验中运行的 Python 脚本,用它去运行实验。
from azureml.core import Experiment, ScriptRunConfig, Environment
from azureml.widgets import RunDetails

# 指定 Python 的实验环境
env = Environment.from_conda_specification("experiment_env", "environment.yml")

# 重要 ScriptRunConfig():定义实验脚本的运行参数
script_mlflow = ScriptRunConfig(
    source_directory=experiment_folder,

    # 把 mlflow_diabetes.py 内容载入
    script='mlflow_diabetes.py',

    # 虚拟机器环境
    environment=env
    )

# 提交实验
experiment = Experiment(workspace=ws, name='mslearn-designer-predict-diabetes-0205')
run = experiment.submit(config=script_mlflow)
RunDetails(run).show()

# 等待跑完要下此指令,否则还没跑完会往下个跑
run.wait_for_completion()
获取 logged metrics
# Get logged metrics
metrics = run.get_metrics()
for key in metrics.keys():
        print(key, metrics.get(key))
Output:
>> observations 10000.0
[前端暴龙机,Vue2.x 进化 Vue3 ] Day3.在认识vue之前(三)
终於~来到了在认识vue之前,我整理的最後一个部份了 会有在认识vue之前的这部份,主要是自己认为...
Day 46 (Node.js)
1.NPM版本 无须更新到最新,怕错误 2.制作专案package.json npm init np...
DAY29 把程序装到手机里吧
前面讲了那麽多,但都还没在真实的手机上实作,今天就来试试吧 首先先把手机开启开发者人员选项,也许每支...
学习Python纪录Day6 - String type和Container type的运算子
String type和Container type的运算子 连接运算子 重复运算子 成员运算子 关...
Day 28 Heroku Docker
跑范例环节 https://devcenter.heroku.com/articles/contai...