Day 15. slate × Interfaces × Iteration
JS 的 Iteration 在 Slate 里头占了不小的份量,即便有 Ref concepts 让我们得以追踪特定的 Location value ,在很多时候我们仍会需要透过『遍历』的方式去实现我们的功能。
在 interfaces/ 里提供的所有 method apis ,只要名称是『复数( s 结尾的那种 )』,有 87% 都是透过遍历的方式实作,而它们除了提供给开发者使用之外也很大幅度地被 Transforms 或 Operations 使用。
我们一样依照惯例先来介绍 JS 里与 Iteration 的先备知识後再回头介绍 Slate 是如何实作这件事的
Protocols
我们首先从 JS 的迭代协议介绍起,在 ES6 的补充内容中,共有两个针对迭代功能的协议,分别是:可迭代协议( Iterable protocol )、迭代器协议( Iterator protocol )
光是看名字实在很难分辨清楚这两个 protocols 到底有什麽差异,让我们依序来介绍它们。
-
可迭代协议( Iterable protocol )
这个协议用途是『定义有哪些 JS Object 是可以迭代的』,只有满足这项协议的 Objects 才能进入
for..ofstatement 的大门,迭代里头的 valuevar a = { first: 1, second: 2 } for (let i of a) { console.log('success', i) // Uncaught TypeError: a is not iterable } var b = [1, 2] for (let i of b) { console.log('success', i) // success 1 \n success 2 }附上
for...of在 MDN 上的解释:『 The for...of statement creates a loop iterating over iterable objects 』想一想其实也蛮合理的,如果没有这个协议提供给
for...of,它又该如何判断丢进来的 value 能不能做迭代呢?就算没有协议规范,上例的 code 里头的a也很明显不是一个能直接拿来迭代的 object 。理解这个协议的用途後,我们又应该如何实作出一个 iterable 的 object 呢?
我们可以从已经符合协议规范的 Array 中找到一些线索:
Array.prototype[Symbol.iterator]() // Array Iterator {}实作的方式就是在 object (或在原型链的原型物件)中实作一个拥有
@@iteratorkey 的 method ,而@@iterator就被存在 ES6 的Symbol.iterator的回传值中:var a = { ..., [Symbol.iterator]: ... // method implementation }丢入
for...ofstatement 以後它就会自动去搜寻@@iteratorkey 回传的 method 。还有另一个限制就是
@@iteratormethod 必须要回传一组符合下一个迭代器协议的 Iterator 。 -
迭代器协议( Iterator protocol )
这个协议定义了一个迭代器( Iterator )所应具备的内容。
一个符合规范的迭代器必须要具有
nextkey 的 method ,而它首先必须不能接受任何参数,另外它必须要回传一组至少拥有下方两个属性的物件:-
done (布林值)
-
true代表已迭代完毕整个序列,此时回传的 object 可以只包含done就好 -
false代表还没迭代完毕,迭代器仍能产出序列中的下一个值
-
-
value
当前回传的成员值。
只要符合规范,我们可以任意定义整组迭代器的内容,我们试着来实作看看
const iteratorEx = { start: 1, end: 3, [Symbol.iterator]() { this.current = this.start; return this; }, next() { if (this.current >= 1 && this.current <= 3) { return { done: false, value: this.current++ }; } return { done: true }; }, }; for (let num of iteratorEx) { console.log(num); // 1\n2\n3 }- 我们建立了一组同时符合 Iterable protocol 与 Iterator protocol 的
iteratorEx物件,将它丢进for...ofstatement 时它首先会找到并呼叫@@iteratorkey 的 method - 此时
@@iteratormethod 里头的 this 指向iteratorEx,建立currentkey 并将 value 指向start的位置并回传iteratorEx本身 - 执行
@@iteratormethod 回传的结果,也就是iteratorEx里头的nextmethod ,依照里面定义的逻辑去做迭代并输出结果。
-
关於迭代协议还有其他额外的使用方式,有兴趣的读者可以自行前往 MDN 查看,网路上也有许多相关的文章有做介绍,笔者就先不偏题太多了!
Protocols 规范好了,可以去客制化自己所需要的可迭代物件与迭代器确实不错,但总不能每次都让开发者去自定义,有个 Javascript 原生提供的工具才合理吧?!
接下来要介绍的 function* 与 Generator 正是为此而存在的。
Generator & function*
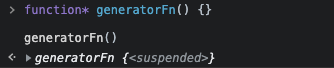
这两个也是在 ES6 同时推出的新内容,开发者在 function* 里头定义一组生成器函式( Generator function ),这组函式在呼叫後 『并不会执行函式内容更不会返回函式运算结果,而是回传一个生成器( Generator )物件』 。
下图为在 chrome 上的执行结果
生成器函式里提供了 yield keyword ,开发者可以透过它暂停函式的执行,并会将其右手边的表达式结果当作 Iterator protocol 中定义的 value 的值回传出去,而生成器物件同时符合了 Iterable protocol 以及 Iterator protocol 也因此在呼叫了生成器函式取得生成器物件後便拥有了 next method 可以使用:
function* generatorFn() {
	yield 'First Yielding!!';
	yield 'Second Yielding!!';
	yield 'Third Yielding!!';
}

var generator = generatorFn();
generatorFn().next(); // Object { value: 'First Yielding!!', done: false }
generatorFn().next(); // Object { value: 'Second Yielding!!', done: false }
generatorFn().next(); // Object { value: 'Third Yielding!!', done: false }
每执行一次 next method 就会重启一次函式的执行,直到遇到下一次的 yield keyword 回传结果,除非遇到:
-
returnkeyword 设value为右方表达式结果以及将done设为true - 执行到函式结束将
value设为undefined以及将done设为true。
也就是说 Generator function 是分段执行的,『 yield keyword 负责暂停与句的执行, next method 则会恢复函式的执行』。
除了 next method 以外它也提供 return 、 throw 等 methods 。
-
next除了重启函式的执行之外,如果传变数进去,则会成为当前重启的
yield表达式本身的回传结果:function* generatorFn() { let test = yield 'yield'; console.log('test-->', test); } var generator = generatorFn(); console.log(generator.next()); // Object { value: 'yield', done: false } console.log(generator.next('testing!!')); // test-->testing!! \n Object { value: undefined, done: true } -
return直接返回提供给 method 的参数内容作为
value并设done为true,并且不会接着继续执行 Generator function 内容:function* generatorFn() { let test = yield 'yield'; console.log('test-->n', test); } var generator = generatorFn(); console.log(generator.next()); // Object { value: 'yield', done: false } console.log(generator.return('return value')); // Object { value: 'return value', done: true } -
throw用於向 Generator 内部抛出 Error :
function* generatorFn() {
  while(true) {
    try {
       yield 42;
    } catch(e) {
      console.log("Error caught!");
    }
  }
}

var generator = generatorFn();
generator.next(); // { value: 42, done: false }
generator.throw(new Error()); // "Error caught!"
以上就是对 JS Iteration 的事前介绍,读者也可以前往 MDN 查看里头的介绍,这里再另外提供一些资源给读者:
紧接着就到 slate 里头是如何搭配 Iteration 去实作遍历功能的。
*Entry type
只要是与遍历相关的功能, slate 都是透过 generator 以及 for...of statement 来实作的,它同时定义了几组 Entry types 作为透过 Generator 执行遍历功能时 yield keyword 回传的 type ,分别是 NodeEntry 、 ElementEntry 、 PointEntry ,例如当 Generator 要透过 yield 回传 element value 时, slate 会选择回传 ElementEntry 而非 Element type
export interface NodeInterface {
	elements: (
    root: Node,
    options?: {
      from?: Path
      to?: Path
      reverse?: boolean
      pass?: (node: NodeEntry) => boolean
    }
  ) => Generator<ElementEntry, void, undefined>
}
来看一下这三种 Entry types 的 type 是怎麽被定义的吧!首先从 NodeEntry 与 ElementEntry 开始:
/**
 * `NodeEntry` objects are returned when iterating over the nodes in a Slate
 * document tree. They consist of the node and its `Path` relative to the root
 * node in the document.
 */

export type NodeEntry<T extends Node = Node> = [T, Path]

/**
 * `ElementEntry` objects refer to an `Element` and the `Path` where it can be
 * found inside a root node.
 */

export type ElementEntry = [Element, Path]
这两组 Entry types 本质跟用法上都是相似的,差别就只是在 NodeEntry 的使用范围比较广而 ElementEntry 仅限缩在 element 的上,笔者大多时候都是使用 NodeEntry 来做遍历,然後在搭配 match method option 与 statement control 去处理不同 type 的情境。
match method 可以在许多 method apis ,包含 Transform methods 以及 Operations 里看到它被放在 options 里面,随便拿一个 transforms/node.ts 里的 insertNodes 当作范例:
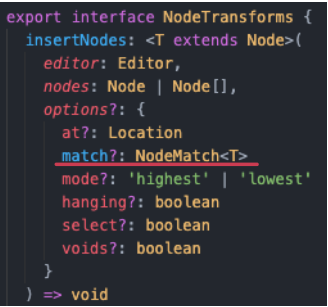
搭配着 NodeMatch type 的它,用途就是提供给开发者一个 narrow Node type 的 helper method ,来看一下 NodeMatch type 里面的定义就会非常清楚了:
/**
 * A helper type for narrowing matched nodes with a predicate.
 */

export type NodeMatch<T extends Node> =
  | ((node: Node, path: Path) => node is T)
  | ((node: Node, path: Path) => boolean)
接着是最後的 PointEntry ,它的用途就很限缩了,作者留给它的 comment 介绍就说明的非常直白了:它就是拿来 Iterate 一组 range 里头的 anchor 与 focus value
/**
 * `PointEntry` objects are returned when iterating over `Point` objects that
 * belong to a range.
 */

export type PointEntry = [Point, 'anchor' | 'focus']
在 slate 里仅有 interfaces/range 里头的 points method api 使用到 PointEntry 而已,其实它就是去实作 PointEntry 的 comment 描述的功能而已:
/**
 * Iterate through all of the point entries in a range.
 */

*points(range: Range): Generator<PointEntry, void, undefined> {
  yield [range.anchor, 'anchor']
  yield [range.focus, 'focus']
},
来做个统整刷刷存在感好了,今天都没有我出场的机会。
今天首先从 JS Iterate 的 Protocols 开始介绍起,解释了Iterable protocol与Iterator protocol之间的差异更了解如何实作出一组同时符合者两个 Protocols 的JS Object。
接着轮到了 Generator ,我们探讨了yield这个 keyword 的使用方式以及 Generator 提供的各种 methods 的使用情境。
最後轮到了各种 Entry types 的介绍,再顺便了解matchoption method 搭配NodeMatchtype 的作用。
紧接着下一篇就要为 Interface 这个章节收尾了!
下一篇要探讨的主题是 slate 的 Custom type ,在准备这篇的内容时笔者是非常兴奋,最後也获益良多的!因为它主要的 code 只有短短不到 10 行而已,却独自包揽了 slate 所有的 custom types 定义的功能,真的非常之厉害!
我们也会从它的历史小故事开始介绍起,明天再见吧~
<<: Day 15 - React: setState 计数器之二
[D02] 数位影像的基本介绍(2)
经过上一篇的介绍,相信大家对影像有基本的了解了! 接下来要介绍影像的色彩 ~ 常见的是三原色光模式(...
【Day 07】领域驱动设计的战术设计(Tactical Design)
前言 上一篇我们讨论DDD的战略设计,说明系统范围如何切割成多个领域(Domain)、子领域(Sub...
【Day8】 Introduction – while & for
紧接着,我们就要来介绍 while、for 回圈啦!但是在介绍之前,要先提到一些基本但常用的运算子。...
Day15 - BMI计算机
BMI(身体质量指数)是用自己身高、体重的比例,来当作是否过胖的「身高体重指数」 它的计算方法也很简...
NNI安装後的验证01
上回我们安装完成後,如何确认安装的正确性呢?当然是下载实验样本来炸炸看。 首先,请先建一个子目录。 ...