[神经机器翻译理论与实作] Google Translate的神奇武器- Seq2Seq (III)
前言
今天继续我们未完成的建模大业吧!
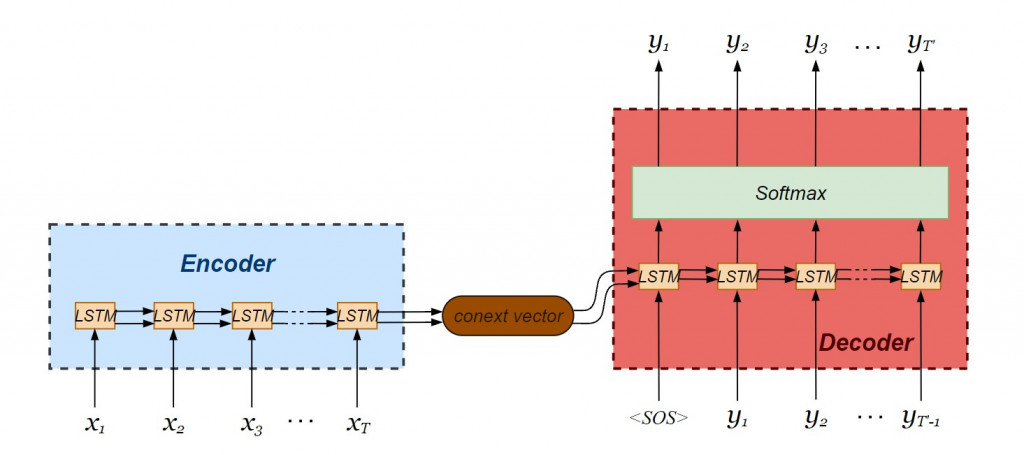
我们要建立的seq2seq模型由LSTM编码器与解码器串接而成:
写一个简单的seq2seq网络吧-续
我们使用 Keras API 进行建模。值得注意的是,值得注意的是 keras API 已经被整合进 tensorflow 框架当中,因此不建议直接引入 Keras ,而是从 tensorflow 中引入 Keras:
from tensorflow import keras as K
建立Encoder-Decoder模型
为了建立神经网络模型,我们引入 Keras API 中写好的单层神经元类别:
- Input :建立输入层物件,可以指定资料维度是「 批次处理资料笔数 × 单笔资料张量维度 」
- LSTM :单层 LSTM 细胞,可以指定 hidden state 与 cell state 向量之维度
- Dense :全连接层( fully connected layer, FC ),为了预测输出序列的每一个时间点最可能出现之单词向量
from tensorflow.keras.layers import Input, LSTM, Dense
from tensorflow.keras.models import Model
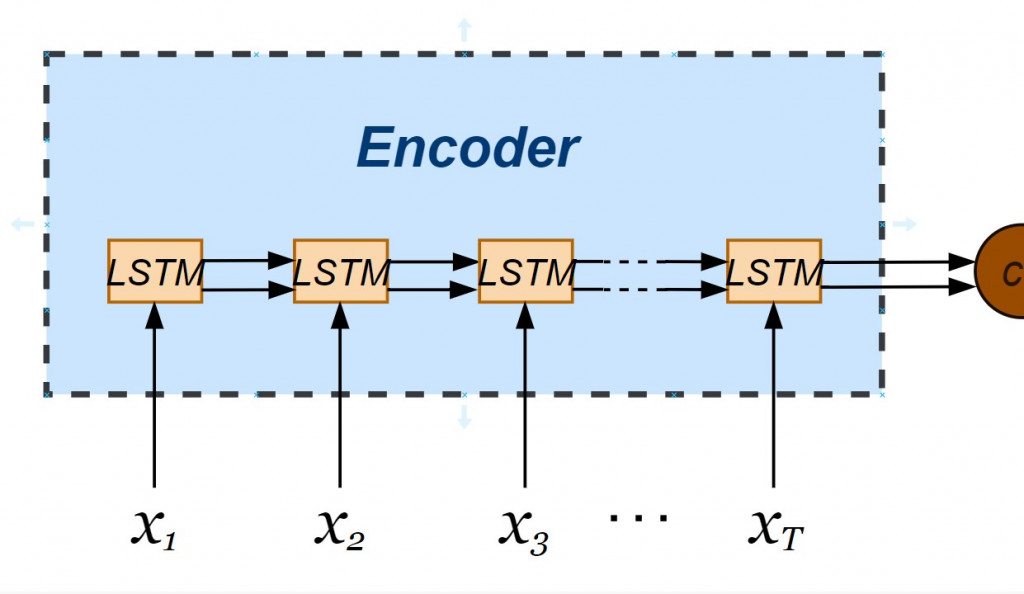
正式建立编码器罗!注意的是我们希望 seq2seq 神经网络能够一次处理多笔资料,指定了输入层资料张量维度以 None 最为开头,并接续单笔资料的维度(不重复 tokens 的总数)。我们也透过 LSTM 物件指定编码器内部 hidden state 与 cell state 皆为 256维向量,透过在实体化 LSTM 物件时设定 return_state = True 让两个内部状态依时间序传递於各个 LSTM 小单元。而编码器的输出值不会被接收,不需使用变数承接。
latent_dim = 256
# Build an encoder LSTM
encoder_inputs = Input(shape = (None, num_encoder_tokens))
encoder_lstm = LSTM(latent_dim, return_state = True)
# Discard encoder_outputs
_, state_hidden, state_cell = encoder_lstm(encoder_inputs)
encoder_states = [state_hidden, state_cell]
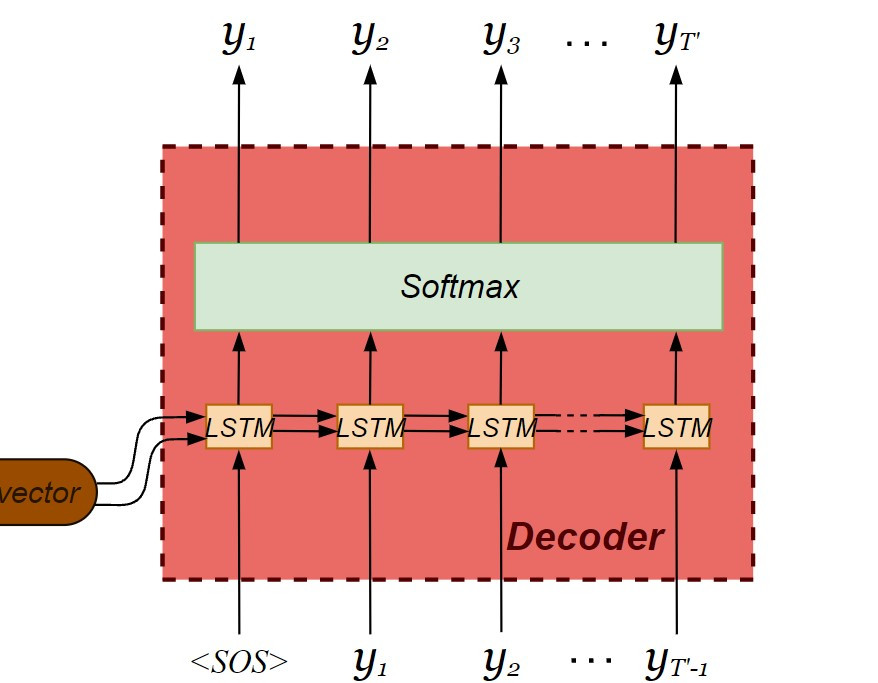
现在轮到解码器的建构了!这里要注意解码器的内部会回传前一个输出值,因此必须在实体化 LSTM 物件时加入 return_sequences = True 的设定。在解码器输出之前会经过激活函数( activation function ),将当下时间的输出分类到最可能出现的 token 。由於输出向量中每个 tokens 的栏位皆被分配机率,属於多类分类问题( multi-class classification ),我们采用 softmax 当作激活函数。
decoder_inputs = Input(shape = (None, num_decoder_tokens))
decoder_lstm = LSTM(latent_dim, return_sequences = True, return_state = True)
decoder_outputs, decoder_state_hidden, decoder_state_cell = decoder_lstm(decoder_inputs, initial_state = encoder_states)
decoder_dense = Dense(num_decoder_tokens, activation = "softmax")
decoder_outputs = decoder_dense(decoder_outputs)
并且利用 Model 类别串联建立好的编码器与解码器,注意 seq2seq 模型整体的输入分别为编码器的输入连同解码器的输入,整体的输出则为仅为解码器的输出。
由於翻译是多类分类问题,指定损失函数设定为 categorical_crossentropy ,找寻损失函数的梯度下降演算法为 Adam ,并且测量模型的精确度:
# Build a seq2seq model
my_seq2seq = Model([encoder_inputs, decoder_inputs], decoder_outputs, name = "seq2seq_Eng-Span_translator")
my_seq2seq.summary()
my_seq2seq.compile(
    optimizer = "adam",
    loss = "categorical_crossentropy",
    metrics = ["accuracy"]
)
模型学习
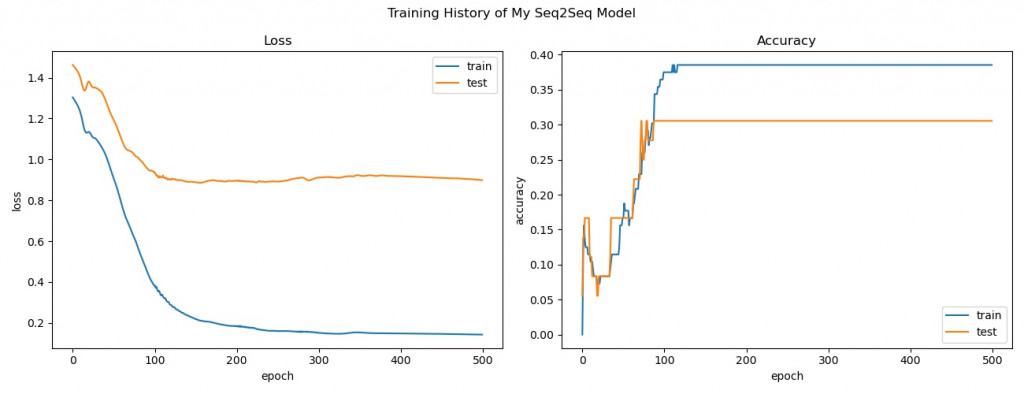
开始训练翻译器模型并回顾训练过程中损失函数及准确度的变化:
batch_size = 50
epochs = 500

# Start training with a GPU
with tf.device("/GPU:0"):
    start = time.time()
    train_hist =  my_seq2seq.fit(
                        x = [encoder_input_data, decoder_input_data],
                        y = decoder_target_data,
                        batch_size = batch_size,
                        epochs = epochs,
                        shuffle = True,
                        verbose = 1,
                        validation_split = 0.2
                        )

# Review training history
print("All history keys: {}".format(train_hist.history.keys()))
fig, axes = plt.subplots(1, 2, figsize = (13, 5))
fig.suptitle("Training History of My Seq2Seq Model")
plt.tight_layout()
axes[0].set_title("Loss")
axes[0].plot(train_hist.history["loss"], label = "train")
axes[0].plot(train_hist.history["val_loss"], label = "test")
axes[0].set_xlabel("epoch")
axes[0].set_ylabel("loss")
axes[0].legend(loc = "upper right")
axes[1].set_title("Accuracy")
axes[1].plot(train_hist.history["accuracy"], label = "train")
axes[1].plot(train_hist.history["val_accuracy"], label = "test")
axes[1].set_xlabel("epoch")
axes[1].set_ylabel("accuracy")
axes[1].legend(loc = "lower right")
plt.show()
测试翻译效果-模型推论过程
def translate_sentence(test_input):
# Encode the input as state vectors
encoder_states_value = encoder_model.predict(test_input)
# Set decoder states equal to encoder final states
decoder_states_value = encoder_states_value
# Generate empty target sequence of length 1
# (batch size, number of tokens to start with, number of tokens in our target vocabulary)
target_seq = np.zeros((1, 1, num_decoder_tokens))
# Populate the first token of target sequence with the start token:
target_seq[0, 0, target_features_dict["<SOS>"]] = 1.
decoded_sentence = ''
stop_condition = False
while not stop_condition:
# Run the decoder model to get possible
# output tokens (with probabilities) & states
output_tokens, new_decoder_hidden_state, new_decoder_cell_state = decoder_model.predict(
[target_seq] + decoder_states_value)
# Choose token with highest probability
sampled_token_index = np.argmax(output_tokens[0, -1, :])
sampled_token = reverse_target_features_dict[sampled_token_index]
decoded_sentence += ' ' + sampled_token
# Exit condition: either hit max length or find <EOS>
if (sampled_token == "<EOS>" or len(decoded_sentence) > max_decoder_seq_length):
stop_condition = True
# Update the target sequence (of length 1)
target_seq = np.zeros((1, 1, num_decoder_tokens))
target_seq[0, 0, sampled_token_index] = 1.
# Update states
decoder_states_value = [new_decoder_hidden_state, new_decoder_cell_state]
return decoded_sentence
# Inference process
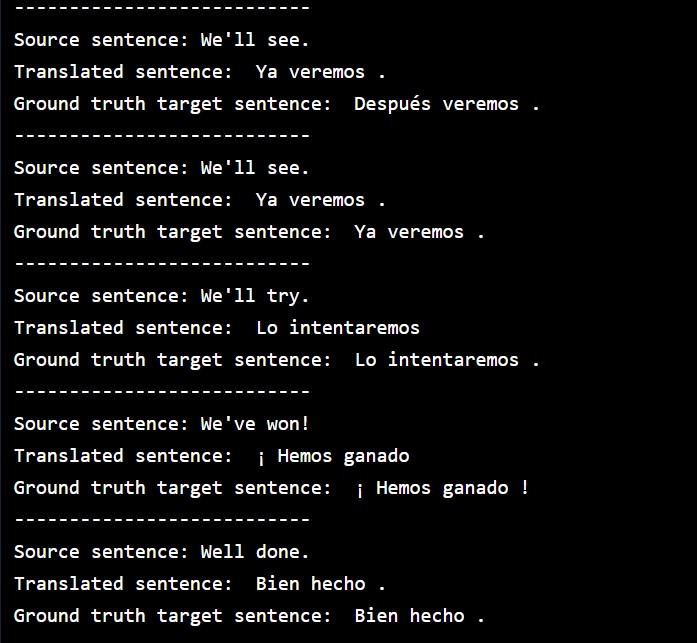
# Translate each English sentence in input_docs into Spanish
with device("/GPU:0"):
for seq_idx in range(10):
test_input = encoder_input_data[seq_idx: seq_idx + 1]
translated_sentence = translate_sentence(test_input)
print("---------------------------")
print("Source sentence:", input_docs[seq_idx])
print("Translated sentence:", translated_sentence)
print("Ground truth target sentence: ", target_docs[seq_idx].lstrip("<SOS> ").rstrip(" <EOS>"))
执行翻译结果,比对一下各句英文的西班牙译文(模型预测)以及语料库中的西班牙原文(真实):
结语
今天的例子中我们采用了极小型的双语平行语料库,里头只有意义相同的英文与西班牙文的文句各11句。在将单词转为向量时,我们为了方便说明,使用了 one-hot 编码,很显然模型的准确度并不会太高。在翻译实际任务上,我们会改用 word2vec 的 word embedding 方式进行向量化,因其保留了语意关系,将大幅提升模型预测的准确度。
今天的文章就记录到这里,各位小夥伴晚安!
阅读更多
>>: # Day 20 High Memory Handling
Gulp 压缩优化程序码(1) DAY88
这里我们先介绍 gulp-clean-css(压缩css) 与 gulp-uglify(压缩js) ...
RISC-V: 在指令之前的 Register File
昨天已经把程序码稍微整理了一下, 分出两大部分:处理器和记忆体, 以及加上 Formatter 让 ...
30-8 之 Presentation Layer - MVC ( Model-View-Controller )
先给个提醒,这和一般人知道的 MVC 可能不太一样,个人建议是如果你对 MVC 感到很混乱再来看看这...
Proxmox VE 虚拟机复制与范本
当我们具备了备份还原、快照倒回的能力之後,几乎已经打造了稳如铁桶的客体机服务,再也不怕故障後无法回...
014-iOS 15
今天更新了手机的作业系统到iOS 15,比起以前,更喜欢常关注以及思考为什麽Apple要这样做的原因...