Angular-介绍(Day14)
好的,在我们结束Spring Boot API的架设後,再来我们要开始进入前端框架-Angular的世界了,
在目前这个倾向前後分离的开发模式之下,等於说身为一名全端工程师,需要熟悉至少一前一後两种框架,不再是以前只要用jQuery+css+html就可以把前端吃透透的年代了,因此需要不断精进自身技能,那现在让我们一起来学习Angular框架吧!
Angular is a development platform, built on TypeScript. As a >platform, Angular includes:
- A component-based framework for building scalable web applications
- A collection of well-integrated libraries that cover a wide variety of features, including >routing, forms management, client-server communication, and more
- A suite of developer tools to help you develop, build, test, and update your code
上文对Angular的介绍中已经体现,Angular的优势,尤其是它以TypeScript建构而成,严谨的物件定义会使得bug产生的机会降低,另外如MVC架构一样,Angular也是由各种小构件组成的,再加上他有强大的社群资源(也就是很多人写所以你有bug上网google比较容易)。
身为一个後端工程师,我入门的框架并不是Angular,但我当时刚开始学的时候,真的被Angular CLI震慑得不要不要的,很多组件你不用自己一个一个字打,指令一下组件就自己建好了,另外还有Two-way Binding的神奇功能,可以即时更新页面上的状态。
以下提供一个Angular架构图
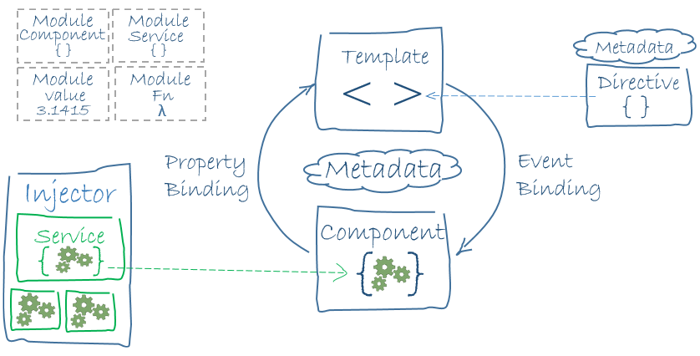
接着介绍Angular的要素
1.Components: 组件
以下是简单的component组件
import { Component } from '@angular/core';

@Component({
  selector: 'hello-world',
  template: `
    <h2>Hello World</h2>
    <p>This is my first component!</p>
  `
})
export class HelloWorldComponent {
  // The code in this class drives the component's behavior.
}
你可以直接用在html页面上使用它
<hello-world></hello-world>
而这样的标签最後解析出来的结果会长这样
<hello-world>
    <h2>Hello World</h2>
    <p>This is my first component!</p>
</hello-world>
我们透过components的简化和整合,可以让原本繁杂的HTML页面,以组件简化。
2.Templates:模板
Angular将html模板扩充,让使用者可以插入自己要的数值进去
<p>{{ message }}</p>
{{ message }}里面所放的值将会来自Component所给予的
import { Component } from '@angular/core';

@Component ({
  selector: 'hello-world-interpolation',
  templateUrl: './hello-world-interpolation.component.html'
})
export class HelloWorldInterpolationComponent {
    message = 'Hello, World!';
}
最终会解析出
<p>Hello, World!</p>
当然要绑定css或js那也不在话下
//css
<p
  [id]="sayHelloId"
  [style.color]="fontColor">
  You can set my color in the component!
</p>

//js
<button
  [disabled]="canClick"
  (click)="sayMessage()">
  Trigger alert message
</button>

sayMessage() {
  alert(this.message);
}
*另外还有 *ngIf ngFor .....等实用的directives(装饰器),相信用过thymeleaf的你应该很习惯看到这样的东西了
3.Dependency injection(依赖注入)
这也是我们的老朋友了,Angular也有引进这样的概念,我们把要的组件引进来,不需要去管它是如何实作的
import { Injectable } from '@angular/core';

@Injectable({providedIn: 'root'})
export class Logger {
  writeCount(count: number) {
    console.warn(count);
  }
}
4.Angular CLI
Angular基本上要启动、建立专案都要依靠它
5.First-party libraries
Angular当然也有提供一个强大的资源库可以直接使用罗
那今天对Angular介绍先到这里,明天再见罗~!!
资料来源:
<<: 撰写API端的第一个Flask API-以tick为例
>>: [Python 爬虫这样学,一定是大拇指拉!] DAY14 - TCP / IP
[第七天]从0开始的UnityAR手机游戏开发-介绍Unity的Asset Store和从Asset Store或网路下载3D模型
介绍Unity资源商店 先开启Asset Store,将Assets Store拖曳出来 对着As...
Day 14:Coroutine,那是什麽?好吃嘛?
Keyword: coroutine 这几天在使用网路功能时,都使用到了Kotlin的Corouti...
JAVA - JAVA Log4j 专门用於 Java 语言的日志记录工具
JAVA - JAVA Log4j 专门用於 Java 语言的日志记录工具 参考资料 参考资料1:L...
[Day 5]从零开始学习 JS 的连续-30 Days---比较与逻辑运算子
比较与逻辑运算子 比较运算子 用於判断比较运算子前後的结果回传逻辑值。 运算子如下 > 大於 ...
18. STM32-CAN-BUS (上)
前几篇有介绍过CANBus~透过MCP2515模块去完成通讯。 这篇会使用STM32当中的CAN-B...