[Day 13] tinyML开发框架(一):TensorFlow Lite Micro初体验(下)
执行推论(C/C++ + Arduino IDE + MCU)
书接上回[Day 12] tinyML开发框架(一):TensorFlow Lite Micro初体验(上) ,在训练完成,在最後一个输出栏位出现一大堆数字,这就是大的那个模型经优化及INT8量化後的结果。在训练过程中,其实有把TensorFlow, TensorFlow Lite和TensorFlow Lite for Microcontroller的模型储在云端硬碟暂存区中,只需点击左侧最下方那个档案夹符号就能看到相关输出档案,如图Fig. 13-1所示。其中 model.cc (C/C++语言格式)就是要给MCU使用的。要特别注意地是,由於这些档案是存放在Google Colab临时性的云端档案夹中,所以要先以滑鼠右键点击档案,下载到自己的电脑或云端硬碟中,以免断线後就消失了。
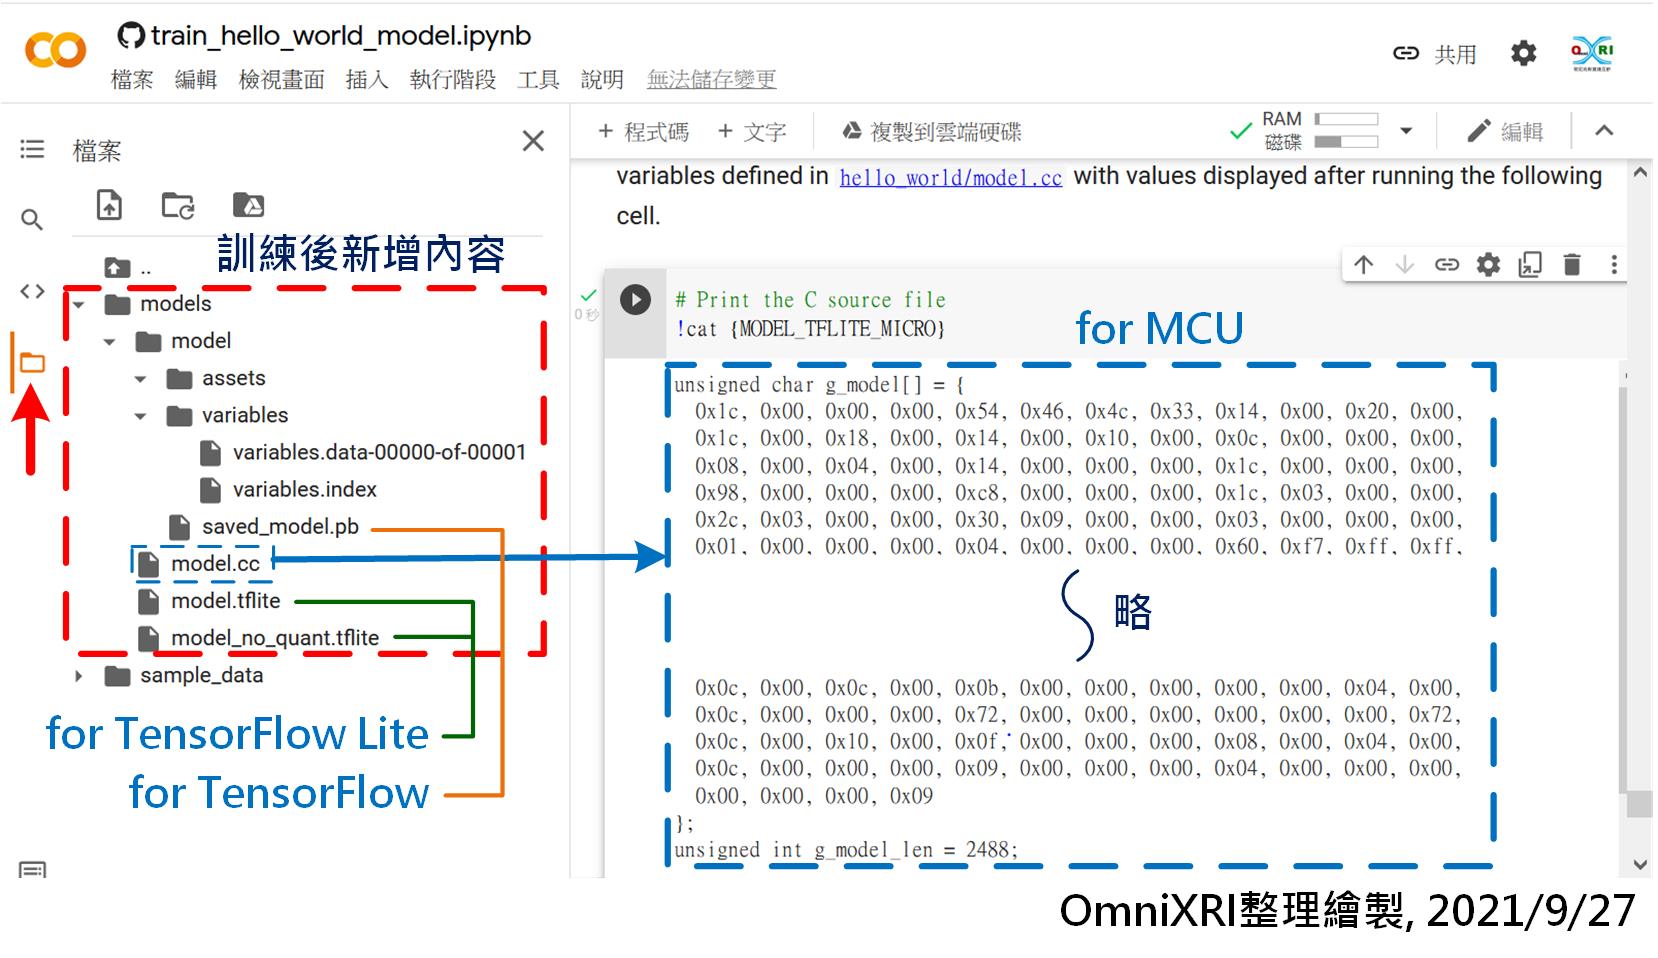
Fig. 13-1 训练完成後新增模型参数档案结构及内容。(OmniXRI整理绘制, 2021/9/27)
为了省去一大堆编译及设定的指令,在MCU端最简单的方法就是使用Arduino IDE,还没安装好的人,可参考「[Day 08]、[Day 09] tinyML开胃菜Arduino IDE上桌」。目前TFLM还有支援Keil, Make和Arm Mbed OS,更进一步的使用方法可参考官网「Understand the C++ library」说明,这里就不多作介绍。
为了让Arduino IDE能顺利使用TensorFlow Lite,首先要点击主选单的[草稿码]─[汇入程序库]─[管理程序库...],然後输入「TensorFlowLite」,此时选择「Arduino_TensorFlowLite」,按下「安装」即可完成。回到主画面後,可到主选单[档案]─[范例]下检查一下是否已出现[Arduino_TensorFlowLite]选项,如图Fig. 13-2所示。当点下[hello_world]就会自动产生完整范例及所需配套档案,如下所示。
- hello_world.ino // 范例主程序
- arduino_constants.cpp
- arduino_main.cpp
- arduino_output_handler.cpp
- constants.h
- main_functions.h
- model.cpp // 模型参数档
- model.h // 模型参数头文件档
- output_handler.h
ps. 这里暂时只会用到 hello_world.ino 和 model.cpp ,其它的档案就暂时忽略说明。
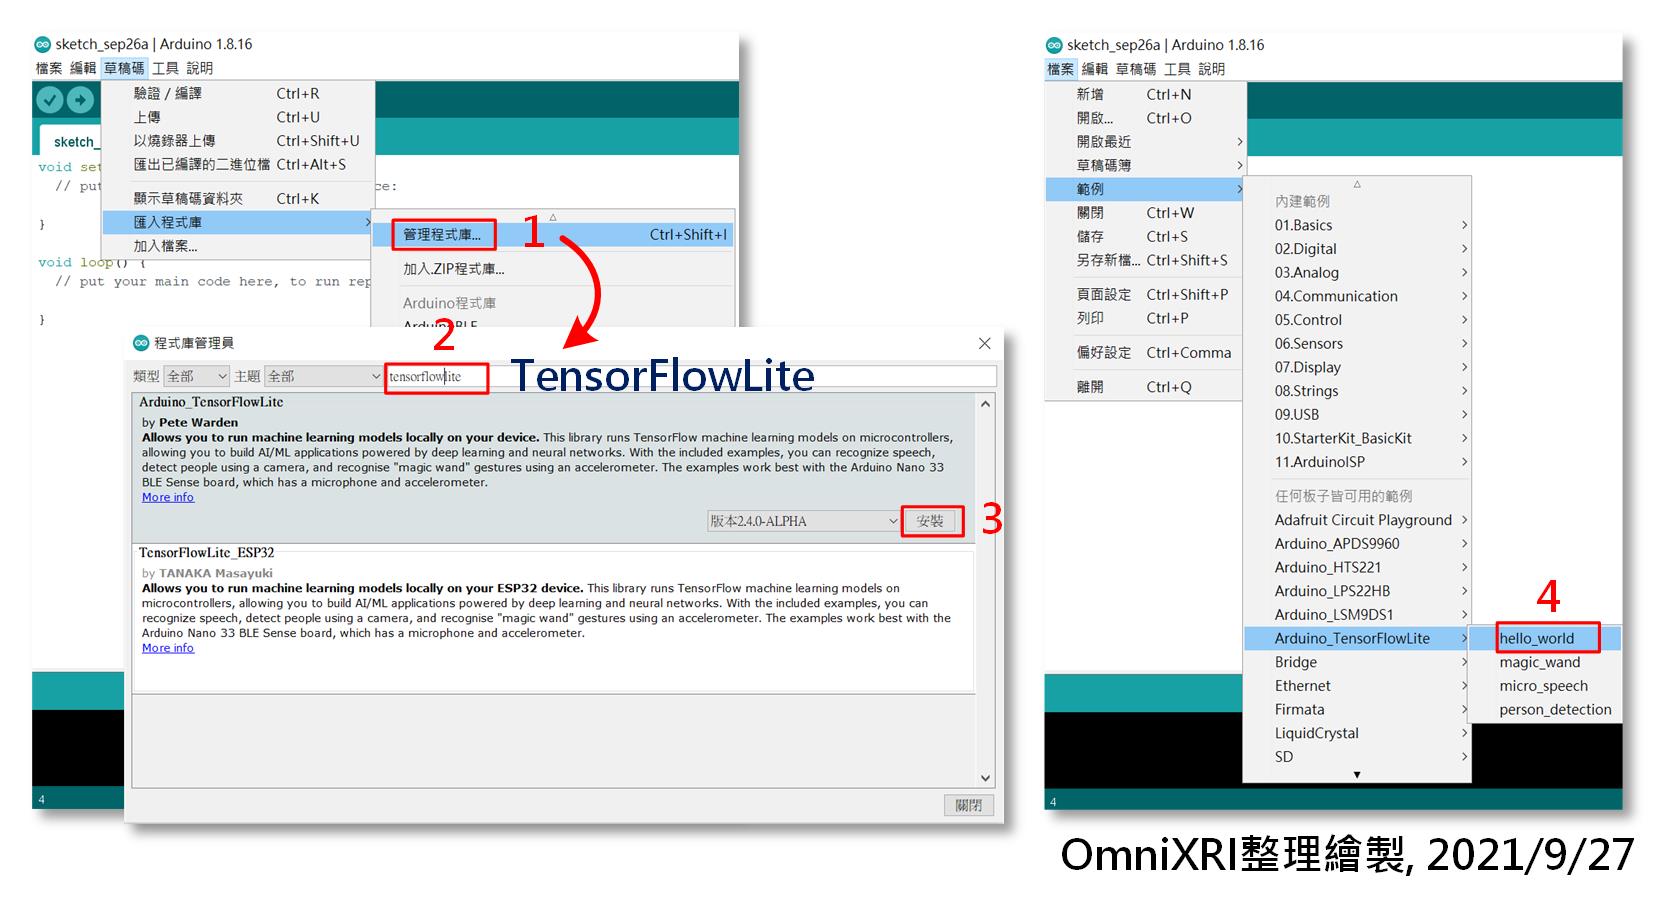
Fig. 13-2 Arduino IDE安装TensorFlowLite程序库步骤及开启hello_world范例。(OmniXRI整理制作, 2021/9/27)
接着把Arduino Nano 33 BLE Sense开发板连接到电脑上,并检查一下开发板是否都已正确设定及序列埠通讯正常,接着就可按左上角[上传](右箭头符号),它会自动重新编译程序并上传到开发板上。如果一切顺利,会在下方讯息区显示写入大小及花费时间。板子会自动重置启动,如果看到板上橘色LED一直闪烁,就表示程序已顺利运作。 此时就可以到[工具]开启[序列埠监控视窗]观察板子送回电脑上的数值,或者使用[序列绘图家]可直接看到波形图,更方便侦错,如图Fig. 13-3所示。
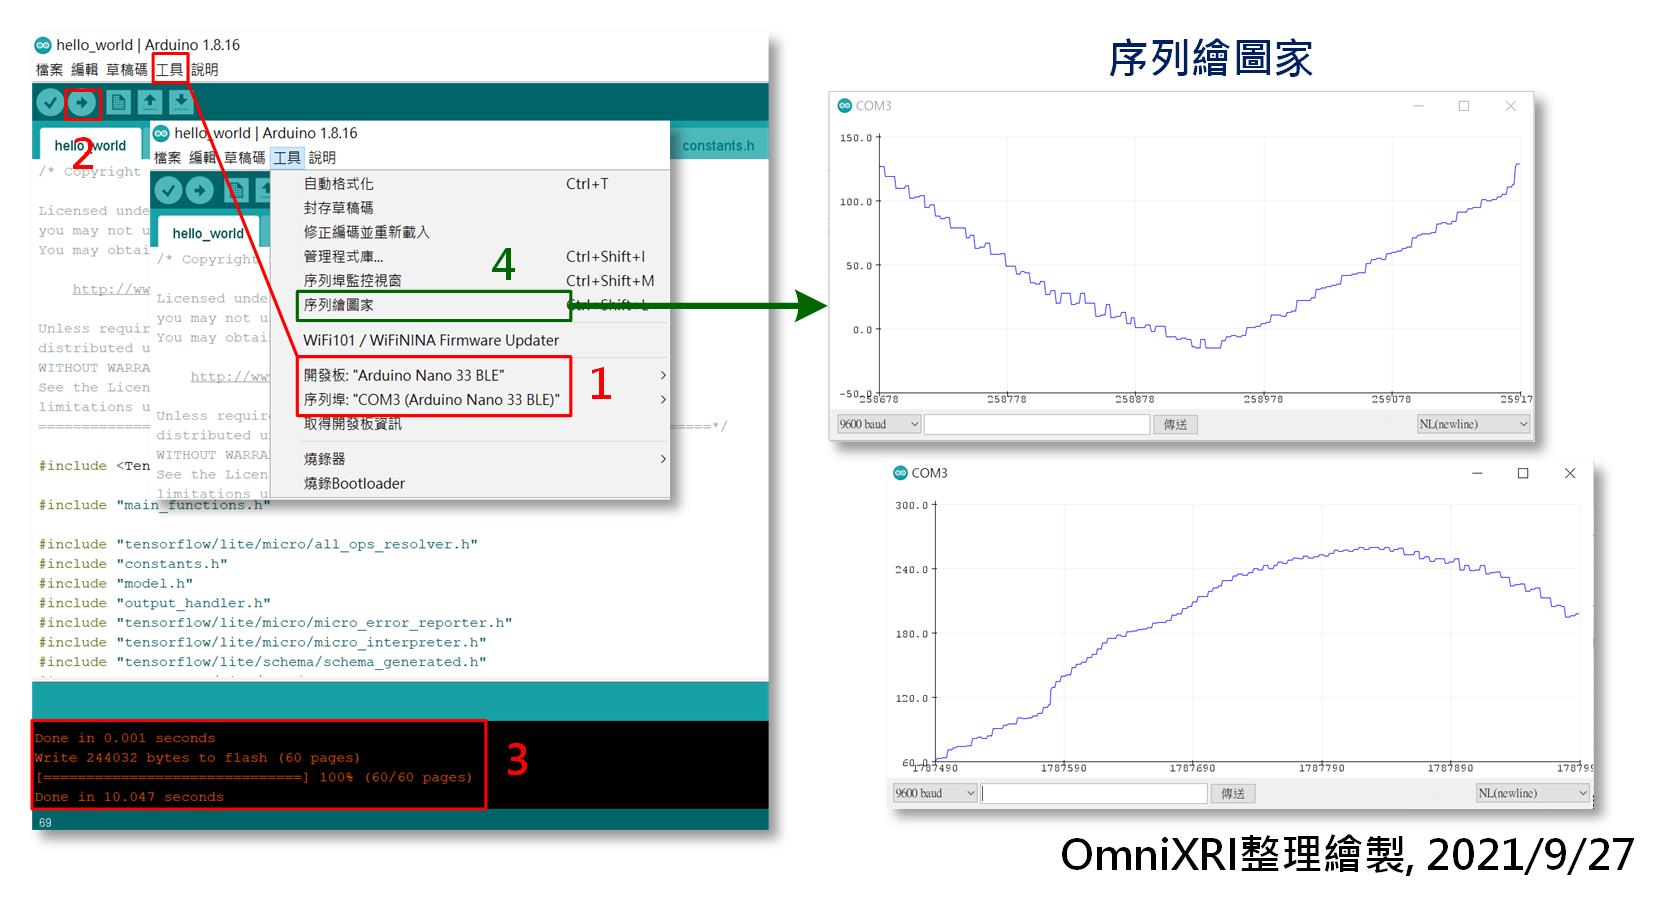
Fig. 13-3 hello_world运行於Arduino Nano 33 BLE Sense结果。(OmniXRI整理绘制, 2021/9/27)
本来作到这里就该收工,但前先训练了老半天的结果 model.cc 怎麽没用到,MCU就能自己跑起来了呢?这是因为范例已自带一个模型参数档 model.cpp 。不过仔细比对会发现 model.cpp 和 model.cc 除了档名不同外,数值设定方式也稍有不同,所以可以只复制 model.cc 大括号{}中间的值再贴到 model.cpp 後再重新编译即可,如下所示。
// Google Colab训练好的原始模型 model.cc
unsigned char g_model[] = {
  0x1c, 0x00, 0x00, 0x00, 0x54, 0x46, 0x4c, 0x33, 0x14, 0x00, 0x20, 0x00,
  ... (略) // 数值内容会随训练结果而有不同
  0x00, 0x00, 0x00, 0x09
};
unsigned int g_model_len = 2488;
// Arduino_TensorFlowLite hello_world范例中的预设模型 model.cpp
#include "model.h"

alignas(8) const unsigned char g_model[] = {
    0x1c, 0x00, 0x00, 0x00, 0x54, 0x46, 0x4c, 0x33, 0x14, 0x00, 0x20, 0x00,
    ... (略) // 数值内容会随训练结果而有不同
    0x00, 0x00, 0x00, 0x09};
const int g_model_len = 2488;
接下来就把 hello_world.ino 作一些简单中文注解,希望能帮助大家更容易理解程序运作原理。其主要步骤可参考官网说明「Get started with microcontrollers - Run inference」。
/*
Copyright 2020 The TensorFlow Authors. All Rights Reserved.
hello_world.ino MCU端推论主程序
在Arduino IDE安装Arduino_TensorFlowLite程序库後,
点击主选单的[档案]─[范例]─[Arduino_TensorFlowLite]─[hello_world]产生。
程序会将推论结果由序列埠送回PC,同时板上橘色LED会一直闪烁代表有在通讯,
可使用工具「序列埠监看视窗」观察数值,或使用「序列绘图家」直接观发波形。
*/
// 导入TensorFlowLite相关及必要之头文件
#include <TensorFlowLite.h>
#include "main_functions.h"
#include "tensorflow/lite/micro/all_ops_resolver.h" // 提供解释器用来运行模型的操作。
#include "constants.h" // 定义常用常数
#include "model.h" // 模型头文件
#include "output_handler.h"
#include "tensorflow/lite/micro/micro_error_reporter.h" //输出除错日志。
#include "tensorflow/lite/micro/micro_interpreter.h" // 包含加载和运行模型的代码。
#include "tensorflow/lite/schema/schema_generated.h" 包含 TFLite FlatBuffer模型文件格式的架构。
#include "tensorflow/lite/version.h" // 为 TFLite 架构提供版本信息。
// 宣告命名空间,方便後续程序呼叫使用
namespace {
tflite::ErrorReporter* error_reporter = nullptr; // 除错日志指标
const tflite::Model* model = nullptr; // 模型指标
tflite::MicroInterpreter* interpreter = nullptr; // 直译器指标
TfLiteTensor* input = nullptr; // 输人指标
TfLiteTensor* output = nullptr; // 输出指标
int inference_count = 0; // 推论计数器
// 宣告全域变数(配置记忆体)
constexpr int kTensorArenaSize = 2000;
uint8_t tensor_arena[kTensorArenaSize];
} // namespace
// 设定脚位用途及模组初始化(只在电源启动或重置时执行一次)
void setup() {
// 建立除错日志
static tflite::MicroErrorReporter micro_error_reporter;
error_reporter = µ_error_reporter;
// 载入模型
model = tflite::GetModel(g_model);
if (model->version() != TFLITE_SCHEMA_VERSION) {
TF_LITE_REPORT_ERROR(error_reporter,
"Model provided is schema version %d not equal "
"to supported version %d.",
model->version(), TFLITE_SCHEMA_VERSION);
return;
}
// 建立解析器(resolver)和直译器(interpreter)
static tflite::AllOpsResolver resolver;
static tflite::MicroInterpreter static_interpreter(
model, resolver, tensor_arena, kTensorArenaSize, error_reporter);
interpreter = &static_interpreter;
// 配置张量所需记忆体
TfLiteStatus allocate_status = interpreter->AllocateTensors();
if (allocate_status != kTfLiteOk) {
TF_LITE_REPORT_ERROR(error_reporter, "AllocateTensors() failed");
return;
}
// 建立输出入
input = interpreter->input(0);
output = interpreter->output(0);
// 清除推论计数器
inference_count = 0;
}
// 设定无穷循环程序 (会一直依序重覆执行)
void loop() {
// 设定输入值x
float position = static_cast<float>(inference_count) /
static_cast<float>(kInferencesPerCycle);
float x = position * kXrange;
int8_t x_quantized = x / input->params.scale + input->params.zero_point;
input->data.int8[0] = x_quantized;
// 运行推理
TfLiteStatus invoke_status = interpreter->Invoke();
if (invoke_status != kTfLiteOk) {
TF_LITE_REPORT_ERROR(error_reporter, "Invoke failed on x: %f\n",
static_cast<double>(x));
return;
}
// 将结果x,y值输出到序列埠
int8_t y_quantized = output->data.int8[0];
float y = (y_quantized - output->params.zero_point) * output->params.scale;
HandleOutput(error_reporter, x, y);
// 推论计数值加1,若超过预设次数就清零
inference_count += 1;
if (inference_count >= kInferencesPerCycle) inference_count = 0;
}
参考连结
Google TensorFlow Lite for Microcontrollers 中文学习指南
Pete Warden Youtube, TinyML Book Screencasts Playlist 影片清单
TensorFlow Lite for Microcontrollers Github 开源码
TFLM Get started with microcontrollers, The Hello World example
Experiments with Google = TensorFlow Lite for Microcontrollers 案例分享
>>: Day13 Let's ODOO: Security(2) Group
Day.7 保有日常备份重要性 - binlog 解析 &备份资料 (mysqldump / binlog)
回顾一下上篇提到的binlog纪录作用,可以用来做资料复原和主从机制下的重要数据纪录。 开始前先了...
Day 3
接续上一堂课, 我们已经可以拿到某一股票的价格。 藉由股票的即时价格,若再拿到配股配息,就可以算出让...
人脸辨识-day16 应用层面--2
人脸辨识还应用在只让特定人员才可进行存取或使用。如以下的例子: 1.在公司行号利用人脸辨识系统自动化...
[Day04] JavaScript - ES6 模板字符串 (Template Literal)
ES6 除了新增了上篇的let & const之外,也提供了新的模版字符串(Template...
Day30-实作(地图) (part2)
从左侧栏位获取药局位置 当我们在左设拦点击药局列表时,左侧的地图区域不会带我们到对应的位置,此时我们...