Day 26 - Stripe Follow Along Dropdown Navigation [更新]
前言
JS 30 是由加拿大的全端工程师 Wes Bos 免费提供的 JavaScript 简单应用课程,课程主打 No Frameworks、No Compilers、No Libraries、No Boilerplate 在30天的30部教学影片里,建立30个JavaScript的有趣小东西。
另外,Wes Bos 也很无私地在 Github 上公开了所有 JS 30 课程的程序码,有兴趣的话可以去 fork 或下载。
本日目标
今天我们要实作的内容是当使用者hover in 或 out 导览列时,展开显示下方的连结、文字内容并搭配上 CSS 的动画效果。

解析程序码
HTML 部分
<h2></h2>用来模拟<nav></nav>不是 HTML 最上面元素的情况。
<nav></nav>(.top)是我们的导览列,其中包含作项目内容背景用途的<div></dvi>(.dropDownBackground),以及项目列表<ul></ul>(.cool)和项目内容<li></li>,其中每一个项目的内容除了<a></a>标题连结有显示外,剩余资讯.dropdown的部分都被预设隐藏。
<h2>Cool</h2>
<nav class="top">
    <div class="dropdownBackground">
      <span class="arrow"></span>
    </div>

    <ul class="cool">
      <li>
        <a href="#">About Me</a>
        <div class="dropdown dropdown1">
          <!--省略-->
        </div>
      </li>
      <li>
        <a href="#">Courses</a>
        <ul class="dropdown courses">
          <!--省略-->
        </ul>
      </li>
      <li>
        <a href="#">Other Links</a>
        <ul class="dropdown dropdown3">
          <!--省略-->
        </ul>
      </li>
    </ul>
</nav>
CSS 部分
-
.dropdown: 分别设定opacity: 0;、display: none;预设隐藏.dropdown,然後用transition监控 CSS 属性值的变化,达成 CSS 动画的效果。 -
.trigger-enter .dropdown:.trigger-enter这个 class 会在 hover in 任意一个<li></li>时,被加到.dropdown上。设定display:block;把隐藏的项目资讯 show 出来,但现在还是透明的。 -
.trigger-enter-active .dropdown:.trigger-enter-active这个 class 会在 hover in 任意一个<li></li>时,被加到.dropdown上。设定opacity:1;把隐藏的项目资讯 show 出来,现在是不透明的。
为什麽要把opacity、display分开写而不写在同一个 class 选择器呢? 因为写在一起的话,transition的动画效果会失效。
.dropdown {
    /*省略...*/
    opacity: 0;
    /*省略...*/
    transition: all 0.5s;
    /*省略...*/
    display: none;
  }

.trigger-enter .dropdown {
    display: block;
}

.trigger-enter-active .dropdown {
    opacity: 1; /*display和opacity分开写是为了CSS动画效果*/
}
-
.dropdownBackground: 初始项目内容的背景被隐藏(透明)。 -
.dropdownBackground.open: 让项目内容的背景被显示出来(不透明)。而.open这个 class 会在 hover in 任意一个<li></li>时,被加到.dropdownBackground上。
.dropdownBackground {
    /*省略...*/
    opacity:0;
}

.dropdownBackground.open { /*show the background*/
    opacity: 1;
}
JS 部分
首先取得所有必要的网页元素,包括项目列表下的每个<li>、作为列表项目内容背景的.dropdownBackground以及导览列.top。
const triggers = document.querySelectorAll('.cool > li');
const background = document.querySelector('.dropdownBackground');
const nav = document.querySelector('.top');
为项目列表中的每个<li>都分别注册mouseenter event listener(hover in 触发)和mouseleave event listener(hover out 触发),然後各自以handleEnter()和handleLeave作事件处理。
//listen for hovering in and out
function handleEnter(){

}

function handleLeave(){

}

triggers.forEach(trigger => trigger.addEventListener('mouseenter',handleEnter));
triggers.forEach(trigger => trigger.addEventListener('mouseleave',handleLeave));
hover in <li>时,将trigger-enter加到<li>上。
然後利用setTimeout()让在<li>加上trigger-enter-active这件事被延迟150毫秒,利用条件判断只有当<li>上已经有.trigger-enter这个 class,才执行後方的在<li>加上.trigger-enter-active,会需要做到这样是为避免使用者 hover in and out 的时间过快,让一个项目的内容还没来得及消失,另一个却马上出现,造成残影的效果。
最後,在项目内容背景加上.open这个 class 让它被 show 出来。
function handleEnter(){
    this.classList.add('trigger-enter');
    //use the arrow function or 'this' will be the window
    //不要让内容太早被show出来,不然可能会出现残影
    setTimeout(()=> this.classList.contains('trigger-enter') && this.classList.add('trigger-enter-active'),150);
    //set background
    background.classList.add('open');
}
handleLeave()要做的事情很简单,就是当使用者 hover out 时,移除所有被新增的 class。
function handleLeave(){
    this.classList.remove('trigger-enter','trigger-enter-active');
     //set background
     background.classList.remove('open');
}
最後的最後,我们要把项目内容的背景移到它该待的地方。
首先取得项目内容的元素然後再取得项目内容相对视窗右上角的座标(这个座标不随着 scroll down 而有所改变)。
复习一下getBoundingClientRect()取得的元素座标图 :
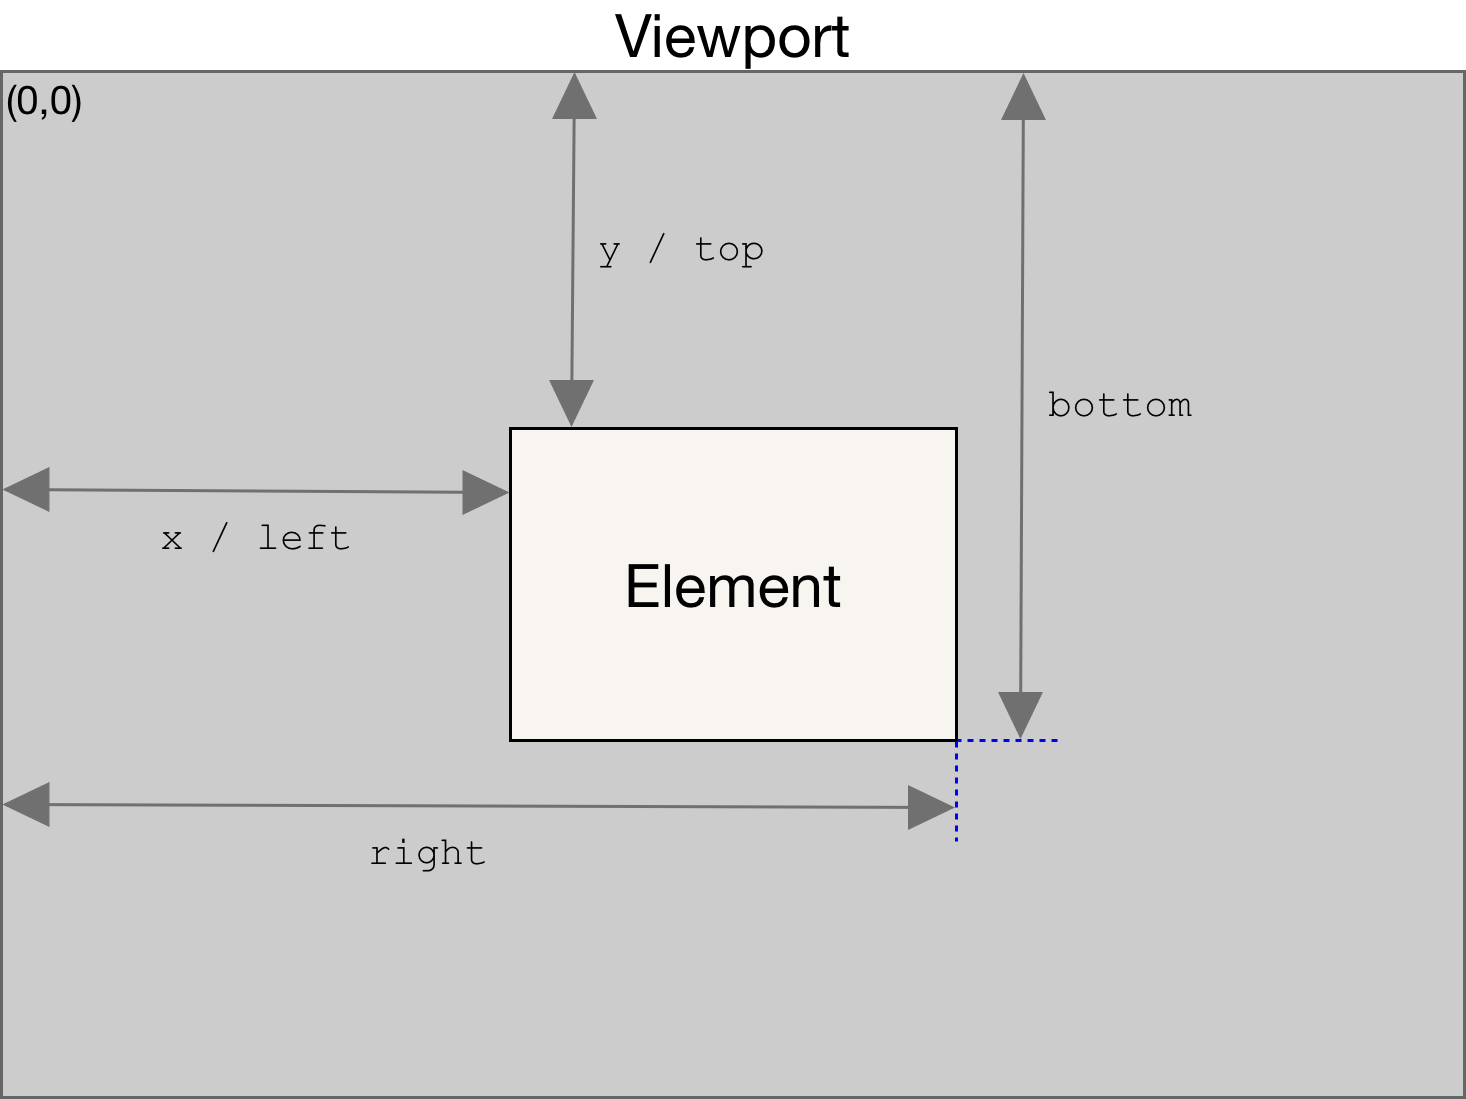
那为什麽我们还需要取得导览列nav的座标呢? 因为在 nav 不是 HTML 文件里的第一个元素时,如果只单单用.dropdown的left、top进行项目内容背景的位置设定,会发现到背景被稍微往下挤了一点,被往下挤的大小刚好可以用导览列nav的位置来作修正,分别将指定的left、top减去nav的left、top就好。
我们将大小、位置等等资讯整合在物件coords里,之後再个别利用coords里的指定值去修改项目内容背景的 CSS 属性就完成了。
function handleEnter(){
     // 上略...
    // set position of the background
    const dropDown = this.querySelector('.dropdown');
    const dropDownCoords = dropDown.getBoundingClientRect();
    const navCoords = nav.getBoundingClientRect();
    console.log(dropDownCoords);

    const coords = {
      height: dropDownCoords.height,
      width: dropDownCoords.width,
      top: dropDownCoords.top - navCoords.top,
      left: dropDownCoords.left - navCoords.left
    }

    background.style.setProperty('width',`${coords.width}px`);
    background.style.setProperty('height',`${coords.height}px`);
    background.style.setProperty('transform',`translate(${coords.left}px,${coords.top}px)`);
}
补充资料 :
mouseenter
mouseleave
Element.getBoundingClientRect()
CSSStyleDeclaration.setProperty()
范例网页请点此
完整程序码
<<: 【Day11-映射】浅谈python的map与pandas的map用法
Day 04-Terraform 也有 Backend?啥是 Terraform Backend 能吃吗?
Terraform 也有 Backend 之啥是 Terraform Backend 能吃吗? 课程...
Day 20 资料库评估 - Database Assessment (sqlmap, SQLite database browser)
前言 今天又进入到了新的一个分类,这个分类里面只有两个工具: SQLite database bro...
从 JavaScript 角度学 Python(4) - 型别与变数
前言 oh!终於要开始学习写 Python 了呢!(被揍),都混了三天,我如果再不开始写 Pytho...
NNI的特性及核心功能
上次开场白说明了NNI最基本的Hyper-parameters(超参)调整,其实只是其中的功能之一。...
JavaScript入门 Day22_if判断2
今天要讲的是if...else,昨天只讲了if 那if...else 就是 如果...否则 来看看c...