Vue3 ( 制作前台 ) -7
1. 产品列表
(1)制作页面(元件)
src/views/Userboard.vue 产品navbar
src/views/UserCart.vue 产品总页面/购物车 =>商品启用才会显示,已经写好API
src/views/UserProduct.vue 产品各别页面
(2)绑路径
src/router/index.js
  {
    path: '/user',
    component: () => import('../views/Userboard.vue'),
    children: [
      {
        path: 'cart',
        component: () => import('../views/UserCart.vue'),
      },
      {
        path: 'product/:productId',
        component: () => import('../views/UserProduct.vue'),
      },
    ],
  },
(3)制作供使用者点击页面
           <div class="btn-group btn-group-sm">
             <button
               type="button"
               class="btn btn-outline-secondary"
               @click="getProduct(item.id)"
             >
               查看更多
             </button>
2. 用户端加入购物车
- 效果1. 购物车按钮暂时无法执行
- 效果2. 小小读取效果
(1)加入购物车 按钮+事件+方法
                  <button
                    v-on:click="addCart(item.id)"
                    type="button"
                    class="btn btn-outline-danger"
                  >
                    加到购物车
                  </button>
(2)抓到参数(id)并送入资料库(依照API给资料)
    addCart(id) {
      console.log("id", id);
      const url = `${process.env.VUE_APP_API}api/${process.env.VUE_APP_PATH}/cart`;
      const cart = {
        product_id: id,
        qty: 1,
      };
      this.$http.post(url, { data: cart }).then((res) => {
        console.log("res", res);
      });
    },
  },
效果1. 购物车按钮暂时无法执行
(1)新增仓库
  data() {
    return {
      status: {
        // 个别小小读取效果仓库(购物车按钮暂时无法执行)
        loadingItem: "", //对应品项id
      },
    };
  },
(2)将值写入仓库,供未来比对用
按下按钮送id,赋值给仓库
    addCart(id) {
      this.status.loadingItem = id; // 按下按钮送id,赋值给仓库
      };
      this.$http.post(url, { data: cart }).then((res) => {
        this.status.loadingItem = ""; //资料库更新成功後,空

      });
    },
(2)制作 不能按(disabled) 样式并写入触发条件
如果仓库收到的值 === 当前id
                  <button
                    v-bind:disabled="this.status.loadingItem === item.id"
                    class="btn btn-outline-danger"
                  >
                    加到购物车
                  </button>
效果2. 小小读取效果
如果仓库收到的值 === 当前id
                    <div
                      v-if="this.status.loadingItem === item.id"
                      class="spinner-grow spinner-grow-sm text-danger"
                      role="status"
                    >
                      <span class="visually-hidden">Loading...</span>
3.用户端加入 Bootstrap Icon
目标:新增查看购物车内容 及 购物车Icon增加
新增查看购物车内容
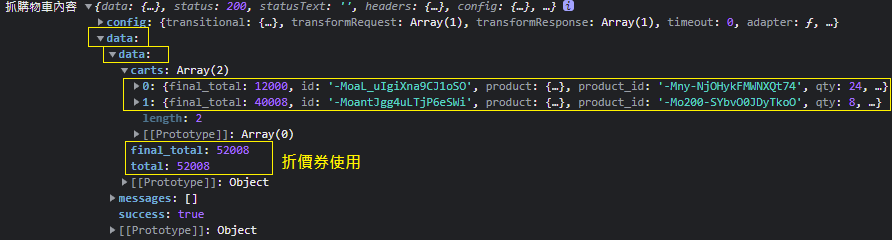
    getCart() {
      const url = `${process.env.VUE_APP_API}api/${process.env.VUE_APP_PATH}/cart`;
      this.$http.get(url).then((response) => {
        console.log("抓购物车内容", response);
        this.cart = response.data.data;
        this.isLoading = false;
      });
    },
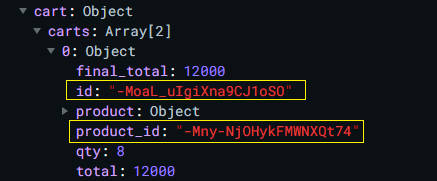
(2)购物车内容渲染网页上
  data() {
    return {
      cart: {},
      coupon_code: "",
    };
  },
<tr v-for="item in cart.carts" :key="item.id">
购物车Icon增加
https://icons.getbootstrap.com/
(1)安装 Bootstrap Icon
npm i bootstrap-icons
(2)汇入
main.js
//bootstrap Icons
import "bootstrap-icons/font/bootstrap-icons.css";
(3)使用
<span class="material-icons-outlined"> backspace </span>
我是使用 material-icons XD
https://www.npmjs.com/package/material-icons
4. 用户端更新购物车数量品项
说明:购物车总金额由 後端 计算
(1)限制最低数量1 min
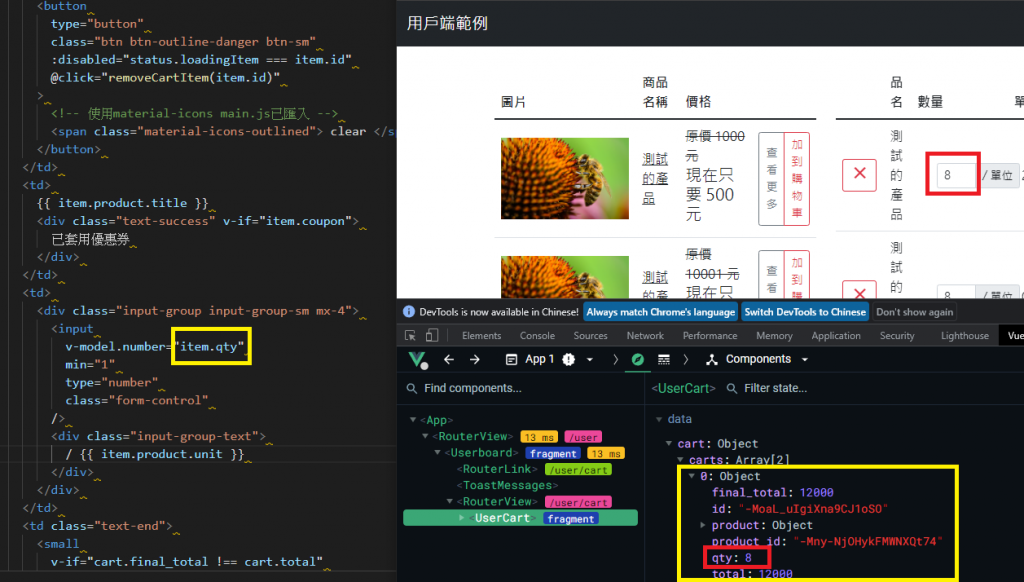
(2)product_id(String)、qty(Number)传递後端才能计算总金额
    updateCart(item) {
      const url = `${process.env.VUE_APP_API}api/${process.env.VUE_APP_PATH}/cart/${item.id}`;
      this.isLoading = true;
      const cart = {
        product_id: item.product_id,
        qty: item.qty,
      };
      this.$http.put(url, { data: cart }).then((res) => {
        console.log("res", res);
        this.getCart();
      });
    },
(3)补做读取中暂时无法使用function
          <input
             :disabled="item.id === status.loadingItem"
           />

  data() {
    return {
      status: {
        // 小小读取效果 + 购物车按钮暂时无法执行 仓库
        loadingItem: "", //对应品项id
      },


    updateCart(item) {
      this.status.loadingItem = item.id; // 按下按钮送id,赋值给仓库
      const cart = {
        product_id: item.product_id,
        qty: item.qty,
      };
      this.$http.put(url, { data: cart }).then((res) => {
        this.status.loadingItem = ""; // 按下按钮送id,赋值给仓库
        this.getCart();
      });
    },
5. 用户端套用优惠券
(1)先在後台增加好优惠卷 并 启用
shop666
(2)抓折扣码的值,透过後端计算
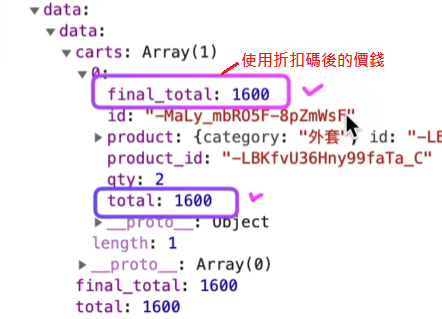
      const url = `${process.env.VUE_APP_API}api/${process.env.VUE_APP_PATH}/coupon`;
      const coupon = {
        code: this.coupon_code,
      };
(3)渲染在画面上
              <!-- 如果不相同 显示此tr -->
              <tr v-if="cart.final_total !== cart.total">
                <td colspan="3" class="text-end text-success">折扣价</td>
                <td class="text-end text-success">
                  {{ $filters.currency(cart.final_total) }}
                </td>
              </tr>
6. 用户端建立订单 + 检查表单内容是否有误
检查表单内容是否有误
(1)Cli 中引入外部套件vee-validate
1-1. 安装vee-validate套件
npm install vee-validate@next --save
1-2. 安装vee-validate套件
https://vee-validate.logaretm.com/v4/guide/global-validators#vee-validaterules
npm install @vee-validate/rules
1-3. 安装vee-validate套件
https://vee-validate.logaretm.com/v4/guide/i18n#using-vee-validatei18n
npm install @vee-validate/i18n
若serve正在跑的话 要先停止(ctrl+C)
1-4. 汇入main.js
import { Form, Field, ErrorMessage, defineRule, configure } from "vee-validate";
import AllRules from "@vee-validate/rules";
import { localize, setLocale } from "@vee-validate/i18n";
import zhTW from "@vee-validate/i18n/dist/locale/zh_TW.json";

//制作 vee-validate 里面的方法都抓出来用
Object.keys(AllRules).forEach((rule) => {
  defineRule(rule, AllRules[rule]);
});


configure({
  generateMessage: localize({ zh_TW: zhTW }), // 载入繁体中文语系
  validateOnInput: true, // 当输入任何内容直接进行验证
});
// 设定预设语系
setLocale("zh_TW");


// vee-validate引用
app.component('Form', Form);
app.component('Field', Field);
app.component('ErrorMessage', ErrorMessage);
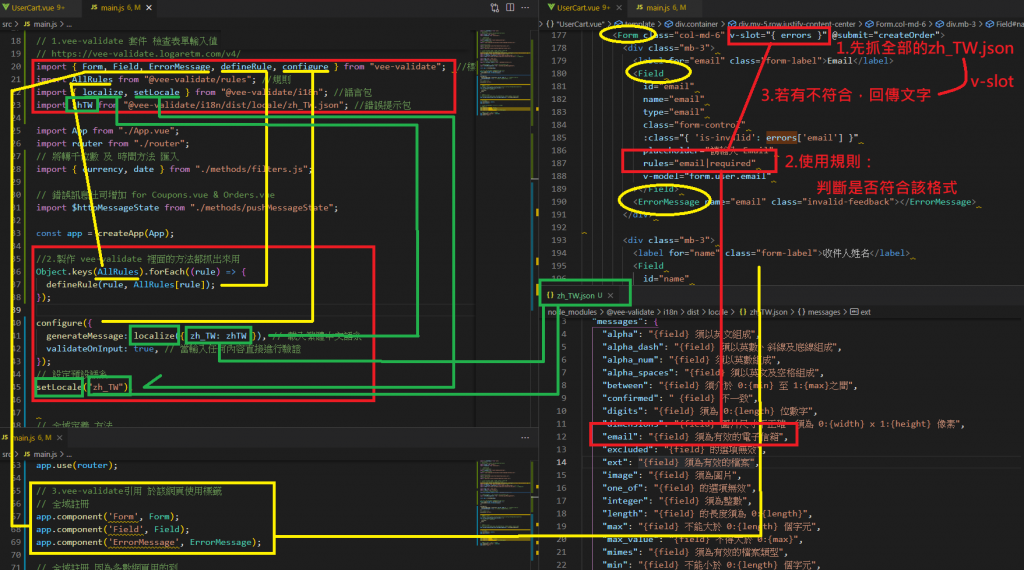
1-5.使用 Form、Field、ErrorMessage标签,及 格式错误回报
v-slot 插入文字or外部标签 vee-validate套件用法 引入zh_TW.json
逻辑:
1.利用v-slot抓全部的zh_TW.json
2.再靠rules="email|required"判断 是否违反格式
3.若违反 v-slot 显示错误讯息文字
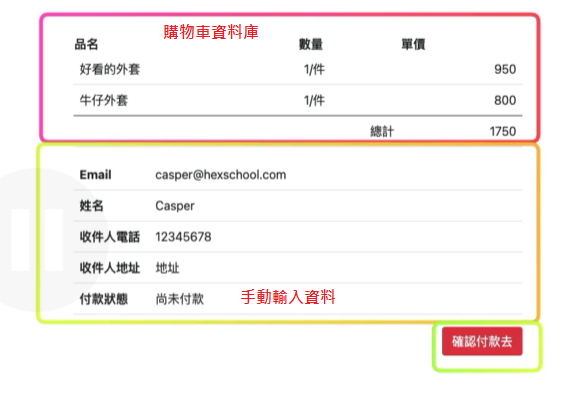
用户端建立订单
(1)建立API需要的仓库
 // 表单资料
      form: {
        user: {
          name: "",
          email: "",
          tel: "",
          address: "",
        },
        message: "",
      },
(2)html 抓输入的值送仓库 v-model
        <Form class="col-md-6" v-slot="{ errors }" @submit="createOrder">

        <div class="mb-3">
          <label for="address" class="form-label">收件人地址</label>
          <Field
            id="address"
            name="地址"
            type="text"
            class="form-control"
            :class="{ 'is-invalid': errors['地址'] }"
            placeholder="请输入地址"
            rules="required"
            v-model="form.user.address"
          ></Field>
(3)写入API
API 结帐页面
https://github.com/hexschool/vue3-course-api-wiki/wiki/%E5%AE%A2%E6%88%B6%E8%B3%BC%E7%89%A9-%5B%E5%85%8D%E9%A9%97%E8%AD%89%5D#%E7%B5%90%E5%B8%B3%E9%A0%81%E9%9D%A2
    createOrder() {
      const url = `${process.env.VUE_APP_API}api/${process.env.VUE_APP_PATH}/order`;
      const order = this.form;
      this.$http.post(url, { data: order }).then((res) => {
        console.log(res);
      });
    },
7. 用户端 结帐至付款 流程
目标:制作 送出订单後转址 及 确认订单页面
(1)制作页面元件
src/views/UserCheckout.vue
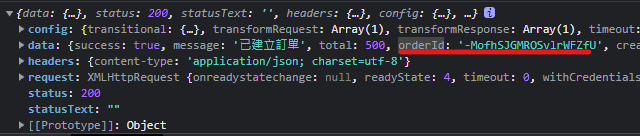
利用UserCart.vue送出订单纽,送出orderID(Ex:-MofhSJGMRQSvlrWFZfU)
orderID抓资料回放到UserCheckout.vue确认订单页面
http://localhost:8080/#/user/checkout/-MofhSJGMRQSvlrWFZfU
(後端API方法)
  created() {
    // $route.params 抓网址列用
    this.id = this.$route.params.productId;
    this.getProduct();
  },
(2)绑Router (checkout/:orderId)
src/router/index.js
  path: "/user",
    component: () => import("../views/Userboard.vue"),
    children: [
      {
        path: "cart",
        component: () => import("../views/UserCart.vue"),
      },
      {
        path: "product/:productId",
        component: () => import("../views/UserProduct.vue"),
      },
      {
        path: 'checkout/:orderId',
        component: () => import('../views/UserCheckout.vue'),
      },
(3)制作供使用者点击可连结的按钮
   <Form class="col-md-6" v-slot="{ errors }" @submit="createOrder">

    createOrder() {
      this.isLoading = true;
      const url = `${process.env.VUE_APP_API}api/${process.env.VUE_APP_PATH}/order`;
      const order = this.form;
      this.$http.post(url, { data: order }).then((res) => {
        console.log(res); // orderId
        this.isLoading = false;
        // 後端有方法会直接清空购物车
        this.getCart();

        // 抓ID送转跳网址列
        this.orderId = res.data.orderId;
        this.$router.push(`checkout/${this.orderId}`);
      });
    },
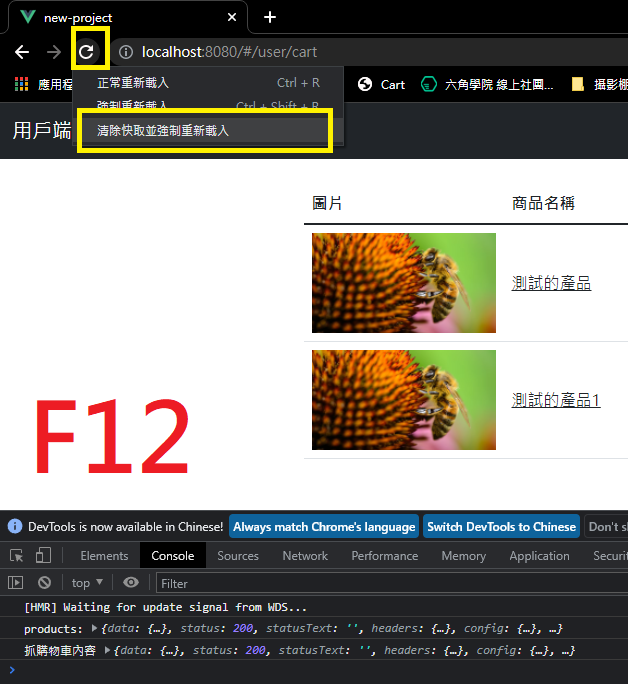
记得清快取
显示该标签 v-if
              <tr v-if="cart.final_total !== cart.total">
                <td colspan="3" class="text-end text-success">折扣价</td>
                <td class="text-end text-success">
                  {{ $filters.currency(cart.final_total) }}
                </td>
              </tr>

            <span v-if="item.is_enabled === 1" class="text-success">启用</span>
            <span v-else class="text-muted">未起用</span>
显示该样式 :class
        :class="{ active: page === pages.current_page }"
        class="page-item"
不能使用功能 :disabled
                  <button
                    v-bind:disabled="this.status.loadingItem === item.id"
                    type="button"
                    class="btn btn-outline-danger"
                  >
删除套件
(1)查看套件资料 package.json
(2)删除套件
npm remove ???
npm remove element-ui
npm remove babel-plugin-component
<<: Certified Oracle 1Z0-1057-21 Exam Dumps is What You Really Need to Pass Your Exam
力抗暗黑,Azure 资安天使的逆袭
第一次出书新手上路,请多多指教 谢谢第十届我们的Diablo, the rest of the li...
成为工具人应有的工具包-06 WirelessKeyView
WirelessKeyView 今天来认识 WirelessKeyView这个酷东西! (还有其他密...
Day25 Redis架构实战-Sentinel选取Replica机制
Replica选择切换机制 先剔除不健康的Replica Replica与Master失去连线时间,...
[Day15] - Django Model - 管理资料库之良伴
不知不觉,铁人赛已经进行到了一半,没想到竟然撑的到如今。给自己和队友们一个赞! 今天我们要来介绍一样...
透明这回事 (Part 2)
前言 今天接着把「透明」这个主题再延伸一些。 Scrum 在开发团队人数的考量上,从 2017 版本...