【Python SQL : 数据持久化 攻略】SQLite x MySQL x SQLAlchemy
人生苦短 我用 Python
目录
- 前言 : 数据持久化 ?
- 使用 SQLite
- 连线 MySQL
- SQLAlchemy ORM 框架
- Flask_SQLAlchemy 套件
前言 : 数据持久化 ?
什麽是数据持久化 ?
顾名思义,就是将程序中的数据,持久的保存到电脑设备中。
记事本保存文字或 Excel 保存表格,都是一种持久化的实现。

不过,在程序设计的领域,主要会透过 SQL 结构化查询语言,
来对资料库进行储存、操作与检索的动作。

在 Python 的应用中 ?
Python 常见的网路爬虫、数据分析或网站开发,基本上都会有大量的数据产生。
要如何妥善的保存这些资料?
这会是程序开发者,一个非常重要的课题 !
如果你刚学习完 Python 程序语言,还不知道要精进哪一方面的技能,
先来了解 Python 的 SQL 操作,会是一个好的选择 !
接下来的 Python SQL 程序码范例 :
https://gitlab.com/GammaRayStudio/DevelopmentGroup/Python/PythonSQL
使用 SQLite
如何使用 SQLite ?
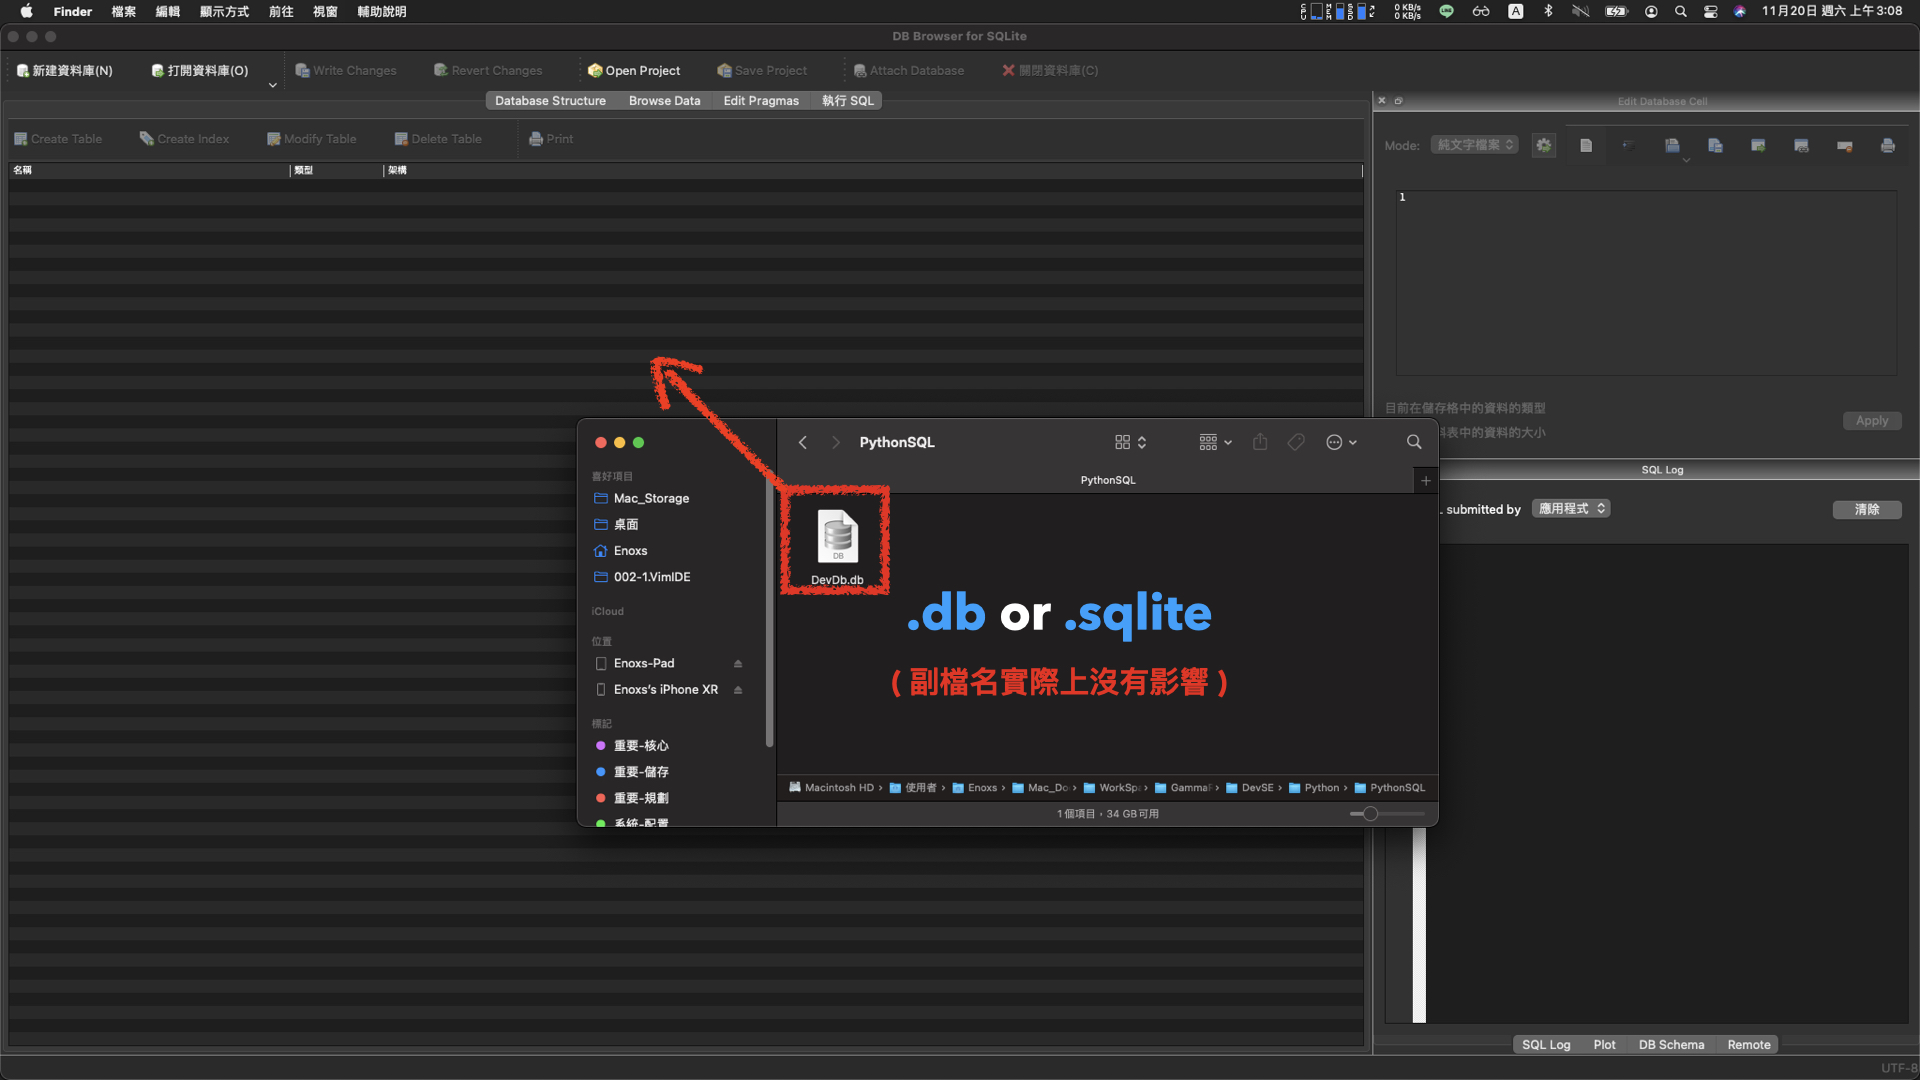
资料库工具: DB Browser for SQLite
创建空白档案,副档名为 .db 或 .sqlite
然後拖曳到 DB Browser for SQLite 里面,就可以将这个档案 作为 sqlite 的资料库。
创建资料表

- 右上角 Create Table 创建表格
- 填入测试的表格名称 app_info
- 新增六个栏位 :
- id 识别码 : Integer , Not Null , Primary Key
- name 应用程序名称 : Text
- version 发布版本 : Text
- author 开发者 : Text
- date 发布日期 : Text
- remark 备注描述 : Text
新增资料
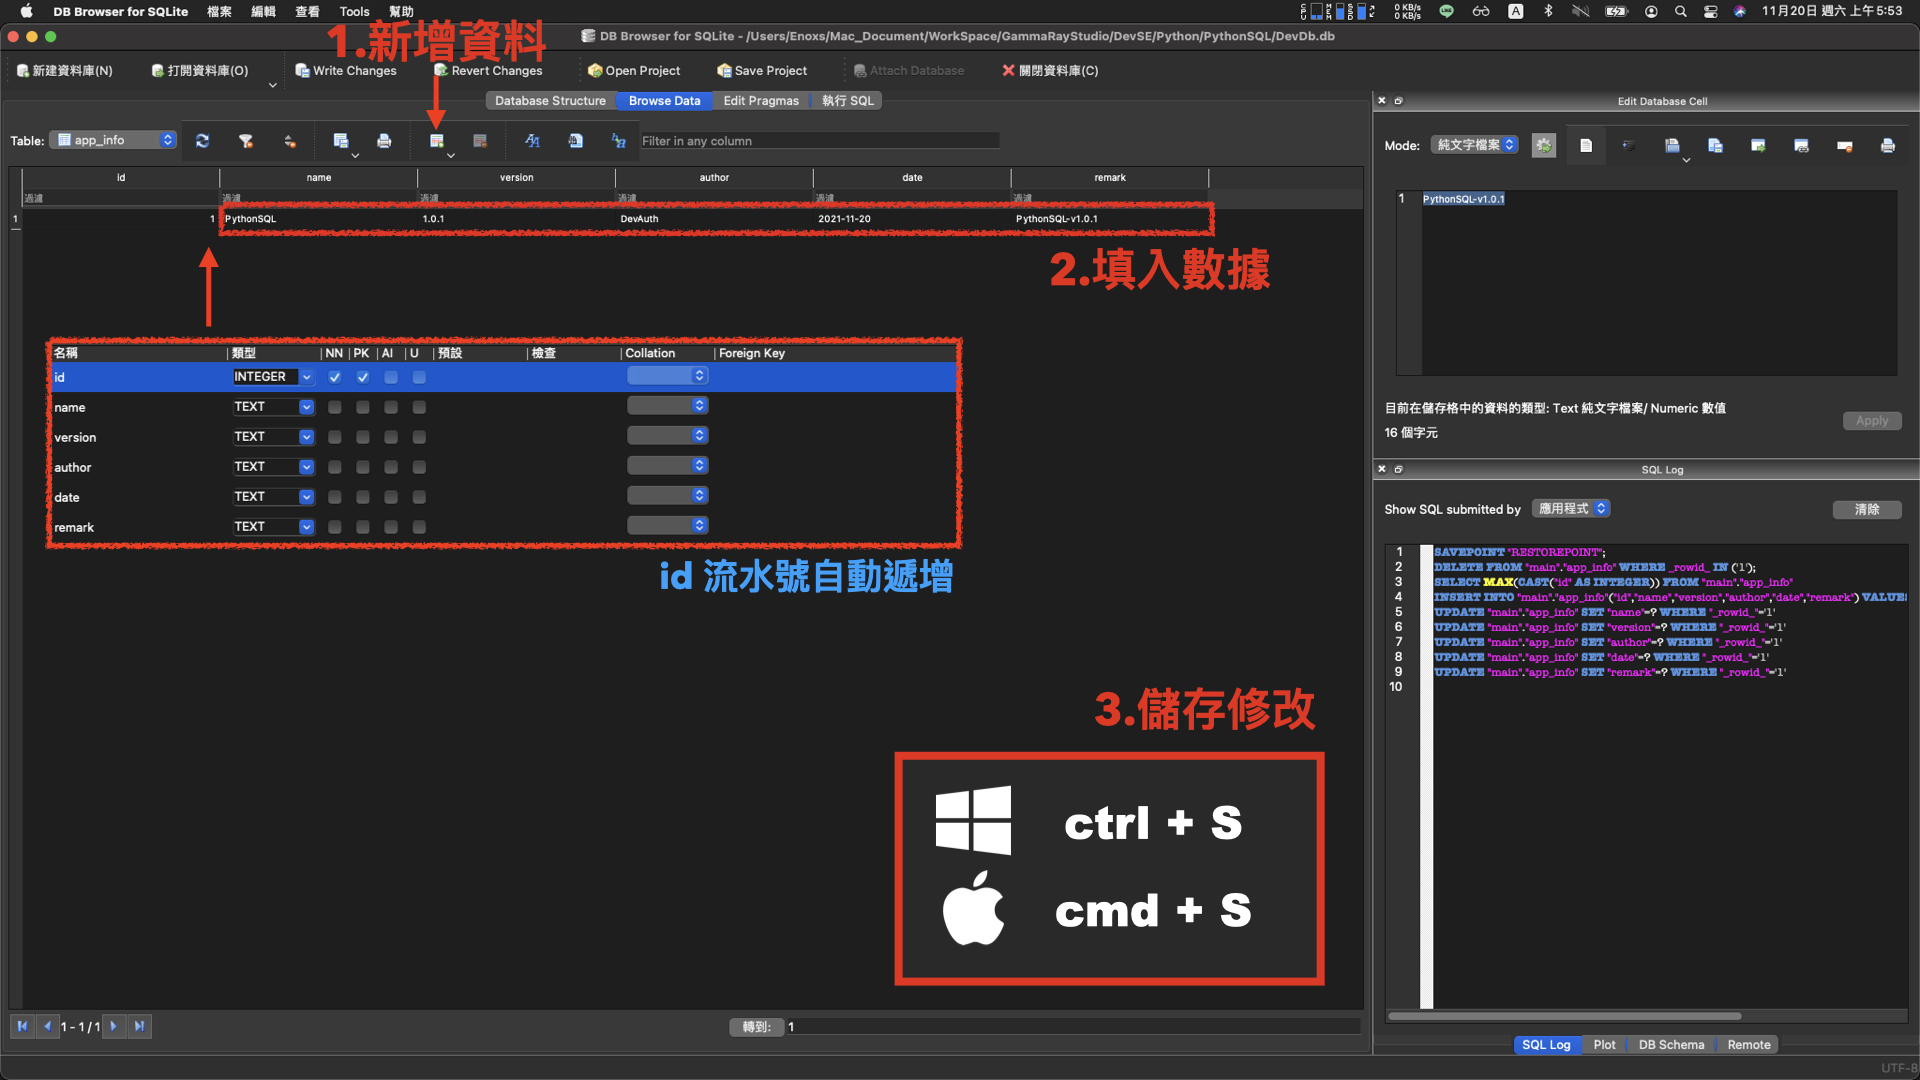
- 切换到 Browse Data 的页签,点击 上方中间 表格与加号的图示
- id 的部分 会自动配置流水号,剩下的表格 依序填入资料
- 完成後,要记得存档,才能够变更资料库的内容
基本的 SQL 语法
有了表格与资料後,接下来就可以使用 SQL 语法进行测试。
测试的操作如下:

- 切换到 执行 SQL 的页签
- 填入要执行的 SQL 语法
- 上方的三角形按钮,执行 SQL
- Select 语法会有回传结果
- Insert、Update、Delete 语法不会回传资料
查询 SQL 语法
SELECT * FROM data_table;
语法结构:

测试 SQL:
SELECT * FROM app_info WHERE id = 1;
新增
INSERT INTO data_table (name, version, remark)
VALUES('App', '1.0.1', 'App-v1');
语法结构:

测试 SQL:
INSERT INTO app_info (name, version, author, date, remark)
VALUES ('App', 'v1.0.1', 'DevAuth', '2021-11-20', 'App-v1.0.1');
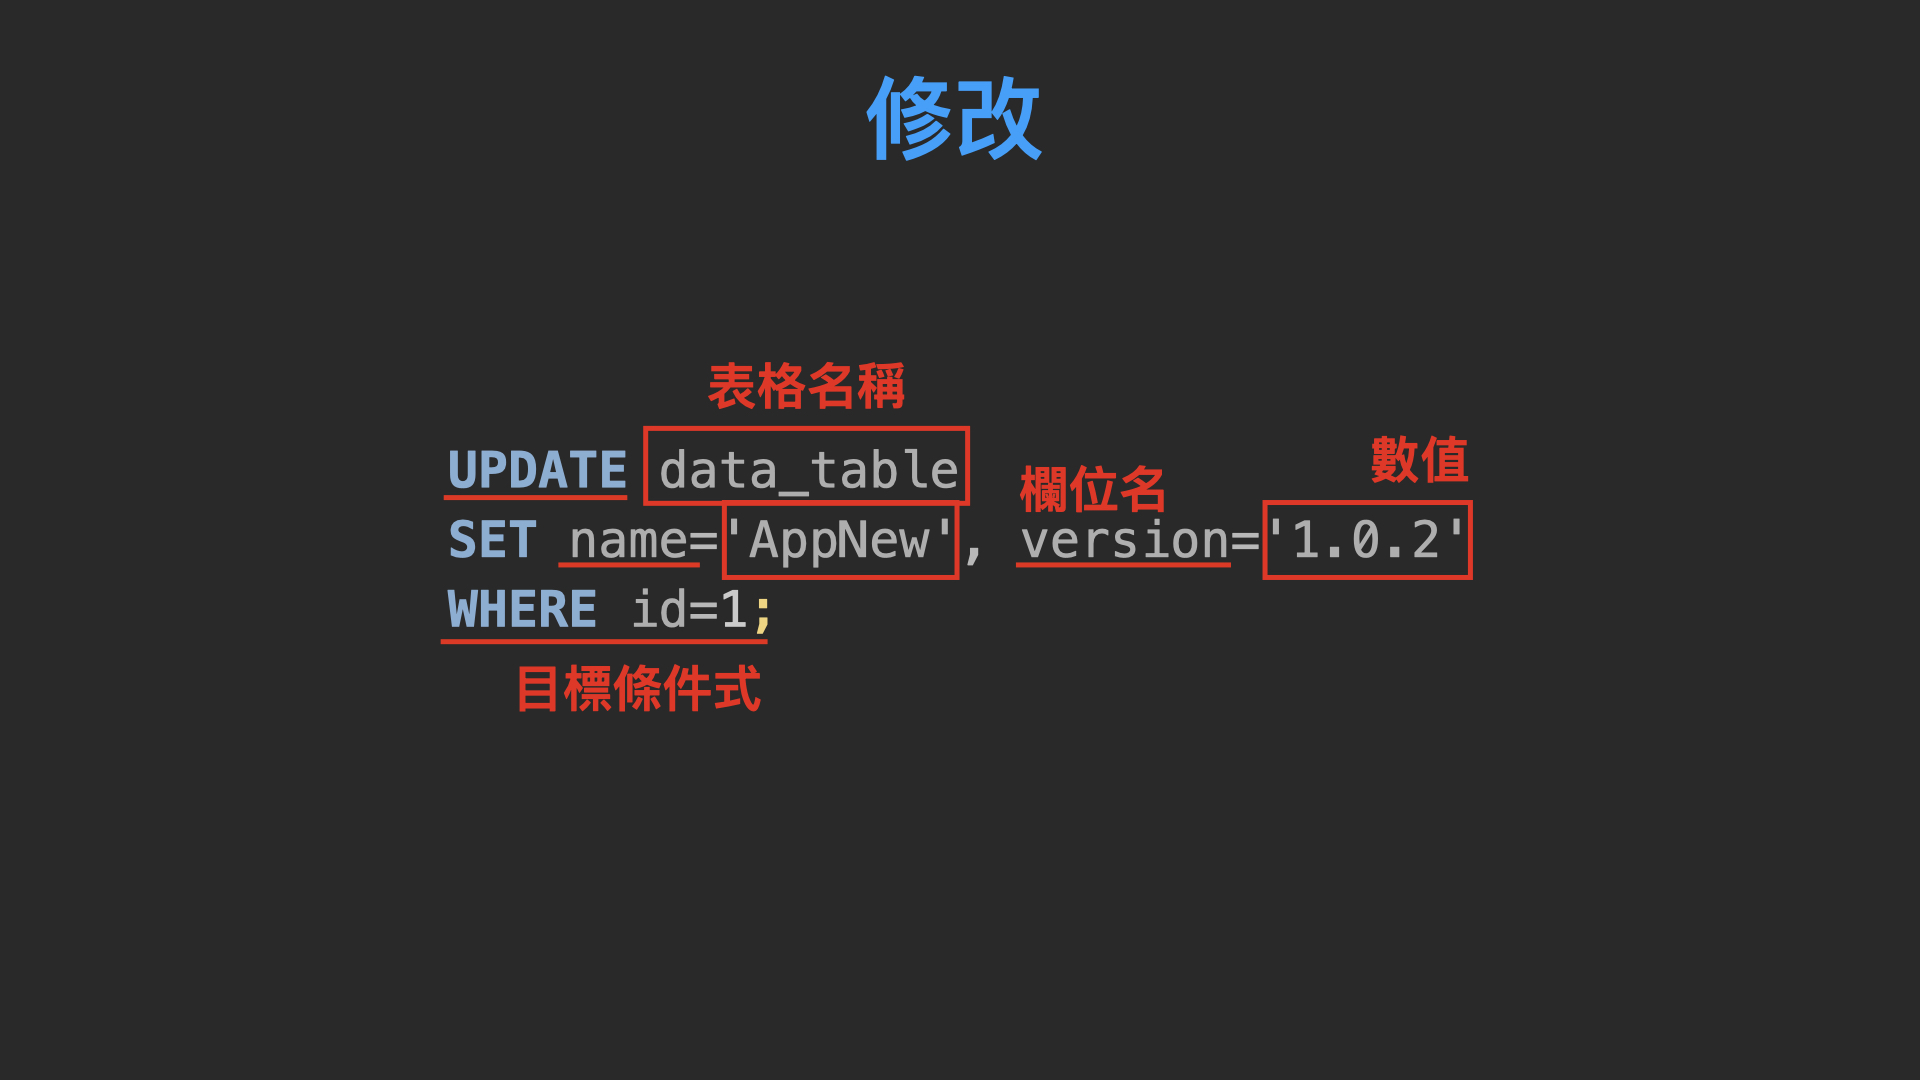
修改
UPDATE data_table
SET name='AppNew', version='1.0.2'
WHERE id=1;
语法结构:
测试 SQL:
UPDATE app_info
SET name='AppNew', version='1.0.2', remark='AppNew-v1.0.2'
WHERE id=1;
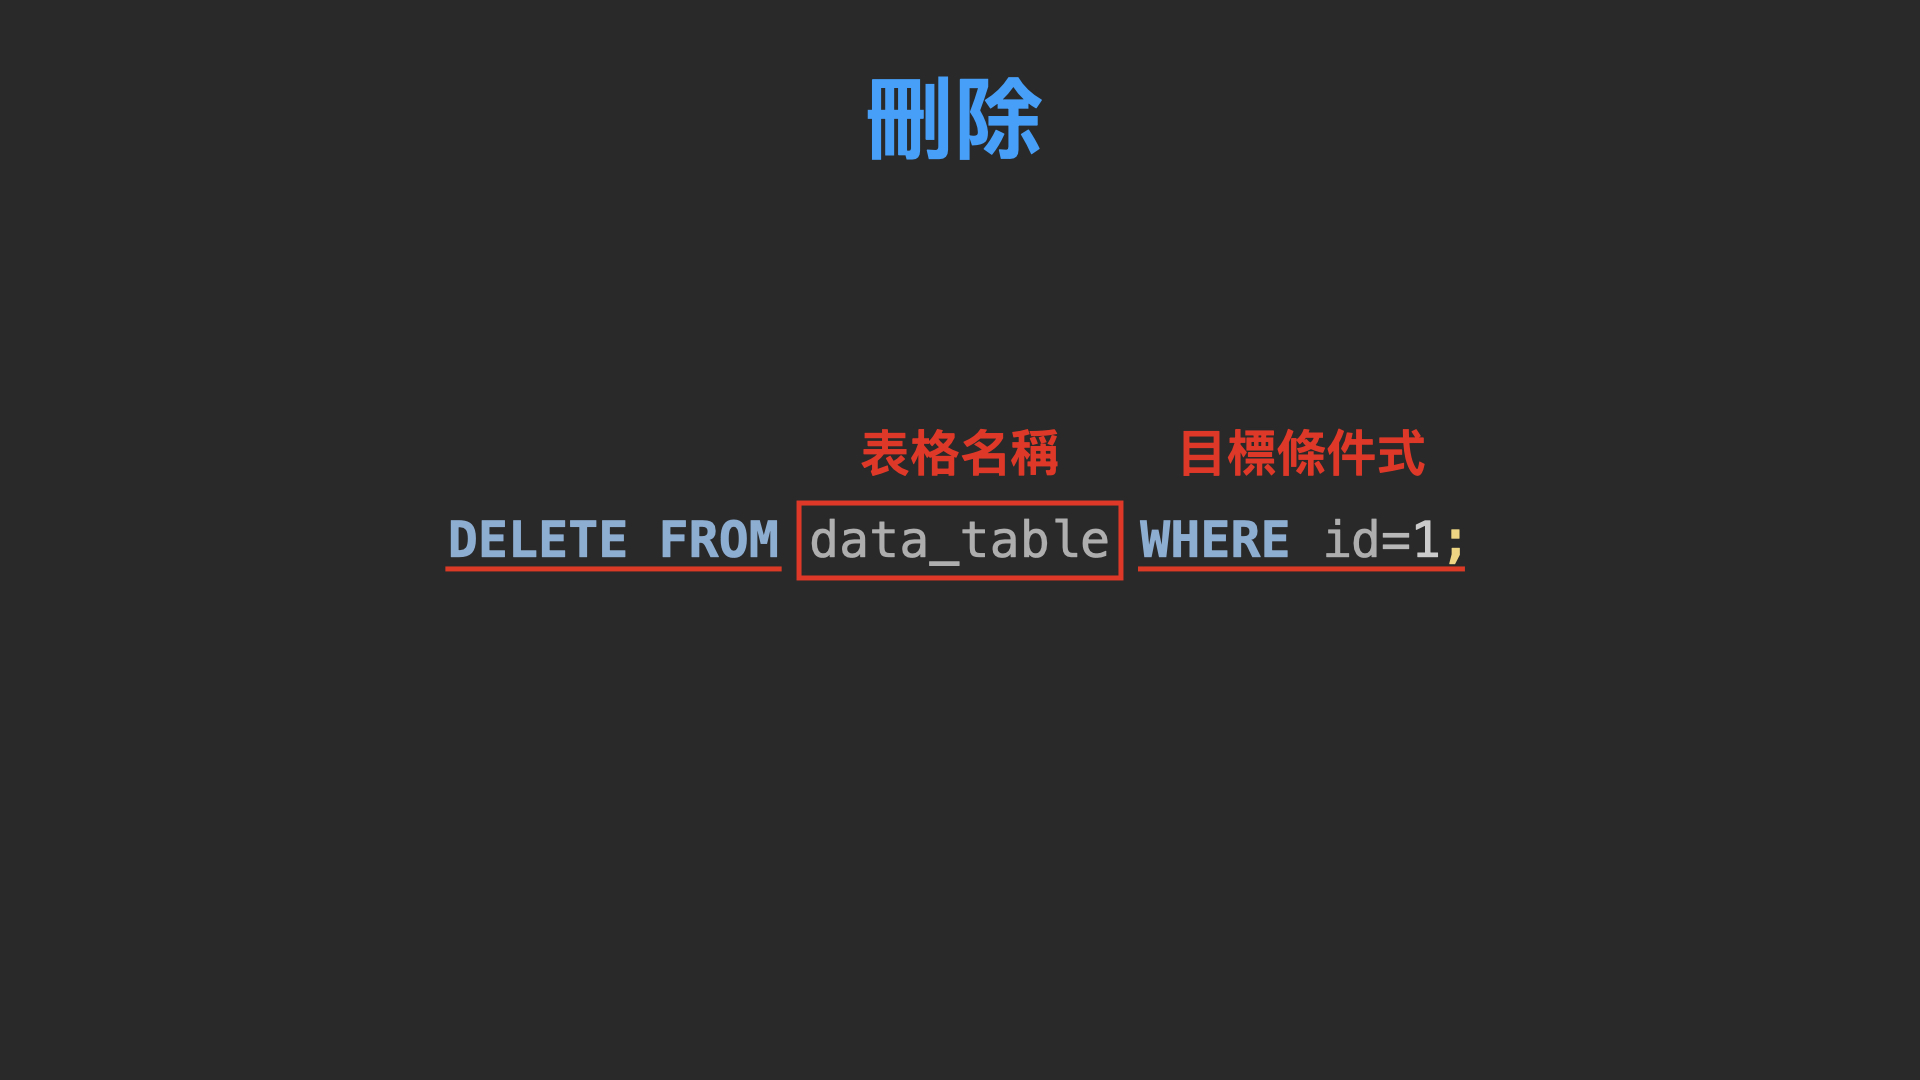
删除
DELETE FROM data_table WHERE id=1;
测试 SQL:
DELETE FROM app_info WHERE id=2;
Python SQLite3 模组
sqlite3 模组是 Python 标准库里面的内容,不用 pip 安装套件,可以直接导入!
sqlite-conn.py
SQLite 资料库连线 与 执行查询的SQL 语法
import sqlite3 #导入模组

conn = sqlite3.connect('DevDb.db') #建立连线

cursor = conn.cursor() #取得游标物件
cursor.execute('SELECT * FROM `app_info`;') #执行 SQL 语法

records = cursor.fetchall() #取得回传资料
print(records)
print("record type => ", type(records)) #回传资料型态
print("record[0] type => ", type(records[0])) #回传资料内部的元素型态

for r in records: # list 型态,可回圈迭代
    print(r)

print("\n---\n")

for r in records:
    app_id, app_name, app_ver, app_author, app_date, app_remark = r # tuple 元素拆解
    print("id => ", app_id)
    print("name => ", app_name)
    print("\n---\n")

cursor.close() # 释放资源
conn.close()
Output:
[(1, 'PythonSQL', '1.0.1', 'DevAuth', '2021-11-20', 'PythonSQL-v1.0.1')]
record type =>  <class 'list'>
record[0] type =>  <class 'tuple'>
(1, 'PythonSQL', '1.0.1', 'DevAuth', '2021-11-20', 'PythonSQL-v1.0.1')

---

id =>  1
name =>  PythonSQL

---
sqlite-ctrl.py
用 While 回圈与 input 方法,实作依据动作代码,执行相应操作的互动程序
import sqlite3

conn = sqlite3.connect('DevDb.db')

cursor = conn.cursor()

appDesc = """
Please input action code :

1 - Insert Data
2 - Update Data
3 - Delete Date
--- --- ---
0 - exit

"""

isRun = True
while isRun:
    cursor.execute('SELECT * FROM `app_info`;')
    records = cursor.fetchall()

    for r in records:
        print(r)

    ctrl = input(appDesc)
    if ctrl == "0": # 结束程序
        isRun = False
    elif ctrl == "1": # 执行插入的 SQL 语法
        sql = """
        INSERT INTO app_info (name, version, author, date, remark)
        VALUES ('App', 'v1.0.1', 'DevAuth', '2021-11-20', 'App-v1.0.1');
        """
        cursor.execute(sql)
        conn.commit() # 新增的语法必须要再加上提交的操作
    elif ctrl == "2": # 执行更新的 SQL 语法
        row_id = input("row_id = ? ") # input 方法,动态决定目标 id
        sql = """
        update app_info
        set name = 'AppNew' , version='1.0.2' , remark = 'App-v1.0.2'
        WHERE id={};
        """.format(row_id)
        cursor.execute(sql)
        conn.commit()# 更新的语法必须要再加上提交的操作
    elif ctrl == "3": # 执行删除的 SQL 语法
        row_id = input("row_id = ? ") # input 方法,动态决定目标 id
        sql = """
        delete from app_info
        where id={};
        """.format(row_id)
        cursor.execute(sql)
        conn.commit()# 删除的语法必须要再加上提交的操作

cursor.close()
conn.close()
新增操作(动作代码1):
(1, 'PythonSQL', '1.0.1', 'DevAuth', '2021-11-20', 'PythonSQL-v1.0.1')

Please input action code :

1 - Insert Data
2 - Update Data
3 - Delete Date
--- --- ---
0 - exit

1
(1, 'PythonSQL', '1.0.1', 'DevAuth', '2021-11-20', 'PythonSQL-v1.0.1')
(2, 'App', 'v1.0.1', 'DevAuth', '2021-11-20', 'App-v1.0.1')

Please input action code :

1 - Insert Data
2 - Update Data
3 - Delete Date
--- --- ---
0 - exit

1
(1, 'PythonSQL', '1.0.1', 'DevAuth', '2021-11-20', 'PythonSQL-v1.0.1')
(2, 'App', 'v1.0.1', 'DevAuth', '2021-11-20', 'App-v1.0.1')
(3, 'App', 'v1.0.1', 'DevAuth', '2021-11-20', 'App-v1.0.1')
修改操作(动作代码2):
Please input action code :

1 - Insert Data
2 - Update Data
3 - Delete Date
--- --- ---
0 - exit

2
row_id = ? 2
(1, 'PythonSQL', '1.0.1', 'DevAuth', '2021-11-20', 'PythonSQL-v1.0.1')
(2, 'AppNew', 'v1.0.2', 'DevAuth', '2021-11-20', 'App-v1.0.2')
(3, 'App', 'v1.0.1', 'DevAuth', '2021-11-20', 'App-v1.0.1')
删除操作(动作代码3):
Please input action code :

1 - Insert Data
2 - Update Data
3 - Delete Date
--- --- ---
0 - exit

3
row_id = ? 3
(1, 'PythonSQL', '1.0.1', 'DevAuth', '2021-11-20', 'PythonSQL-v1.0.1')
(2, 'AppNew', 'v1.0.2', 'DevAuth', '2021-11-20', 'App-v1.0.2')
连线 MySQL
主流 MySQL 模组有三种:
- pymysql
- mysql connector
- mysqldb
(其中 mysqldb 只支援 python 2,python 3 的 改名叫 mysqlclient,这边没有额外的去测试。)
PyPI 安装套件
- PyMySQL - https://pypi.org/project/PyMySQL/
- mysql-connector-python - https://pypi.org/project/mysql-connector-python/
SQLite3 vs PyMySQL

- 模组名称,从 SQLite3 改成 PyMySQL
- 连线的部分,改成 mysql 需要的参数
- 主机 (Host)
- 端口 (Port)
- 用户名称 (User)
- 用户密码 (Password)
- 资料库 (Database)
PyMySQL vs mysql-connector-python
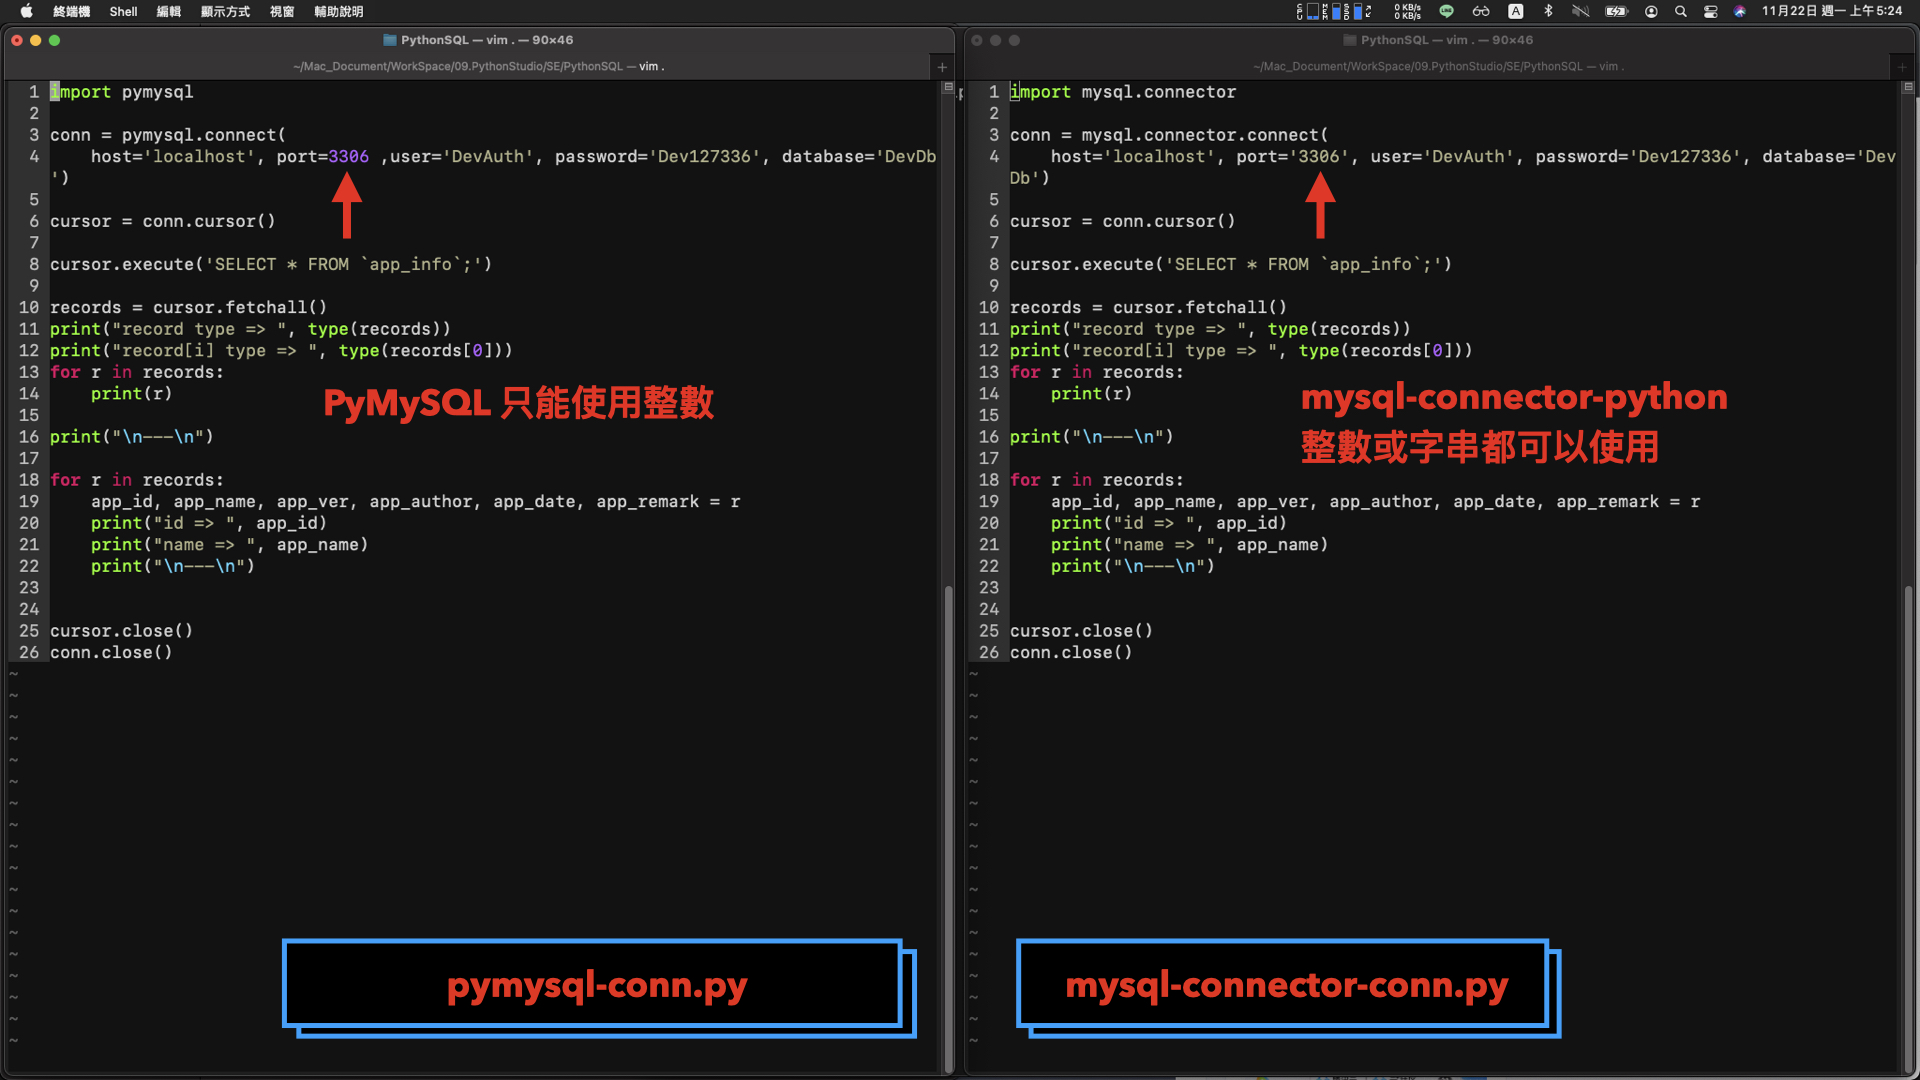
- 连线部分的端口参数,型态细微差异
pymysql-conn.py
import pymysql # 导入 pymysql 参数

conn = pymysql.connect( # 填入 MySQL 资料库,连线需要的参数
    host='localhost', port=3306, user='DevAuth', password='Dev127336', database='DevDb')

cursor = conn.cursor()

cursor.execute('SELECT * FROM `app_info`;')

records = cursor.fetchall()
print("record type => ", type(records))
print("record[i] type => ", type(records[0]))
for r in records:
    print(r)

print("\n---\n")

for r in records:
    app_id, app_name, app_ver, app_author, app_date, app_remark = r
    print("id => ", app_id)
    print("name => ", app_name)
    print("\n---\n")


cursor.close()
conn.close()
pymysql-ctrl.py
import sqlite3

conn = sqlite3.connect('DevDb.db')

cursor = conn.cursor()

appDesc = """
Please input action code :

1 - Insert Data
2 - Update Data
3 - Delete Date
--- --- ---
0 - exit

"""

isRun = True
while isRun:
    cursor.execute('SELECT * FROM `app_info`;')
    records = cursor.fetchall()

    for r in records:
        print(r)

    ctrl = input(appDesc)
    if ctrl == "0":
        isRun = False
    elif ctrl == "1":
        sql = """
        INSERT INTO app_info (name, version, author, date, remark)
        VALUES ('App', 'v1.0.1', 'DevAuth', '2021-11-20', 'App-v1.0.1');
        """
        cursor.execute(sql)
        conn.commit()
    elif ctrl == "2":
        row_id = input("row_id = ? ")
        sql = """
        update app_info
        set name = 'AppNew' , version='1.0.2' , remark = 'App-v1.0.2'
        WHERE id={};
        """.format(row_id)
        cursor.execute(sql)
        conn.commit()
    elif ctrl == "3":
        row_id = input("row_id = ? ")
        sql = """
        delete from app_info
        where id={};
        """.format(row_id)
        cursor.execute(sql)
        conn.commit()

cursor.close()
conn.close()
两个范例执行的结果,跟 SQLite 的范例一模一样
若还未安装过 MySQL 资料库,可参考「Docker 攻略 : MySQL 安装篇」
SQLAlchemy ORM 框架
Python 的 ORM 框架
PyPI 模组安装 SQLAlchemy
ORM 框架
Object Relational Mapping
意思是将程序中的物件,对应到资料库中的表格:
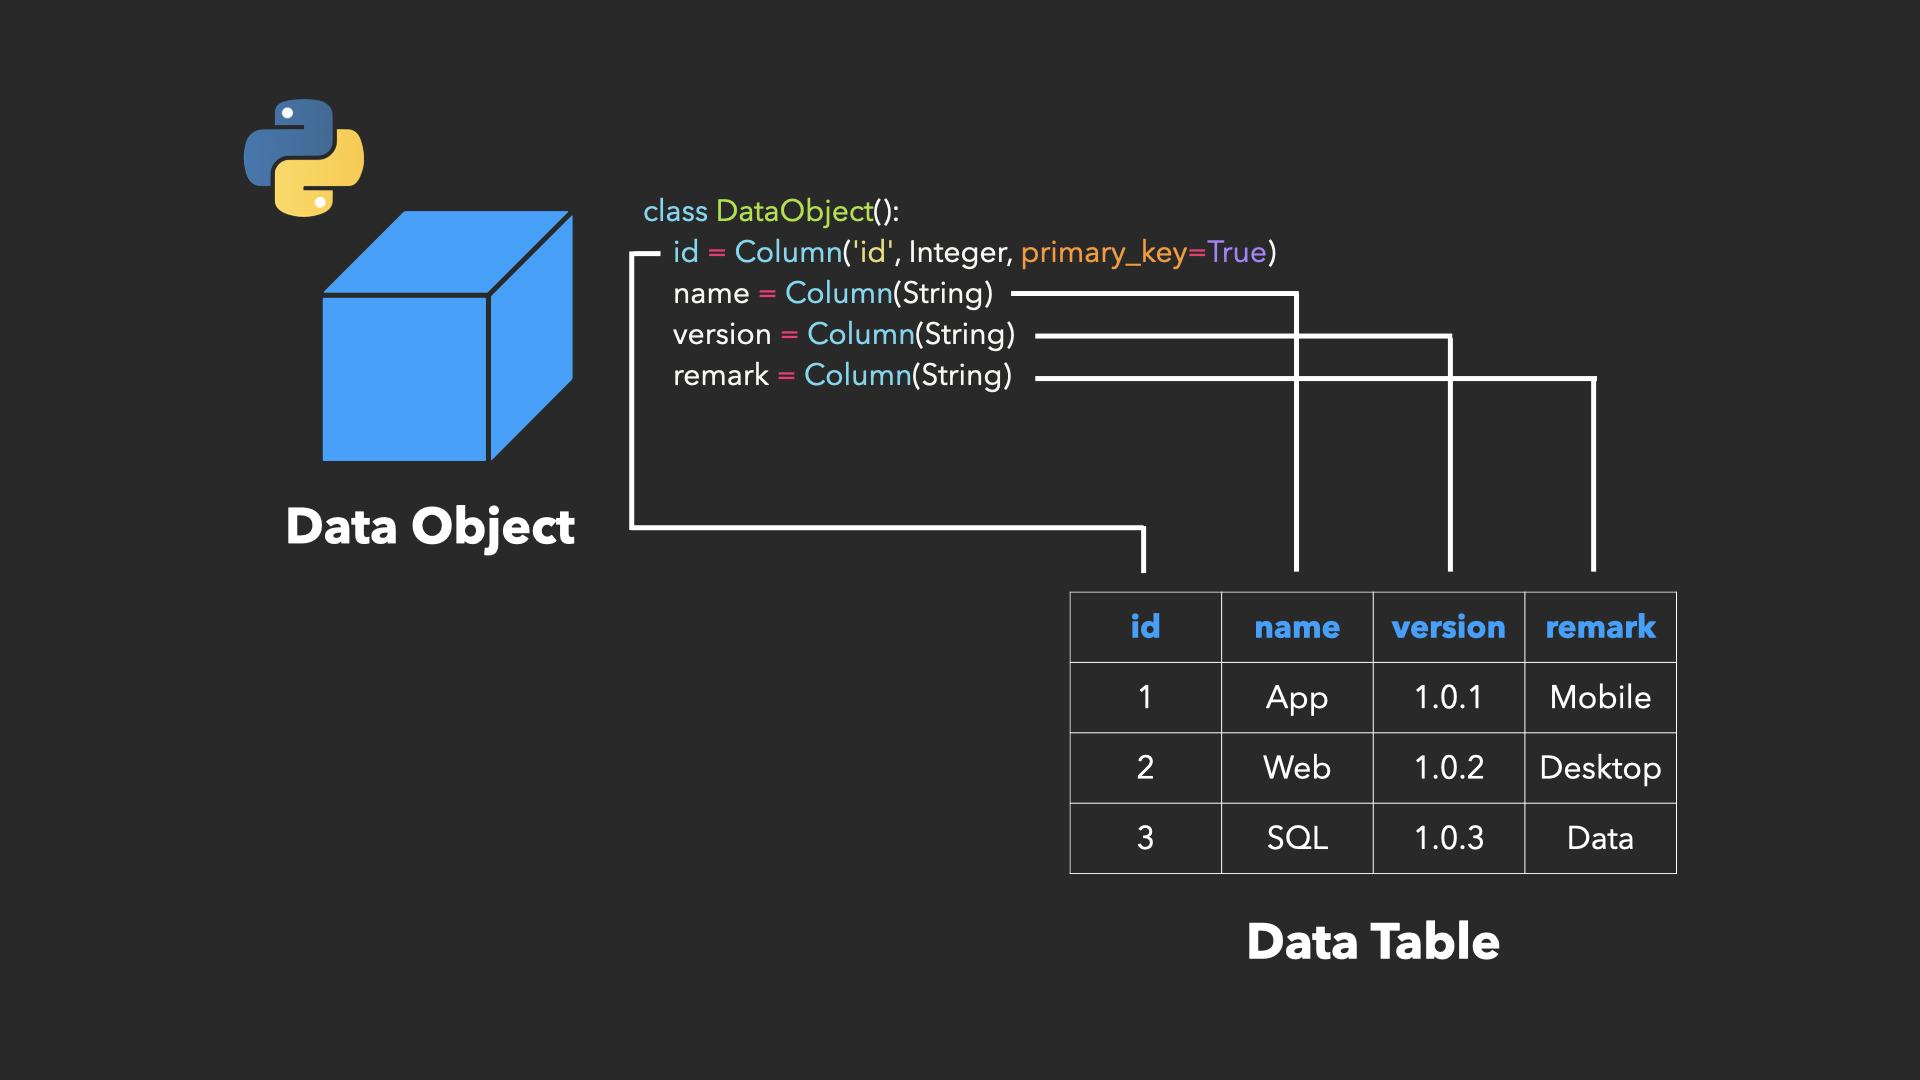
也就是说,在 Python 程序中,操作物件的增、删、改、查,就等於操作资料表的增、删、改、查。

sql-alchemy-ddl.py
使用程序物件的方式,创建资料表
from sqlalchemy import *

engine = create_engine('sqlite:///DevDb.db', echo=True) # 建立连线

db = MetaData() # 取得类似於 Cursor 的物件

demo_table = Table( # 代表资料表数据的物件
    'demo_table', db,
    Column('id', Integer, primary_key=True),
    Column('name', String),
    Column('data', String),
)

db.create_all(engine) # 创建资料表
- 使用 Table 的 Class 类别,初始化资料表:
- 名称 : demo_table
- 栏位 : id , name , data
sql-alchemy-conn.py
结构相似於之前的 sqlite-conn.py 范例
from sqlalchemy import *

engine = create_engine('sqlite:///DevDb.db', echo=False)

conn = engine.connect()
db = MetaData()

demo_table = Table(
    'demo_table', db,
    Column('id', Integer, primary_key=True),
    Column('name', String),
    Column('data', String),
)

sql = demo_table.select() # 使用 select 函式

print("sql => ", str(sql), '\n') # 完整 SQL 语句

result = conn.execute(sql) # 执行 SQL 方法

print("result type => ", type(result), '\n') # <class 'sqlalchemy.engine.cursor.LegacyCursorResult'>

for row in result: # 具有 list 型态特性,可回圈迭代
    print(type(row)) # <class 'sqlalchemy.engine.row.LegacyRow'>
    demo_id, demo_name, demo_data = row # 具有 tuple 元素特性,可拆分为参数
    print("id => ", demo_id)
    print("name => ", demo_name)
- 执行结果与之前相同
延伸用法: Where 子句
print("sql: select * from demo_table where id = 1 => \n")
sql = demo_table.select().where(demo_table.c.id == 1) # select 包含 where 子句的用法
result = conn.execute(sql)
for row in result:
    demo_id, demo_name, demo_data = row
    print("id => ", demo_id)
    print("name => ", demo_name)

print("\n---\n")
- 物件後方 select() 函式後,接续 where() 函式,相等於 Where 子句
print("sql_text: select * from demo_table where id = 1 => \n")
sql_text = text( # text() 函式
    "select * from demo_table where id = :app_id") # sql 语法 + 参数

result = conn.execute(sql_text, app_id='1').fetchall() # where 子句,栏位 id 的数值
print(result)
- text 函式,可以撰写一般的 SQL 语法,
- 参数部分,用冒号接续变数名称,动态决定执行数值
sql-alchemy-ctrl.py
结构相似於之前的 sqlite-ctrl.py 范例
from sqlalchemy import *

engine = create_engine('sqlite:///DevDb.db', echo=False)

conn = engine.connect()
db = MetaData()

demo_table = Table(
    'demo_table', db,
    Column('id', Integer, primary_key=True),
    Column('name', String),
    Column('data', String),
)


appDesc = """
Please input action code :

1 - Insert Data
2 - Update Data
3 - Delect Date
--- --- ---
0 - exit

"""
isRun = True

while(isRun):
    sql = demo_table.select()
    result = conn.execute(sql)

    for row in result:
        print(row)

    ctrl = input(appDesc)
    if ctrl == "0":
        isRun = False
    elif ctrl == "1":
        sql = demo_table.insert().values(name='App', data="text") # 插入操作 :  insert() + values()
        conn.execute(sql)
    elif ctrl == "2":
        row_id = input("row_id = ? ")
        sql = demo_table.update().values( # 更新操作 : update() + values() + where()
            name='AppNew', data="new text").where(demo_table.c.id == row_id)
        conn.execute(sql)
    elif ctrl == "3":
        row_id = input("row_id = ?")
        sql = demo_table.delete().where(demo_table.c.id == row_id) # 删除操作 : delete() + where()
        conn.execute(sql)
- 执行结果与之前相同
SQLAlchemy 进阶用法
使用真正的资料物件,相似於 sqlite-conn.py 范例
sql-alchemy-orm-object.py
from sqlalchemy.orm import sessionmaker
from sqlalchemy.ext.declarative import declarative_base
from sqlalchemy import Column, Integer, String
from sqlalchemy import create_engine

engine = create_engine('sqlite:///DevDb.db', echo=False) # 连线
Base = declarative_base() # 取得类似於 Cursor 的物件


class AppInfo(Base): # class 宣告 AppInfo 类别
    __tablename__ = 'app_info' # 表格名称
    id = Column('id', Integer, primary_key=True) # id 栏位 , Integer 型态 , 主键
    name = Column(String) # name 栏位 , String 型态
    version = Column(String) # versione 栏位 , String 型态
    author = Column(String) # author 栏位 , String 型态
    date = Column(Integer) # date 栏位 , String 型态
    remark = Column(String) # remark 栏位 , String 型态


Session = sessionmaker(bind=engine)
session = Session() # 取得 Session 物件
result = session.query(AppInfo).all() # 执行查询方法

for row in result:
    print(type(row)) # <class '__main__.AppInfo'>
    print("id => ", row.id)
    print("name => ", row.name)
- 从使用套件的 Table 类别,改成使用自定义的 AppInfo 类别
- 查询的方法变成 取得 session 物件後,执行 query() 的方法
- 最後回传的结果,就会是 AppInfo 的物件,而不是 之前回传的 tuple 型态
sql-alchemy-orm-mysql.py
使用真正的资料物件,相似於 sqlite-ctrl.py 范例
from sqlalchemy.orm import sessionmaker
from sqlalchemy.ext.declarative import declarative_base
from sqlalchemy import Column, Integer, String
from sqlalchemy import create_engine
from datetime import datetime

engine = create_engine( # 改成 mysql 的连线方式
    'mysql+pymysql://DevAuth:[email protected]:3306/DevDb', echo=False)
Base = declarative_base()


class AppInfo(Base):
    __tablename__ = 'app_info'
    id = Column('id', Integer, primary_key=True)
    name = Column(String)
    version = Column(String)
    author = Column(String)
    date = Column(Integer)
    remark = Column(String)

    def __init__(self, name, version, author, date, remark):
        self.name = name
        self.version = version
        self.author = author
        self.date = date
        self.remark = remark

    def __str__(self):
        return """
        app_id => {},
        app_name => {},
        app_version => {},
        app_author => {},
        app_date => {},
        app_remark => {}
        """.format(self.id, self.name, self.version, self.author, self.date, self.remark)


Session = sessionmaker(bind=engine)
session = Session()

appDesc = """
Please input action code :

1 - Insert Data
2 - Update Data
3 - Delect Date
--- --- ---
0 - exit

"""
isRun = True

while(isRun):
    result = session.query(AppInfo).all()
    for row in result:
        print(row)

    ctrl = input(appDesc)
    if ctrl == "0":
        isRun = False
    elif ctrl == "1":
        appInfo = AppInfo('App', '1.0.1', 'DevAuth', # 宣告 AppInfo 物件
                          datetime(2021, 11, 8, 12, 30, 10), 'App-v1.0.1')
        session.add(appInfo) # add() 方法,参数带入目标物件
        session.commit() # 新增的操作必须要加上提交的方法
    elif ctrl == "2":
        row_id = input("id = ? ")
        appInfo = session.query(AppInfo).filter_by(id=row_id).first() # 先查询出目标物件
        appInfo.name = "AppNew" # 直接修改物件的参数
        appInfo.version = "1.0.2"
        appInfo.remark = "App-v1.0.2"
        session.commit() # 更新的操作必须要加上提交的方法
    elif ctrl == "3":
        row_id = input("id = ? ")
        appInfo = session.query(AppInfo).filter_by(id=row_id).first() # 先查询出目标物件
        session.delete(appInfo) # delete 方法,参数带入目标物件
        session.commit() # 删除的操作必须要加上提交的方法
- 执行结果,与之前的 sqlite-ctrl.py 范例相同
- 更加的符合物件导向的程序操作,已经完全看不出 SQL 语法的影子
- 先查询後动作的流程,在更新与删除部分,也是後端开发建议的实作方法
(操作更精准)
Flask_SQLAlchemy 套件
这一次的 Python SQL 的教程,实际上是要用来补充之前 Python Flask 框架,後端 持久化的部分。
(一不小心,扩充成现在的内容)
程序码的部分有更新在 「Python Flask : 入门指南」的范例程序中 :
要先 PyPI 安装 Flask_SQLAlchemy 套件
接着执行 DbDao.py 范例
python DbDao.py
启动程序後,访问网站
http://localhost:5000

程序码的部分,如果有看过 Flask 入门指南,
以及刚才的 SQL-Alchemy 章节,应该可以很容易的理解。
专案路径
Python SQL
https://gitlab.com/GammaRayStudio/DevelopmentGroup/Python/PythonSQL
FlaskSE
https://gitlab.com/GammaRayStudio/DevelopmentGroup/Python/FlaskSE
参考资料
DB Browser for SQLite
DBeaver
PyPI - PyMySQL
https://pypi.org/project/PyMySQL/
PyPI - mysql-connector-python
https://pypi.org/project/mysql-connector-python/
PyPI - SQLAlchemy
https://pypi.org/project/SQLAlchemy/
PyPI - Flask_SQLAlchemy
https://pypi.org/project/Flask-SQLAlchemy/
mysql客户端pymysql在python下性能比较
https://cloud.tencent.com/developer/article/1399154
>>: 为了转生而点技能-JavaScript,day8(浅笔记-物件之浅层复制与深层复制
Rstudio
Shift+Ctrl+R 分段 可缩 Shift+Ctrl+C 多行注解 Shift+Ctrl+M ...
[1][STM32G4系列] GPIO笔记 - CubeMX GPIO整理与应用
前言 GPIO为最基础应用也最广泛之功能,本篇主要纪录GPIO中所学习到的知识。 以STM32G43...
Day 19 上传图片
在大部分的网站中,上传图片也是很重要的功能,今天我们就来实作。 (注:这是用 Blazor Serv...
企划实现(1)
常常有人说做好一个企划需要勇气,但绝非这麽简单,创业不只需要勇气还需要运气、人脉、实力 、执着 做好...
Day2.程序运行的基本概念(预处理、编译、组译、链结)
平常我们很少关注编译和链结的过程,因为开发环境都集成开发的环境,比如Visual Studio、Ec...