Day 07 Style
第七天~
我们昨天写了个 Hello World 出来,
但是这只是单单把字给秀出来而已,
假如我们希望对画面做调整的话,
让我们的 Hello World 看起来不这麽单调的话,
我们就要使用 Style 来调整我们画面的样式
Style
Style 在 React Native 是蛮重要的一个环节,
在 React Native 假如需要制定画面的样式,
都需要透过 Style 才能完成,
使用的方式有两种:
-
StyleSheet.create([object])
const styles = StyleSheet.create({
  title: {
    backgroundColor: "#c0c0c0",
    width: 100,
  },
});
- inline style
const styles = {
  title: {
    backgroundColor: "#c0c0c0",
    width: 100,
  },
};
如上,
我们可以用 object 去定义不同的 style,并且给 style 一个 key ,让我们放入 component style props 参数里
<View style={[styles.title]}></View>
两者差别在哪里?
StyleSheet.create 会去验证每个 style 的参数是否符合, inline style 则不会
毕竟我们开发的是 双平台的 APP,写 CSS 也只是表象而已,
所以并不能完全的照着 CSS 那样写,
像是:
Selector
每个 style,只能影响当下的使用到的 component,不能像 web 透过 css selector 去影响其他元素
display
在 React Native 是不会有 block or inline ...等参数
它目前只有使用 flex 来做布局的排版
单位
毕竟是做双平台开发, android 是 dp , ios 是 pt,
那针对不同单位的问题,
React Native 采用 无单位的方式,
所以我们在开发时,是不需要使用任何单位的,
不过目前可以支援百分比 %
const styles = StyleSheet.create({
  title: {
    width: 100,
  },
});
//or
const styles = StyleSheet.create({
  title: {
    width: '50%',
  },
});
参数不能全部写在一起
在 web 里,我们 css 有些参数可以写一起,
ex: margin、border、padding...等
好比说今天要调整 margin 但是上下左右都不一样,
在 web , 是可以直接写成
margin : 10 20 30 10
但是在 React Native,是不行的,
我们必须去设定每一个的参数
const styles = StyleSheet.create({
  title: {
    marginTop: 10,
    marginRight: 20,
    marginBottom: 30,
    marginLeft: 10,
  },
});
那相关的 style 参数是可以在 React Native 官网 找到
那我们知道如何设定了的话,
开始调整 Hello World 吧~
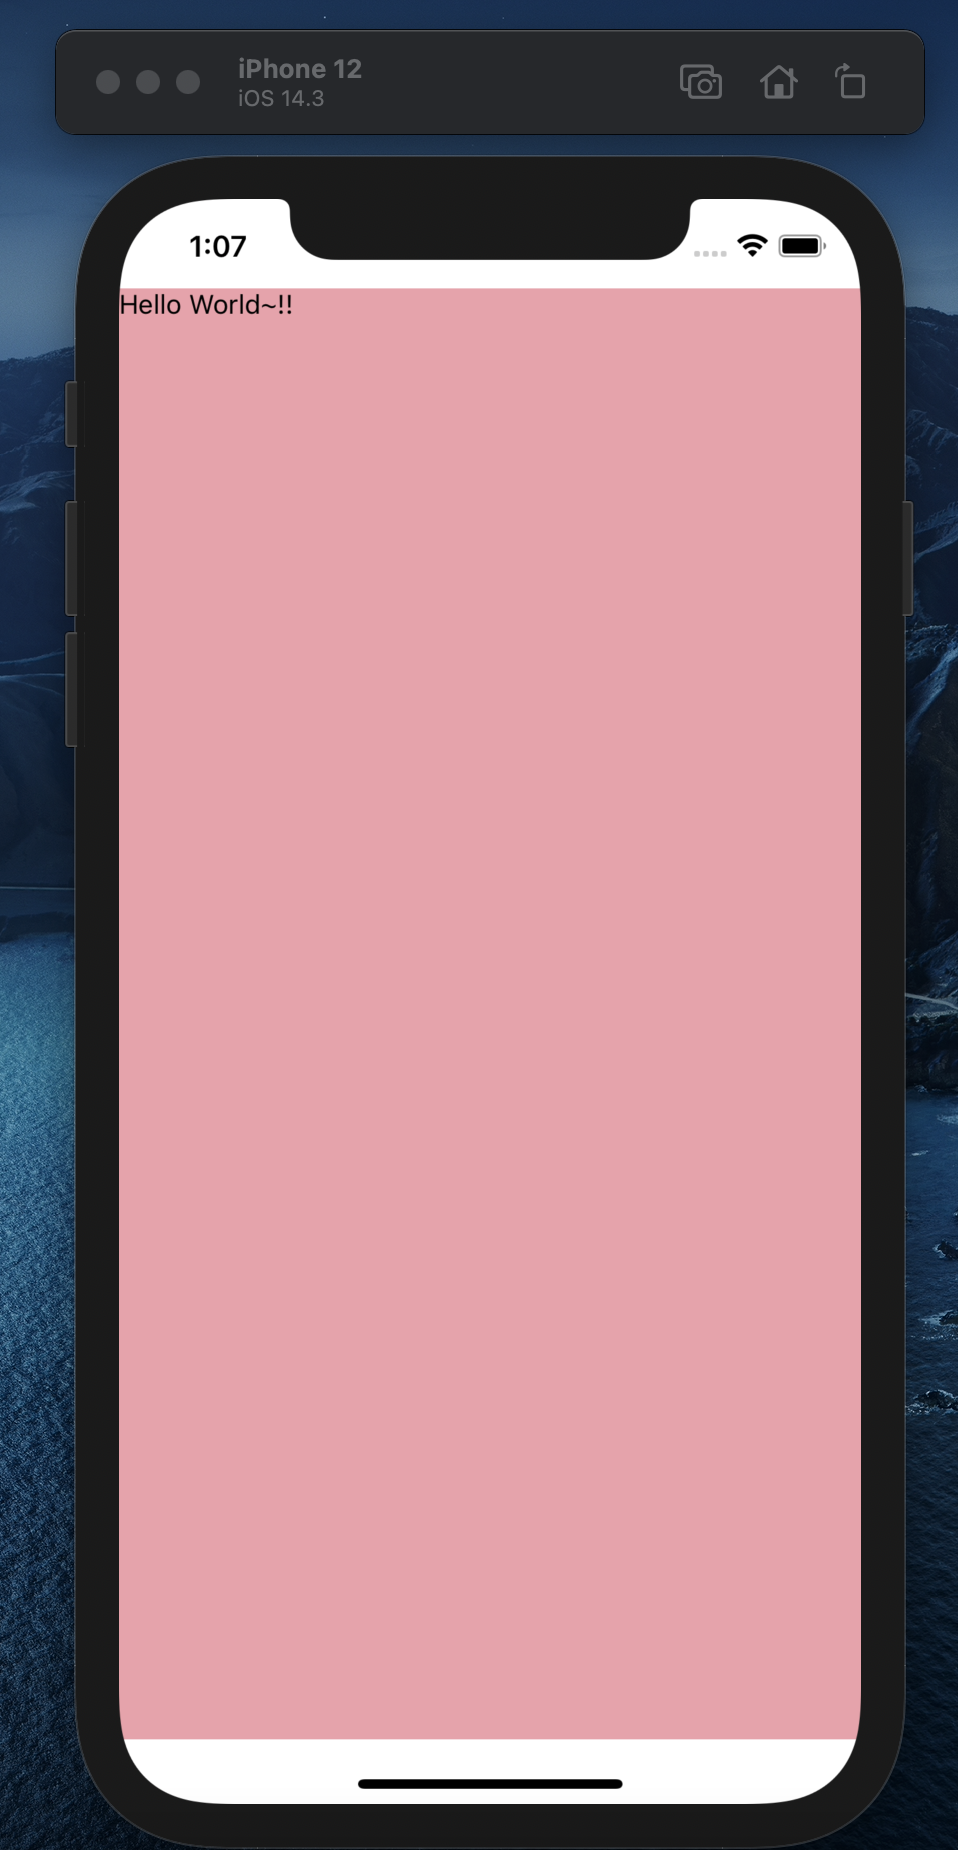
- 希望背景不要是白色太单调,那我们设定一个
root的style,并把它挂在View component
const App = () => {
  return (
    <SafeAreaView>
      <View style={styles.root}>
        <Text>Hello World~!!</Text>
      </View>
    </SafeAreaView>
  );
};

const styles = StyleSheet.create({
  root: {
    width: "100%",
    height: "100%",
    backgroundColor: "#f0a0aa",
  },
});
这时画面就变成:
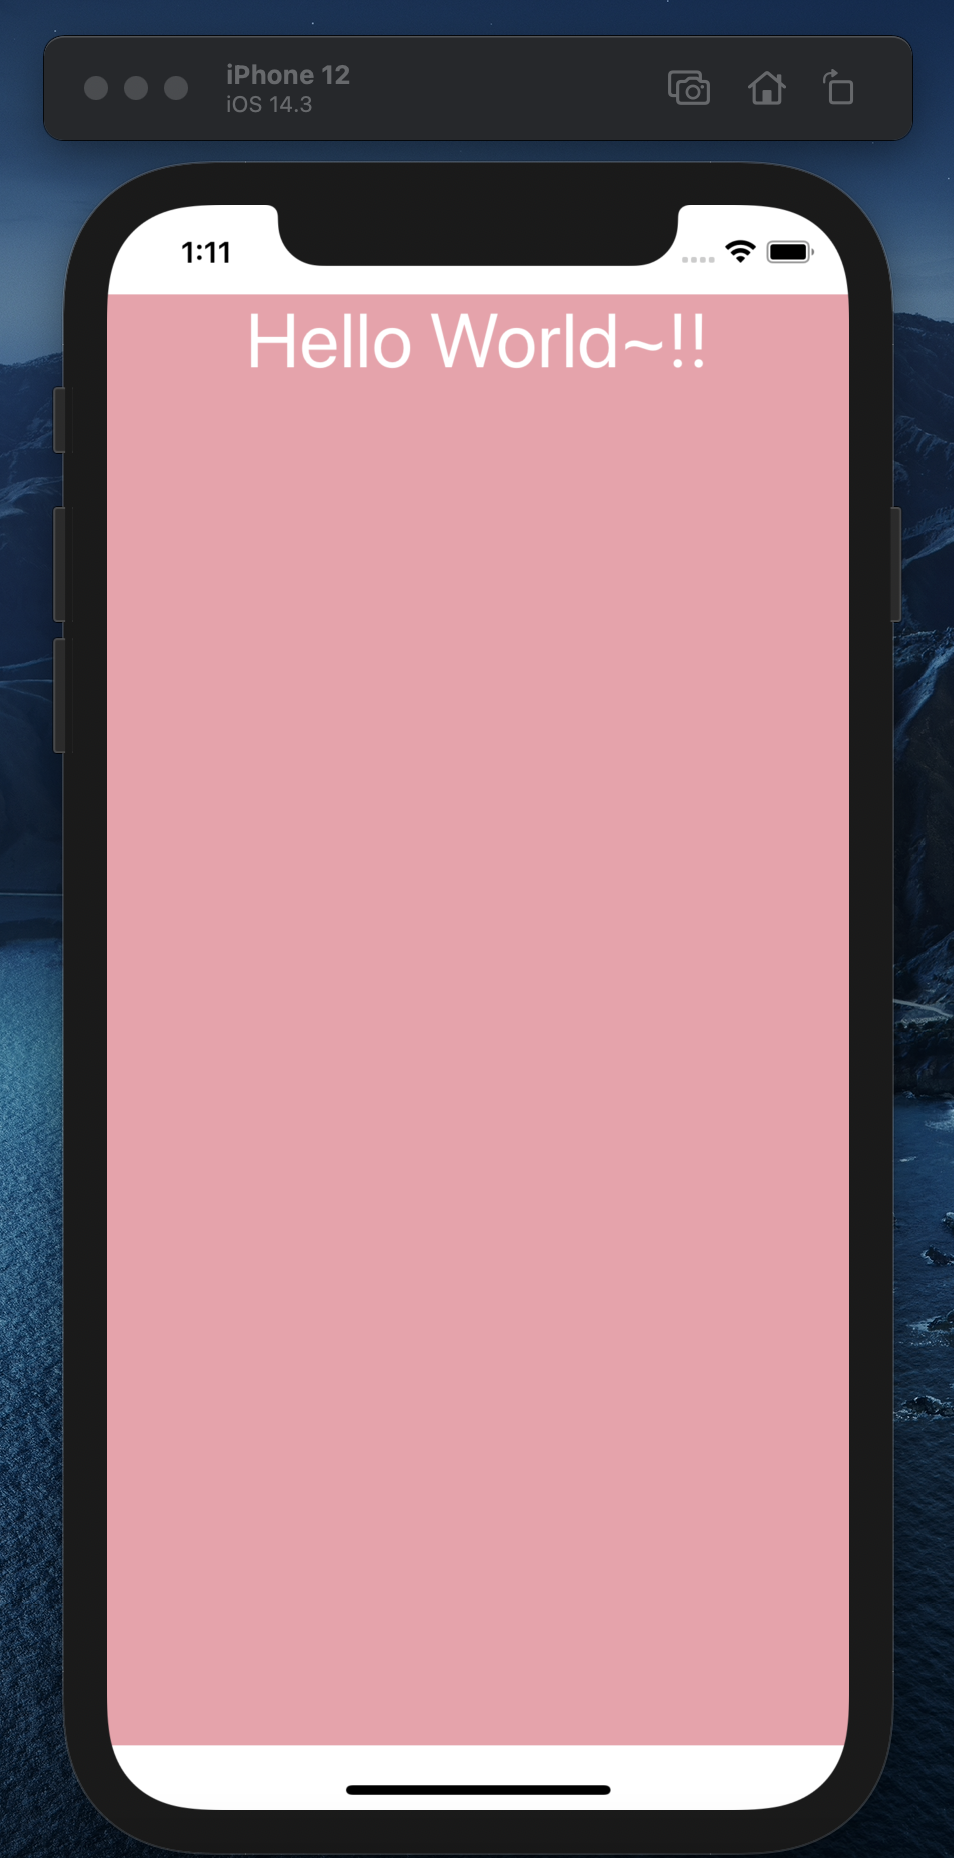
- 希望我们的字能够大一点,颜色为白色,并且置中,再新增一个
text style,挂在Text component
const App = () => {
  return (
    <SafeAreaView>
      <View style={styles.root}>
        <Text style={styles.text}>Hello World~!!</Text>
      </View>
    </SafeAreaView>
  );
};

const styles = StyleSheet.create({
  root: {
    width: "100%",
    height: "100%",
    backgroundColor: "#f0a0aa",
  },
  text: {
    fontSize: 40,
    color: "#FFF",
    textAlign: "center",
  },
});
这时画面就变成:
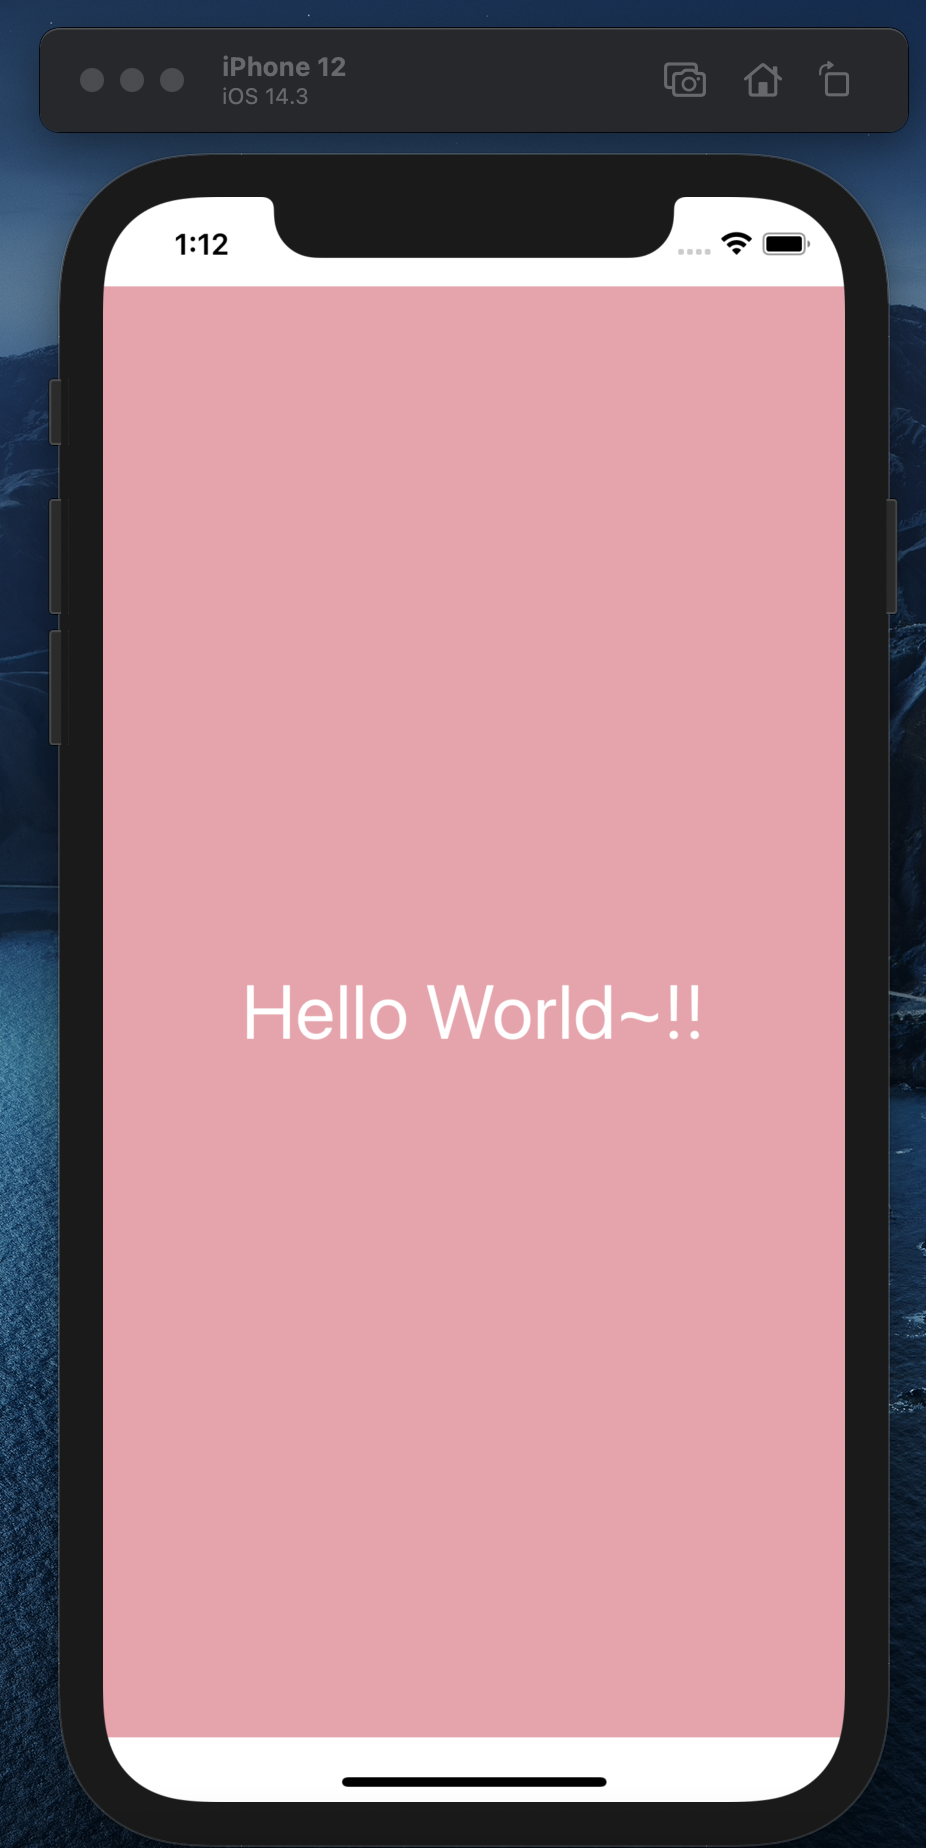
- 最後,希望可以垂直置中
const App = () => {
  return (
    <SafeAreaView>
      <View style={styles.root}>
        <Text style={styles.text}>Hello World~!!</Text>
      </View>
    </SafeAreaView>
  );
};

const styles = StyleSheet.create({
  root: {
    width: "100%",
    height: "100%",
    justifyContent: "center",
    backgroundColor: "#f0a0aa",
  },
  text: {
    fontSize: 40,
    color: "#FFF",
    textAlign: "center",
  },
});
这就是最後画面啦:
<<: DAY 9:Worker Pool Pattern,就。很。Pool。
>>: 【Day22】 Transformer 新手包 (二)
第30天:终於撑到完赛QQ-JavaScript技术手册阅读笔记
四开四个主题实在太累,JavaScript技术手册阅读笔记这个主题就是读这本书买很久的书,顺便把之前...
[重构倒数第02天] - Slots 与 Render Functions 的进阶心法
前言 该系列是为了让看过Vue官方文件或学过Vue但是却不知道怎麽下手去重构现在有的网站而去规画的系...
DAY9-OH CRUD.
前言: 上一篇的最後我们提到今天要来补完Update和Delete,可是阿森不想让所有人都可以控制...
Day 17. UX/UI 设计流程之五:GUI Design (上)
规划设计完 Wireflow 产出关键蓝图规格稿之後,基本上已经完成了整个产品的骨架。接着就是要根据...
Python & Celery 学习笔记_基本操作
这边主要是纪录一下目前学习 Celery 的一些纪录,想要知道完整的 Celery 的介绍可以自行 ...