[Day17] 藉由DialogFlow Fulfillment 实践对话流设计
藉由Google Cloud Function建构DialogFlow Fulfillment

透过GCP上的Cloud Function这项SaaS (Software as a Service) 服务,
我们能轻松快速地建构DialogFlow Fulfillment来达成我们今日的需求。
你也能参见官方撰写於Qwiklabs的实作范例。
Google Assistant: Build an Application with Dialogflow and Cloud Functions
开启内建编辑器
如果各位尚未进行任何设定,可以先完成下列文章的教学再接续下方的步骤
[Day12] 於DialogFlow中实践对话流设计
-
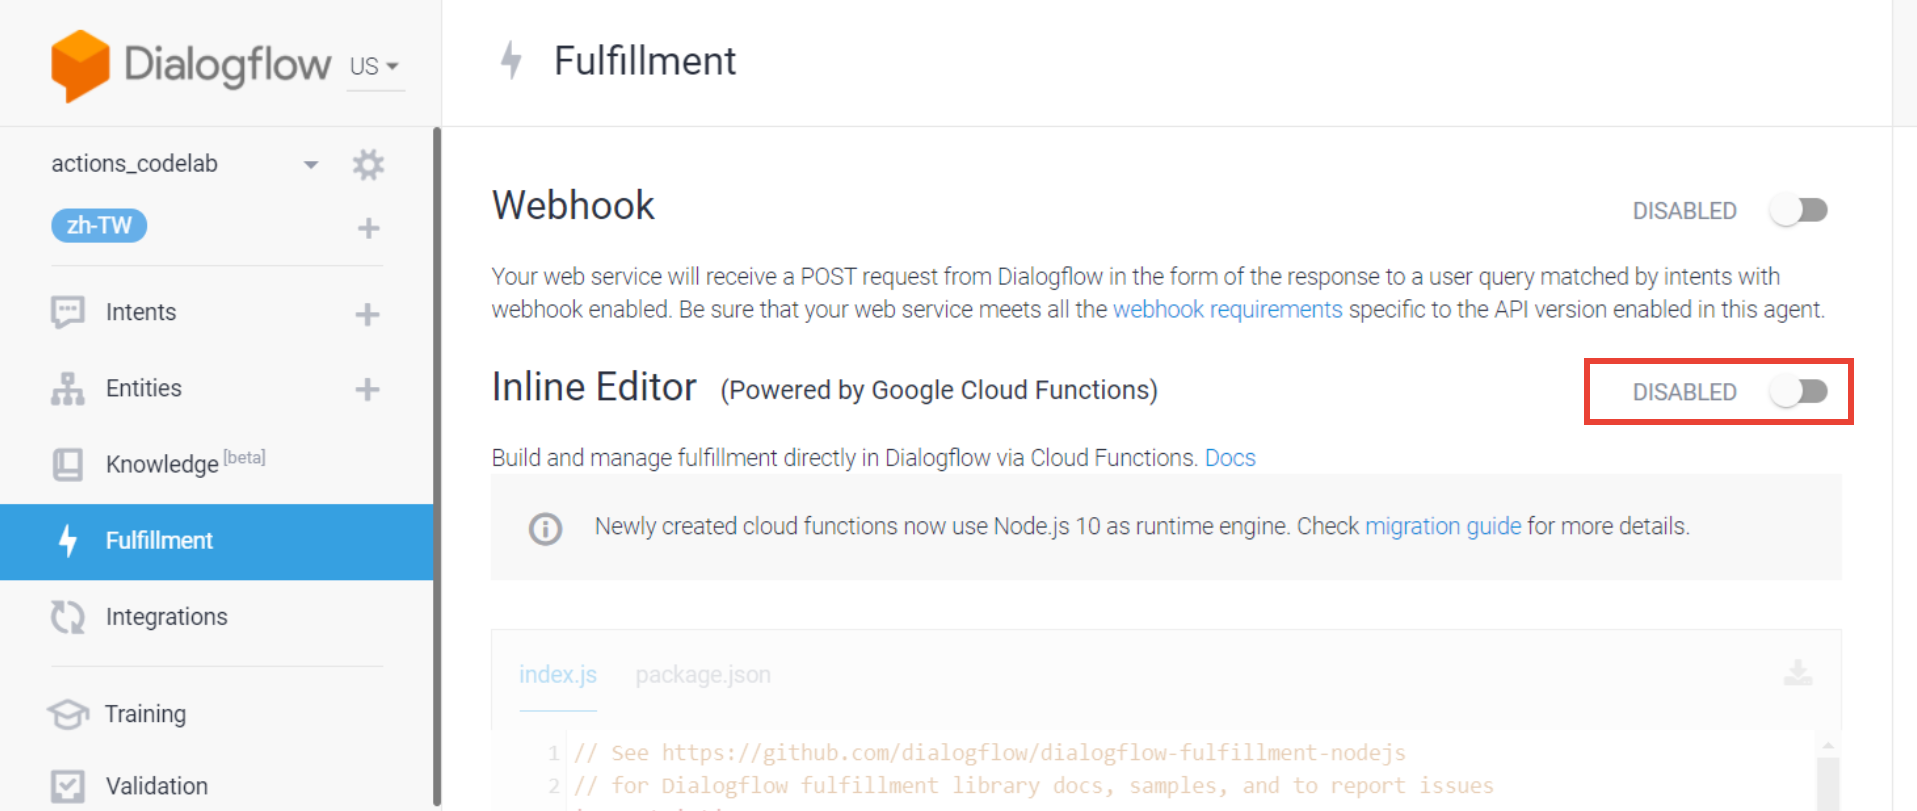
首先,前往「Fulfillment」分页。
开启Inline Editor的功能,我们将透过他於GCP上建立云端函式。
并以此撰写程序来客制化回应。
-
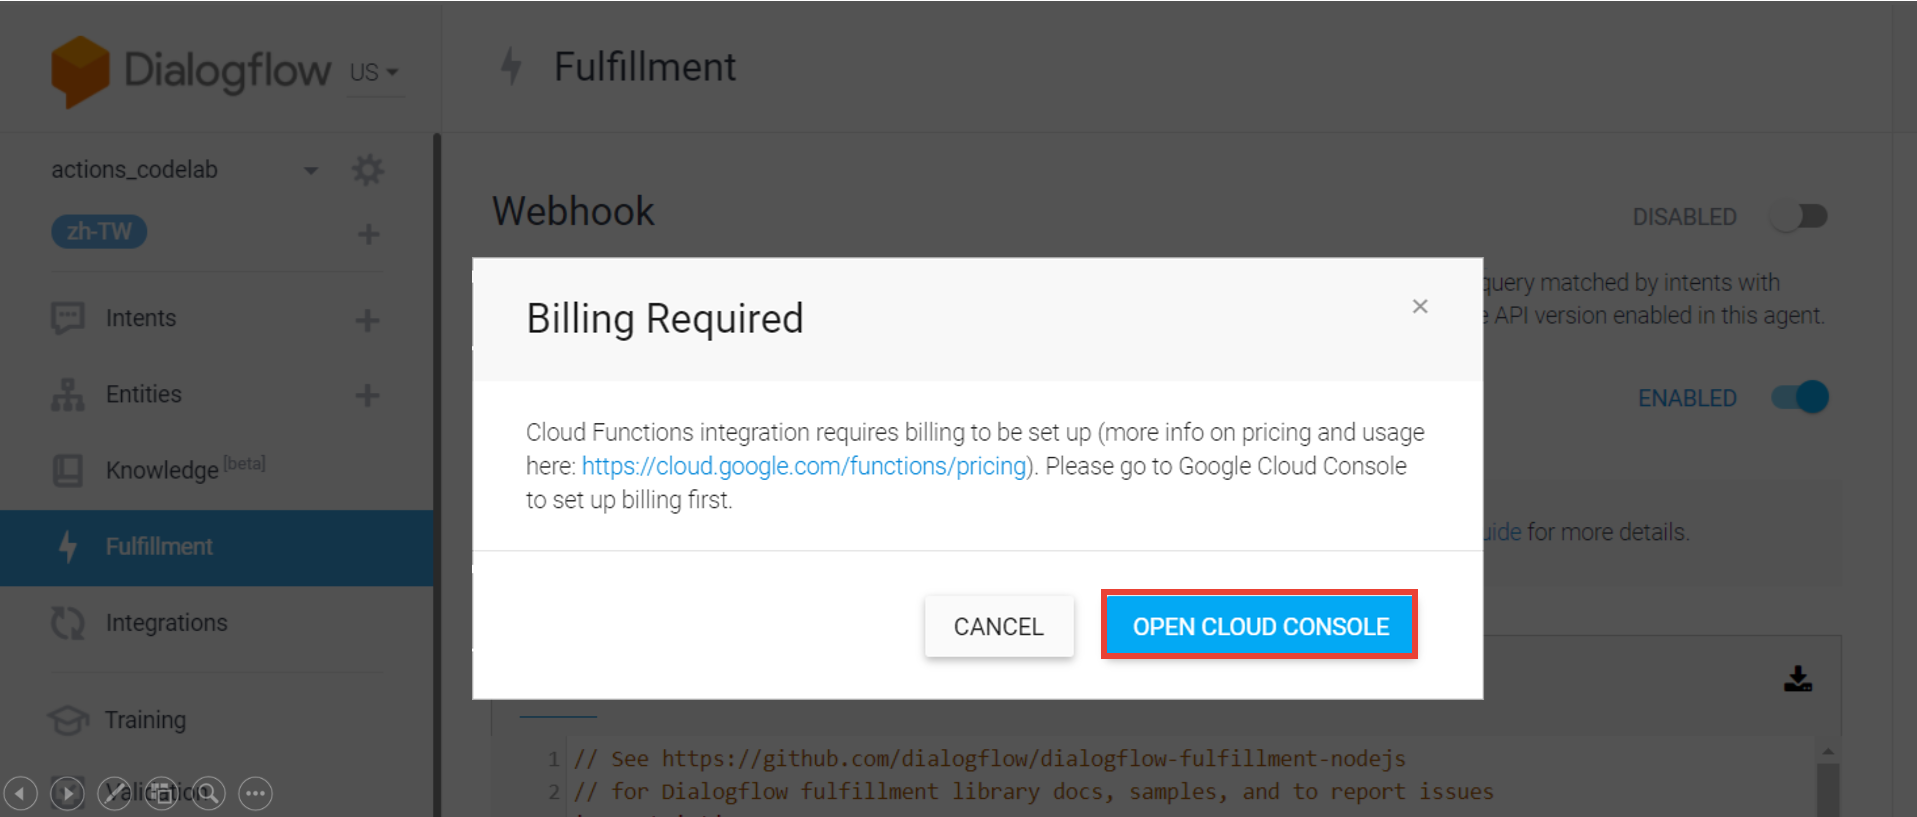
开启该功能後,系统会提示需要启用GCP的付费功能。
请点击「OPEN CLOUD CONSOLE」继续操作。
-
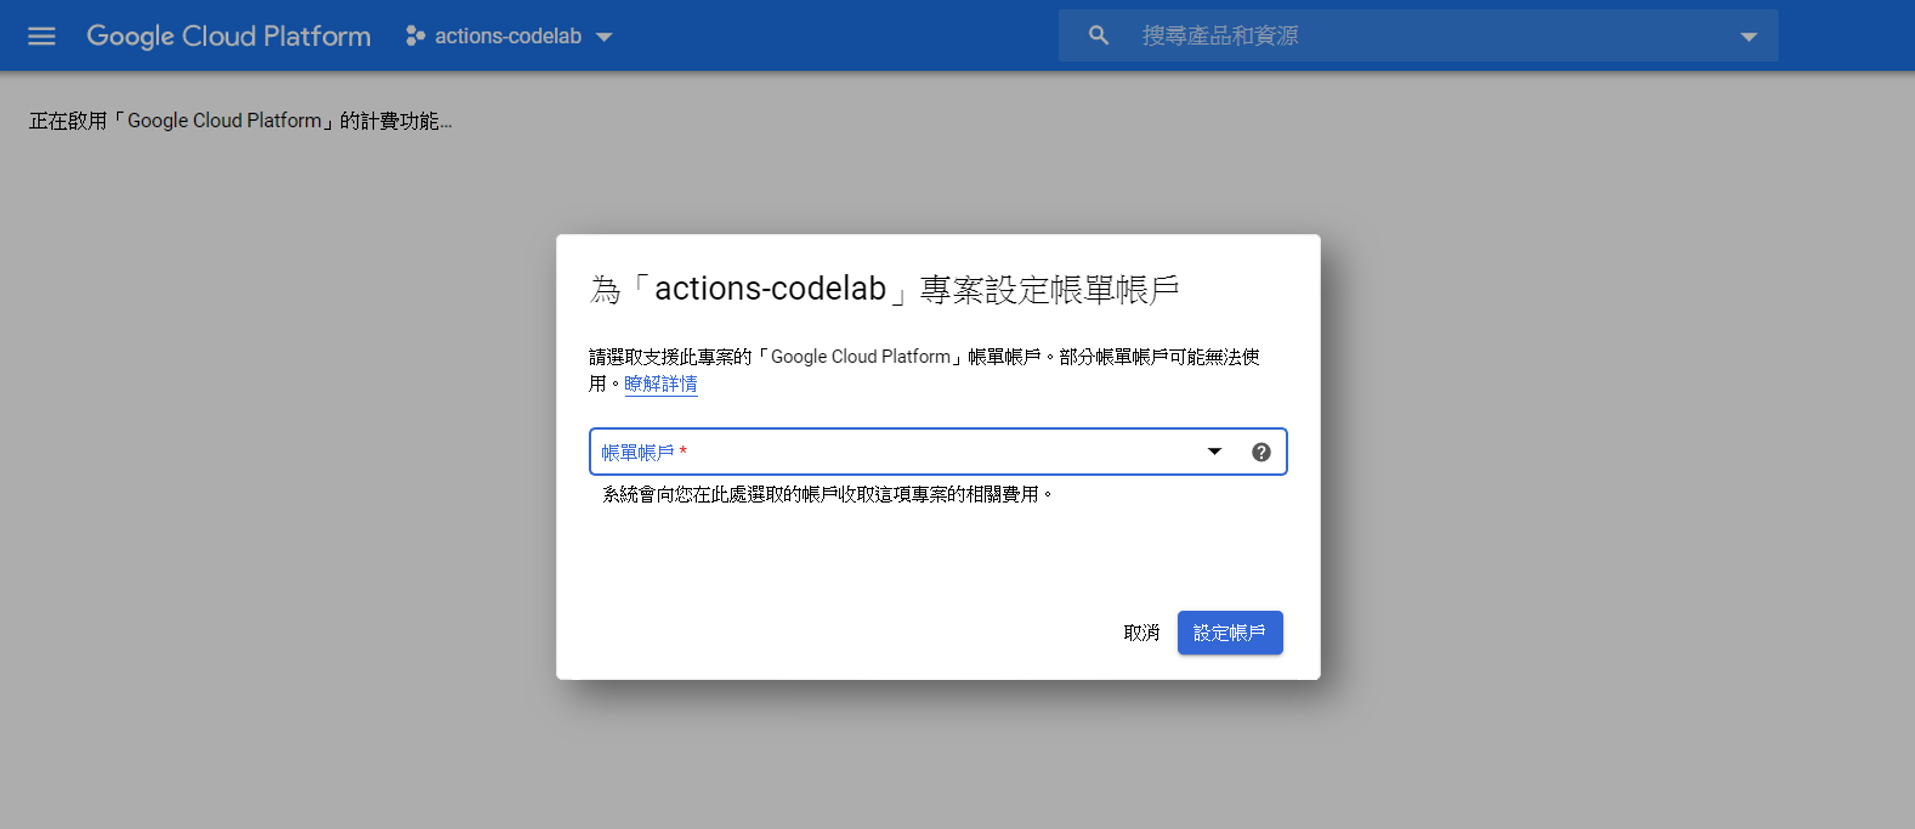
跟着系统的导引建立帐单帐户,并将其绑订到这个专案上
-
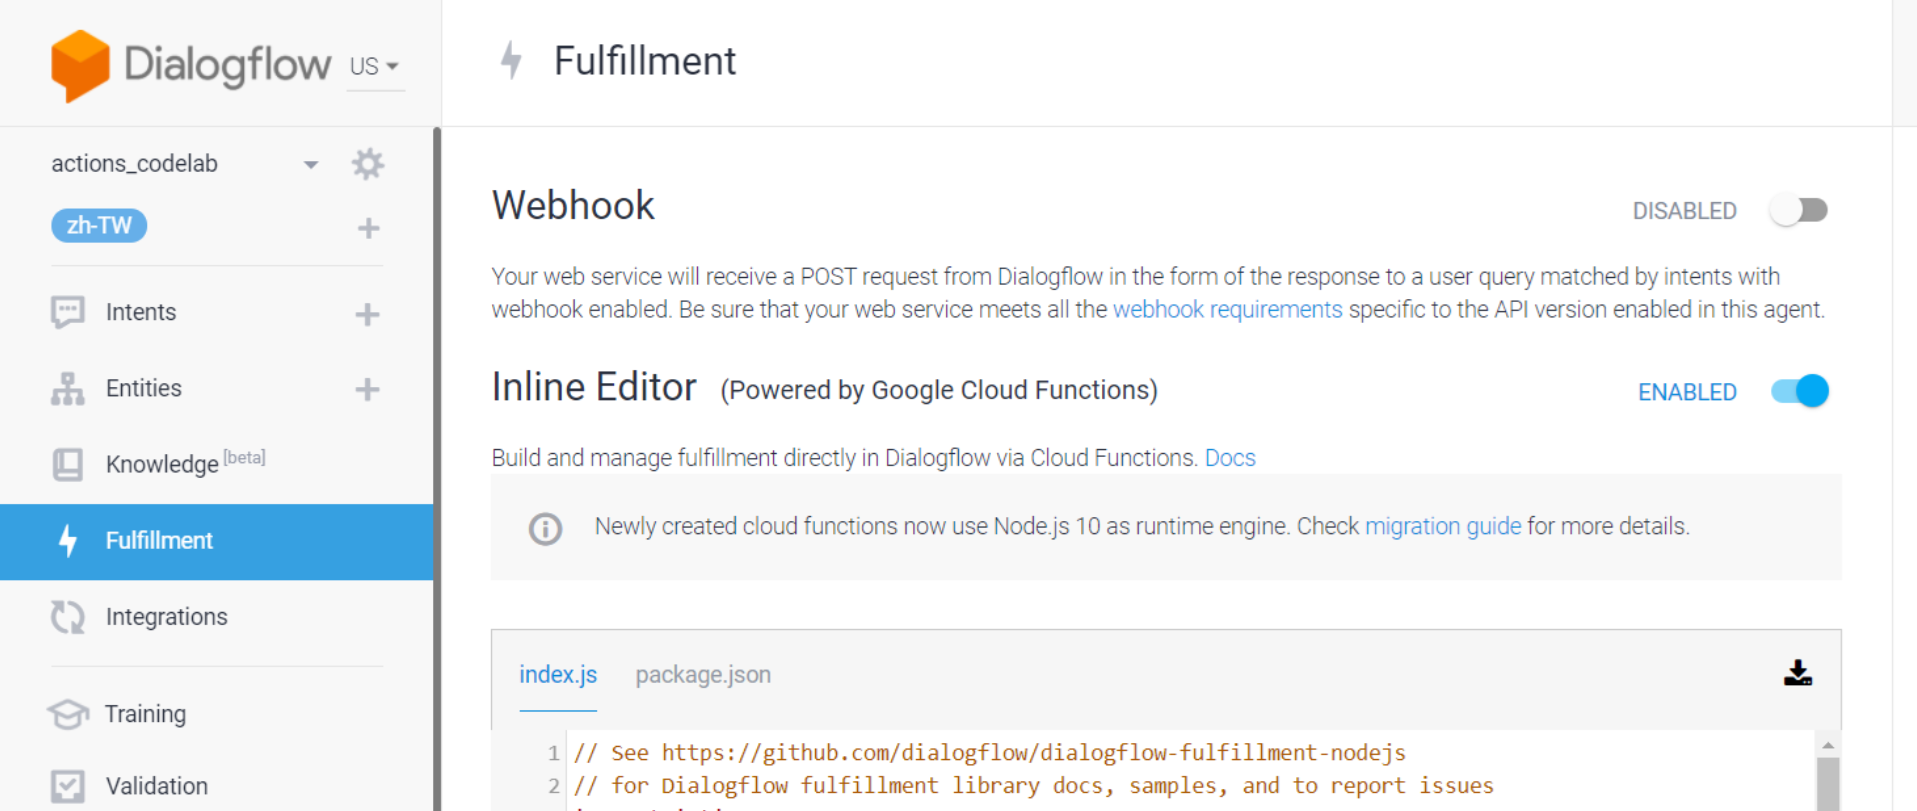
现在,你已经成功开启我们所需要的云端编辑器啦!
透过Fulfillment修改Intent的回应
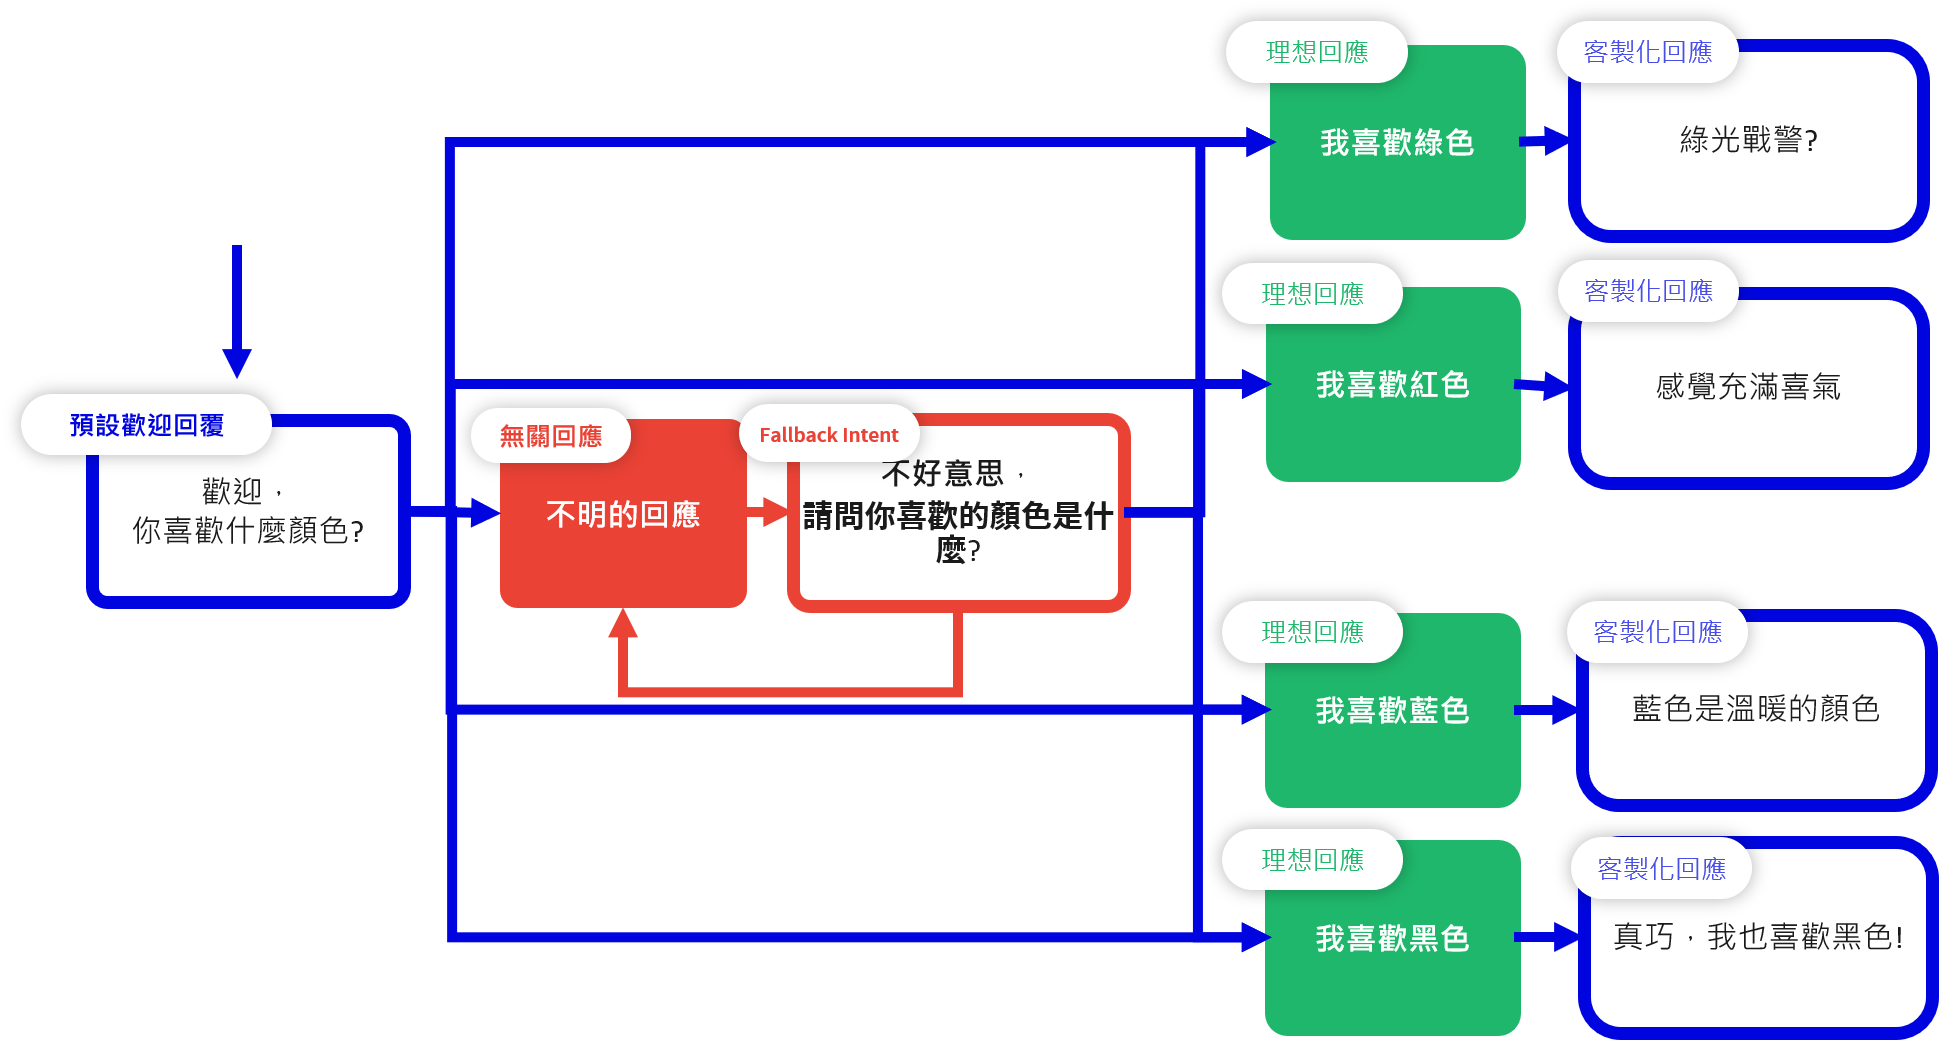
依照我们先前所提及的架构。
来客制化我们先前要设计的对话。
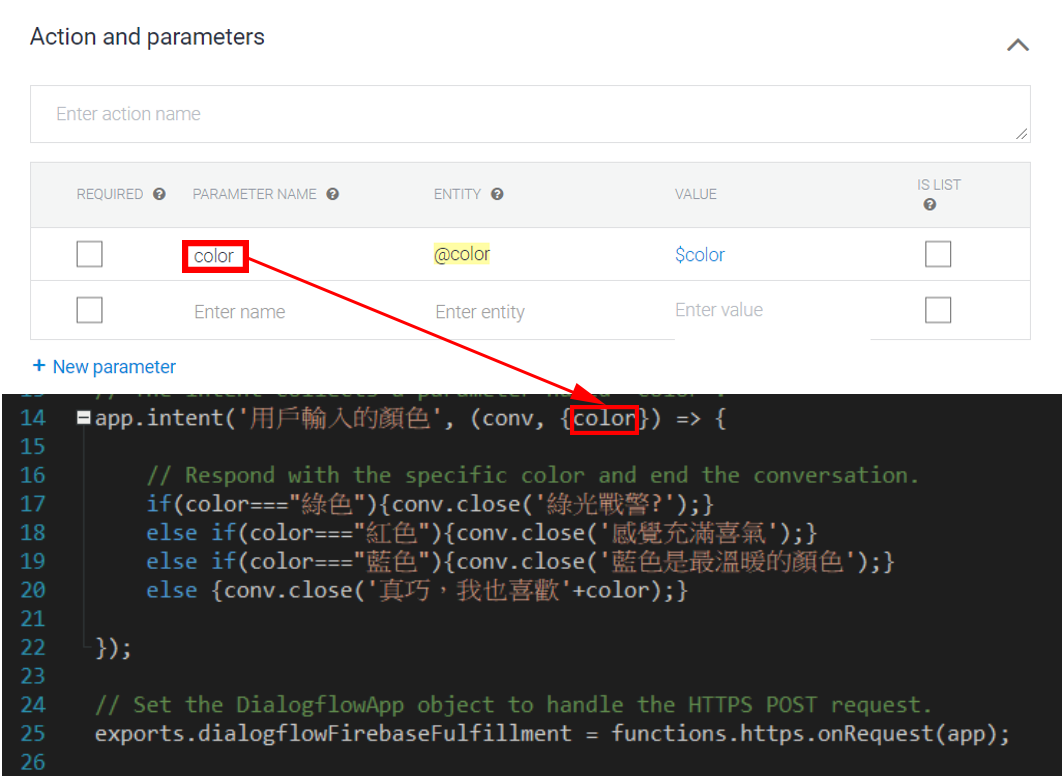
1. 复制贴上以下程序片段到「index.js」,取代原有的程序码
'use strict';

// Import the Dialogflow module from the Actions on Google client library.
const {dialogflow} = require('actions-on-google');

// Import the firebase-functions package for deployment.
const functions = require('firebase-functions');

// Instantiate the Dialogflow client.
const app = dialogflow({debug: true});

// Handle the Dialogflow intent named 'favorite color'.
// The intent collects a parameter named 'color'.
app.intent('用户输入的颜色', (conv, {color}) => {

	// Respond with the specific response and end the conversation.
	if(color==="绿色"){conv.close('绿光战警?');}
	else if(color==="红色"){conv.close('感觉充满喜气');}
	else if(color==="蓝色"){conv.close('蓝色是最温暖的颜色');}
	else {conv.close('真巧,我也喜欢'+color);}

});

// Set the DialogflowApp object to handle the HTTPS POST request.
exports.dialogflowFirebaseFulfillment = functions.https.onRequest(app);
2. 复制贴上以下程序片段到「package.json」,取代原有的程序码
{
  "name": "dialogflowFirebaseFulfillment",
  "description": "This is the default fulfillment for a Dialogflow agents using Cloud Functions for Firebase",
  "version": "0.0.1",
  "private": true,
  "license": "Apache Version 2.0",
  "author": "Google Inc.",
  "engines": {
    "node": "10"
  },
  "scripts": {
    "start": "firebase serve --only functions:dialogflowFirebaseFulfillment",
    "deploy": "firebase deploy --only functions:dialogflowFirebaseFulfillment"
  },
  "dependencies": {
    "actions-on-google": "^2.2.0",
    "firebase-admin": "^5.13.1",
    "firebase-functions": "^2.0.2",
    "dialogflow": "^0.6.0",
    "dialogflow-fulfillment": "^0.5.0"
  }
}
额外补充
在Fulfillment之中,我们能撷取来自Dialogflow的资料进行判断并据此回覆。
在我们的范例中,撷取的资料是「用户输入的颜色」这个Intent所撷取的参数(Entities)「color」。
而上述的「index.js」所做的事是判断参数「color」的数值来给予回应。
後续步骤
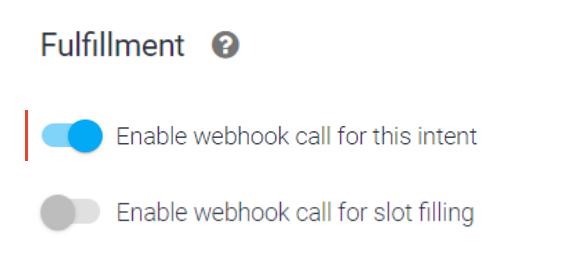
前往「用户输入的颜色」这个Intent的设定页面。
至页面最底部的「Fulfillment」,
开启「Enable webhook call for this intent」
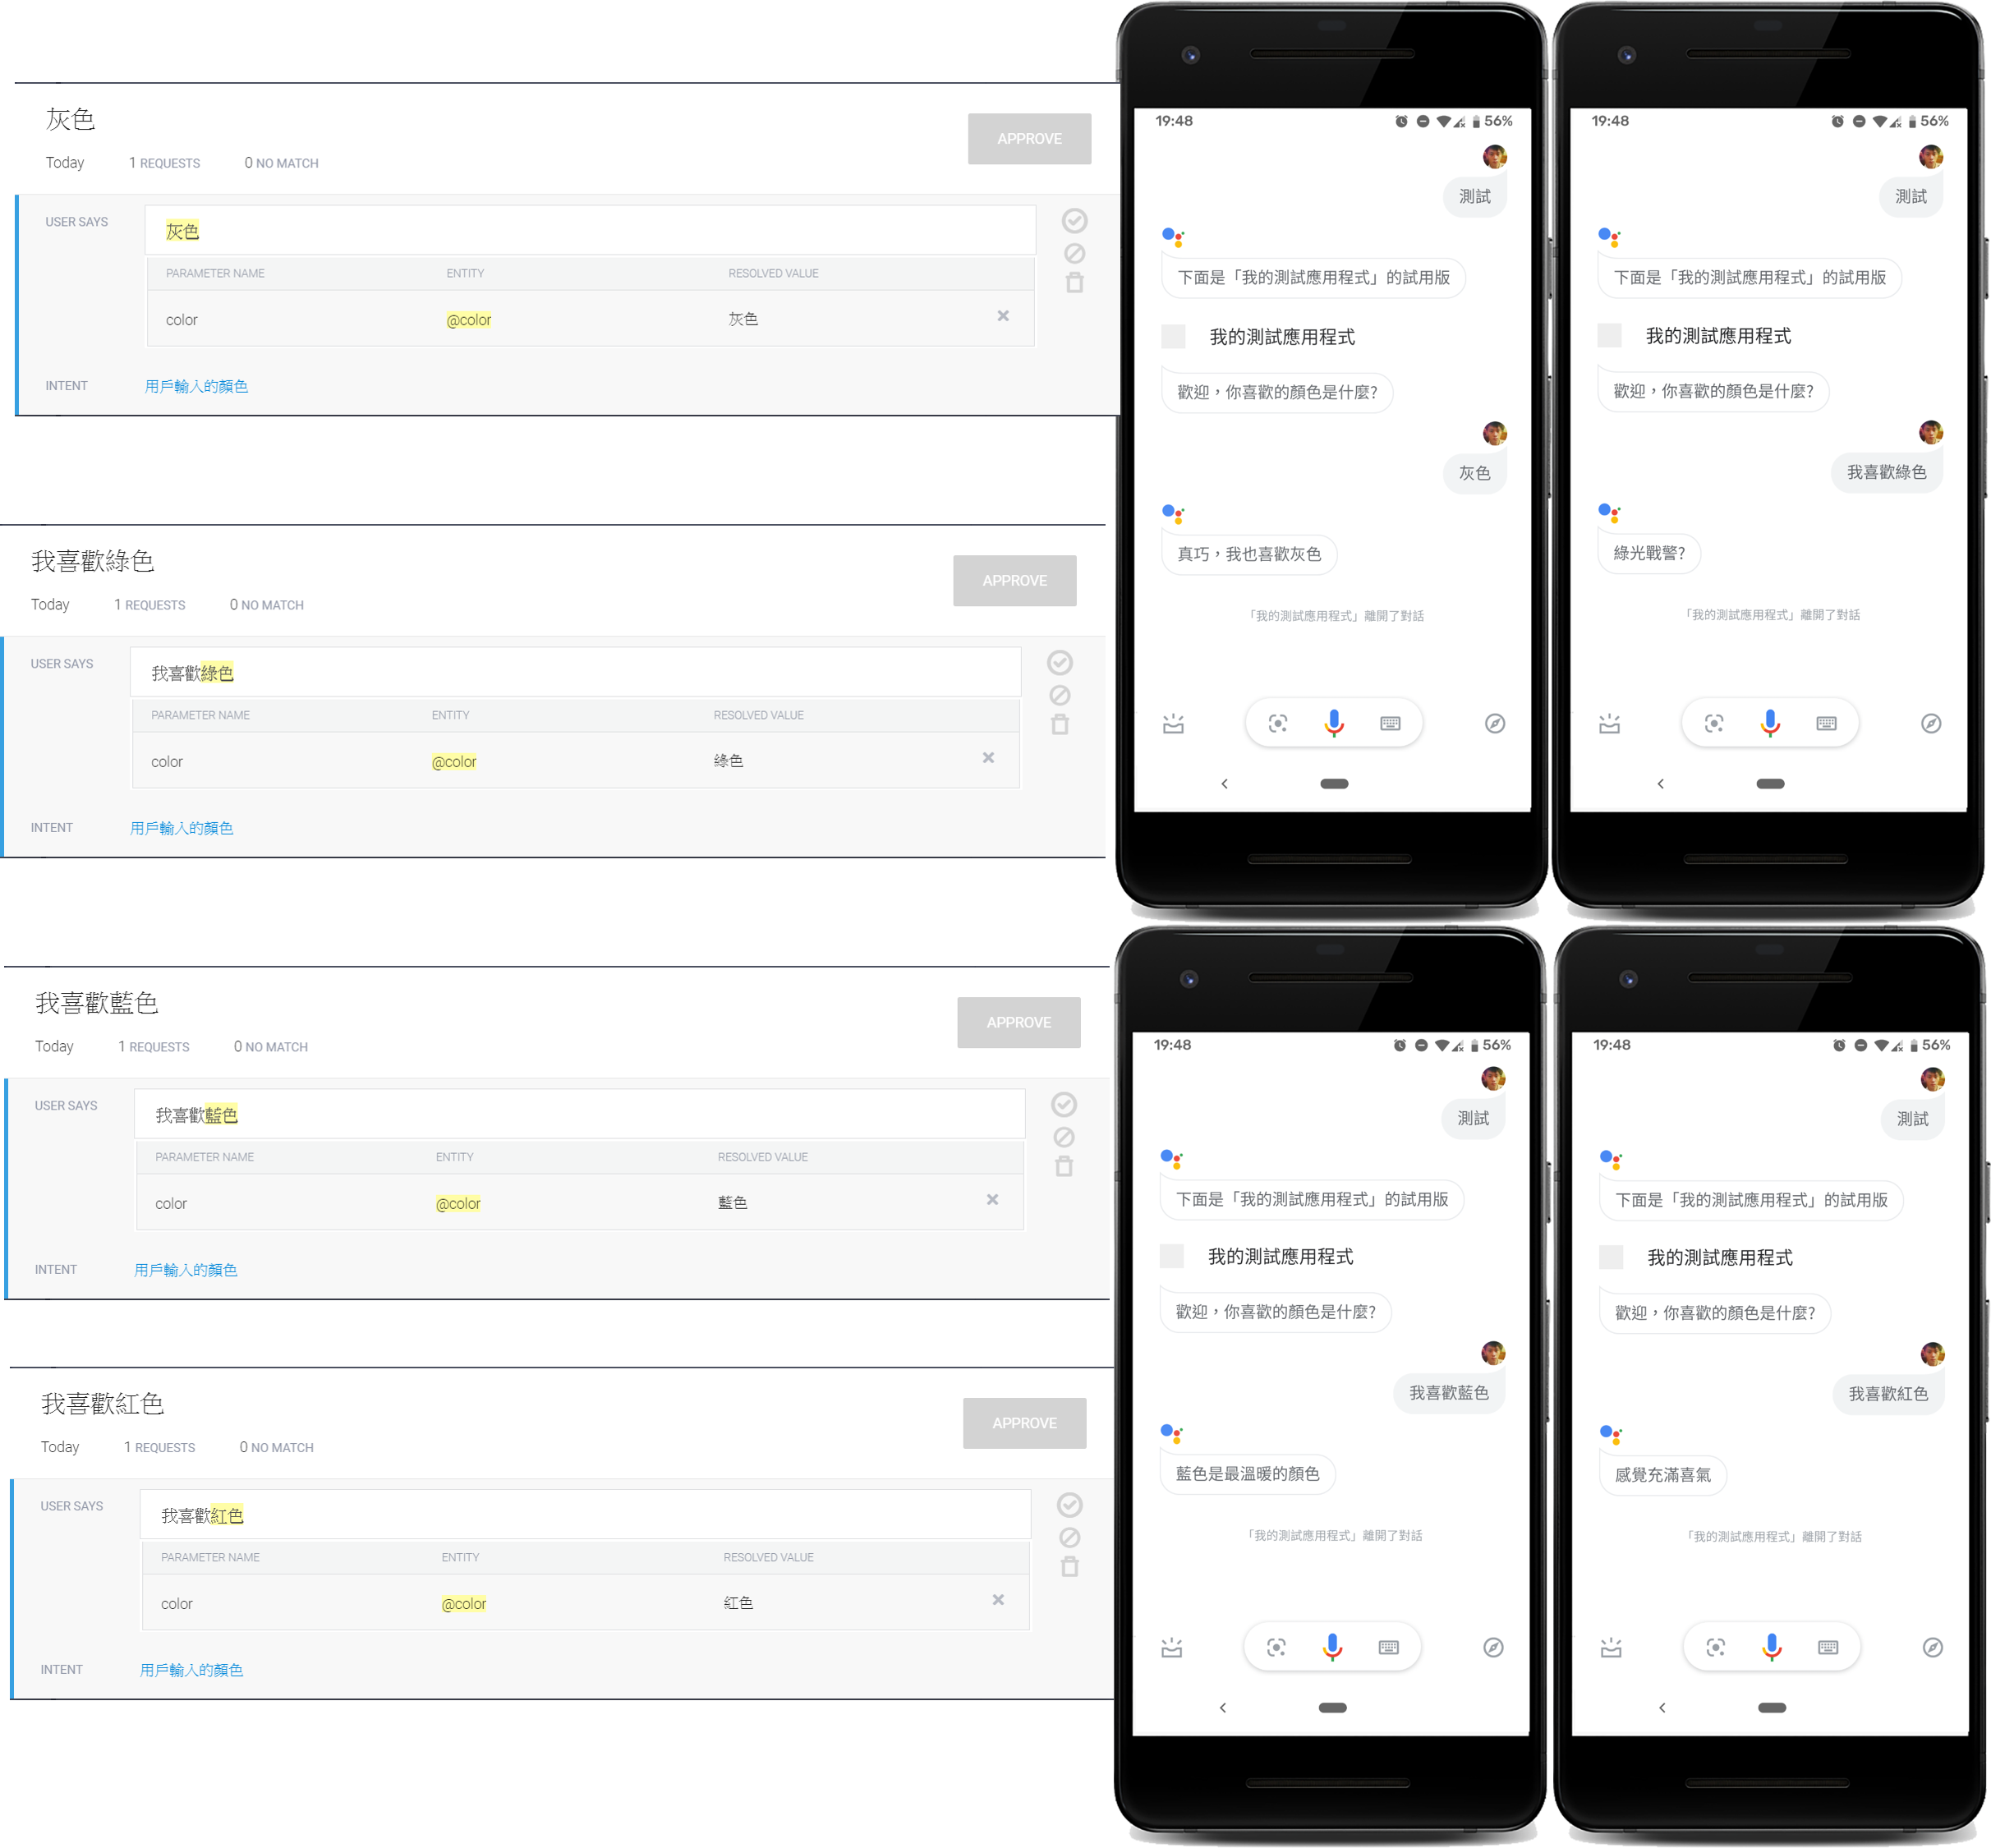
在Google助理上试用
请参照以下教学的详细步骤
[Day13] 前往Actions On Google平台试用
现在,你可以前往 Actions on Google Developer Console进行测试了,
看看你的Action是否有照着Fulfillment设定的逻辑进行回应!
参考资料
在这里所使用的Fulfillment是在DialogFlow上透过Google Cloud Function所建构的。
你也能够在Google Cloud Platform或Firebase上进行编辑。
详情请参考下列的网址:
接下来...
我们将会从语音使用者介面设计的角度,
探讨与对话流设计息息相关的长尾问题 (long tail problem)。
并了解如何应用它使Action能专注在主要的目的上并增进使用体验。
<<: Day11 K平均演算法(K-means clustering algorithm)
>>: Day04 - Gem-activerecord-import 批次建立介绍与应用
【Day08-比较】我们不一样——在python中判断相等的用法is, ==, 与如何判断nan
在用numpy和pandas处理资料的时候 我们很常会遇到需要nan的情况 而最初在处理它的时候,就...
Day 13 实作调色盘App(1/3)
我们可以藉由小小的调色盘App专案来加强我们对一些元件的认识 1.先新增一个专案 -> Cr...
[Day - 19] - Spring 例外处理之优雅化客制化错误讯息原理与设计
Abstract 相信许多人都有遇过例外处理的事件,但又不想要让内部核心的错误资讯呈现在前端上,仅记...
21 - Traces - 观察应用程序的效能瓶颈 (5/6) - 透过 APM Agents 收集并传送後端服务运作的记录
Traces - 观察应用程序的效能瓶颈 系列文章 (1/6) - Elastic APM 基本介绍...
AI ninja project [day 23] 生成对抗网路 Generative Adversarial Network(GAN)
相信大家都有听过GAN的名子, 原理就好像同时有一名创作家及一名监定员, 创作家进行创造,而监定员进...