[Angular] Day11. Attribute, class, and style bindings and Two-way binding
在上一张中介绍了 property binding 是用来将 Component 中的 property 绑定给 HTML Tag 的 property,还介绍了 event binding 是用来将 Component 中的 method 绑定给 HTML Tag 用来监听画面事件,而本章将持续介绍两种 binding 方式。
Attribute binding 可以用来让你在开发 Template 时直接设置 property 值,透过 attuibute 可以提高访问性、动态设置画面样式与可以同时管理多个 CSS Class 或样式。
Binding to an attribute
在大部分的情况下,对於设置 HTML 元件属性都建议你都使用 property binding 来做,但是有时候会遇到你可能要绑定某一个元件的某个属性,但这个元件并没有这个属性,如果强制使用 property binding 则会出错,这实际需要使用 attibute binding了,比如说 ARIA(WAI-ARIA) 或 SVG(Scalable Vector Graphic) 都是 purely attribute,代表他们既没有元件的 property 也无法对他进行设置,这时就必须使用 attribute binding。
到这边可能有满多新手开始头晕了,attribute 跟 property 不是都是属性吗?有什麽不一样,这边简单来说 attributes 由 HTML 定义,所有出现在 HTML 标签内的描述皆为 attributes ,而 DOM properties 则是 标准的 HTML attributes 经过浏览器解析後会产生相对应的 DOM properties,有兴趣可以看看 这篇文章 里面详细的介绍了什麽是 HTML attribute 与 DOM Property 的区别。
Syntax
要了解一个新的用法就必须先了解他的语法,而 attribure binding 的语法与 property binding 相似,但不是将 element property 放在括号之间,而是在 attuibute 前面加上一个前缀字 attr 後跟一个点(.),这样就会把你输入在後面的字串表达式解析成 attribute 值。
Note: 这边的介绍可能都会使用英文介绍对应的专有名词,毕竟 property 与 attribute 的中文都是属性...
<p [attr.attribute-you-are-targeting]="expression"></p>
注意喔!如果将後面的字串表达式设置为 null 或 undefined 的话,Angular 会直接将这个属性完全删除。
Example: Binding to colspan
举个 attribute binding 的例子吧,常见的使用 attribute binding 的例子是 table 中的 colspan attribute,colspan 是用来改变一个单元的格子应该跨越多少格,所以如果使用 attribute binding 可以做到动态这是 table。
<!--  expression calculates colspan=2 -->
<tr><td [attr.colspan]="1 + 1">One-Two</td></tr>
这样的设定可以使绑定的 <tr> 跨越两列。
Note: 要注意,<tr> 元件拥有的是 colspan attribute,而如果是 property 的话则是 colSpan,大小写要非常注意!
Binding to the class attribute
attribute 还有一个常用的用法,就是用於绑定 element 中的 CSS class,可以做到同时新增或删除等管理多个 CSS class。
Binding to a single CSS class
如果要绑定单个 CSS class 请使用 class 当作前缀後面跟上一个点(.)和 CSS class 的名称,例如 [class.sale]="onSale",当订的表达是为 true 时 Angular 会为这个 element 多添加一个 CSS class,反之则会被移除。
Binding to multiple CSS classes
如果要同时绑定多个 CSS class 请使用 [class],例如:[class]="classExpression",插入的表达是可以是:
- 以
空格分隔的 CSS class 的名字 - 以 object 的 key 作为名称,以 true 或 false 表达式作为值的物件
- 包含多个 CSS class 名字的阵列
Binding to the style attribute
attribute binding 也可以做到动态设置你的 element stype。
Binding to a single style
要创建单个的 style binding,请使用前缀字 style後跟一个点(.)和 CSS stype property,例如 [style.width]="width", Angular 将 property 设置为绑定表达式的值,通常是一个字串或着可以添加像 em 或 % 的单位扩展符。
Note: 可以使用破折号或驼峰命民法来编写 style property 的名称
<nav [style.background-color]="expression"></nav>

<nav [style.backgroundColor]="expression"></nav>
Binding to multiple styles
要绑定多个 style 请绑定到 [style] property,例如 [style]="styleExpression" 而 styleExpression 可以是以下之一:
- 样式的字串列表:
"width: 100px; height: 100px; background-color: cornflowerblue;" - 以样式名称为 key,以样式值为 value 的物件:
{width: '100px', height: '100px', backgroundColor: 'cornflowerblue'}
Note: 注意! [style] 不像 [class] 一样支持绑定阵列喔!
Styling Precedence
可以将多个源头的值绑定给单一 HTML element 的 CSS class 和 style,当同一个 CSS class 或 style property 有多个绑定时,Angular 会遵循一组优先规则解决冲突并确定哪些 CSS class 或 stype 最终被应用於 HTML element。
- Template bindings
-
Property binding:
<div [class.foo]="hasFoo"> or <div [style.colo]="color"> -
Map binding:
<div [class]="classExpr"> or <div [style]="styleExpr" -
Static value:
<div class="foo"> or <div style="color: blue">
-
Property binding:
- Directive host bindings
-
Property binding:
host: {'[class.foo]': 'hasFoo'} or host: {'[style.color]': 'color'} -
Map binding:
host: {'[class]': 'classExpr'} or host: {'[style]': 'styleExpr'} -
Static value:
host: {'class': 'foo'} or host: {'style': 'color: blue'}
-
Property binding:
- Component host bindings
-
Property binding:
host: {'[class.foo]': 'hasFoo'} or host: {'[style.color]': 'color'} -
Map binding:
host: {'[class]': 'classExpr'} or host: {'[style]': 'styleExpr'} -
Static value:
host: {'class': 'foo'} or host: {'style': 'color: blue'}
-
Property binding:
可以看到 CSS class 或 style 越具体其优先级就越高,绑定到特定 CSS class([class.foo])会优先於通用 [class] 的绑定,而通用 [class] 的绑定又会优先於特定样式绑定([style.bar]),而他又会优先於通用 [style] 的绑定。
Two-way binding
介绍完 attribute, class, style binding 後,接着要来介绍另一个非常常用的 binding 方法 Two-way binding,还记得在前几天介绍的 @Input() 与 @Output() 吗?在父层的 HTML 中如果要传递数据给子层,需要将父层的 property 利用 porperty binding 将它放入中括号 ( [ ] ) 中传递给子层,而父层要接受子层传递的数据时,需要利用 event binding 将子层的 EventEmitter 放括号中,当子层传递数据时触发父层中绑定的 method
<app-childComponent [inputData]="inputData" (outputData)="onChildOutpu($event)"></app-childComponent>
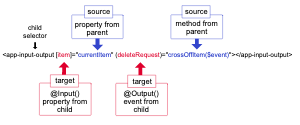
所以如果同一个子层同时要有 @Input() 与 @Output() 那就会把他家的很长不太好看,所以 Angular 提供了 Two-way binding,将 property binding 与 event binding 整合再一起,语法是将方括号与圆括号组合再一起 [()]。
<app-sizer [(size)]="fontSizePx"></app-sizer>
How two-way binding works
要让 Two-way binding 可以正常运作需要将 @Output() property 使用 inputChange 模式,其中 input 是 @Input() 的名称,举例来说当你的 @Input() 命名为 size 则要将 @Output() 命名为 sizeChange,让我们举个例吧
-
在 child.component.ts 中建立一个 @Input() 属性 size 与 @Output() 属性 sizeChange 并加入三个 method
import { Component, Input, Output, EventEmitter } from '@angular/core'; @Component({ selector: 'app-child', templateUrl: './child.component.html', styleUrls: ['./child.component.css'], }) export class ChildComponent { @Input() size!: number | string; // (1) @Output() sizeChange = new EventEmitter<number>(); // (2) constructor() {} dec() { // (3) this.resize(-1); } inc() { // (4) this.resize(+1); } resize(delta: number) { // (5) this.size = Math.min(40, Math.max(8, +this.size + delta)); this.sizeChange.emit(this.size); } }- (1): 使用 @Input() 将 size 装饰为父层传递下来的数据
- (2): 使用@Output() 将 sizeChange 装饰为一个 EventEmitter 用於将数据向上传给父层
- (3): 用於减小字体大小
- (4): 用於增加字体大小
- (5): 增加或减少字体大小的 method
-
在 child.component.html 中新增两个按钮用於让使用者增加或减少字体大小,和使用 text interpolation 将 size 插入到 template 中
<div> <button (click)="dec()" title="smaller">-</button> <button (click)="inc()" title="bigger">+</button> <label [style.font-size.px]="size">FontSize: {{size}}px</label> </div> -
在 parent.component.ts 中新增一个 property
import { Component } from '@angular/core'; @Component({ selector: 'app-parent', templateUrl: './parent.component.html', }) export class ParentComponent { frontSizePx = 16; constructor() { } } -
在 parent.component.html 中将 frontSizePx 使用 Two-way binding 绑定给子层
<app-child [(size)]="fontSizePx"></app-child>
<div [style.font-size.px]="fontSizePx">Resizable Text</div>

在画面中可以看到,当我们点击画面中的 button 後,首先先让子层向父层传递更改的大小,父层收到後再透过 @Input() 将变更的大小传递回子层让子层可以显示出 FontSize 的数值,这又就可以透过一个绑定就完成需要 @Input() 与 @Output() 的情况。
结论
本章中介绍了什麽最後的两种绑定模式,可以使用 attribute binding 对没有 property 的 HTML 元件动态绑定,可以使用 class binding 对一个 HTML 元件绑定一个或多个 CSS class,可以使用 style binding 对一个 HTML 元件绑定一个或多个样式,而 CSS class 与 style 的绑定优先级遵守越具体其优先级就越高的概念。
第二种介绍了 Two-way binding,如何透过一种绑定就达成 property binding 与 event binding,要注意的是如果要让 Two-way binding 成功作用必须将 @Output() 麽名称设定为 @Input() 的名称加上Change。
下一篇将会介绍 Template variables,他可以让你在 template 的任意一处使用被标记过的 HTML 元件的数据,详细的内容就留到明天在介绍吧,那我们明天见。
Reference
- Angular.io - Attribute, class, and style bindings
- Angular.io - Two-way binding
- HTML Attributes 与 DOM Properties 的区别
- What is an SVG File (And How Do You Use it)?
- WAI-ARIA Overview
<<: [Day 3] SRE - Log写好一点,对团队好一些
Day1 渗透测试定义与资安服务比较
何谓渗透测试 以骇客的角度,针对企业的网路、系统、网站进行检测弱点与漏洞,并撰写一份渗透测试报告提...
Flutter基础介绍与实作-Day3 Flutter和React Native的比较
Flutter的特色 1.一切皆为元件(widgwt) 在Flutter中一切皆为元件,我们在开始写...
[Day10]-字典2
遍历字典 Items() 可以取得key跟value Key() 只取得key Values() ...
30/欧洲码农的新手村任务, 完成!!
铁人赛总算来到最後一天! 非常感谢30天太赶留职停薪专心写文章的靠北战队的队友们。从欧洲远端一起挑战...
Day 46 (Node.js)
1.NPM版本 无须更新到最新,怕错误 2.制作专案package.json npm init np...