Day 42 (PHP)
1.header的用法
(1)画画时
指定画面Content-type网页输出,用image/jpeg型态
header('Content-type: image/jpeg');
(2)输出转导向
输出转导向: 转去这个网站
header("Location: brad44.html")
思考方式 http
<head>
    <meta charset="UTF-8">
     //这个文件内容(content-type)是这个(text/html)型态
    <meta http-equiv="content-type" content="text/html; charset=UTF-8">
</head>
2.上传档案,等比例缩小 imagecopyresized(作业)
https://www.php.net/manual/en/function.imagecopyresized
3.PHP的相加
- 数学相加
. 字串相加
4.物件 ->的
$this->speed
5.物件:重点在属性,不是方法
  class Bike{
    private $speed = 0;

    function upSpeed()
    {
        $this->speed = $this->speed < 1 ? 1 : $this->speed * 1.2;  //->的
    }
    function downSpeed()
    {
        $this->speed = $this->speed < 1 ? 0 : $this->speed * 0.7;
    }
    function getSpeed()
    {
        return $this->speed;
    }
  }
6.创物件
$myBike = new Bike; //new 新创物件
7.物件 - 继承extends(好事发扬光大,坏事变更小)
若函式内甚麽都没写,会完全跟爸爸(Scooter)一样
    // Scooter is-a Bike
    class Scooter extends Bike{
    private $gear = 0;

    function chGear($gear = 0)
    {
        if ($gear >= 0 && $gear <= 7) {
            $this->gear = $gear;
        }
    }

    function upSpeed()
    {
        $this->speed = $this->speed < 1 ? 1 : $this->speed * ($this->gear * 1.2);
    }

    function dump()
    {
        var_dump($this);
    }
}
8.物件 - private
只能用在这个函式中,可以拿来使用,但不能继承extends
  class Bike{
    private $speed = 0;

    function upSpeed()
    {
        $this->speed = $this->speed < 1 ? 1 : $this->speed * 1.2;  //->的
    }
    function downSpeed()
    {
        $this->speed = $this->speed < 1 ? 0 : $this->speed * 0.7;
    }
    function getSpeed()
    {
        return $this->speed;
    }
  }
开放继承子类别(一个子) - protected
    class Bike{
    // Bike has-a speed
    protected $speed = 0;  //protected

    // Bike has-a upSpeed()
    function upSpeed()
    {
        $this->speed = $this->speed < 1 ? 1 : $this->speed * 1.2;
    }
    function downSpeed()
    {
        $this->speed = $this->speed < 1 ? 0 : $this->speed * 0.7;
    }
    function getSpeed()  //辨识protected
    {
        return $this->speed;
    }
    }
都没有设定就是全部都可以继承用
9.建构式/建构子/建构方法/Constructor => 物件初始化
__construct进行属性的初始化
原本物件已存在,再进行属性的初始化(给定义)
   class Person
    {

    //属性,属性,属性
    private $name, $bike, $scooter;
    function __construct($name)
    {
    //定义属性
        $this->name = $name;
        $this->bike = new Bike;
        $this->scooter = new Scooter;
    }

    function getName()
    {
        return $this->name;
    }
    function getBike()
    {
        return $this->bike;
    }
    function getScooter()
    {
        return $this->scooter;
    }
}
10.MySQL - MySQLi
Abstraction Layers > 连接各家资料库来源(有整合的)
DBA — Database (dbm-style) Abstraction Layer
ODBC — ODBC (Unified) ===>整合各家程序语言系统(DSN)
PDO — PHP Data Objects
Vendor Specific Database Extensions > 直接连线各家的
CUBRID
dBase
Firebird/InterBase
FrontBase
IBM DB2 — IBM DB2, Cloudscape and Apache Derby
MongoDB — MongoDB driver
MySQL — MySQL Drivers and Plugins
OCI8 — Oracle OCI8
PostgreSQL
SQLite3
SQLSRV — Microsoft SQL Server Driver for PHP
https://www.php.net/manual/en/refs.database.php
MySQL 列表
https://www.php.net/manual/en/set.mysqlinfo.php
MySQLi MySQL的强化版
https://www.php.net/manual/en/book.mysqli.php
MySQLi > The mysqli class MySQL类别
https://www.php.net/manual/en/class.mysqli.php
MySQLi > The mysqli class > mysqli::__construct 连接特定资料库
11.PHP要写资料库时,要开MySQL
看看组态档brad02有没有支援到 MySQLi 外挂
12.建立 连结资料库MySQL
<?php
    $mysqli = new mysqli('127.0.0.1', 'root', 'root', 'class', 3306);  //建立SQL物件
    $mysqli->set_charset("utf8"); //编码

    //准备 要执行的SQL(抓好$sql的资料型态)
    $stmt = $mysqli->prepare($sql); //物件式
    //$stmt = mysqli_prepare($mysqli, $sql); //方法式

    $stmt->execute(); //执行SQL
?>
13.查看有无连线到资料库 var_dump()
$mysqli = new mysqli('127.0.0.1', 'root', 'root', 'class', 3306);
echo gettype($mysqli); //object0
var_dump($mysqli);
// object(mysqli)#1 (18) {
// ["affected_rows"]=> int(0)
// ["client_info"]=> string(13) "mysqlnd 7.4.1"
// ["client_version"]=> int(70401)
// ["connect_errno"]=> int(0)
===>无错误 连线上
// ["connect_error"]=> NULL
// ["errno"]=> int(0)
// ["error"]=> string(0) ""
// ["error_list"]=> array(0) { }
// ["field_count"]=> int(0)
// ["host_info"]=> string(20) "127.0.0.1 via TCP/IP"
// ["info"]=> NULL
// ["insert_id"]=> int(0)
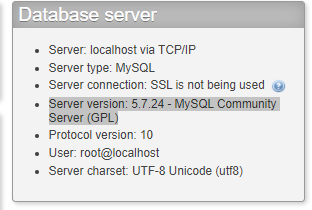
// ["server_info"]=> string(6) "5.7.24"
===>Server version: 5.7.24 - MySQL Community Server (GPL)
// ["server_version"]=> int(50724)
// ["sqlstate"]=> string(5) "00000"
// ["protocol_version"]=> int(10)
// ["thread_id"]=> int(5)
// ["warning_count"]=> int(0) } 0
14.增加TABLE资料
prepare()是抓好$sql的资料型态,之後
bind_param 直接绑定 (必须按照INSERT INTO(DELETE、UPDATE..)顺序=======>重要)
execute()执行SQL
就可以放资料
    $sql = "INSERT INTO students (cName,cSex,cBirthday) VALUES (?,?,?,?)";
    //VALUES (?,?,?,?) 预先准备不要直接给

    //准备 要执行的SQL(抓好$sql的资料型态)
    $stmt = $mysqli->prepare($sql); //物件式

    $cName = 'Brad';
    $cSex = 'M';
    $cBirthday = '1999-01-02';
    $stmt->bind_param('sss', $cName, $cSex, $cBirthday);
    //绑定参数bind_param(资料型态s字串 i整数)
必要给的资料要给,会自动递增的无须写入
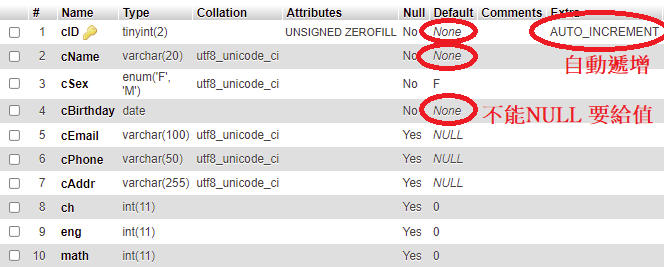
Q:为什麽 删掉後再新增的资料id不会递补前面被删号码??
A:自动递增是一个变数,只会前进不会後退
如果想要调整自动递增的值
查询:php mysql reset increment value
https://www.studentstutorial.com/php/autoincrement-reset.php
mysqli_query($conn,"ALTER TABLE category AUTO_INCREMENT = 1");
15.资料库语法 - 显示错误
https://www.php.net/manual/en/function.mysql-errno.php
    //错误讯息显示
    echo $mysqli->errno . '<br />'; //0 无错误
    echo $mysqli->error . '<br />';
16.删除TABLE资料
    $sql = "DELETE FROM students WHERE cID > ?";

    $stmt = $mysqli->prepare($sql);

    $delId = 10;  //cID 10号不要
    $stmt->bind_param('i', $delId);
    $stmt->execute(); //执行SQL
17.修改TABLE资料
    //修改 UPDATE SET WHERE 条件式
    $sql = "UPDATE students SET ch =?, eng=?, math=? WHERE cID = ?";

    $stmt = $mysqli->prepare($sql);


    //修改45号
    $updateId = 45;
    $ch = rand(50, 80);
    $eng = rand(50, 80);
    $math = rand(50, 80);
    $stmt->bind_param('iiii', $ch, $eng, $math, $updateId);
    $stmt->execute(); //执行SQL
18.查询TABLE资料v_1(prepare版本)
选择的结果种类
mysqli_stmt — The mysqli_stmt class
https://www.php.net/manual/en/book.mysqli.php
     <?php
     $mysqli = new mysqli('127.0.0.1', 'root', 'root', 'class', 3306);
     $mysqli->set_charset("utf8");

     $sql = "SELECT cName,ch,eng,math FROM students";   //1.MySQL I 叙述句


     // 两种写法都一样 准备 要执行的SQL      //2.拿到MySQL I 叙述句
     $stmt = $mysqli->prepare($sql);
     //$stmt = mysqli_prepare($mysqli, $sql);


     $stmt->execute(); //执行SQL     //3.执行拿到MySQL I 叙述句

     $stmt->store_result();     //4.把结果储存

     echo $stmt->num_rows . '<br />';     //5.打开看 选择的结果

     $stmt->bind_result($v1, $v2, $v3, $v4);     //6.限定看哪几种资料
                                                 //bind_result查看资料的绑定参数,必须按照SELECT顺序

     while ($stmt->fetch())                      //7.一个一个抓出来看fetch()
         echo "{$v1} : {$v2} : {$v3} : {$v4}<br />";
     }
19.查询TABLE资料v_2(阵列版本)
mysqli_query 制作成物件後,抓全部
https://www.php.net/manual/en/mysqli.query.php
看要出来甚麽值
https://www.php.net/manual/en/class.mysqli-result.php
阵列
https://www.php.net/manual/en/mysqli-result.fetch-array.php
     $mysqli = new mysqli('127.0.0.1', 'root', 'root', 'class', 3306);
     $mysqli->set_charset("utf8");

     //mysqli_query 制作成物件後,抓全部(物件) 2.MySQL I 叙述句
     $result = $mysqli->query('SELECT * FROM students ');


     $row = $result->fetch_array();  //3. 看要出来甚麽值 用阵列的方式拿值

     //4.制作成回圈,让全部资料被抓取
     while ($rows = $result->fetch_array()) {
         echo "{$rows['cID']} : {$rows['cName']} : {$rows['ch']}<br />";

     }
20.查询TABLE资料v_2(阵列版本)
mysqli_query 制作成物件後,抓全部
https://www.php.net/manual/en/mysqli.query.php
看要出来甚麽值
https://www.php.net/manual/en/class.mysqli-result.php
物件
https://www.php.net/manual/en/mysqli-result.fetch-object.php
     $mysqli = new mysqli('127.0.0.1', 'root', 'root', 'class', 3306);
     $mysqli->set_charset("utf8");

     $result = $mysqli->query('SELECT * FROM students '); // 2.MySQL I 叙述句

     $row = $result->fetch_object();  // 3.换成物件
     //$row = $result->fetch_array();

     // 4.全部抓出来
     while ($rows = $result->fetch_object()) {
         //物件抓法
         echo "{$rows->cID} : {$rows->cName}<br />";
         //echo "{$rows[0]} : {$rows[1]} : {$rows[7]}<br />";
     }
<<: docker network bridge error
Day 29:
昨天练习测试专案预设的元件後,今天要来测试之前所开发的Todolist app 来回忆一下Todol...
创建App第一步
建立了全新的Xcard专案,并在Main.storyboard界面页中拖拉数个Image View用...
伸缩自如的Flask [day2] blue_print
开始之前,我相信你已经有碰过flask的经验,或是至少知道藉由 pip install Flask ...
[DAY 5] _stm32f103c8t6开发板暂存器开发_控制MCU的GPIO High、Low范例
想走嵌入式系统开发这行必经的路,直接了解最底层怎麽运作的,Arduino底层也是这样运作的,只是Ar...
解决 "No manual entry for gcc" 的记录
问题: $ man gcc No manual entry for gcc 看到这个方法,但是失败了...