[Day 26] - React 前端串後端 - 串接登入
经过一整天的奋斗,终於跟React稍微熟了一点
首先建一个apiUtil.js
我打算把跟後端相关的方法都集中在这边做管理
先从登入开始
这边就是拿使用者输入的email、登入帐号、密码,用axios丢到後端登入api
import axios from "axios";

const userRequest = axios.create({
    baseURL: 'http://localhost:8080',
    headers: { 'Content-Type': 'application/json' },
  })

export const login = (email,userAccount, userPassword) => {
    return userRequest.post("/demo/api/v1/user/login",
    JSON.stringify({
        email,
        userAccount,
        userPassword,})
        ).then((res) => res.data).catch((err)=>err.toString());
  };
再来,建立一个Login.js,这支是拿来放登入页面的component
import React, { useState } from 'react';
import { login } from "../util/auth";
import { setAuthToken } from "../util/auth";
import { useHistory } from "react-router-dom";
const Login =() => {
const [useremail, setUseremail] = useState("");
const [username, setUsername] = useState("");
const [password, setPassword] = useState("");
const [errorMessage, setErrorMessage] = useState("");
const [loading, setLoading] = useState(false);
const handleLogin = (e) => {
setLoading(true);
setErrorMessage(null);
login(useremail,username, password).then((data) => {
if (data.token ==null) {
setLoading(false);
return setErrorMessage(data.status);
}
setLoading(false);
});
};
const handleUseremail = (e) => {
setUseremail(e.target.value);
};
const handleUsername = (e) => {
setUsername(e.target.value);
};
const handlePassword = (e) => {
setPassword(e.target.value);
};
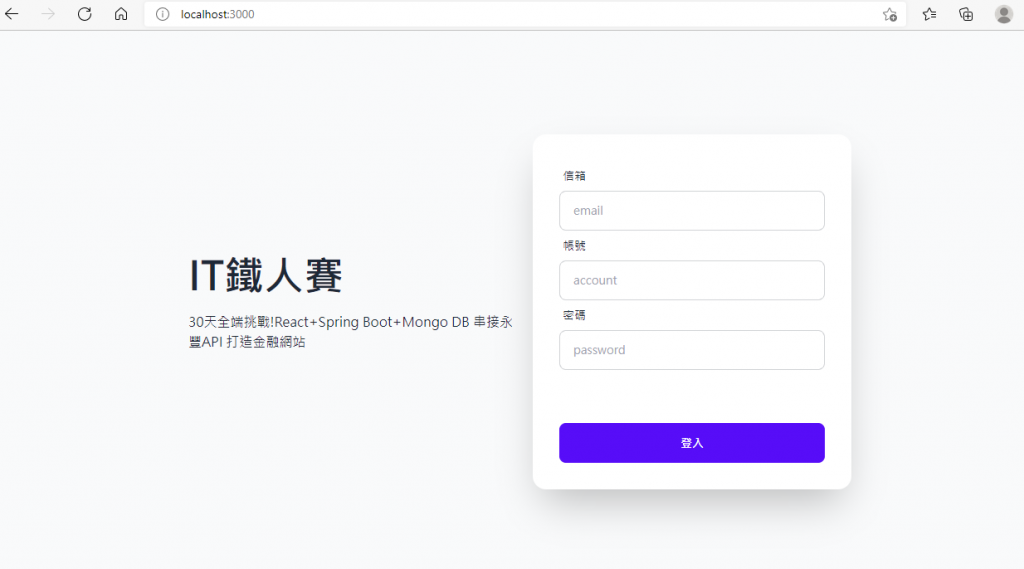
return(
<div className="hero min-h-screen bg-base-200">
<div className="flex-col justify-center hero-content lg:flex-row">
<div className="text-center lg:text-left">
<h1 className="mb-5 text-5xl font-bold">
IT铁人赛
</h1>
<p className="mb-5">
30天全端挑战!React+Spring Boot+Mongo DB 串接永丰API 打造金融网站
</p>
</div>
<div className="card flex-shrink-0 w-full max-w-sm shadow-2xl bg-base-100">
<div className="card-body">
<div className="form-control">
<label className="label">
<span className="label-text">信箱</span>
</label>
<input type="text" placeholder="email" className="input input-bordered" value={useremail} onChange={handleUseremail}/>
</div>
<div className="form-control">
<label className="label">
<span className="label-text">帐号</span>
</label>
<input type="text" placeholder="account" className="input input-bordered" value={username} onChange={handleUsername}/>
</div>
<div className="form-control">
<label className="label">
<span className="label-text">密码</span>
</label>
<input placeholder="password" className="input input-bordered" type="password" value={password} onChange={handlePassword}/>
<label className="label">
</label>
</div>
{errorMessage && <><small style={{ color: 'red' }}>{errorMessage}</small><br /></>}<br/>
<div className="form-control mt-6">
<input type="button" className="btn btn-primary" value={loading ? '登入中...' : '登入'} onClick={handleLogin} disabled={loading} />
</div>
</div>
</div>
</div>
</div>
)
}
export default Login
这边就是把使用者输入的值做绑定,输入完之後,如果按登入就会触发事件把资料藉由前面在apiUtil写的方法带到api
因为我在登入api有做调整,改成回json格式,
登入成功的话会带status跟token两个值
失败的话就只会带status,
所以我在这边以data.token是否存在来判断有没有登入成功,
登入失败的话就会把status秀出来在页面上
Login.js写好之後,就拿它来取代原本在index.js的<APP/>
在index.js引入import Login from './components/Login'之後
就可以把<APP/>换成<Login/>
这麽一来React的预设画面就会被换成刚刚写好的登入页了
写完之後就来试试

又遇到了熟悉的CORS问题
这里要回到Spring Boot後端
上次新增的WebSecurityConfig.java去增加CORS的设定
允许localhost:3000连到这个Spring Boot的後端取资料
import java.util.Arrays;
import com.rei1997.vault.util.filter.AuthorizationCheckFilter;
import org.springframework.context.annotation.Bean;
import org.springframework.context.annotation.Configuration;
import org.springframework.security.config.annotation.web.builders.HttpSecurity;
import org.springframework.security.config.annotation.web.configuration.EnableWebSecurity;
import org.springframework.security.config.annotation.web.configuration.WebSecurityConfigurerAdapter;
import org.springframework.security.config.http.SessionCreationPolicy;
import org.springframework.security.web.authentication.www.BasicAuthenticationFilter;
import org.springframework.web.cors.CorsConfiguration;
import org.springframework.web.cors.CorsConfigurationSource;
import org.springframework.web.cors.UrlBasedCorsConfigurationSource;
import static org.springframework.security.config.Customizer.withDefaults;


@Configuration
@EnableWebSecurity
public class WebSecurityConfig extends WebSecurityConfigurerAdapter {


    @Override
    protected void configure(HttpSecurity http) throws Exception {

        http.csrf().disable();
        http.sessionManagement().sessionCreationPolicy(SessionCreationPolicy.STATELESS);
        http.addFilterBefore(new AuthorizationCheckFilter(), BasicAuthenticationFilter.class);
        http.cors(withDefaults());//增加这行
    }

    //增加这个bean
    @Bean
    CorsConfigurationSource corsConfigurationSource() {
        final CorsConfiguration configuration = new CorsConfiguration();
        configuration.setAllowedOrigins(
        Arrays.asList("http://localhost:3000"));
        configuration.setAllowedMethods(
        Arrays.asList("GET", "PUT", "POST", "PATCH", "DELETE", "OPTIONS"));
        configuration.setAllowedHeaders(
        Arrays.asList("Authorization", "Cache-Control", "Content-Type"));
        final UrlBasedCorsConfigurationSource source = new UrlBasedCorsConfigurationSource();
        source.registerCorsConfiguration("/**", configuration);
        return source;

    }

}
再来试试,
故意输入错误的密码,因为登入成功後的动作我还没写好
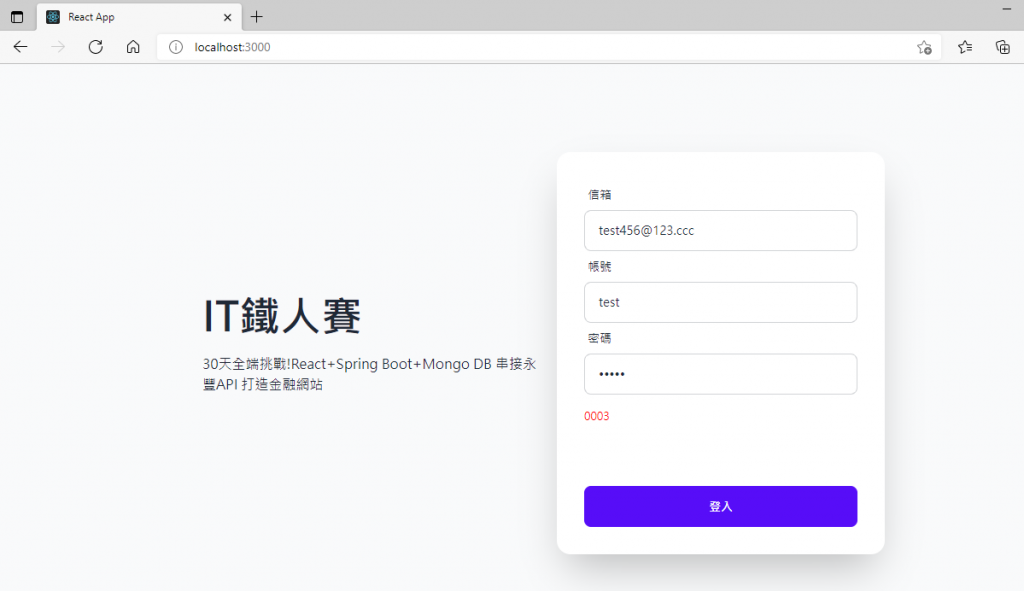
页面显示0003
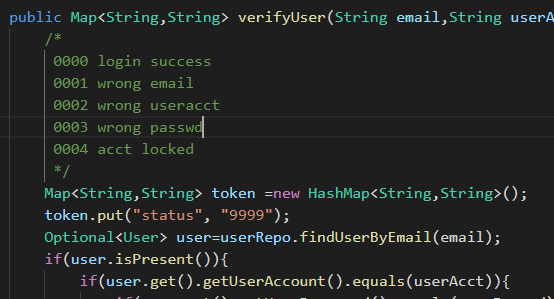
没错,就是密码错误
测试成功,接下来就试着把登入成功後得到的token存到cookie或者localstorage里面
然後要在每次对後端api发request时带上着个token以通过验证
<<: Re: 新手让网页 act 起来: Day26 - React Hooks 之 useLayoutEffect
>>: #26 No-code 之旅 — 实作 Dark Mode 和加入 Google Fonts ft. Chakra UI
[Day27]效能监控
每间公司的开发都需要仰赖大量的资料,这也成为公司最重要的资产,而究竟什麽是效能监控呢,就好比资料表是...
[Day09]程序菜鸟自学C++资料结构演算法 – 堆叠Stack介绍与建立
前言:介绍完了阵列和链结串列的实作之後,接着就要进入下一个主题-堆叠。那堆叠事甚麽,又有怎麽样的特性...
[Day12] placeholder for test day 18
写在前面 placeholder for test day 18 placeholder for t...
建立第一个RESTful api server(设定环境变数篇) (Day19)
在上篇的内容中,我们将资料库的连线字串放进程序码中,并写死在里面,但在常规的程序开发中,这样是非常不...
Day19-pytorch(2)认识backward、自己设置loss function及updata参数
backward计算微分後的结果 backward可自动算出function微分後的结果 也就是算出...