【把玩Azure DevOps】Day22 建立自管的Azure DevOps Agent(Linux Container agent)
前一篇文章建立了Azure DevOps Agent的Windows Container Image,已经知道了基本的概念就是:
- 选择基底映像档
- 安装所需要的额外套件与程序
- 将Azure DevOps Agent的开始程序start.ps/start.sh复制进去
既然已经知道了上面的概念,前一篇也有做过一次,那麽这篇就少浪费一些篇幅,直接把Code端上来看吧!
start.sh的内容如下,记得要改成Unix格式的结束符号(LF)喔!(或是透过dos2unix转换)
#!/bin/bash
set -e

if [ -z "$AZP_URL" ]; then
  echo 1>&2 "error: missing AZP_URL environment variable"
  exit 1
fi

if [ -z "$AZP_TOKEN_FILE" ]; then
  if [ -z "$AZP_TOKEN" ]; then
    echo 1>&2 "error: missing AZP_TOKEN environment variable"
    exit 1
  fi

  AZP_TOKEN_FILE=/azp/.token
  echo -n $AZP_TOKEN > "$AZP_TOKEN_FILE"
fi

unset AZP_TOKEN

if [ -n "$AZP_WORK" ]; then
  mkdir -p "$AZP_WORK"
fi

export AGENT_ALLOW_RUNASROOT="1"

cleanup() {
  if [ -e config.sh ]; then
    print_header "Cleanup. Removing Azure Pipelines agent..."

    # If the agent has some running jobs, the configuration removal process will fail.
    # So, give it some time to finish the job.
    while true; do
      ./config.sh remove --unattended --auth PAT --token $(cat "$AZP_TOKEN_FILE") && break

      echo "Retrying in 30 seconds..."
      sleep 30
    done
  fi
}

print_header() {
  lightcyan='\033[1;36m'
  nocolor='\033[0m'
  echo -e "${lightcyan}$1${nocolor}"
}

# Let the agent ignore the token env variables
export VSO_AGENT_IGNORE=AZP_TOKEN,AZP_TOKEN_FILE

source ./env.sh

print_header "1. Configuring Azure Pipelines agent..."

./config.sh --unattended \
  --agent "${AZP_AGENT_NAME:-$(hostname)}" \
  --url "$AZP_URL" \
  --auth PAT \
  --token $(cat "$AZP_TOKEN_FILE") \
  --pool "${AZP_POOL:-Default}" \
  --work "${AZP_WORK:-_work}" \
  --replace \
  --acceptTeeEula & wait $!

print_header "2. Running Azure Pipelines agent..."

trap 'cleanup; exit 0' EXIT
trap 'cleanup; exit 130' INT
trap 'cleanup; exit 143' TERM

# To be aware of TERM and INT signals call run.sh
# Running it with the --once flag at the end will shut down the agent after the build is executed
./run.sh "$@"
官方的Dockerfile内容如下:
FROM ubuntu:18.04

# To make it easier for build and release pipelines to run apt-get,
# configure apt to not require confirmation (assume the -y argument by default)
ENV DEBIAN_FRONTEND=noninteractive
RUN echo "APT::Get::Assume-Yes \"true\";" > /etc/apt/apt.conf.d/90assumeyes

RUN apt-get update && apt-get install -y --no-install-recommends \
    ca-certificates \
    curl \
    jq \
    git \
    iputils-ping \
    libcurl4 \
    libicu60 \
    libunwind8 \
    netcat \
    libssl1.0 \
  && rm -rf /var/lib/apt/lists/*

RUN curl -LsS https://aka.ms/InstallAzureCLIDeb | bash \
  && rm -rf /var/lib/apt/lists/*

ARG TARGETARCH=amd64
ARG AGENT_VERSION=2.185.1

WORKDIR /azp
RUN if [ "$TARGETARCH" = "amd64" ]; then \
      AZP_AGENTPACKAGE_URL=https://vstsagentpackage.azureedge.net/agent/${AGENT_VERSION}/vsts-agent-linux-x64-${AGENT_VERSION}.tar.gz; \
    else \
      AZP_AGENTPACKAGE_URL=https://vstsagentpackage.azureedge.net/agent/${AGENT_VERSION}/vsts-agent-linux-${TARGETARCH}-${AGENT_VERSION}.tar.gz; \
    fi; \
    curl -LsS "$AZP_AGENTPACKAGE_URL" | tar -xz

COPY ./start.sh .
RUN chmod +x start.sh

ENTRYPOINT [ "./start.sh" ]
同样的,上面的Dockerfile并不包含dotnet sdk,所以仍然需要自行安装进去。
也和上一篇提到的一样,我们可以透过在Docker hub上找到官方的dotnet sdk映像档,找到我们要的OS版本,然後取代Dockerfile第一行的FROM後面使用的image repository:
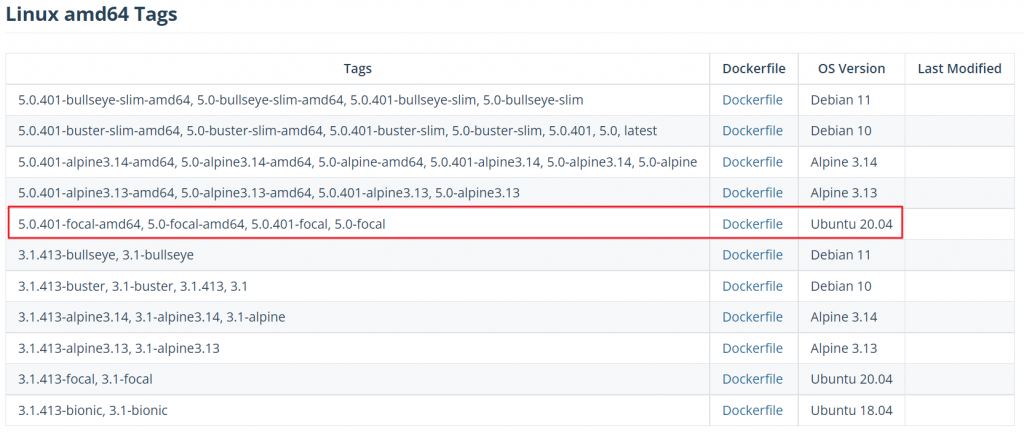
上图的表格来自於微软在Docker Hub上的dotnet sdk页面,dotnet sdk的image repository是 mcr.microsoft.com/dotnet/sdk:5.0 ,我们只需要将冒号後面的5.0改成需要的就行了,以上面红框内容为例,就把5.0改为5.0-focal,这样就是以Ubuntu 20.04为版本安装了dotnet sdk 5.0制作的Docker image,再加上安装PowerShell、Docker的话,最终的Dockerfile内容如下:
FROM mcr.microsoft.com/dotnet/sdk:5.0-focal

# To make it easier for build and release pipelines to run apt-get,
# configure apt to not require confirmation (assume the -y argument by default)
ENV DEBIAN_FRONTEND=noninteractive
RUN echo "APT::Get::Assume-Yes \"true\";" > /etc/apt/apt.conf.d/90assumeyes

#在这底下加入要额外装在Docker Image内的程序

RUN apt-get update && apt-get install -y --no-install-recommends \
    ca-certificates \
    curl \
    jq \
    git \
    iputils-ping \
    libcurl4 \
    libicu66 \
    libunwind8 \
    netcat \
    libssl1.0 \
	wget \
  && rm -rf /var/lib/apt/lists/*

# 新增 Microsoft 存放库金钥和摘要
RUN wget https://packages.microsoft.com/config/ubuntu/18.04/packages-microsoft-prod.deb -O packages-microsoft-prod.deb && \
         dpkg -i packages-microsoft-prod.deb

# 安装PowerShell
# Enable the "universe" repositories & Install PowerShell
RUN apt-get update && apt-get install -y powershell

# 安装Docker
RUN apt-get install apt-transport-https ca-certificates curl gnupg-agent software-properties-common
RUN curl -fsSL https://download.docker.com/linux/ubuntu/gpg | apt-key add
RUN add-apt-repository \
   "deb [arch=amd64] https://download.docker.com/linux/ubuntu \
   $(lsb_release -cs) \
   stable"
RUN apt-get update && apt-get install docker-ce docker-ce-cli containerd.io

#===========================================

RUN curl -LsS https://aka.ms/InstallAzureCLIDeb | bash \
  && rm -rf /var/lib/apt/lists/*

ARG TARGETARCH=amd64
ARG AGENT_VERSION=2.185.1

WORKDIR /azp
RUN if [ "$TARGETARCH" = "amd64" ]; then \
      AZP_AGENTPACKAGE_URL=https://vstsagentpackage.azureedge.net/agent/${AGENT_VERSION}/vsts-agent-linux-x64-${AGENT_VERSION}.tar.gz; \
    else \
      AZP_AGENTPACKAGE_URL=https://vstsagentpackage.azureedge.net/agent/${AGENT_VERSION}/vsts-agent-linux-${TARGETARCH}-${AGENT_VERSION}.tar.gz; \
    fi; \
    curl -LsS "$AZP_AGENTPACKAGE_URL" | tar -xz

COPY ./start.sh .
RUN chmod +x start.sh

ENTRYPOINT [ "./start.sh" ]
上面的Dockerfile内容中要特别提一下在官方的范例中安装的libicu60 package只适用在Ubuntu 18.04(参考这篇),因为我是选Ubuntu 20.04,所以改成libicu66(参考这篇)。
准备好Dockerfile和start.sh这两个档案之後,执行下面的指令建立映像档:
docker build -t devopsagent .
完成Build Image的动作之後,透过下面的指令建立一个名为azure-agent的Container:
docker run --name azure-agent -d -v /var/run/docker.sock:/var/run/docker.sock -e AZP_URL=[AzureDevOpsURL] -e AZP_TOKEN=[AzureDevOpsPAT] -e AZP_AGENT_NAME=[AzureDevOpsAgentName] IMAGE:TAG
docker run的指令和前一篇的大同小异,主要差别在於如何系结host的docker给container使用。
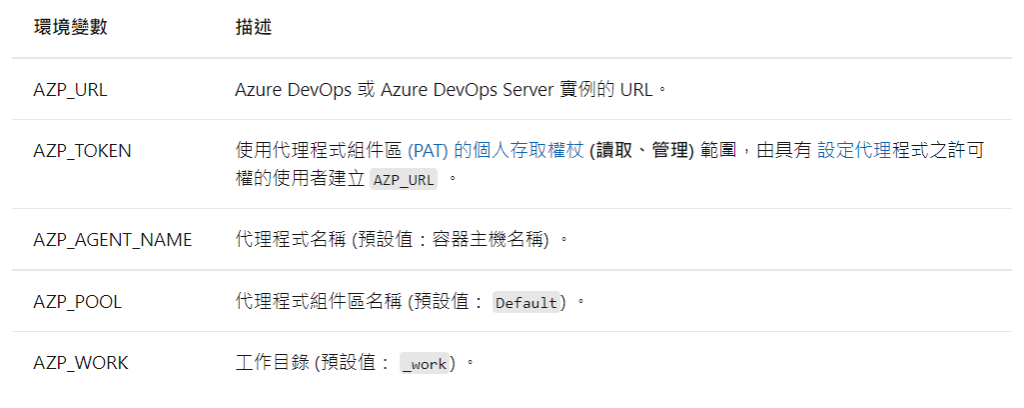
同样的环境变数表再贴一次:
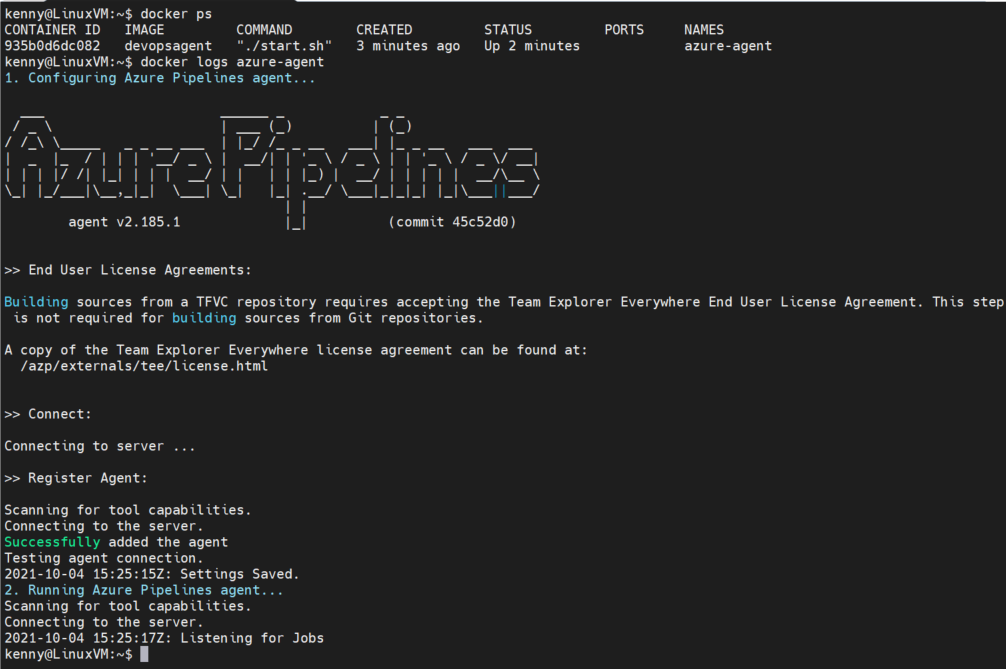
同样贴一下执行的结果:
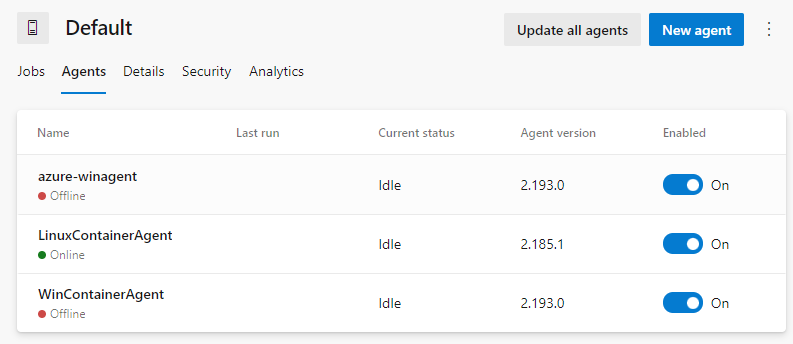
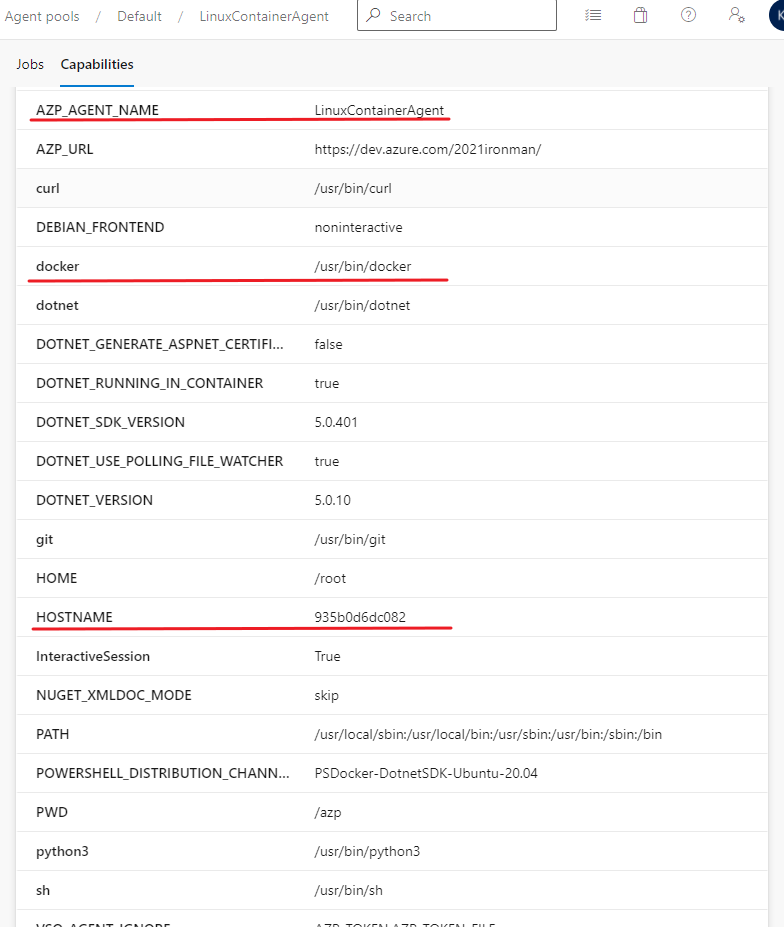
还有Agent Pools里的列表和Agent的Capabilities:
其它和前一篇的内容没什麽太大的差别,至於Linux VM的部份意思差不多,所以就不再另外弄一篇安装在Linux VM里的文章了。
>>: 【程序】Onboarding process 转生成恶役菜鸟工程师避免 Bad End 的 30 件事 - 21
虹语岚访仲夏夜-9(专业的小四篇)
鲜红创伤 在夜里 暗淡无光 愈合後 变成透明的疤 日光下 仍是无光 三日月的慌 莫过於再十...
追求JS小姊姊系列 Day4 -- 我知道很怪,但你不好奇字串姐变身会怎样吗(下)
前情提要 倒在路边的我,醒来发现人早已不见,只好回家过节。 (时间来到了,回到家中的午餐後) **我...
[从0到1] C#小乳牛 练成基础程序逻辑 Day 24 - String操纵术I 遍历综合技 Trim()
Scrabble串起来 | 字串=字元阵列 | 去头去尾 ...
[D07] placeholder
写在前面 placeholder for test placeholder for test pla...
【Day20】比较Nodelist与HTML collection的差异
前面提到透过DOM API取得网页节点的方法: //根据传入的id 名称,找到DOM里面相同id名...