【设计+切版30天实作】|Day19 - 切版 - Heroheader - 怎麽切出满版heroheader?
大纲
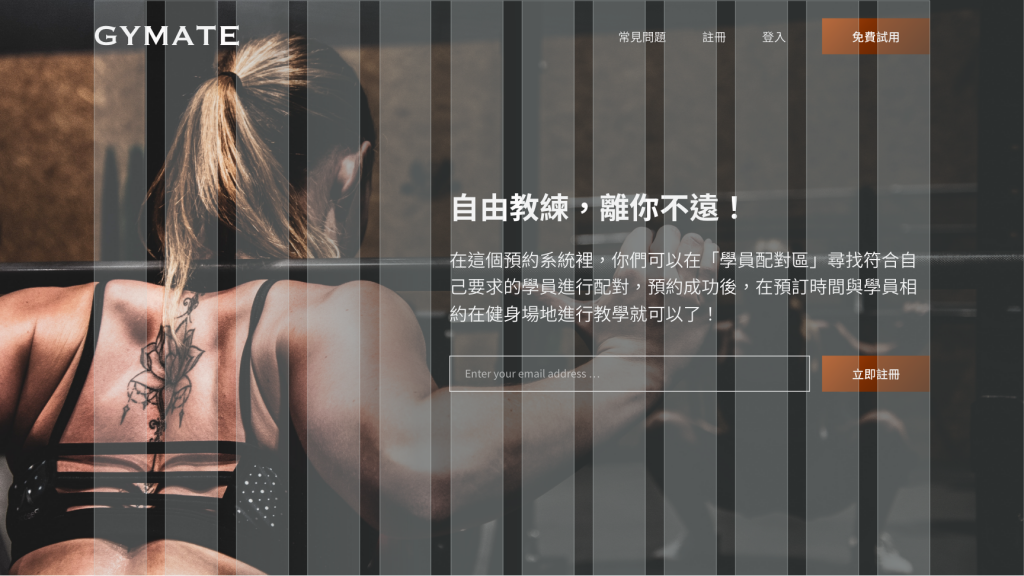
前半段都在设计,今天开始就要进行切版了!(紧张!!!)那我们header的部分分成heroheader和navbar,今天的任务是切「Heroheader」的「背景图」和「标题、内容、intput、btn」。Navbar的部分等明天再来完成唷!
(下方是header的设计稿)
数据收集
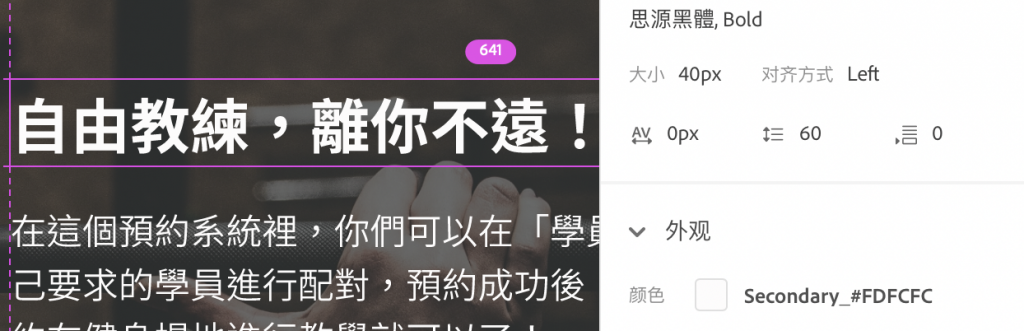
header标题的样式
- Font-weight:Bold
- Font-size:40px
- Text-color:$Secondary
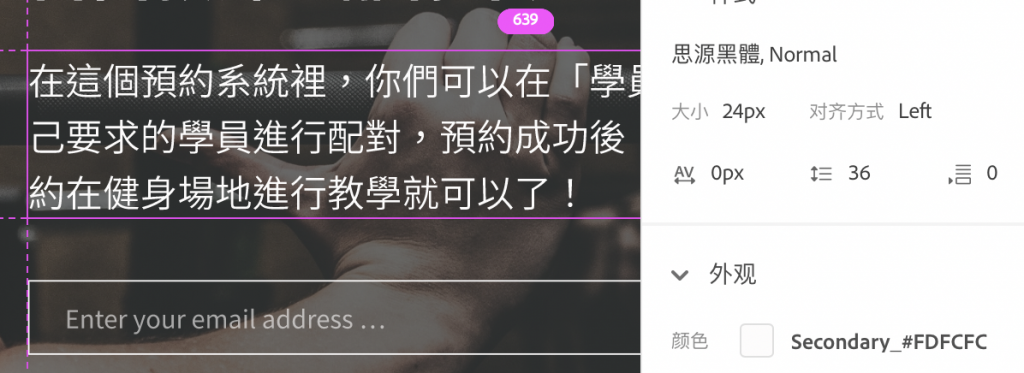
header内文的样式
- Font-weight:Normal
- Font-size:24px
- Text-color:$Secondary
input的placeholder样式
- Font-weight:Regular
- Font-size:16px
- Text-color:$Secondary , 60%

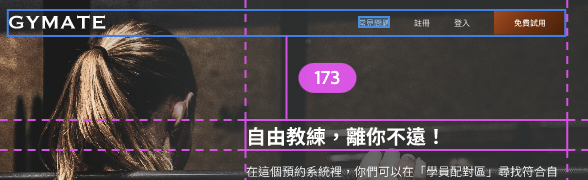
header标题的margin-top:173px
header标题的margin-bottom:24px

header内文的margin-bottom:40px
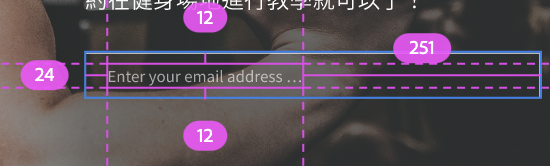
header input的margin-right:16px

header input的padding
- padding-y:12px
- padding-left:24px
步骤
先开一个新区块

- 开啓
<section>,命名为heroheader - 另外在後面加入背景img,并加入
<section class="heroheader" style="background-image: url(style/PHOTO/bg_header.png)">
</section>
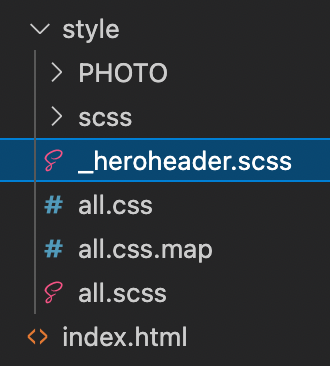
由於背景图必须在最底层,所以我们来帮他客制化一下
- 在style资料夹里新增一个客制化的scss,命名为
_heroheader.scss - 在
_heroheader.scss里新增.heroheader的客制化
.heroheader{
  background-size:cover;
  background-repeat: no-repeat;
  z-index: -1;
  padding-bottom: 245px;
}
回到
html,在<img>下方新增container和Grid Row with Column。
*注意:设计稿上的文字是占col-7,另外是从右到左喔,因此要在row加上justify-content-end

<section class="intro heroheader">
  <div class="container">

			<!--文字从右到左-->
      <div class="row justify-content-end">

					<!--占7栏-->
          <div class="col-xl-7"></div>
      </div>
  </div>
</section>
客制「标题」、「内容」、「input」、「btn」的样式
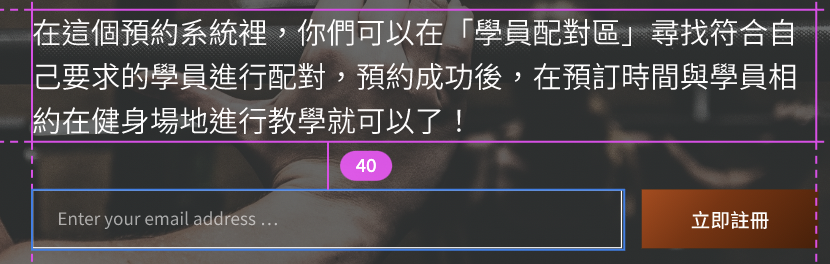
<h1 class="text-secondary">自由教练,离你不远!</h1>
<p class="text-secondary fs-4 fw-light">在这个预约系统里,你们可以在「学员配对区」寻找符合自己要求的学员进行配对,预约成功後,在预订时间与学员相约在健身场地进行教学就可以了!</p>
<input class="py-3 ps-6 bg-transparent border-1 border-secondary me-5" style="width: 73%;" type="text" placeholder="Enter your email address ...">
<button class="btn btn-primary py-3 border-0 fw-light">立即注册</button>
- 另外在
_heroheader.scss新增.hero-margin
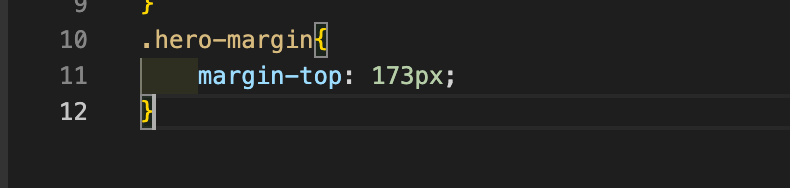
```scss
.hero-margin{
    margin-top: 173px;
}
```
-
在标题、内容、input、btn外层的
<div class="row">加入hero-margin的class名称<div class="row justify-content-end hero-margin"></div>
在里面加入刚客制完的标题、内容、input、btn
<section class="intro heroheader">
	<div class="container">

		<!-- 加上客制化"hero-margin"的class名称 -->
    <div class="row justify-content-end hero-margin">
      <div class="col-lg-7">

				<!-- header的标题、内容、input、btn -->
				<h1 class="text-secondary">自由教练,离你不远!</h1>
				<p class="text-secondary fs-4 fw-light">在这个预约系统里,你们可以在「学员配对区」寻找符合自己要求的学员进行配对,预约成功後,在预订时间与学员相约在健身场地进行教学就可以了!</p>
				<input class="py-3 ps-6 bg-transparent border-1 border-secondary me-5" style="width: 73%;" type="text" placeholder="Enter your email address ...">
				<button class="btn btn-primary py-3 border-0 fw-light">立即注册</button>

			</div>
    </div>
  </div>

</section>
结论
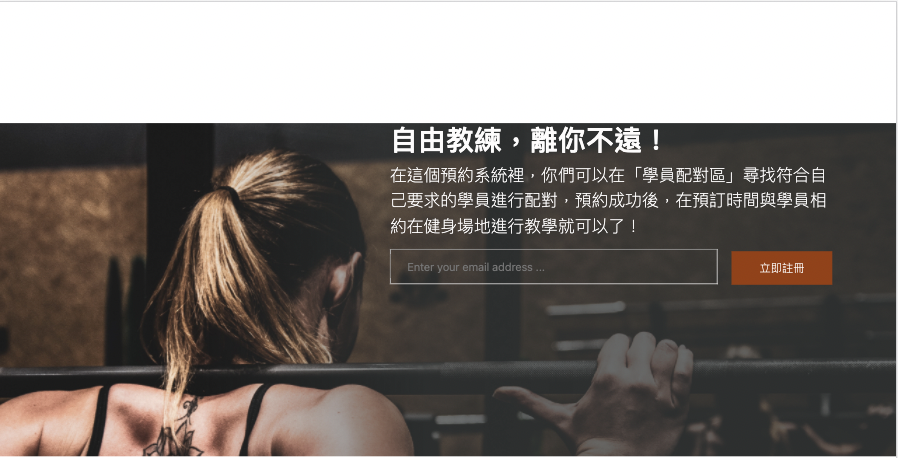
登登登登,Heroheader的区块就完成啦!因为目前还没做好navbar,所以看起来有点怪怪的,等明天把navbar加上去就可以有美美的header了~
那明天再来切下一个东东吧!
<<: 自动化测试,让你上班拥有一杯咖啡的时间 | Day 19 - 如何写入档案和读取档案
DAY14 资料室--Vuex项目结构
前言 Vuex 并不会限制我们的代码结构,只是有三大原则需要遵守: 应用层级的状态应该集中到单个 s...
【Day 25】Google Apps Script - API Blueprint 篇 - 执行专案取得 .apib 档
执行 Google Docs 转换 API Blueprint 格式专案程序,最後来看看转换後的 ...
[Day25] 在 Codecademy 学 React ~ 终於来到 Hook 的世界 ‧ useState 篇 (2)
前言 快开天窗了先把目前进度 po 出来再说orz 今天文章重点在 setState 搭配 ...p...
Day26 - 移除没用到的 CSS,使用 Purge CSS (feat. Ant Design, Tailwind)
前言 在前端的世界中,我们经常会站在巨人的肩膀上,如果任何事情都需要自己从零开始动手做,後续的维护也...
Unity与Photon的新手相遇旅途 | Day4-树木与地形制作
今天要来讲该如何使用Unity里面的工具来制作树木以及地形 ...