Day 21 资料宝石:【Lab】RDS架构 建立自己的第一台云端资料库 (上)
今天我们将开始进行 RDS Lab 练习,架构自己的第一台云端资料库。由於此章节非常大,我将会分成上中下三篇文章,将这次的 Lab 完整的呈现出来!
环境建立
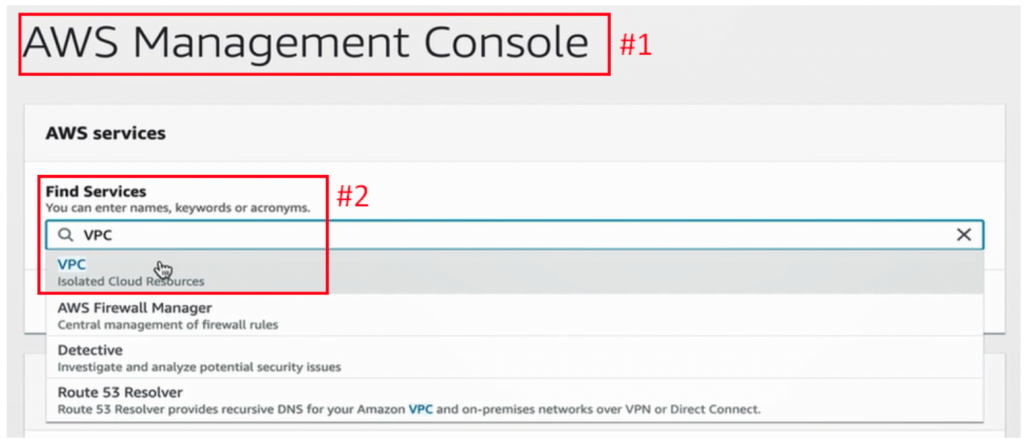
为建立云端资料库,就得要先设立环境,所以首先到 AWS Management Console 页面(下图#1)搜寻 VPC (下图#2)。
建立 Elastic IP address
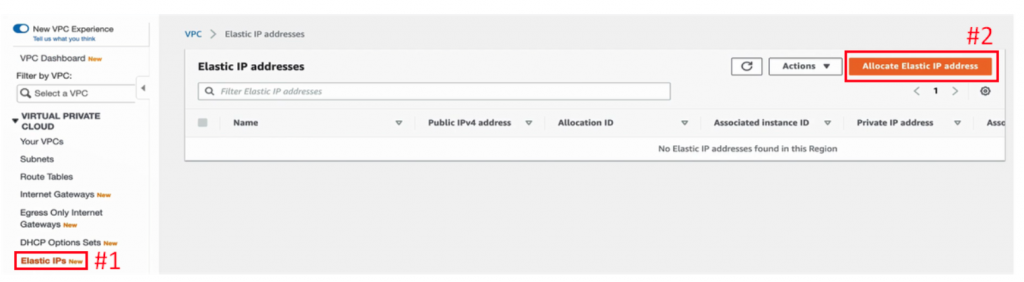
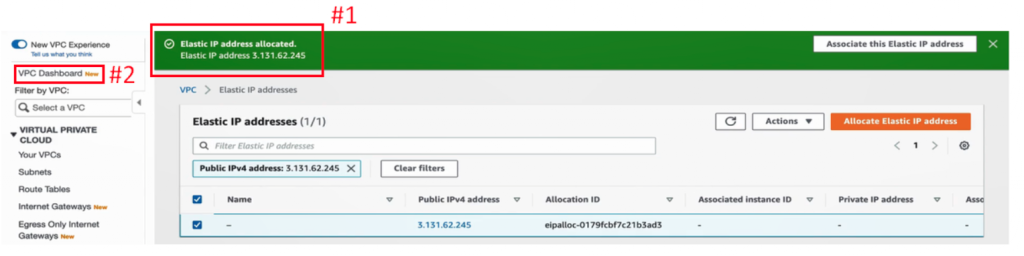
第一步点击左边列表 Elastic IP (下图#1),切换到创建 Public IP 页面,再按右上角 Allocate Elastic IP address (下图#2),来建立 Elastic IP address。
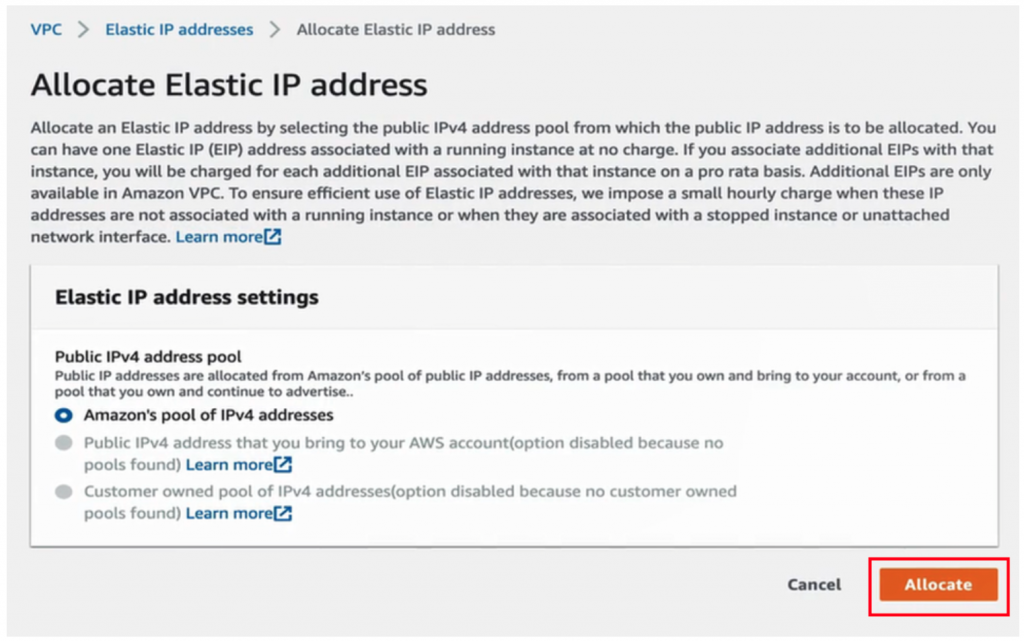
点击右下角的 Allocate,来得到 Public IP,如下图:
创建 VPC
分配到 Elastic IP address 之後(下图#1),点击 VPC Dashboard (下图#2)
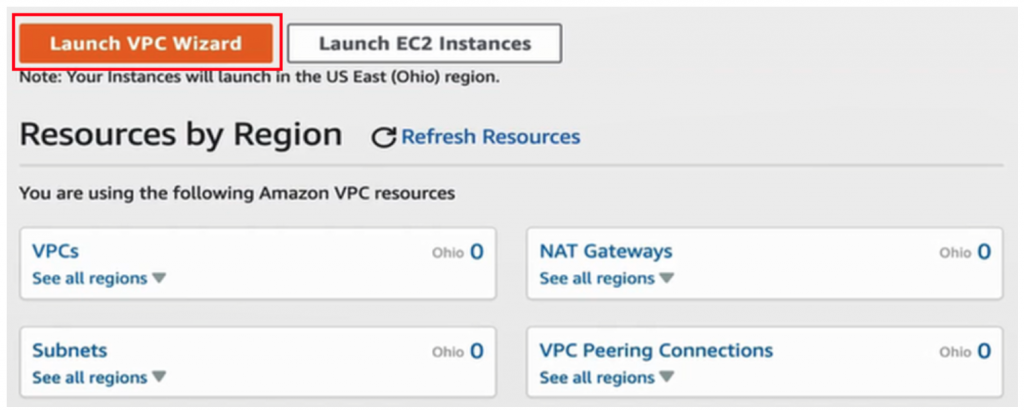
切换至 VPC Dashboard 页面後,点击 Launch VPC Wizard,来开始 VPC 的建置,如下图:
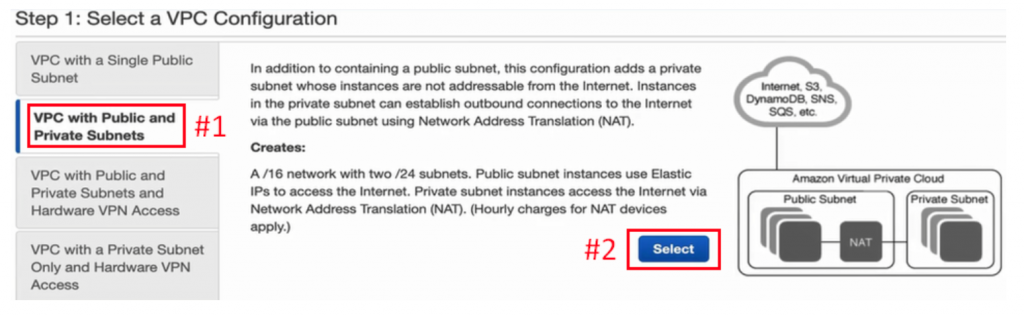
进到 Step 1: Select a VPC Configuration 页面後,选择 VPC with Public and Private Subnets (下图#1),再按右下角的 Select (下图#2)。
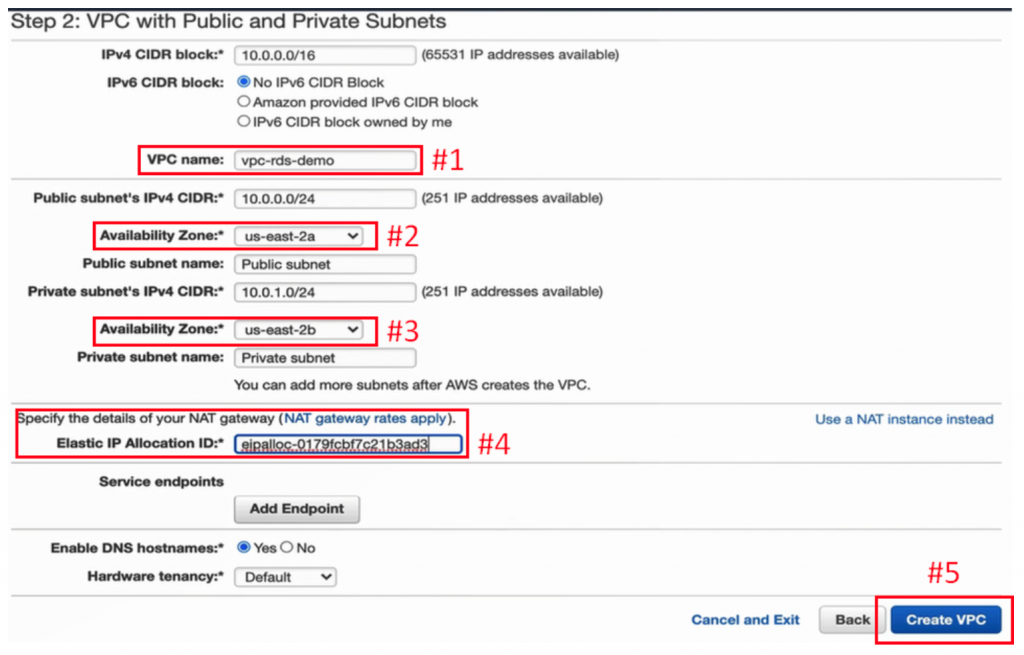
进入到 Step 2: VPC with Public and Private Subnets 页面。
假设 VPC 的名称叫作 vpc-rds-demo (下图#1),把 Public subnet 所要放的 Availability Zone 选为 us-east-2a (下图#2),而 Private subnet 所要放的 Availability Zone 选为 us-east-2b (下图#3),往下在 NAT getway 放上刚才分配的 Elastic IP Allocation ID (EIP)(下图#4),最後点击 Create VPC (下图#5),以上列设定来建立 VPC。
VPC 建立完成之後,点击右下角 OK,来完成建立 VPC 的动作,如下图:

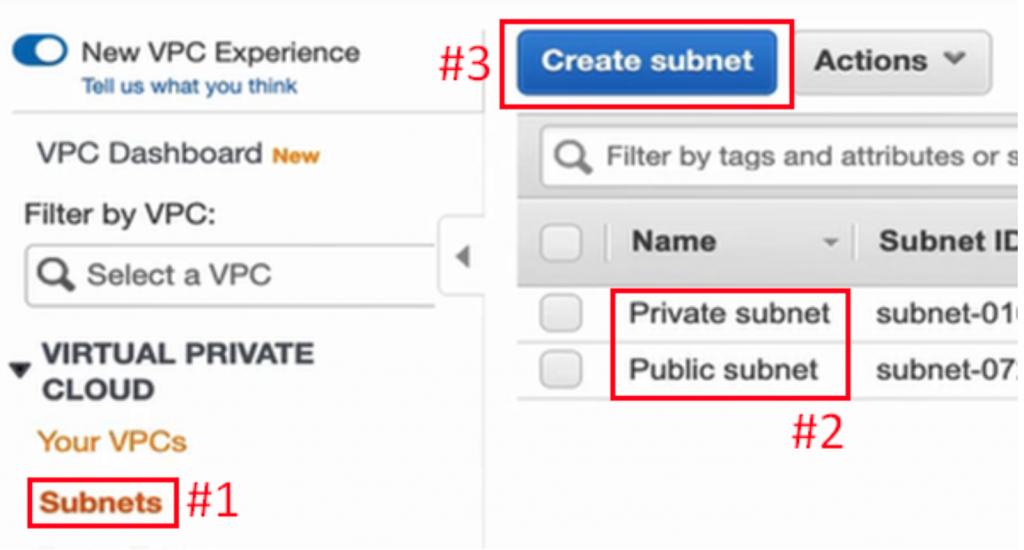
建立 Subnet
按页面左列的 Subnets(下图#1),切换到 Subnets 页面,可以看到因上方VPC 的建立而已经存在的 Public subnet 以及 Private subnet (下图#2),现在再示范创建另一个 Private subnet,点击 Create subnet (下图#3)。
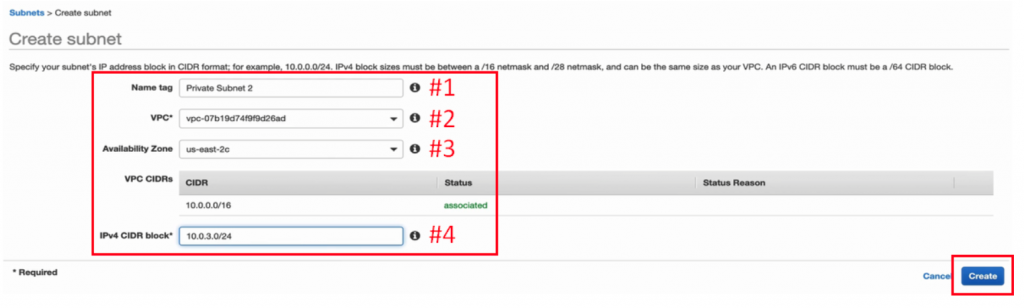
假设给一个名称叫 Private Subnet 2 (下图#1),VPC 选择刚才建立的 VPC (下图#2),Availability Zone 选择 us-east-2c(下图#3),再给一个网路空间为 10.0.3.0/24 (下图#4),最後按右下角的 Create (下图#5),以上列设定来建立 Subnet。
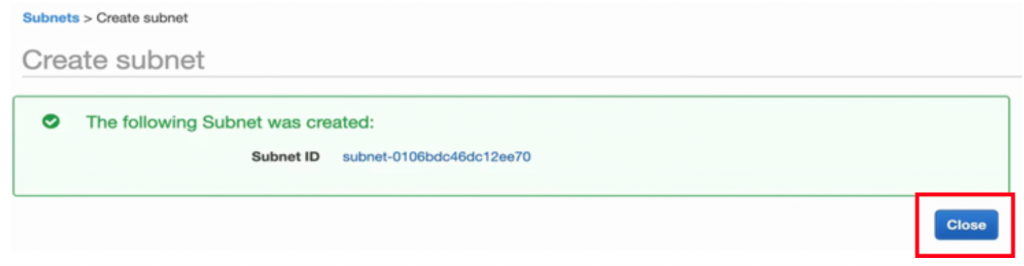
Subnet 建立完成後,按右下角 Close,来结束建立 Subnet 的动作。
目前便已经建立了 1 个 Public subnet 与 2 个 Private subnet,如下图:

创建 Security Group
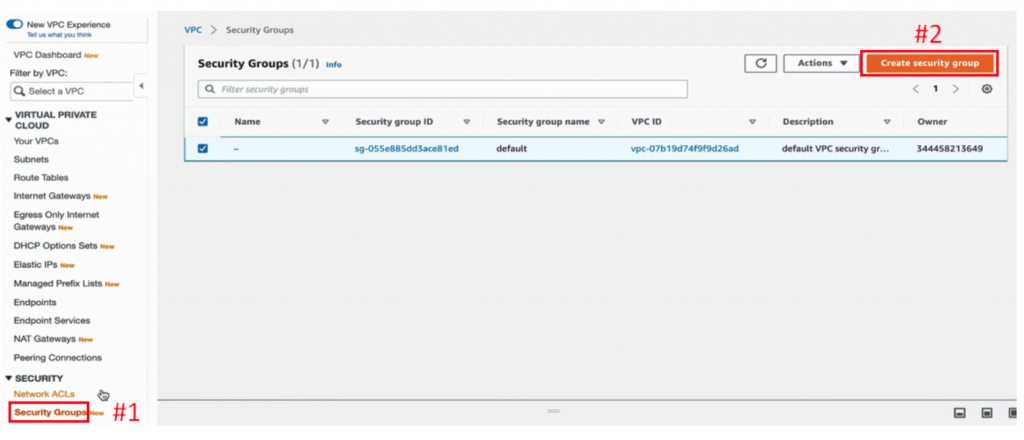
按页面左列下方的 Security Groups (下图#1),切换到 Security Groups 页面,点击 Create security group (下图#2),来创建 Security Group。
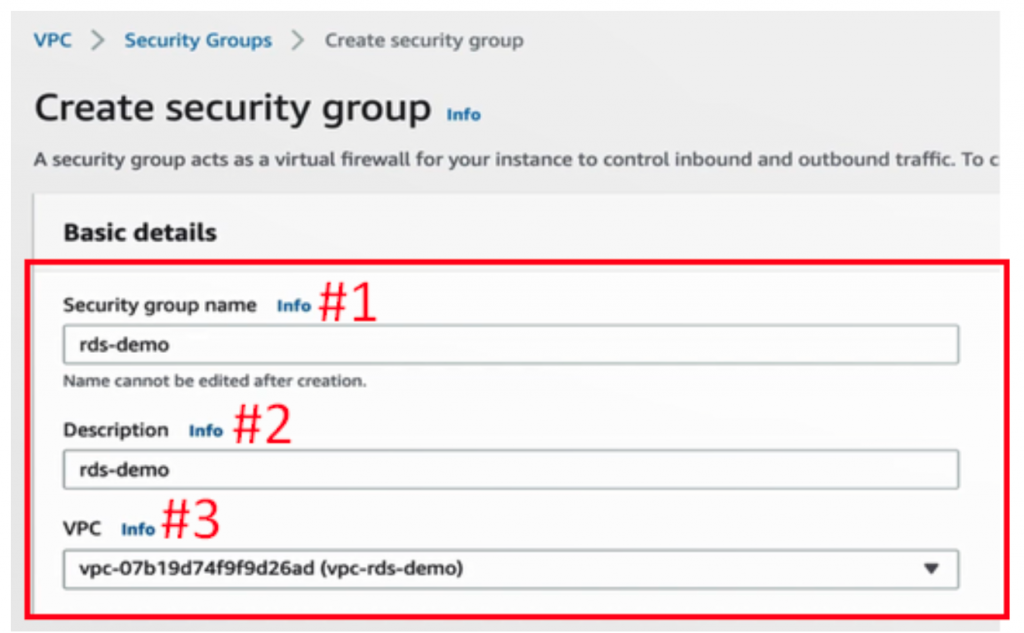
假设 Security Group 名称为 rds-demo (下图#1),Description 一样是 rds-demo (下图#2),VPC 选择刚才所建立的 VPC (下图#3)。
点击 Add rule (下图#1),以建造 1 个 Inbound rules。由於想开放别人来连,所以 Type 选择 MYSQL/Aurora (下图#2),而可以看到右方的 Port range 通常就是 3306 (下图#3),来源选择 Anywhere (下图#4),点击页面右下角的 Create security group (下图#5),以上列设置来建立 Security Group 。
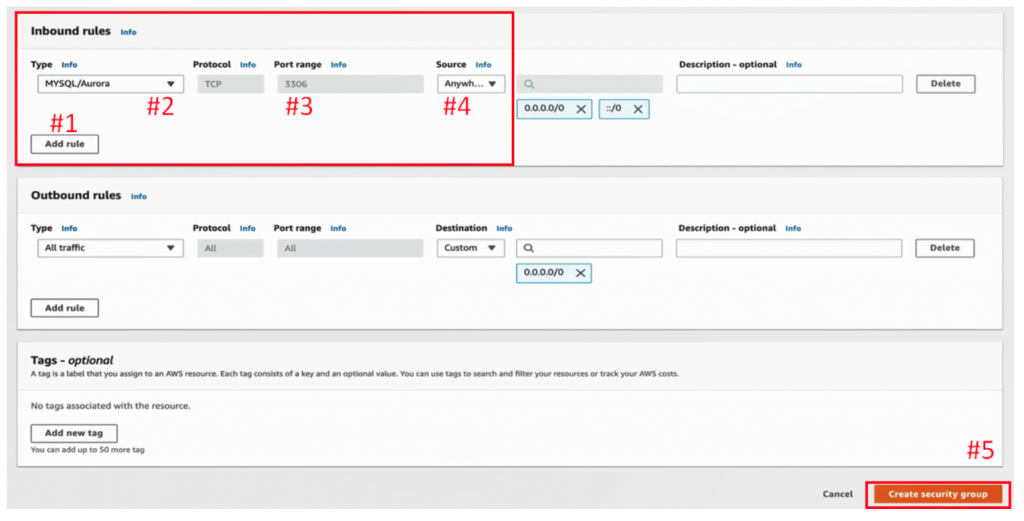
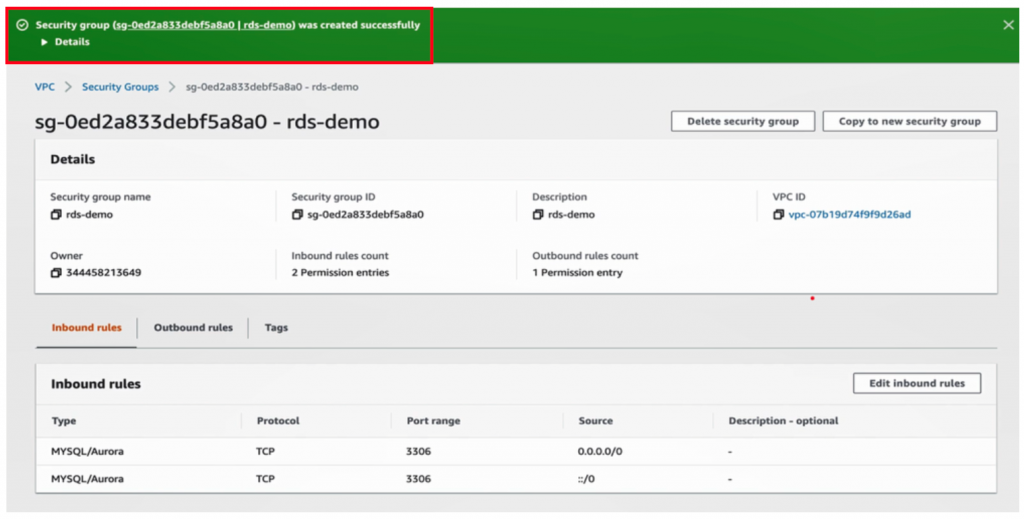
这样就建立 Security Group 成功了,如下图。
建立 Subnet Group
每一个 RDS instance 都要放到一个 Security Group,如同 Subnet groups 这个名称,一个 Subnet group 会涵盖一个以上的 Security Group。
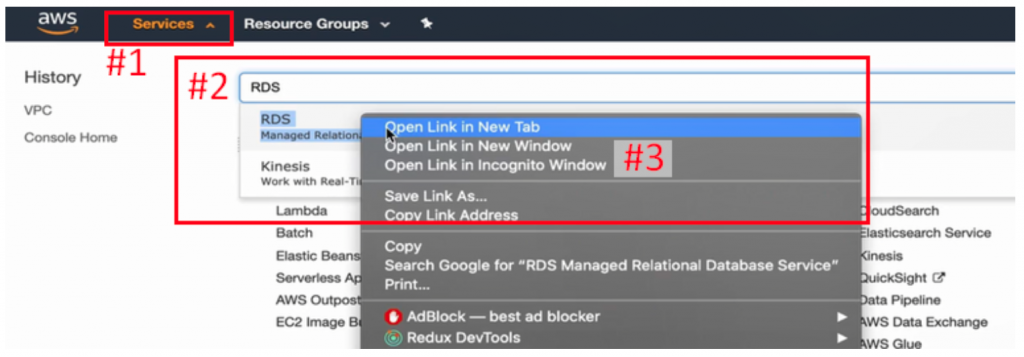
点开 Services (下图#1),打开清单,在搜寻列搜寻 RDS (下图#2),右键以新分页开启连结(下图#3)。
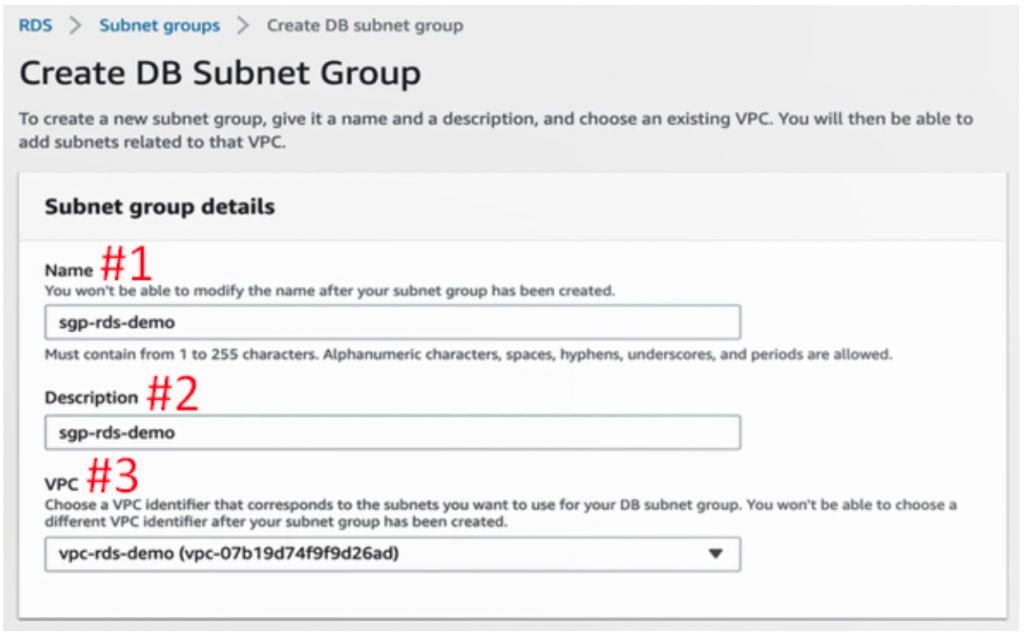
进到 RDS 页面後,按下左边列表的 Subnet groups (下图#1),再点击右上角的 Create DB Subnet Group (下图#2),来建立 Subnet Group。

假设 Subnet Group 名称为 sgp-rds-demo (下图#1), Description 也同样名称(下图#2),VPC 选择刚才建造的 VPC(下图#3)。
把页面下滑,Subnet 是以 Availability Zone (AZ)为角度来看的,所以依据 Private Subnet 的所在 AZ,此处选择为 us-east-2b 与 us-east-2c (下图#1)。 Subnets 则选择刚才建立的两个 Subnet (下图#2),最後点击 Create (下图#3),来建立 Subnet 的放置。
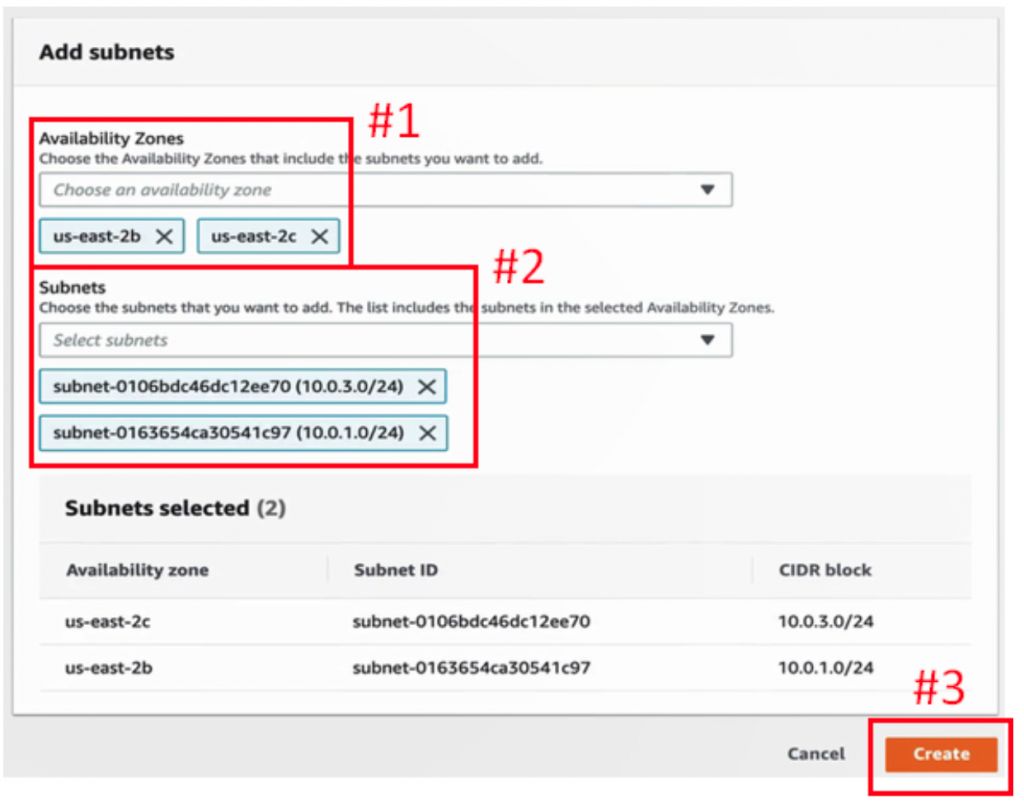
如下图,如此便成功建立 Subnet group,而这个 Subnet group 即是涵盖了刚才放置的在不同两个 AZ 的 Private Subnets。

结语
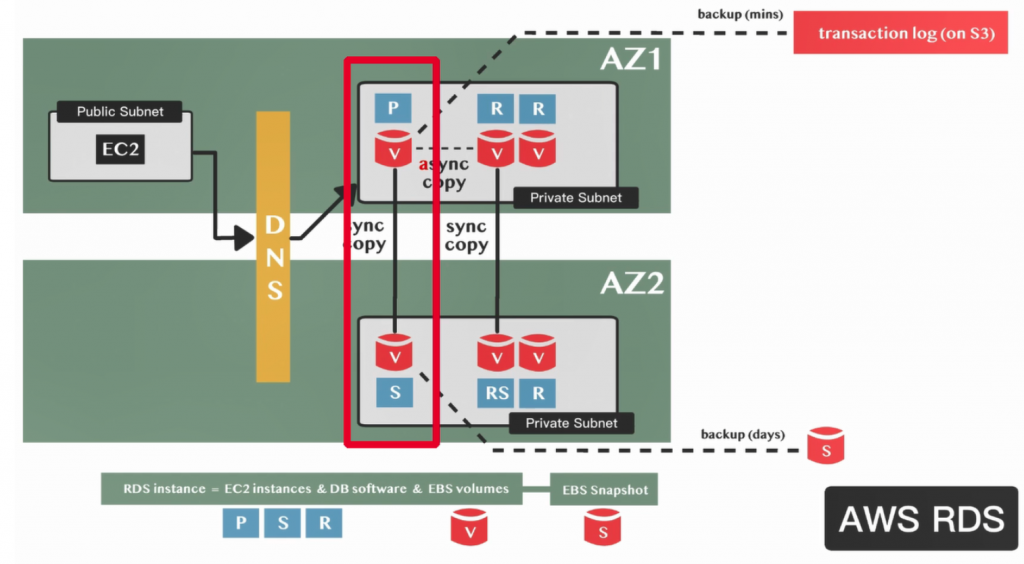
到此,已完成了部分的 RDS Instace 环境建置,如下图红框部分:
What's Next?
明天我们将接着看到「资料宝石:【Lab】RDS架构 建立自己的第一台云端资料库(中)」!
<<: 电子书阅读器上的浏览器 [Day26] 保持画面不会自动关闭
>>: Day23 | Livewire 实作 购物网站(二): 建立商品细节页面
[Day28]用Canvas打造自己的游乐场-labyrinth 收尾
今天要来把迷宫游戏做个收尾,其实也就检查一下有没有哪里有问题,那因为後来觉得55块砖的范围还有有点大...
Day13:13 - 购物车服务(1) - 後端 - 购物车总商品显示、加入购物车API
హలో,我是Charlie! 在Day12当中,我们完成了商品详情显示的API,而今天我们将完成後端...
Day07-生命周期
前面几天稍微懂Vue能做到哪些是情,今天就要来深入了解Vue的生命周期,看他怎麽从无到有来处理我们对...
【程序】我为什麽转职,转职後快乐吗 转生成恶役菜鸟工程师避免 Bad End 的 30 件事 - 22
我为什麽转职, 转职後快乐吗 了解自己 相信自己 自我实现 ...
【Day 04】CVE 哪有那麽萌 - 找漏洞经验分享
动机 这篇内容讲的是我在今年暑假参加 AIS3 暑期营队软件安全组所做的专题,队友分别为郑永泰、许智...