[Day09] Storybook - What's a story and how to write
Story 是元件呈现状态的描述,开发者可以为每个元件攥写多个 Story,也就是说元件可能会因为不同的参数组合而有不同的样貌,而我们可以透过定义 Story 来将几个标志性的用法呈现出来。
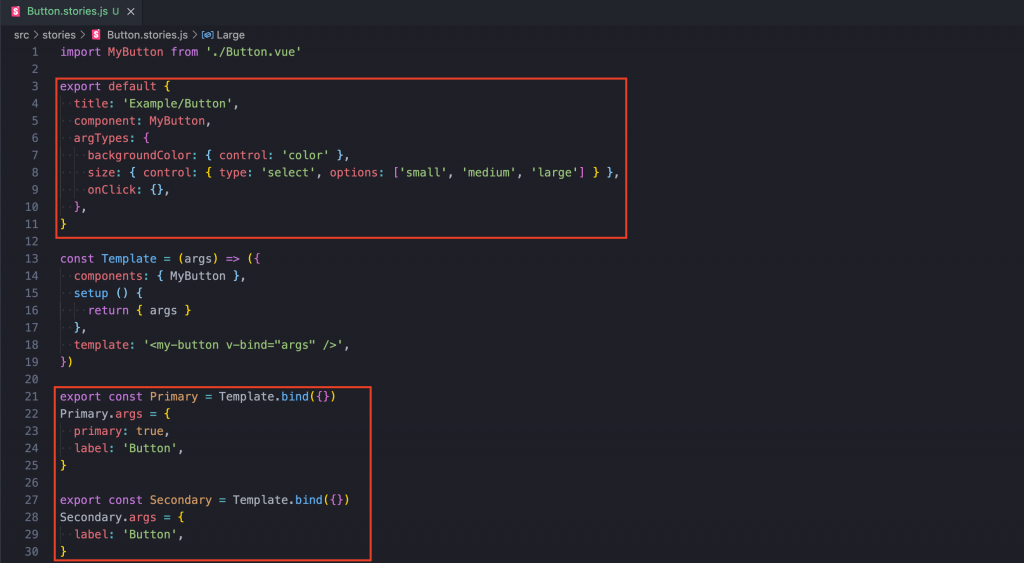
我们以 CLI 创建时自动产生的样本范例 Button.stories.js 为例。
// src/stories/Button.stories.js
...

const Template = (args) => ({
  components: { MyButton },
  setup() {
    return { args };
  },
  template: '<my-button v-bind="args" />',
});

export const Primary = Template.bind({});
Primary.args = {
  primary: true,
  label: 'Button',
};

export const Secondary = Template.bind({});
Secondary.args = {
  label: 'Button',
};

export const Large = Template.bind({});
Large.args = {
  size: 'large',
  label: 'Button',
};

export const Small = Template.bind({});
Small.args = {
  size: 'small',
  label: 'Button',
};
在 Button.stories.js 中定义了 Primary, Secondary, Large 以及 Small,而这每一个都分别代表着 Button 元件的一个 Story,每个 Story 都有一个相应的侧边栏项目,单击切换时,它会在 Canvas(一个独立的预览 iframe)中呈现相对应的 Story 内容。

Component Story Format
目前官方推荐我们使用 Component Story Format (CSF) (一个基於 ES6 modules 的格式) 的方式攥写 Story,每一个 CSF 会 default export 出一个元件的基本设定以及 named export 出一至多个元件的 Story 内容。
在 Storybook 支援的众多框架之中,唯独 React Native 无法使用 CSF ,所以如果是 React Native 的开发者,只能使用旧版的 storiesOf API来取代,storiesOf()的使用语法可以参考官方提供的 API 文件。

How to write stories
创建 Story 最简单的方法就是直接定义多个具有不同参数的元件。
import MyButton from './Button.vue';

export default {
  component: MyButton,
  title: 'Example/Button',
}

export const Primary = () => ({
  components: { MyButton },
  template: '<my-button backgroundColor="#ff0" label="Button" />',
})
export const Secondary = () => ({
  components: { MyButton },
  template: '<my-button backgroundColor="#ff0" label="????" />',
})
这样的写法对於很少 Story 的元件来说可能没什麽问题,但对於有许多 Story 可能就会重复很多程序码。
Args
为了减少重复的程序码,我们可以定义一个带有 args 参数的 Template 函式,该 args 参数会 bind 在元件上作为其 props ,接着再透过 Function.prototype.bind() 来让每一个复制出来的函式可以互不干扰地设定自己的 args。
需注意的是,args 是关键字,不能由开发者自由更换参数名称。
import MyButton from './Button.vue'

export default {
  title: 'Example/Button',
  component: MyButton
}

const Template = (args) => ({
  components: { MyButton },
  setup () {
    return { args }
  },
  template: '<my-button v-bind="args" />',
})

export const Primary = Template.bind({})
Primary.args = {
  primary: true,
  label: 'Button',
}

export const Secondary = Template.bind({})
Secondary.args = {
  label: 'Button',
}
...
此外你也可以运用展开运算符(Spread Operator) 来重复使用定义好的 Story。
export const PrimaryLongName = Template.bind({});

PrimaryLongName.args = {
  ...Primary.args,
  label: 'Primary with a really long name',
}
Component args
args 除了可以在各个 Story 中定义以外,也可以在元件的层级中定义,如此一来这些 args 就会在所有的 Story 起作用,除非被 Story 层级的 args 给覆盖掉。
import MyButton from './Button.vue'

export default {
  title: 'Example/Button',
  component: MyButton,
	args: {
    primary; true
  }
}

export const Primary = Template.bind({})
Primary.args = {
  label: 'Button',
}

export const PrimaryLongName = Template.bind({});

PrimaryLongName.args = {
  label: 'Primary with a really long name',
}

export const Secondary = Template.bind({})
Secondary.args = {
  Primary: false,
  label: 'Button'
}
参考资料
- Storybook - What's a Story
- Storybook - How to write stories
- Storybook - Args
- 玩转 Storybook: Day 06 Component Story Format
- 玩转 Storybook: Day 07 Write stories
今天的分享就到这边,如果大家对我分享的内容有兴趣欢迎点击追踪 & 订阅系列文章,如果对内容有任何疑问,或是文章内容有错误,都非常欢迎留言讨论或指教的!
明天要来分享的是 Storybook 主题的第三篇 Configure story rendering,那我们明天见!
<<: android studio 30天学习笔记-day 9-rxjava2补充
>>: Day 12. 生命周期 - Lifecycle Hooks
D14 重新设定create date & 上传功能测试
将create date的auto_now_add删除 并加入upload相关栏位 DateTime...
Day 28 shared_preferences本机存放区
(一)介绍 Flutter推荐使用者使用shared_prederences储存资料,可以存取少量资...
#19 Telegram Bot 起手式
今天开始做我们的 Telegram Bot! Telegram Telegram 是一个通讯软件,就...
Day 8 - Rancher 丛集管理指南 - 架设 K8s(上)
本文将於赛後同步刊登於笔者部落格 有兴趣学习更多 Kubernetes/DevOps/Linux 相...
Day 5 安装Prometheus
2021 铁人赛 DAY5 昨天已经简单介绍过Prometheus了,今天要来将他装在我们的丛集里,...