伪类与伪元素-30天学会HTML+CSS,制作精美网站
昨天介绍了各种选择器,今天介绍伪类及伪元素样式设定,可以让画面有更多的样式变化,也减少html code的撰写。让我来为你一一介绍各种属性使用方式吧~
伪类选择器
伪类选取器是特殊的效果加到特定选择器上,已经存在的东西,是以单冒号「:」作为开头,伪类分为状态伪类、结构性伪类、语言伪类、表单伪类、目标伪类
状态伪类
是标签常见的
- :link:未访问过的连结
- :visited:已访问过的连结
- :hover:滑鼠滑入
- :focus:选取具有焦点的输入元素
- :active:被点击的那一刻
结构性伪类
:root根元素
在html中根元素是html元素,也可以写body或html
/*使用根元素*/
:root{
    background:#efefef;
}
/*使用html*/
html{
    background:#efefef;
}
/*使用body*/
body{
    background:#efefef;
}
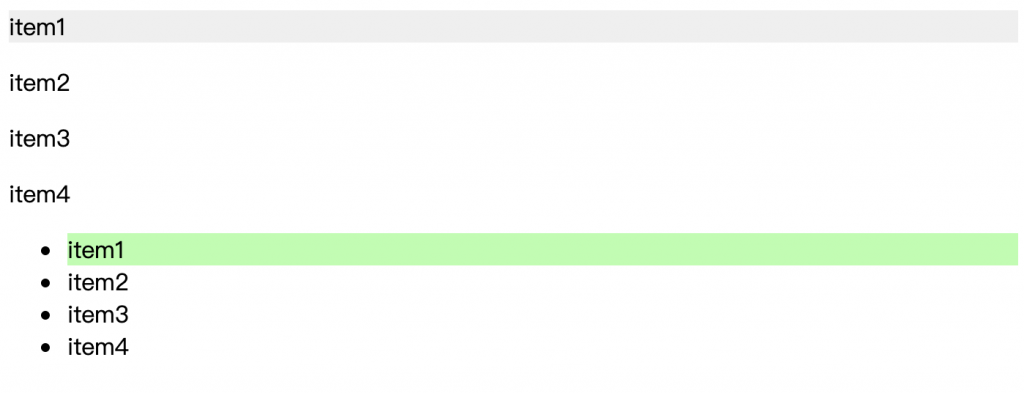
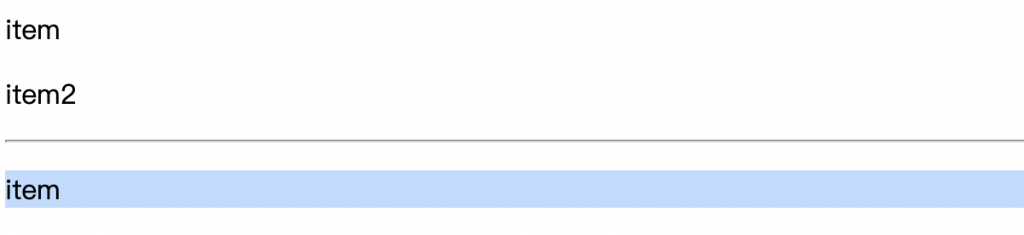
:first-child 选择第一个子元素
针对ul元素里的第一个li元素
<ul>
    <li>item1</li>
    <li>item2</li>
    <li>item3</li>
    <li>item4</li>
</ul>
ul li:first-child{
	background-color:#d1e1ff;
}

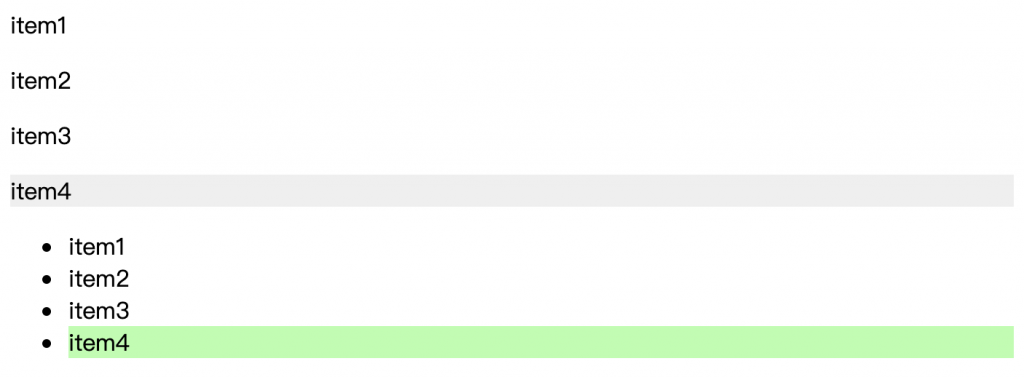
:last-child 选择最後一个子元素
针对ul元素里的最後一个li元素
<ul>
    <li>item1</li>
    <li>item2</li>
    <li>item3</li>
    <li>item4</li>
</ul>
ul li:last-child{
	background-color:#d1e1ff;
}

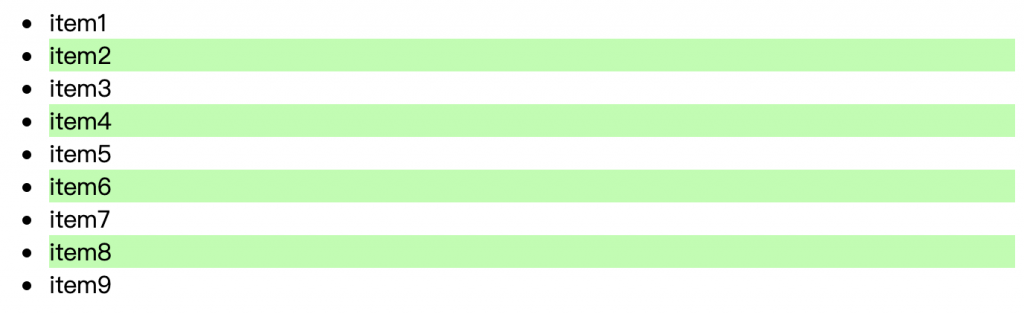
:nth-child(n)
用来定位父元素里的一个或多个特定的子元素。
n是参数,可以是是整数(1,2,3….)、表达式(2n+2)、关键词(odd, even)。
通常会用在列表,间隔填色或是item的间距设定
<ul>
    <li>item1</li>
    <li>item2</li>
    <li>item3</li>
    <li>item4</li>
    <li>item5</li>
    <li>item6</li>
    <li>item7</li>
    <li>item8</li>
    <li>item9</li>
</ul>
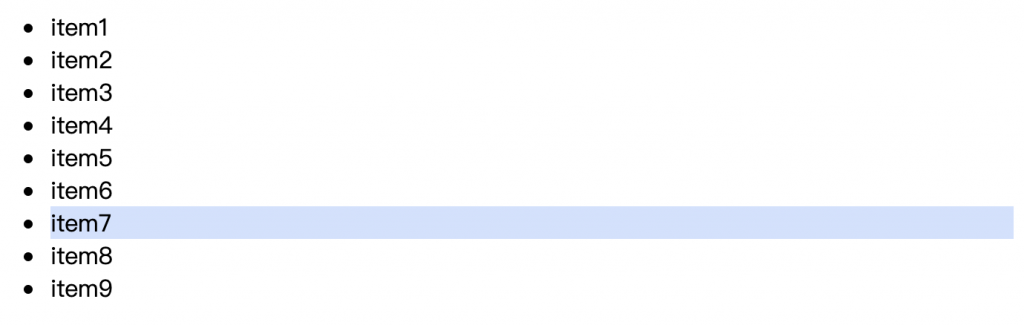
选择ul元素里的第七个li元素
ul li:nth-child(7){
	background-color:#d1e1ff;
}
选择ul元素里的三倍数
ul li:nth-child(3n){
	background-color:#ffe893;
}
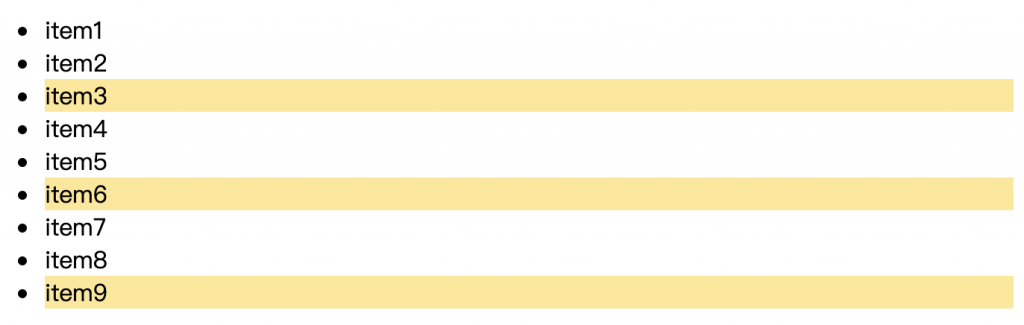
选择ul元素里的奇数
ul li:nth-child(odd){
	background-color:#b1ffab;
}
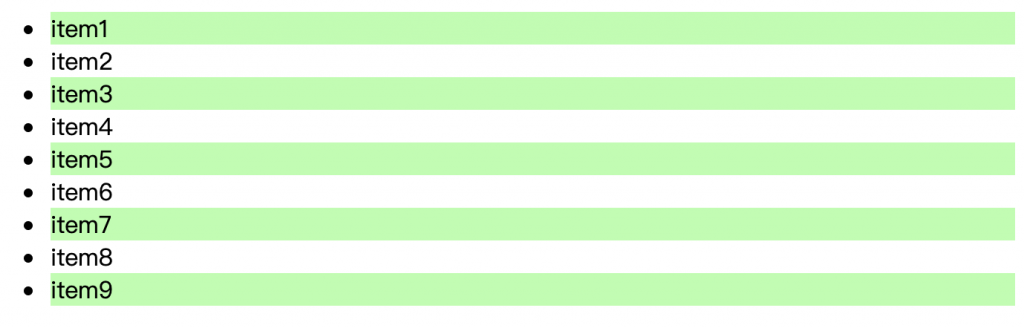
选择ul元素里的偶数
ul li:nth-child(even){
	background-color:#b1ffab;
}
:nth-last-child(n)
在父元素里倒数第n个位置或特定某元素。用法与:nth-child同,方向不同而已。
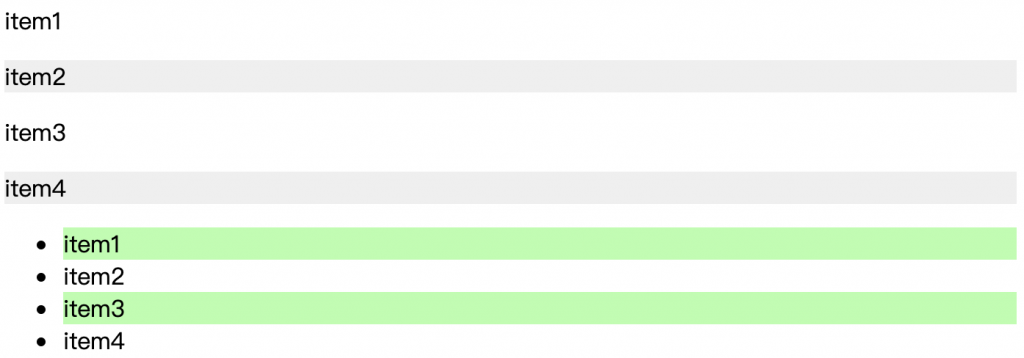
:first-of-type
指定元素的类型的第一个元素。
<div>
  <p>item1</p>
  <p>item2</p>
  <p>item3</p>
  <p>item4</p>
</div>
<ul>
  <li>item1</li>
  <li>item2</li>
  <li>item3</li>
  <li>item4</li>
</ul>
/*选择p元素的第一个*/
p:first-of-type{
	background:#efefef;
}
/*选择li元素的第一个*/
li:first-of-type{
	background:#b1ffab;
}
- :last-of-type
指定元素的类型的最後一个元素。与:first-of-type相反。
<div>
  <p>item1</p>
  <p>item2</p>
  <p>item3</p>
  <p>item4</p>
</div>
<ul>
  <li>item1</li>
  <li>item2</li>
  <li>item3</li>
  <li>item4</li>
</ul>
/*选择p元素的最後一个*/
p:last-of-type{
	background:#efefef;
}
/*选择li元素的最後一个*/
li:last-of-type{
	background:#b1ffab;
}
:nth-of-type(n)
指定父元素内中的某种类型的子元素,n可以是整数、关键词、表达式
<div>
  <p>item1</p>
  <p>item2</p>
  <p>item3</p>
  <p>item4</p>
</div>
<ul>
  <li>item1</li>
  <li>item2</li>
  <li>item3</li>
  <li>item4</li>
</ul>
/*选择p元素的2的倍数*/
p:nth-of-type(2n){
	background:#efefef;
}
/*选择li元素的奇数行*/
li:nth-of-type(odd){
	background:#b1ffab;
}
:nth-last-of-type(n) 选择
在父元素里倒数第n个位置或特定某类型元素。与:nth-of-type相反。
:only-child
在父元素里只有一个子元素
范例:box2里面只有一个span子元素,所以背景色会是绿色
<div class="box1">
  <p>item</p>
  <span>content</span>
</div>
<div class="box2">
  <span>content2</span>
</div>
span:only-child{
	background:#b1ffab;
}

:only-of-type
在父元素内只有一个类型的子元素
范例:box2里面只有一个p元素,所以box2背景色为蓝色
<div class="box1">
  <p>item</p>
  <p>item2</p>
</div>
<hr>
<div class="box2">
  <p>item</p>
</div>
p:only-of-type{
	background:#bfdbff;
}
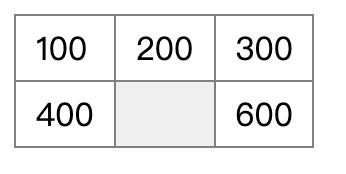
:empty
用来设定没有任何元素的内容,连一个空白都不行
范例:在表格资料没有内容时
<table border="1">
  <tr>
    <td>100</td>
    <td>200</td>
    <td>300</td>
  </tr>
  <tr>
    <td>400</td>
    <td></td>
    <td>600</td>
  </tr>
</table>
table{
	border-collapse:collapse;
}
table td{
	padding:5px 10px
}
table td:empty{
	background-color:#efefef
}
语言伪类
:lang
选择指定语言的元素
范例:lang属性为"tw"的元素
<p lang="en">English lang</p>
<p lang="tw">中文语言区块</p>
p:lang(tw){
	background:#efefef;
}

表单伪类
:checked
常用在表单的单选与复选,下面以radio自订样式
radio:
<div class="select-item radio-item">
  <input type="radio" id="man" name="sex" checked>
  <label for="man"></label>男
</div>
<div class="select-item radio-item">
  <input type="radio" id="woman" name="sex">
  <label for="woman"></label>女
</div>
.select-item {
  position: relative;
  display: inline-block;
  margin-right: 5px;
}
.select-item input {
  vertical-align: middle;
  width: 14px;
  height: 14px;
  appearance: none;
  -webkit-appearance: none;
  opacity: 0;
  outline: none;
  margin: 0 5px 0 0 ;
}
.select-item label {
  position: absolute;
  left: 3px;
  top: 3px;
  z-index: -1;
  width: 14px;
  height: 14px;
  border: 1px solid #409eff;
  border-radius: 50%;
}
.select-item input:checked + label {
  background-color: #409eff;
}
.select-item input[type="radio"]:checked + label::after {
  content: "";
  position: absolute;
  left: calc(50% - 4px);
  top: calc(50% - 4px);
  width: 8px;
  height: 8px;
  background-color: #fff;
  border-radius: 50%;
}
:disabled/:enabled
不可用/可用,常用在输入框
 enabled: <input type="text"  /><br>
 disabled: <input type="text" disabled="disabled"  />
input[type="text"]:enabled{
	background:#fff;
	border:1px solid #d4d9de;
}
input[type="text"]:disabled{
	background:#d4d9de;
    border:1px solid #d4d9de;
}

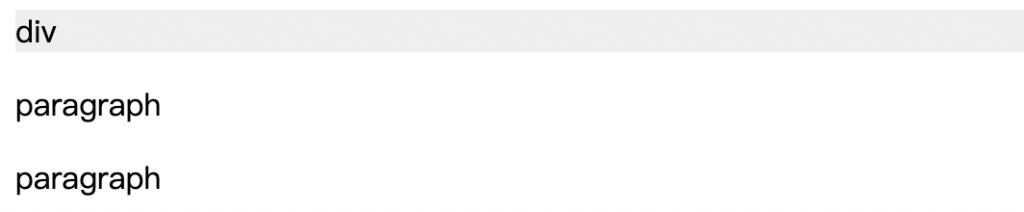
否定伪类
:not:某元素之外的元素,范例样式指的是.not区块内不是p的元素
<div class="not">
    <div>div</div>
    <p>paragraph</p>
    <p>paragraph</p>
</div>
.not div:not(p) {
    background-color: #efefef;
}
伪元素选择器
伪元素不是真正的网页元素,是透过CSS样式创造新的假元素,以两个冒号「::」作为开头,伪元素有
::before
元素之前加入内容,有content属性,才会显示在画面上
<span>内容</span>
```css
div::before{
    content:"我是 before,";
    color:blue;
}
```

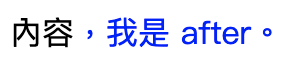
::after
元素之後加入内容,有content属性,才会显示在画面上
<span>内容</span>
```css
div::after{
    content:",我是 after。";
    color:blue;
}
```
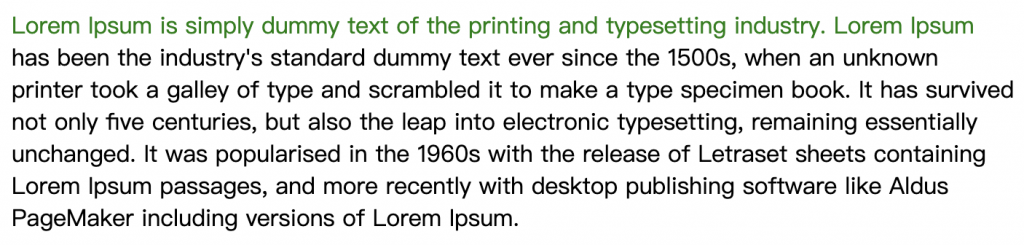
::first-line:
p元素的第一行
```css
p::first-line{
  color:green;
}
```
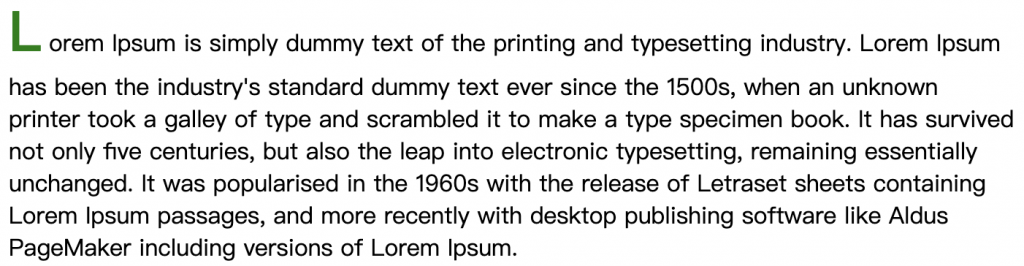
::first-letter:
元素的第一个字
p::first-letter{
  font-weight:bold;
  font-size:38px;
  color:green;
  margin-right:5px
}
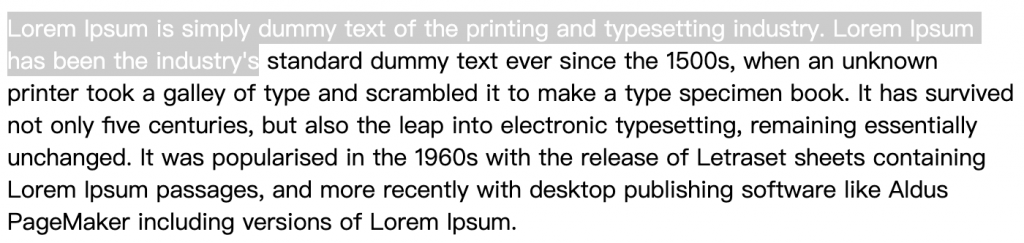
::selection
选取文字反白後
p::selection{
  color:#fff;
  background:#ccc;
}
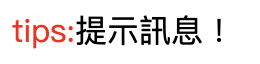
伪元素运用
伪元素内放字串
<div class="tips">提示讯息!</div>
.tips::before {
  content: 'tips:';
  color: red;
}
伪元素内放图片
- url
范例:是将li前面放置小图
<ul>
    <li>item1</li>
    <li>item2</li>
    <li>item3</li>
</ul>
ul{
	list-style:none;
}
li::before{
	content:url(img.gif);
    display:inline-block;
    margin-right:5px;
}
- 背景图
范例:在li前面放置小图,以背景图方式设定
ul{
	list-style:none;
}
li::before{
	content:"";
    display:inline-block;
    margin-right:5px;
    background-image:url(img.gif);
    width:16px;
    height:16px;

}
伪元素内放attr
<div id="checked" class="text">选择div的id:</div>
.text::after {
  content: '#' attr(id);
  color: red;
}

<<: Day08-为了让表单资料不要太过自大,给予其正确的绝望-Validation(I)
>>: [Angular] Day23. Introduction to forms in Angular
JS [笔记] debounce、throttle
完全参考,此处为整理笔记 [有趣面试题] 网页效能问题改善之 Debounce & Thro...
GitHub Commit signature verification - 确定每次变更来源是可以信任的
GnuPG (简称 GPG),允许作者对资料与通信进行加密与签章。你可以在本地端使用 GPG 对 C...
Day 25 bert 文字情感分类-4
接续昨天的结果,范例程序码的其他部分可以不做更动, 或是把一些测试用的区段改成中文以确认编码是否成功...
30天学会C语言: Day 11-什麽都可以取名字
前置处理器(Preprocessor) 在程序码最前面内容,编译前编译器会依照这些内容进行不同的处理...
Azure - Day6 Azure Function
Hi~大家好,我今天想要介绍包括如下: < Azure Function > 基本介绍 ...