【Day7】BottomNavigation X ProfileFragment
不知道今年大家中秋节有没有见到许久没见到的亲戚朋友呢!? 笔者发现年龄越长,大家都会越来越有自己的生活圈,但是,尽管不是很常见面/联络~ 但是偶尔一见面,又可以聊的没有隔阂,我特别喜欢这种氛围,也希望明年中秋节,大概可以更无忧无虑的一起烤肉,喝喝小米酒。 那麽,抒发情感的话不多说,今天我们主要是要来做下方导航的BottomNavigation,以及让我们显示我们目前的登入帐号资讯的ProfileFragment。
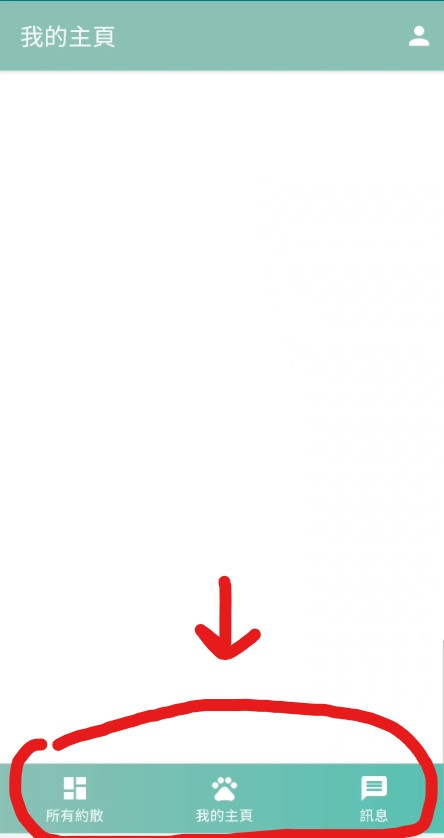
一、BottomNavigation 底部导航
先上图! BottomNavigation长以下
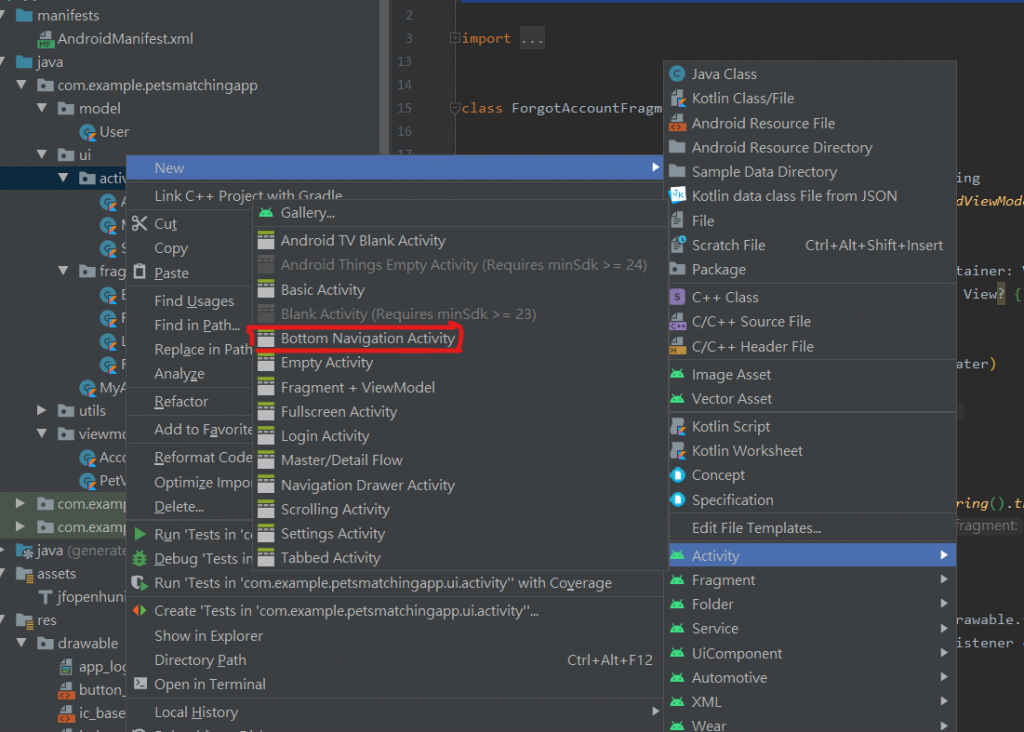
1.直接新增有 Bottom Navigation 的 Activity
有很多时候,我们在新增的时候可以看一下我们需要新增什麽样的Activity,就可以省下许多时间呦!
★ 注意,因为之前的文章那时候建立 MatchingActivity的时候,是直接建立空白的,所以我们要先把之前的MatchingActivity删掉
建立好完,会有
- 三个Fragment + layout
- 与三个Fragment先应的viewModel
- 一个Activity + layout
- 一个mobile_navigation.xml档
- 一个menu
建立好後,如果依照我们之前在LoginFragment的逻辑,当登入成功後,就会到MatchingActivity,你如果登入帐号後,就可以转到有BottomNavigation的Activity。

那接下来我们会有几个步骤
1.1.把Fragment的viewModel删掉
因为我们会用sharedViewModel,让整个MatchingActivity都可以share一样的资料,所以就不单用某Fragment的viewModel了
★删掉後也要记得要把Fragment有用到viewModel的一并删掉喔!
我们先看到MatchingActivity里面的内容会是
//我们bottomNavigation的view
val navView: BottomNavigationView = findViewById(R.id.nav_view)

//navController,让我们控制Fragment之间的跳转
val navController =findNavController(R.id.nav_host_fragment)

//navigationUI使用AppBarConfiguration来控制导航按钮,而因为BottomNavigation的Fragment彼此没有层级关系,所以我们这边传入id。
val appBarConfiguration =AppBarConfiguration(
setOf(
R.id.navigation_home, R.id.navigation_dashboard, R.id.navigation_notifications
    )
)
setupActionBarWithNavController(navController, appBarConfiguration)
navView.setupWithNavController(navController)
★ AppBarConfiguration里面的 setOf顺序,不会影响bottomNavigation的排序,如果需要更改的话,就要去menu来修改item的排序。
1.2 调整Fragment的位置
新增并替换bottomNavigation的icon
直接去drawable→new→vector asset → clip art,
搜寻 pets跟message跟一个白色的dashboard给我们的bottom Navigation。
修改bottomNavigation的顺序+替换icon
因为我们希望使用者滑到最左边时,可以看到其他使用者新增的资料,会比较符合使用情境?? 吧! 我想..
<?xml version="1.0" encoding="utf-8"?>
<menu xmlns:android="http://schemas.android.com/apk/res/android">


    <item
		//id是我们刚刚在activity指定的id
        android:id="@+id/navigation_dashboard"
		//更换我们的icon
        android:icon="@drawable/ic_baseline_dashboard_24"
	    //title是显示在左上方的ActionBar显示的title
		android:title="@string/title_dashboard" />

    <item
        android:id="@+id/navigation_home"
        android:icon="@drawable/ic_baseline_pets_24"
        android:title="@string/title_home" />

    <item
        android:id="@+id/navigation_notifications"
        android:icon="@drawable/ic_baseline_message_24"
        android:title="@string/title_notifications" />

</menu>
2.客制化bottomNavigation的view
看似一切都美好,都可以正常切换页面後,我们发现! 预设的蓝色非常不符合我们的App的主色调,所以我们要进到 activity_matching.xml来修改
我们需要修改的有,背景+字颜色+icon颜色
所以我们要先去新增 drawable,就跟我们之前做button的background一样!
我们就做个渐层就好,而有些人可能会疑惑,这怎麽感觉跟之前button的内容很像,那就直接用它就好啦? 其实不然,因为button的我们有加上圆角 ><
<?xml version="1.0" encoding="utf-8"?>
<shape xmlns:android="http://schemas.android.com/apk/res/android">

    <gradient
        android:startColor="@color/light_pewter_blue"
        android:endColor="@color/pewter_blue"
        android:angle="360"
        android:type="linear">
    </gradient>

</shape>
再来回到activity的xml的BottomNavigation的View里面,我们新增以下
//修改後面的background样式
android:background="@drawable/bottom_navigation_background"
//修改字的颜色
app:itemTextColor="@color/white"
//修改icon的颜色
app:itemIconTint="@color/white"
3.修改ActionBar
接下来我们要把ActionBar的样式更改成跟我们AccountActivity一样的颜色!
我们直接去 values→themes 修改colorPrimary的颜色
<item name="colorPrimary">@color/light_pewter_blue</item>
以下是一其他比较常用的theme name对应图,可以适时新增/修改主题,让我们节省时间
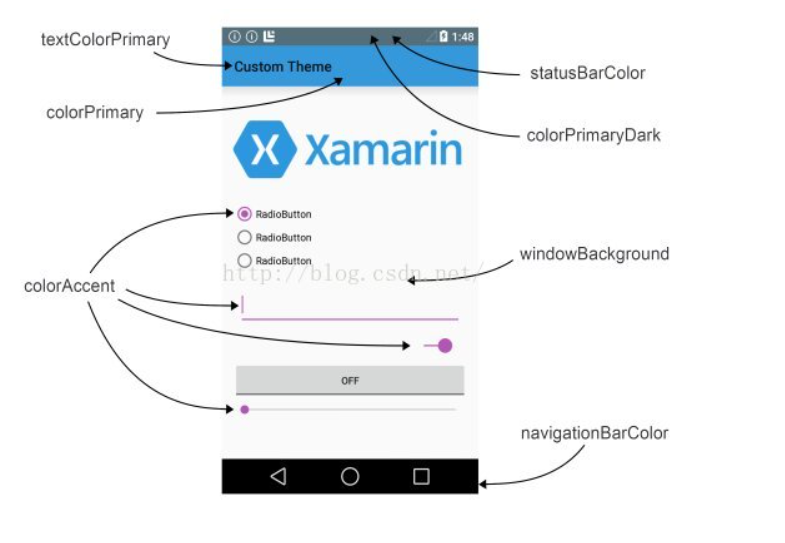
图片来源(https://blog.csdn.net/liu1164316159/article/details/52163772)
既然上面都有修改statusBar的颜色了,那我们就直接来修改看看吧!
首先在color新增以下颜色
<color name="status_color"> #007979</color>
再来theme指定成上面的颜色
<item name="android:statusBarColor" tools:targetApi="l">@color/status_color</item>
这样就完成啦!!
二、ProfileFragment
我们在注册的时候,我们是把资料放在Firestore,但是有没有眼尖的小夥伴发现,我们的User里面,还有user的image这一栏位!? 那我们要在什麽时候新增呢? 设计理念是觉得,尽量减少user在注册时所消耗的时间,所以我们会在使用者登入後,另外有一个介面可以让他更新
1.我们要新增一个Fragment,名叫ProfileFragment
2.依照惯例,layout直接贴
dimen
    <dimen name="profile_image_width_height">150dp</dimen>
    <dimen name="profile_image_margin_top">125dp</dimen>
    <dimen name="profile_textSize">16sp</dimen>
    <dimen name="profile_text_margin_top">10dp</dimen>
    <dimen name="button_margin_top_bottom">25dp</dimen>
string
	<string name="toolbar_title_profile">个人页面</string>
    <string name="edit">修改</string>
    <string name="logout">登出</string>
<?xml version="1.0" encoding="utf-8"?>

<layout xmlns:android="http://schemas.android.com/apk/res/android"
    xmlns:tools="http://schemas.android.com/tools"
    xmlns:app="http://schemas.android.com/apk/res-auto">


    <androidx.constraintlayout.widget.ConstraintLayout

        android:layout_width="match_parent"
        android:layout_height="match_parent"
        tools:context=".ui.fragment.ProfileFragment">


        <FrameLayout
            android:layout_width="match_parent"
            android:layout_height="@dimen/login_banner_height"
            android:background="@color/light_pewter_blue"
            app:layout_constraintTop_toTopOf="parent">

            <androidx.appcompat.widget.Toolbar
                android:id="@+id/toolbar_profile_fragment"
                android:layout_width="match_parent"
                android:layout_height="?attr/actionBarSize">

                <com.example.petsmatchingapp.utils.JFTextView
                    android:layout_width="match_parent"
                    android:layout_height="match_parent"
                    android:textColor="@color/white"
                    android:gravity="center"
                    android:text="@string/toolbar_title_profile"
                    android:textStyle="bold"
                    android:textSize="@dimen/toolbar_textSize">

                </com.example.petsmatchingapp.utils.JFTextView>

            </androidx.appcompat.widget.Toolbar>


        </FrameLayout>

        <FrameLayout
            android:id="@+id/fl_profile_fragment_people_image"
            android:layout_width="@dimen/profile_image_width_height"
            android:layout_height="@dimen/profile_image_width_height"
            android:layout_marginTop="@dimen/profile_image_margin_top"
            app:layout_constraintEnd_toEndOf="parent"
            app:layout_constraintStart_toStartOf="parent"
            app:layout_constraintTop_toTopOf="parent">


            <ImageView
                android:id="@+id/iv_profile_fragment_image"
                android:layout_width="match_parent"
                android:layout_height="match_parent" />

        </FrameLayout>

        <com.example.petsmatchingapp.utils.JFTextView
            android:id="@+id/tv_profile_fragment_name"
            android:layout_width="wrap_content"
            android:layout_height="wrap_content"
            app:layout_constraintTop_toBottomOf="@id/fl_profile_fragment_people_image"
            app:layout_constraintStart_toStartOf="parent"
            app:layout_constraintEnd_toEndOf="parent"
            android:layout_marginTop="20dp"
            android:textStyle="bold"
            android:textSize="16sp"
            tools:text = "王大明"/>

        <com.example.petsmatchingapp.utils.JFTextView
            android:id="@+id/tv_profile_fragment_email"
            android:layout_width="wrap_content"
            android:layout_height="wrap_content"
            app:layout_constraintStart_toStartOf="parent"
            app:layout_constraintEnd_toEndOf="parent"
            android:layout_marginTop="@dimen/profile_text_margin_top"
            android:textSize="@dimen/profile_textSize"
            android:textStyle="bold"
            app:layout_constraintTop_toBottomOf="@id/tv_profile_fragment_name"
            tools:text = "[email protected]"/>


        <com.example.petsmatchingapp.utils.JFButton
            android:id="@+id/btn_profile_fragment_go_edit"
            android:layout_width="match_parent"
            android:layout_height="wrap_content"
            app:layout_constraintStart_toStartOf="parent"
            app:layout_constraintEnd_toEndOf="parent"
            app:layout_constraintTop_toBottomOf="@id/tv_profile_fragment_email"
            android:layout_marginTop="@dimen/button_margin_top_bottom"
            android:layout_marginStart="@dimen/tip_margin_start_end"
            android:layout_marginEnd="@dimen/tip_margin_start_end"
            android:background="@drawable/button_background"
            android:foreground="?attr/selectableItemBackground"
            android:textColor="@color/white"
            android:text="@string/edit"/>

        <com.example.petsmatchingapp.utils.JFButton
            android:id="@+id/btn_profile_fragment_signout"
            android:layout_width="match_parent"
            android:layout_height="wrap_content"
            app:layout_constraintStart_toStartOf="parent"
            app:layout_constraintEnd_toEndOf="parent"
            app:layout_constraintTop_toBottomOf="@id/btn_profile_fragment_go_edit"
            android:layout_marginTop="@dimen/button_margin_top_bottom"
            android:layout_marginStart="@dimen/tip_margin_start_end"
            android:layout_marginEnd="@dimen/tip_margin_start_end"
            android:background="@drawable/button_background"
            android:foreground="?attr/selectableItemBackground"
            android:textColor="@color/white"
            android:text="@string/logout"/>


    </androidx.constraintlayout.widget.ConstraintLayout>
</layout>
3.HomeFragment导航到ProfileFragment
我们要先去 mobile_navigation.xml
我们希望一开始开启MatchingActivity的时候出现的是dashboard的Fragment,所以我们要先把把
startDestination 修改成以下
app:startDestination="@+id/navigation_dashboard"
新增刚刚建立好的ProfileFragment,并且把HomeFragment连到ProfileFragment
再过来新增menu,并命名为 home_menu,icon的部分一样透过新增vector asset,搜寻 person
<?xml version="1.0" encoding="utf-8"?>
<menu xmlns:android="http://schemas.android.com/apk/res/android"
    xmlns:app="http://schemas.android.com/apk/res-auto">

    <item
        android:id="@+id/navigation_profile"
        android:icon="@drawable/ic_baseline_person_24"
        app:showAsAction="always"
        android:title="@string/navigation_profile">
    </item>

</menu>
跑回HomeFragment,一样先设定databinding,这边就不赘述了
我们先在onCreateView新增
//指定Fragment愿意新增item到选单
setHasOptionsMenu(true)
再来override以下两个funtion
override fun onCreateOptionsMenu(menu: Menu, inflater: MenuInflater) {
//把刚刚我们创建好的menu,传进去
inflater.inflate(R.menu.home_menu,menu)
super.onCreateOptionsMenu(menu, inflater)
}
override fun onOptionsItemSelected(item: MenuItem): Boolean {
    when(item.itemId){
			//这边的id是我们刚刚在home_menu新增的item
      R.id.navigation_profile -> {
				//NavController也要记得宣告喔
        nav.navigate(R.id.action_navigation_home_to_profileFragment)
      }
    }

    return super.onOptionsItemSelected(item)
  }
这样他就会在在HomeFragment右上角出现刚刚设定的profileIcon,且可以点击
4.隐藏ActionBar跟BottomNavigation
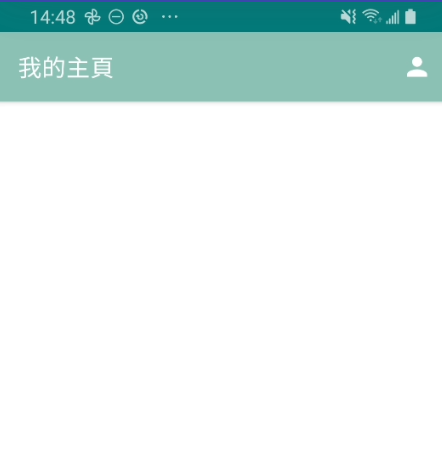
但是!! 我们却发现! 他点进去後竟然是这副德性
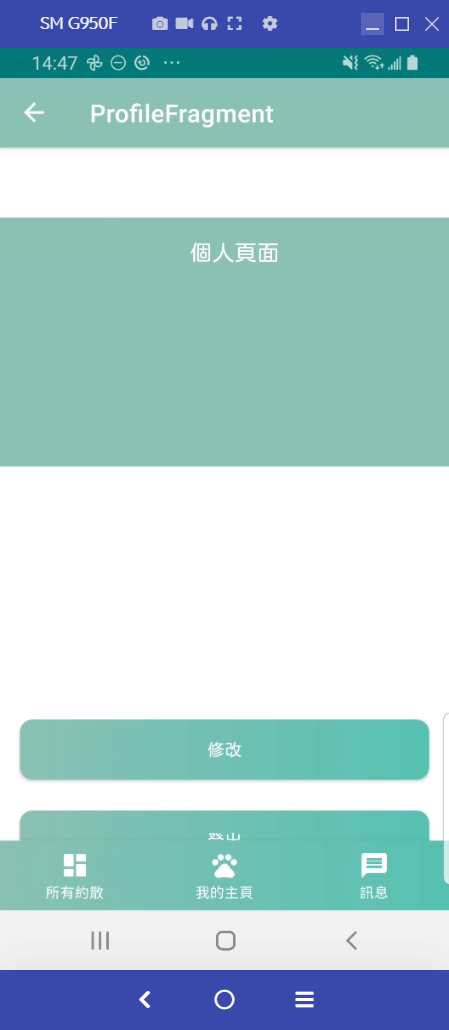
他保留了ActionBar跟BottomNavigation的View,这是因为这两个都是跟着Activity的,所以我们要把他们隐藏掉!
我们在ProfileFragment新增以下的funtion,并在 onCreateView呼叫它
private fun dismissActivityActionBarAndBottomNavigationView(){
        val activityInstance = this.activity as MatchingActivity
        activityInstance.supportActionBar?.hide()
        activityInstance.findViewById<BottomNavigationView>(R.id.nav_view).visibility = View.GONE

    }
并且到activity_matching.xml的 ConstranLayout里面把预设的 Padding删掉
//把这个删掉
android:paddingTop="?attr/actionBarSize"
5.新增返回键
binding.toolbarProfileFragment.setNavigationIcon(R.drawable.ic_baseline_arrow_back_24)
        binding.toolbarProfileFragment.setNavigationOnClickListener {
            requireActivity().onBackPressed()
        }
6.显示资料
好了!! 接下来是最重要的,我们要把资料从Firestore的资料叫出来,并且存到livedata,好让我们可以观察到有变化
好的,那我们首先要回到AccoutViewModel 新增以下两个funtion
6.1.拿到现在的userId
fun getCurrentUID(): String?{
        return FirebaseAuth.getInstance().currentUser?.uid
    }
6.2.拿到我们Firestore的资料
fun getUserDetail(){
	//先确认我们的getCurrentUID是否为null
    getCurrentUID()?.let {
    FirebaseFirestore.getInstance().collection(Constant.USER)
        .document(it)
        .get()
        .addOnSuccessListener {
//把得到的result转成User的object并放到livedata,让我们可以观察
   _userDetail.postValue(it.toObject(User::class.java))
           }
        .addOnFailureListener {
//这边我是用Timber,功能类似Log,但是更加简洁,有兴趣可以查关键字
                    Timber.d("Error while getUserDetail cause$it")
                }
        }
    }
这时候会发现我们的 addOnSuccessListener里面会是红字,没关系我们来解决它
6.3一样在AccountViewModel新增以下
LiveData,可以让我们储存数据,也可以让我们在UI层观察变化,有兴趣的人可以查关键字,这边就不多说了
//这边我们设成private,目的是不要让UI层可以修改我们的数据
private val _userDetail = MutableLiveData<User>()

//这边就是可以让UI层观察到的数据,其数据是跟_userDetail同步的
val userDetail: LiveData<User>
get() = _userDetail
接下来一样在AccountViewModel新增,让我们初始化时,就呼叫getUserDetail的funtion
init{
getUserDetail()
}
6.4.来观测数据吧!
回到ProfileFragment
一样要在class下面呼叫 accountViewModel喔
private val accountViewModel: AccountViewModel by sharedViewModel()
accountViewModel.userDetail.observe( viewLifecycleOwner, Observer {

						Constant.loadUserImage(it.image,binding.ivProfileFragmentImage)
            binding.tvProfileFragmentName.setText(it.name)
            binding.tvProfileFragmentEmail.setText(it.email)

        })
因为我们会有使用者的图片,目前还没有新增,但是之後会教大家怎麽把图片存到云端。所以我们需要使用第三方套件 Glide,让我们可以load网路上的照片!
首先我们要implementation以下
    //Glide
    implementation "com.github.bumptech.glide:glide:$glide_version"
	//这让我们可以新增圆角等等...
    implementation 'jp.wasabeef:glide-transformations:3.0.1'
并在 project层级新增版本
ext.glide_version = "4.12.0"
接下来就去 Constant来新增 Glide的funtion
这样可以让我们以後在别的Fragment要load图片时,不用再写重复的Code
//我们只要两个参数,一个是你要显示的图片url跟你要显示的ImageView
fun loadUserImage(url: Any, v:ImageView){
		//圆角
        val mRequestOptions = RequestOptions.circleCropTransform()

        Glide.with(v)
			//传入你要显示的图片url
            .load(url)
			//放入圆角
            .apply(mRequestOptions)
			//顾名思义,当今天还没load到照片时,要先显示啥照片,这边大家可以自己抓网路上的图片
            .placeholder(R.drawable.placeholder)
			//要显示在哪个ImageView
            .into(v)
    }
我们可以简单试试看把一些图片先直接丢进去,成功如下
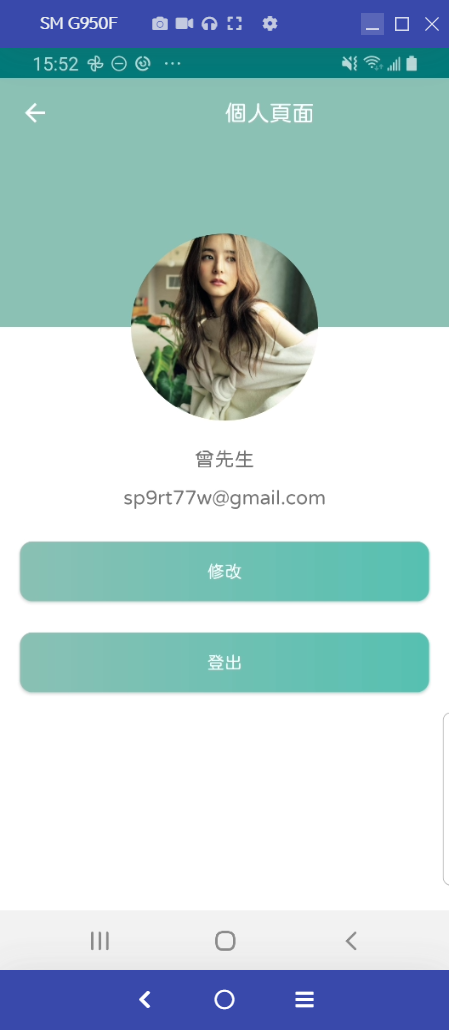
先说,图片中的不是本人,也不是杨幂(ㄇㄧˋ),知道是谁的夥伴们,可以在留言栏留言,我会随机按赞!!
最後在新增 logout的功能就结束啦!!
7.新增logout
先到AccountViewModel新增以下,简单明了不解释
fun signOut(){
        FirebaseAuth.getInstance().signOut()
    }
并新增 onClickListener,一样先继承 View.OnClickListener
override fun onClick(v: View?) {
        when(v){

            binding.btnProfileFragmentSignout ->{
				//登出
                accountViewModel.signOut()
				//转到AccountActivity
      startActivity(Intent(requireActivity(),AccountActivity::class.java))
                //关掉当前的Activity
				requireActivity().finish()
            }
        }
    }
并且别忘了在 onCreateView新增
binding.btnProfileFragmentSignout.setOnClickListener(this)
看起来一切都美好,但是... 这边出现问题啦,当我们左上角的返回键後!!
原来是我们刚刚把这两个都关掉啦!
这边就新增以下funtion,并在onCreateView呼叫就好!
看起来是有点笨的作法! 有知道其他方法的夥伴们,可以告诉我 plz
private fun showActionBarAndBottomNavigation(){

    if (requireActivity().findViewById<BottomNavigationView>(R.id.nav_view).visibility == View.GONE){
      requireActivity().findViewById<BottomNavigationView>(R.id.nav_view).visibility = View.VISIBLE
    }

    val activityInstance = this.activity as MatchingActivity
    activityInstance.supportActionBar?.show()
  }
大功告成!!
成功如下!!

明天会做新增注册资料的页面!! 请大家期待啦 へけっ
<<: Day 10 - 智慧城市Go Smart Award 经历(4) - 展览
>>: Day 22 - Tailwind Plugin 使用 (一) => Aspect Ratio、Line Clamp
[Day 28] LSTM初探
准备资料 etf50_df = pd.read_csv("data/ETF50.csv&q...
Day 28: 人工智慧在音乐领域的应用 (伦敦-Jukedeck、纽约-Amper Music 、OpenAI-Jukebox)
今天我们继续介绍一些比较知名的AI作曲的公司/软件。 Jukedeck Jukedeck可以说是AI...
[Day-9] if-else小练习
上次练习完if-else 今天就要来练习程序码了! 题目:小美体重70kg,她的梦想体重是40kg,...
IT 铁人赛 k8s 入门30天 -- day5 k8s run tools: minikubes 安装与 kubectl 安装
前言 一般的 k8s 丛集都是多个Control Plane 还有多个 Node 然而在资源不足的情...
待更新
待更新待更新待更新待更新待更新待更新待更新待更新待更新待更新待更新待更新待更新待更新待更新待更新待更...