【Day6】重设密码页面X Firebase Auth
中秋节快乐!!! 这几天烤肉烤到有点忘记打Code的感觉了,那提到忘记这个词,我们就想到我们平常密码也有可能会忘记,那怎麽办呢!? Firebase Auth提供我们透过寄到我们注册的email帐户,让我们更改密码!
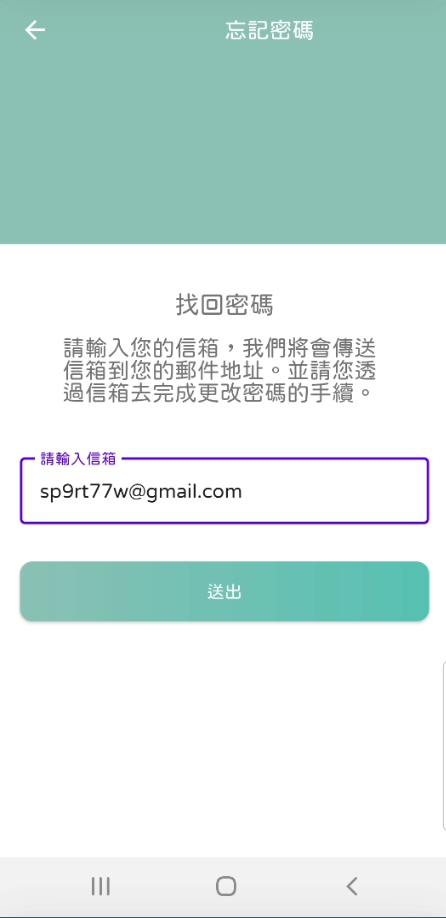
页面长相会是这样,简单明了又不失小小偷懒
零、建立ForgotAccountFragment
这个部分就是要记得设定databinding,以及继承BaseFragment
一.Layout
1.设定string
由於这次我们要做的layout,有几个尺寸是非常客制化,很难达到复用,所以我有许多layout的尺寸都是写死的。如果觉得有必要的话,可以自己斟酌是否要写入dimen
string 如下
<string name="toolbar_title_forgot_account">忘记密码</string>
<string name="forgotAccount_find_your_account">找回密码</string>
<string name="forgotAccount_description">请输入您的信箱,我们将会传送信箱到您的邮件地址。并请您透过信箱去完成更改密码的手续。 </string>
<string name="submit">送出</string>
<string name="forgotAccount_already_send_email">我们已经寄送更改密码的信件到您信箱罗!</string>
2.这次layout比较简单,一样直接贴Code
<?xml version="1.0" encoding="utf-8"?>

<layout xmlns:android="http://schemas.android.com/apk/res/android"
    xmlns:tools="http://schemas.android.com/tools"
    xmlns:app="http://schemas.android.com/apk/res-auto">

    <androidx.constraintlayout.widget.ConstraintLayout
        android:layout_width="match_parent"
        android:layout_height="match_parent"
        tools:context=".ui.fragment.ForgotAccountFragment">

        <FrameLayout
            android:id="@+id/fl_forgot_fragment"
            android:layout_width="match_parent"
            android:layout_height="@dimen/login_banner_height"
            android:background="@color/light_pewter_blue"
            app:layout_constraintTop_toTopOf="parent">

            <androidx.appcompat.widget.Toolbar
                android:id="@+id/toolbar_forgot_fragment"
                android:layout_width="match_parent"
                android:layout_height="?attr/actionBarSize"
                android:layout_gravity="top">


                <com.example.petsmatchingapp.utils.JFTextView
                    android:layout_width="match_parent"
                    android:layout_height="match_parent"
                    android:text="@string/toolbar_title_forgot_account"
                    android:gravity="center"
                    android:textColor="@color/white"
                    android:textSize="@dimen/toolbar_textSize"/>


            </androidx.appcompat.widget.Toolbar>

        </FrameLayout>

        <com.example.petsmatchingapp.utils.JFTextView
            android:id="@+id/tv_forgot_fragment_forgot_password"
            android:layout_width="wrap_content"
            android:layout_height="wrap_content"
            app:layout_constraintTop_toBottomOf="@id/fl_forgot_fragment"
            app:layout_constraintStart_toStartOf="parent"
            app:layout_constraintEnd_toEndOf="parent"
            android:text="@string/forgotAccount_find_your_account"
            android:layout_marginTop="35dp"
            android:textSize="20sp" />

        <com.example.petsmatchingapp.utils.JFTextView
            android:id="@+id/tv_forgot_fragment_description"
            android:layout_width="0dp"
            android:layout_height="wrap_content"
            app:layout_constraintTop_toBottomOf="@id/tv_forgot_fragment_forgot_password"
            app:layout_constraintStart_toStartOf="parent"
            app:layout_constraintEnd_toEndOf="parent"
            android:text="@string/forgotAccount_description"
            android:layout_marginTop="10dp"
            android:layout_marginStart="50dp"
            android:layout_marginEnd="50dp"
            android:textSize="18sp" />

        <com.google.android.material.textfield.TextInputLayout
            android:id="@+id/tip_forgot_enter_email"
            android:layout_width="match_parent"
            android:layout_height="wrap_content"
            app:layout_constraintTop_toBottomOf="@id/tv_forgot_fragment_description"
            app:layout_constraintStart_toStartOf="parent"
            app:layout_constraintEnd_toEndOf="parent"
            style="@style/Widget.MaterialComponents.TextInputLayout.OutlinedBox"
            android:layout_marginTop="@dimen/tip_margin_top_bottom"
            android:layout_marginStart="@dimen/tip_margin_start_end"
            android:layout_marginEnd="@dimen/tip_margin_start_end">

            <com.example.petsmatchingapp.utils.JFEditText
                android:id="@+id/ed_forgot_email"
                android:layout_width="match_parent"
                android:layout_height="wrap_content"
                android:hint="@string/hint_enter_your_email"
                android:padding="@dimen/edText_padding"
                android:textSize="@dimen/edText_textSize">

            </com.example.petsmatchingapp.utils.JFEditText>


        </com.google.android.material.textfield.TextInputLayout>


        <com.example.petsmatchingapp.utils.JFButton
            android:id="@+id/btn_forgot_submit"
            android:layout_width="match_parent"
            android:layout_height="wrap_content"
            app:layout_constraintTop_toBottomOf="@id/tip_forgot_enter_email"
            app:layout_constraintStart_toStartOf="parent"
            app:layout_constraintEnd_toEndOf="parent"
            android:layout_marginStart="16dp"
            android:layout_marginEnd="16dp"
            android:layout_marginTop="30dp"
            android:foreground="?attr/selectableItemBackground"
            android:background="@drawable/button_background"
            android:textColor="@color/white"
            android:text="@string/submit"/>

    </androidx.constraintlayout.widget.ConstraintLayout>

</layout>
二、回到Code
1.确认使用者是否输入为空
private fun validDataForm(): Boolean{

       return when{
           TextUtils.isEmpty(binding.edForgotEmail.text.toString().trim()) -> {
               showSnackBar(resources.getString(R.string.hint_enter_your_email),true)
               false
           }
           else -> true
       }
    }
2.我们要呼叫 AccountViewModel,所以我们一样要写下
private val accountViewModel: AccountViewModel by sharedViewModel()
3.建立button的onClick事件
由於我们这次这个Fragment没有特别多的onClick需要我们去设定,所以就直接用以下方法,这样就不用在Fragment後面要去设定继承
binding.btnForgotSubmit.setOnClickListener{
						//确认email栏位是否为空
            if (validDataForm()){
                showDialog(resources.getString(R.string.please_wait))
								//拿到user输入的edText资料
                val email = binding.edForgotEmail.text.toString().trim()
                accountViewModel.sendEmailToResetPassword(this,email)
            }
        }
★这时候会发现我们的 sendEmailToResetPassword 这边是红的,但没关系,我们等等来做!
4.新增AccountViewModel设定忘记密码寄信的funtion
我们的所有的与Firebase沟通的,都会透过viewModel。
fun sendEmailToResetPassword(fragment: ForgotAccountFragment,email: String){

				//直接拿到Auth的 Instance,就可以叫出 sendPasswordResetEmail了!
                FirebaseAuth.getInstance().sendPasswordResetEmail(email)
                    .addOnSuccessListener {
                    fragment.sendEmailSuccessful()
                    }
                    .addOnFailureListener {
                    fragment.sendEmailFail(it.toString())
                    }

        }
5.新增sendPassword的成功跟失败後所要回馈的funtion
非常鼓励有看过昨天/前天文章的夥伴们,可以自己尝试做,或是设定不同的funtion,这样会比较有趣,也比较会有印象!
fun sendEmailSuccessful(){
        hideDialog()
        showSnackBar(resources.getString(R.string.forgotAccount_already_send_email),false)
    }

    fun sendEmailFail(e: String){
        hideDialog()
        showSnackBar(e,true)
    }
6.ForgotAccountFragment的Toolbar新增返回键
binding.toolbarForgotFragment.setNavigationIcon(R.drawable.ic_baseline_arrow_back_24)
binding.toolbarForgotFragment.setNavigationOnClickListener {
            requireActivity().onBackPressed()
        }
Navigation设定
1.到 account_nav,新增今天做好的 ForgotAccountFragment,并且把 LoginFragment连到ForgotAccountFragment
2.LoginFragment,在onClick的funtion新增
binding.tvForgotPassword -> {
                nav.navigate(R.id.action_loginFragment_to_forgotAccountFragment)
            }
★别忘了在onCreateView也要新增
binding.tvForgotPassword.setOnClickListener(this)
就好罗,你可以去当初注册的email帐号,去察看信件,就可以Reset你的密码啦!!
<<: Day 20:「资料拿来我就帮你改」- Vue 基础观念及常用语法
>>: Day 7 : HTML - 上下左右!如何用Flex的属性去控制grid?
Day 18 - for in & for of loop
for in 可以用在 object,也可以用在 Array 使用 for in 列举一个 obje...
Context Diagram 系统上下文图
系统上下文图 System Context Diagram (SCD) 是一种概念图的呈现,用於表达...
Day 12 - [爬虫] 02-储存爬虫资料-CSV格式
接续上一篇,昨天已经把问答集的内容都爬下来了,再来要把内容整理成下一个阶段(训练模型),方便使用的格...
Day24 跟着官方文件学习Larave-Dusk
Laravel Dusk 提供我们浏览器自动化及测试 API。首先把套件引入 composer re...
【元件如何正确归类 ?】元件内聚性三大原则 : REP、CCP、CRP
适当时机 x 适当分类 大纲 全新的专案 高内聚就能低耦合 内聚性三大原则 REP , 再使用性 -...