Day06:06 - User服务(1) - 後端 - 注册、登入、Python正则表达式
Hi,Сәлам,我是Charlie!
在Day05当中我们完成了Django的基本架构跟资料库,今天我们要来做注册跟登入罗。今天的注册跟登入是基本程序,Day07中是前端的基本注册跟登入,而在Day08当中我们会完成JWT -- 令牌的部分。
================================◉‿◉=================================
首先在users里面建立urls.py,并在里面新增url patterns:
from django.conf.urls import url
from . import views

urlpatterns = [
	url(r'^$',views.users)
]
并到专案主资料夹的urls import url跟include,把users的url传入:
from django.conf.urls.static import static
from django.conf.urls import url,include

urlpatterns = [
    path('admin/', admin.site.urls),
    url('user',include('users.urls'))
]
然後到settings里面加上:
APPEND_SPLASH = False
接着到users的views.py,新增一个视图,并且返回一个JsonRespnose:
from django.shortcuts import render
from django.http import JsonResponse

def users(request):
	return JsonResponse({"status":200,"message":"Hello World"})
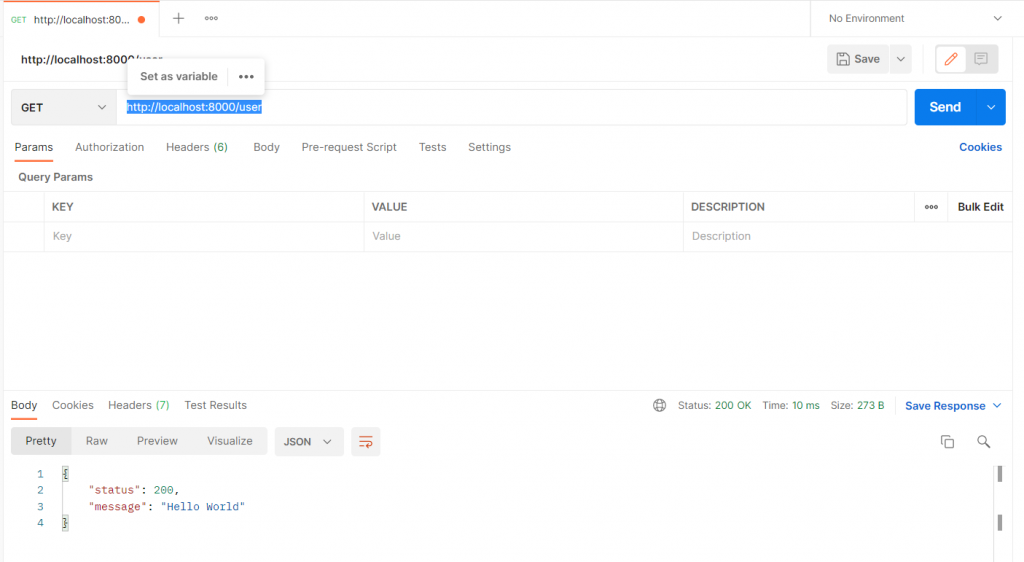
在这里我们要使用postman来测试API,首先到官网下载postman:
https://www.postman.com/downloads/
在安装完postman之後,新增一个request,在url的地方打入:
http://localhost:8000/user
Send完之後,看到Json回应就是成功了:
但这样子的话会发现,每次都要写status = 200,status_code非常的分散,所以我们从tools里面新增一个R.py,建立status常量跟Result class:
from django.http import JsonResponse

# status code: 200 OK
STATUS_OK = 200

# status code 201 : created
CREATED = 201

# status code 401 : Unauthorized
UNAUTHORIZED = 401

# status code: 400 Bad Request
BAD_REQUEST = 400

# status code: 405 method not allowed
METHOD_NOT_ALLOWED = 405

# status code: 500 Internal Server Error
INTERNAL_SERVER_ERROR = 500

class R:
	@staticmethod
	def ok(data = None):
		if data is None:
			return JsonResponse({"code":STATUS_OK})
		return JsonResponse({"code":STATUS_OK,"data":data})

	@staticmethod
	def created(data = None):
		if data is None:
			return JsonResponse({"code":CREATED})
		return JsonResponse({"code":CREATED,"data":data})

	@staticmethod
	def unauthorized(data = None):
		if data is None:
			return JsonResponse({"code":UNAUTHORIZED})
		return JsonResponse({"code":UNAUTHORIZED,"data":data})

	@staticmethod
	def badRequest(data = None):
		if data is None:
			return JsonResponse({"code":BAD_REQUEST})
		return JsonResponse({"code":BAD_REQUEST,"data":data})

	@staticmethod
	def methodNotAllowed(data = None):
		if data is None:
			return JsonResponse({"code":METHOD_NOT_ALLOWED})
		return JsonResponse({"code":METHOD_NOT_ALLOWED,"data":data})

	@staticmethod
	def internalServerError(data = None):
		if data is None:
			return JsonResponse({"code":INTERNAL_SERVER_ERROR})
		return JsonResponse({"code":INTERNAL_SERVER_ERROR,"data":data})


if __name__ == "__main__":
	print(R.internalServerError("server is busy"))
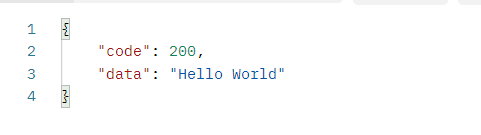
接着我们将views里面的Hello World改写:
def users(request):
	return R.ok("Hello World")
就可以看到正常的Json Response了:
再来是注册的部分,注册是使用POST,并且需要GET Json的资料,所以这边要先判断方法是否为POST,如果是的话就解析内容。
而我们需要model来解析JSON跟取得资料,所以先建立一个User Model:
import json

class UserModel:
	def __init__(self,username = "",password = "",password1 = "",phone = "",email = "",address = ""):
		self.username = username
		self.password = password
		self.password1 = password1
		self.phone = phone
		self.email = email
		self.address = address

	def fromJson(self,data):
		jsondata = json.loads(data)
		self.username = jsondata["username"] if "username" in jsondata else None
		self.password = jsondata["password"] if "password" in jsondata else None
		self.password1 = jsondata["password1"] if "password1" in jsondata else None
		self.phone = jsondata["phone"] if "phone" in jsondata else None
		self.email = jsondata["email"] if "email" in jsondata else None
		self.address = jsondata["address"] if "address" in jsondata else None

	def __str__(self):
		return "UserModel[username=%s,password=%s,password1=%s,phone=%s,email=%s,address=%s" % (self.username,self.password,self.password1,self.phone,self.email,self.address)
接着到users的地方建立新的程序码,印出UserModel试试看:
def users(request):
	if request.method == "POST":
		res = request.body
		user = UserModel()
		user.fromJson(res)
		print(user)
		return R.ok("Hello World")
	else:
		return R.methodNotAllowed("Method Not Allowed")
接着到postman, 方法选择POST,另外加上body:
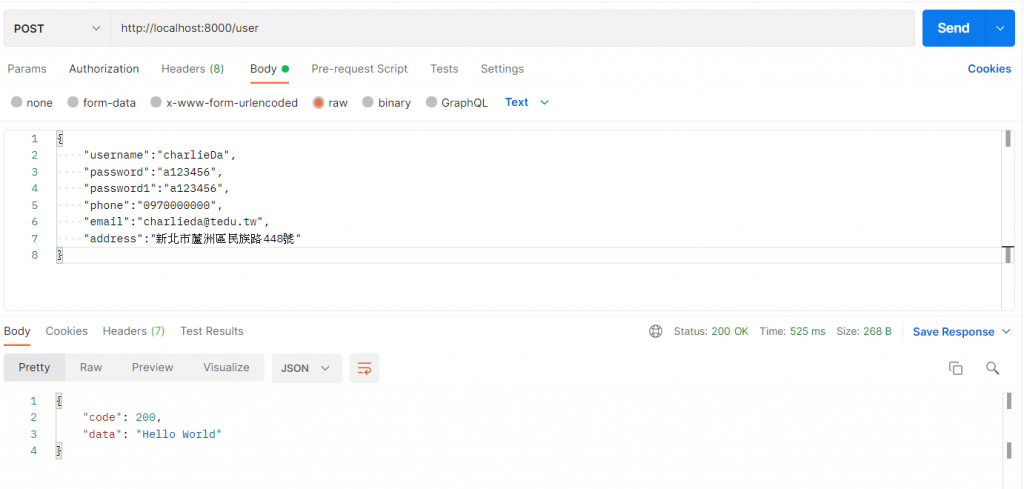
send之後就可以看到Hello World。
接着我们要开始做register的验证,这里要使用re模组:
import re
接着使用正则表达式:
if not re.match("^[A-Za-z0-9]*$",user.username):
	return R.badRequest("username contains invalid character")
if not re.match('^(\w|\.|\_|\-)+[@](\w|\_|\-|\.)+[.]\w{2,3}$',user.email):
	return R.badRequest("email is not correct")
第一个的是除了大小写字母跟数字以外的都不匹配,第二个则是匹配email的格式。
接下来是密码,密码不可小於6位数,phone则是不可小於10位并且只能有数字:
if not re.match("^[0-9]*$",user.phone) or len(user.phone) != 10:
	return R.badRequest("phone is not correct")
if len(user.password < 6):
	return R.badRequest("password length is not correct")
return R.created("user created")
还有password跟password1必须一致:
if user.password != user.password1:
	return R.badRequest("password verify failed")
这些都做完之後,代表验证正确,要开始注册了。
首先是密码,密码必须加盐,这里我们使用hashlib的md5来加密:
import hashlib

md5 = hashlib.md5()
passwordString = user.password + user.username
md5.update(passwordString.encode())
pwd = md5.hexdigest()

接着我们create User Model:

u = User.objects.create(
		name = user.username,
		password = pwd,
		phone = user.phone,
		address = user.address
	)
u.save()
测试:

再来是登入,登入的话先另外起一个app:
$ python manage.py startapp login
并在INSTALLED_APPS里面加入login,还有在urls里面加入login:
# keyboardmarket\urls.py

url('login',include('login.urls'))

# login\urls.py

from django.conf.urls import url
from . import views

urlpatterns = [
	url(r'^$',views.login)
]
接着先在login中判断传回的json data,判断是否有这个用户:
if request.method == "POST":
	res = request.body
	user = UserModel()
	user.fromJson(res)
	fuser = User.objects.filter(name = user.username)
	if len(fuser) == 0:
		return R.badRequest("User does not exist")
else:
	return R.methodNotAllowed("method not allowed")
接着要判断密码是否相同,这里也是使用hashlib比对:
password = fuser[0].password
md5 = hashlib.md5()
passwordString = user.password + user.username
md5.update(passwordString.encode())
pwd = md5.hexdigest()
if pwd != password:
return R.badRequest("password incorrect")
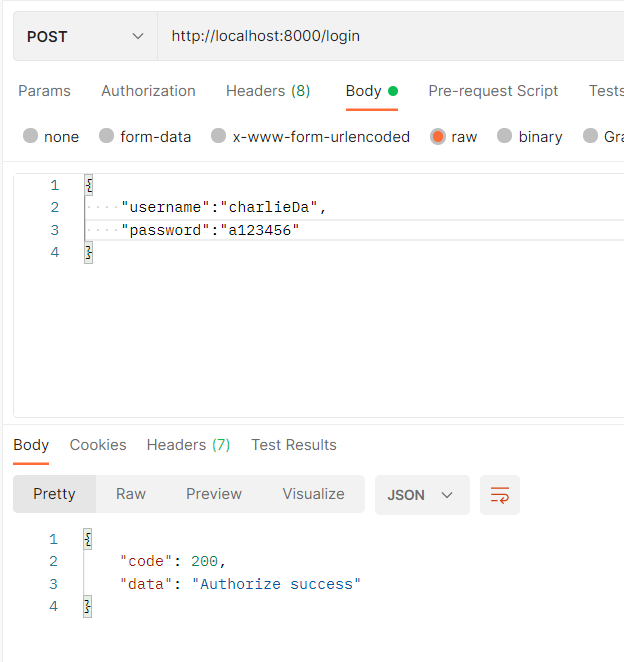
return R.ok("Authorize success")
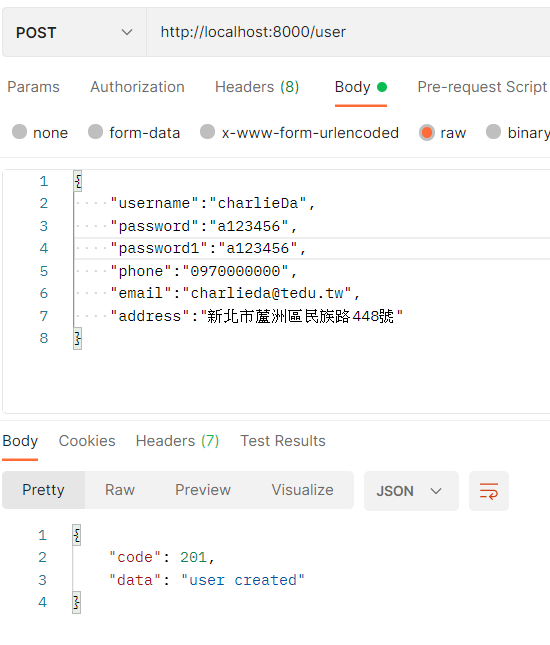
接着用POSTMAN打试试看:
================================◉‿◉=================================
Day06结束了! 在这边我们先完成了注册跟登入的基本程序,在Day07当中会完成前端的注册跟登入,然後在Day08时,我们会真正完成登入跟注册:利用JWT令牌判别。See ya next day!
<<: [Day20] JavaScript - Event Bubbling (事件冒泡) & Event Capturing (事件捕获)
>>: Day 6:AWS是什麽?30天从动漫/影视作品看AWS服务应用 -伊藤计划《和谐》
Day 26 - 新鲜人带新鲜人篇
早上七点半的闹钟,大概是进入职场刚开始比较不习惯的事情(这应该是要报到的前端新鲜人的心情),今天的内...
Day 26 | 使用ManoMotion制作Flappy Bird游戏 Part2 - ManoMotion侦测Grab动作并往上飞
上一篇已将障碍物山的建置与移动做好,今天要来做帝江的跳跃。 目录 ManoMotion手部Grab动...
Day 26 - State Monad I
还记得先前提到 Math.random 并非是纯函式吗,因为每次给定相同的输入都会是不同的输出回传回...
DAY 25- 区块链 Blockchain
「给我钱 !! ALL IN BITCOIN!!」 根据维基百科解释,「区块链是藉由密码学串接并保护...
D26 将config等等隐密资讯另外放置 - yaml
将重要资讯放到yaml内 config.yaml(放在BASE_DIR) --- email: EM...