Android Studio初学笔记-Day2-LinearLayout介绍
对於初学着来说(像我本人),一开始如果没先了解布局的运作容易在布局的编排上产生问题,所以第一篇先来介绍基本的布局LinerLayout
LinerLayout(线性布局)
其主要的布局方向分成水平(horizontal)和垂直(vertical)两部分
效果大致如下:

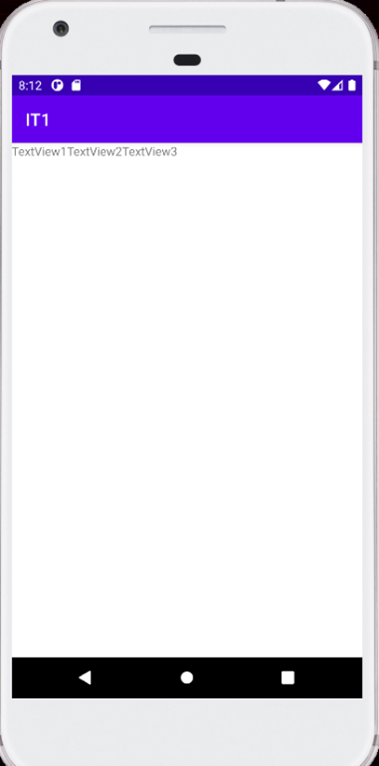
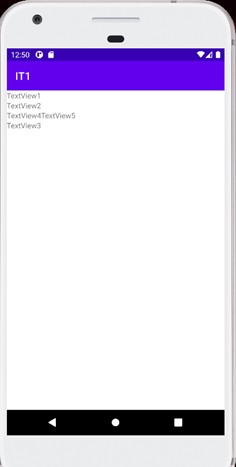
其主要差在android:orientation=”” 的部分,一个填上horizontal另一个则填上vertical。不过这里稍微提一下在android:layout_weight和android:layout_height所设定的值,有wrap_content和match_parent两种,前着会跟随TextView或其他所设定的子元件内容调整合适的长宽,後着会跟随父元件的大小调整至合适的状态,也可以直接输入数字加单位(如60dp)设定自己想要的长宽。也可以试着结合两着运用,例如一开始用垂直(vertical)在第三横行时用水平(horizontal),做出不同的排列。依此类推,也可以透过这种做法做出类似表格的效果。简单运用的例子给大家参考
程序码
<LinearLayout xmlns:android="http://schemas.android.com/apk/res/android"
    xmlns:tools="http://schemas.android.com/tools"
    android:layout_width="match_parent"
    android:layout_height="match_parent"
    android:orientation="vertical"
    tools:context=".MainActivity">

        <TextView
            android:layout_width="wrap_content"
            android:layout_height="wrap_content"
            android:text="TextView1" />

        <TextView
            android:id="@+id/textView"
            android:layout_width="wrap_content"
            android:layout_height="wrap_content"
            android:text="TextView2" />
        <LinearLayout
            android:layout_width="match_parent"
            android:layout_height="wrap_content"
            android:orientation="horizontal">

            <TextView
                android:id="@+id/tv2"
                android:layout_width="wrap_content"
                android:layout_height="wrap_content"
                android:text="TextView4" />

            <TextView
                android:id="@+id/tv3"
                android:layout_width="wrap_content"
                android:layout_height="wrap_content"
                android:text="TextView5" />
        </LinearLayout>
        <TextView
            android:id="@+id/textView2"
            android:layout_width="wrap_content"
            android:layout_height="wrap_content"
            android:text="TextView3" />
</LinearLayout>
最後总结一下
- 优点:能自动在一个方向上布局,简单上手。
- 缺点:死板弹性低,只能在一个方向上
LinerLayout就简单介绍到这里,谢谢大家
【在 iOS 开发路上的大小事-Day05】透过闭包 (Closure) 来传值
前情提要 一般我们在做传值动作的时候,会有好几种方式可以做,像是用 Segue、Closure、De...
Day7 Redis组态档设定-REPLICATION
Redis.config REPLICATION replicaof 透过非同步方式进行Master...
AI ninja project [day 11] 图片分类(1)
我想先回来介绍一些深度学习框架好了, 非类神经的演算法也可以被归为AI, 但是神经网路的深度学习算是...
资安这条路 27 - [服务器软件]Web 应用服务器-Tomcat、Weblogic、Websphere、Jboss
Tomcat 开放原始码,支援 JSP 和 servlets 的 Web 应用服务器 切勿使用 ro...
[FGL] Error: Invalid hello message
出现频率:极少数客户 (但是若有,该主机就会常常出现此讯息) 成因:目前未能完全确认原始成因,但是...