Day 13 - 半自动标签图片的方法与实作
Day 13 - 半自动标签图片的方法与实作
以下介绍一个自制的简易的半自动标签图片的作法,主要是因为手动标签真的很麻烦,於是上网找了一些文章,有一篇文章 Image Segmentation With 5 Lines 0f Code 是最令人开心的,因为只要 5 行代码就可以把一张图片的物件分割出来。测试结果还令人蛮满意的,如下图所示。
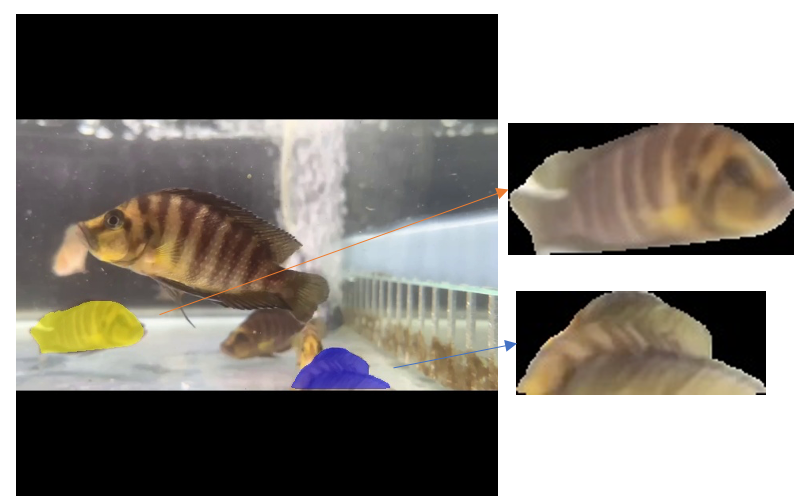
图 1、使用 pixellib 套件分割图片
实作步骤如下:
- 建立一个虚拟环境
- 安装相关套件
- 运行代码
- 将分割的讯息转成 YOLO 格式
- 针对目录进行处理
建立一个虚拟环境
考虑到使用某些比较复杂的套件可能会安装一些不必要的套件,所以在测试期间最好是用虚拟环境来练习。
# 建立虚拟环境 imageSeg
python3 -m venv imageSeg
# 激活虚拟环境,这是在 Mac下的指令,在 Windows 需要执行 Activate.ps1
. imageSeg/bin/activate
安装相关套件
这段代码主要使用的是 pixellib 这个套件,而这个套件运用 Mask R-CNN 框架来进行影像分割,所以需要安装 OpenCV, tensoflow 等相关相依套件。
# 先更新 pip 套件
pip3 install --upgrade pip
# 安装所有需要的套件
pip3 install tensorflow opencv-python scikit-image pillow pixellib
下载 mask r-cnn model模型档案
下图里确认是否1. 已进入虚拟环境 2. 确认已下载 mask r-cnn 模型 3. 检查所有安装套件,会有很多相依套件,这是正常的。
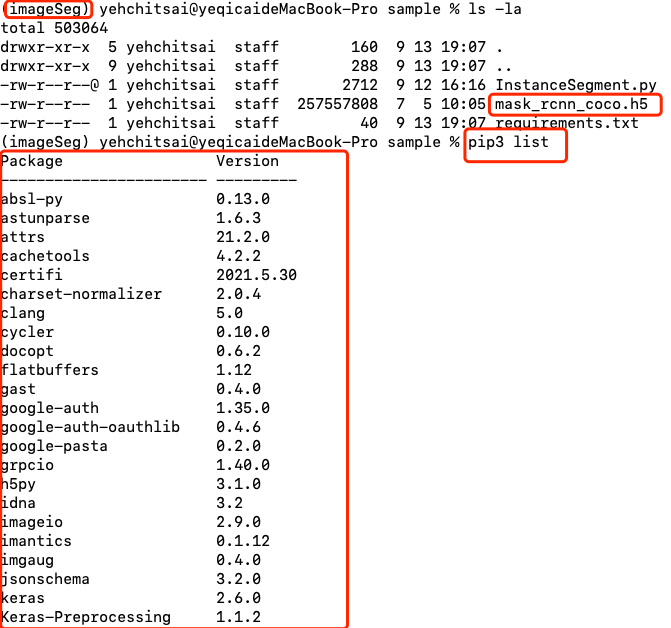
图 2、确认工作环境
运行代码
代码如下,只需要 5 行,前两行是汇入 pixellib 以及 instance_segmentation,因为它支援语意分割跟实体分割,而我们这个情况需要的是实体分割,所以就呼叫实体分割的方法,第四行是载入 mask r-cnn 的模型,第五行则是进行分割,需要指定的参数是目标图片,结果图片,是否取出切割出来的实体,是否把切割出来的实体单独存档。直接结果就如同图 1,结果图片 (frame-0001_seg.jpg) 会把切割出来的实体涂色,而切割出来的实体单独存成档案, segmented_object_1.jpg,segmented_object_2.jpg。
FishSegment.py
import pixellib
from pixellib.instance import instance_segmentation
from pixellib.semantic import semantic_segmentation

segment_image = instance_segmentation()
segment_image.load_model("mask_rcnn_coco.h5")

segmask, output = segment_image.segmentImage("../image/00-frame-608x608-0001.jpg", output_image_name = "frame-0001_seg.jpg", extract_segmented_objects=True, save_extracted_objects=True)
将分割的讯息转成 YOLO 格式
而对我们来说,这不是我们要的,我们希望可以得到那两个被切割出来的实体的方块框的座标,并转成 YOLO 格式,这样就可以帮我们达成半自动化的目标。我们需要知道的是这两个实体的方块框的相关资讯。在上述程序中 segmask, output 这两个回传参数,一个是切割实体的资讯,另一个则是结果图片的资讯,所以只要分析 segmask 这个回传参数就可以得到我们所要的资讯。segmask 内有一个 rois 的阵列,内容分别为 target_ymin, target_xmin, target_ymax, target_xmax,可以透过这个变数取得左上角到右下角的资料。
FishSegment.py
strings = []
extIndex = 1
image_w, image_h, channel= output.shape

print(segmask['rois'],type(segmask['rois']))

for rois in segmask['rois']:
# rois 内容分别为左上角到右下角的资料
	target_ymin, target_xmin, target_ymax, target_xmax = rois
# 转换成 YOLO 的格式,物件名称为 0
	centerPoint = ( ( (target_xmin + target_xmax) * 0.5 ) / image_w, ((target_ymin + target_ymax) * 0.5 ) / image_h)
	target_w = (target_xmax - target_xmin) * 1. / image_w
	target_h = (target_ymax - target_ymin) * 1. / image_h
	extIndex += 1
	strings.append(f"0 {centerPoint[0]:.6f} {centerPoint[1]:.6f} {target_w:.6f} {target_h:.6f}")
	yolo_string = '\n'.join(strings)
# yolo格式的档名为 label.txt
	with open('label.txt', 'w') as f:
		f.write(yolo_string)
所产生的 YOLO 格式的 label.txt 如下所示。
label.txt
0 0.145559 0.652138 0.245066 0.116776
0 0.685033 0.732730 0.245066 0.090461
针对目录进行处理
接下来在把整个档案改成针对目录的,以下是运行後的标示结果,有标示到的才会产生 YOLO 文件档,虽然不是 100% 标示出来,但已经省了很多手工标签的结果。
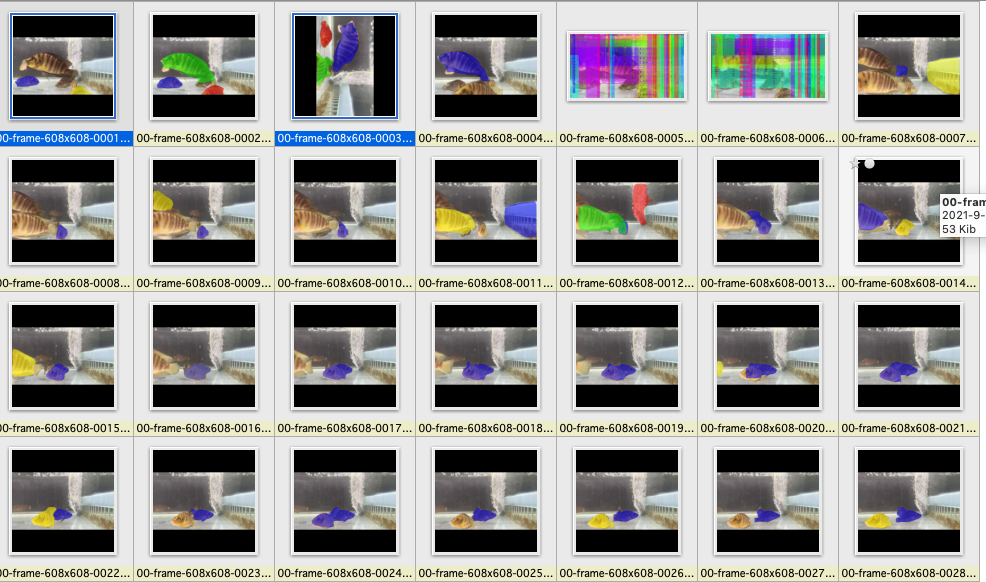
图 3、针对目录的运行结果
下图是显示生成档案的文件夹,原则上都是一个图片可以搭配一个文件。
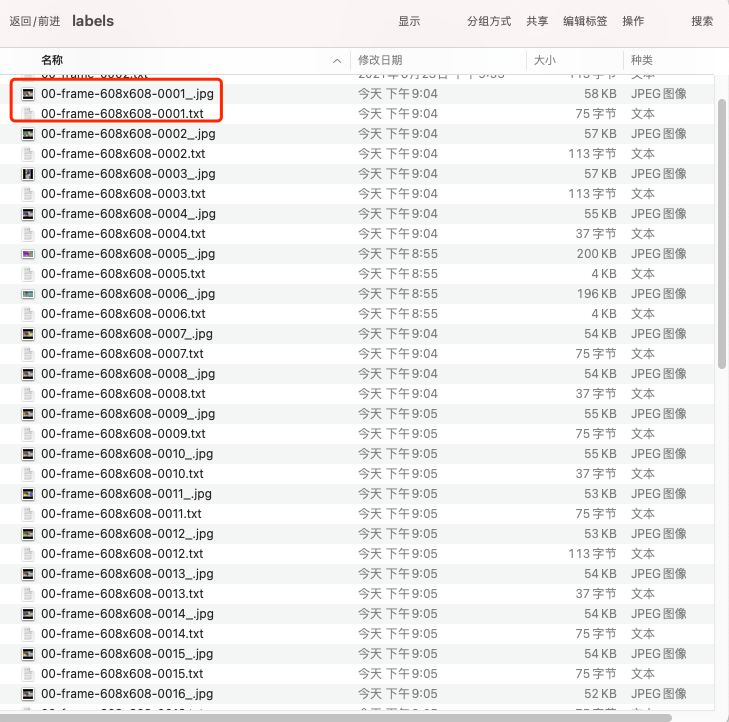
图 4、显示生成档案的目录
完整代码如下所示:
FishSegment.py
#!/usr/bin/env python3
import argparse
import glob
import os
import numpy as np

import pixellib
from pixellib.semantic import semantic_segmentation
from pixellib.instance import instance_segmentation
import cv2

# 从命令列中取得参数
def get_arg():
	parser = argparse.ArgumentParser()

	_, all_arguments = parser.parse_known_args()
	script_args = all_arguments[0:]

	parser.add_argument("-ipath","--input_path", type=str, help="input path of image or image folder")
	parser.add_argument("-opath","--output_image_path", type=str, help="path to yolo output images")
	parser.add_argument("-tpath","--output_text_path", type=str, help="path to yolo output text files")
	parser.add_argument("-ylabel","--yolo_label", type=int, default=0, help="yolo string class number")

	parsed_script_args,_ = parser.parse_known_args(script_args)

	return parsed_script_args

# 取得 yolo 格式字串
def getYoloLabel(args, model, image_path):
# 如果没办法辨识就跳过
	try:
		segmask, output = model.segmentImage(image_path, show_bboxes = False , extract_segmented_objects = False, save_extracted_objects = False)
	except ValueError:
		os.remove(image_path)
		return 'Cannot segment file, remove it'

	if len(segmask['rois']) == 0 :
		os.remove(image_path)
		return 'Cannot segment file, remove it'

	strings = []
	extIndex = 1
	image_w, image_h, channel= output.shape
	for rois in segmask['rois']:
		#cv2.rectangle(img, segmask['rois'][], (290,436), (0,255,0), 4)

		target_ymin, target_xmin, target_ymax, target_xmax = rois

		centerPoint = ( ( (target_xmin + target_xmax) * 0.5 ) / image_w, ((target_ymin + target_ymax) * 0.5 ) / image_h)
		target_w = (target_xmax - target_xmin) * 1. / image_w
		target_h = (target_ymax - target_ymin) * 1. / image_h
		extIndex += 1
		strings.append(f"{args.yolo_label} {centerPoint[0]:.6f} {centerPoint[1]:.6f} {target_w:.6f} {target_h:.6f}")

	yolo_string = '\n'.join(strings)
	if args.output_text_path:
		if not os.path.isdir(args.output_text_path):
			os.makedirs(args.output_text_path)
		with open(os.path.join(args.output_text_path, f'{os.path.basename(image_path)}'.split('.')[0] + '.txt'), 'w') as f:
			f.write(yolo_string)

	if args.output_image_path:
		if not os.path.isdir(args.output_image_path):
			os.makedirs(args.output_image_path)
		cv2.imwrite(os.path.join(args.output_image_path, f'{os.path.basename(image_path)}'.split('.')[0] + '_.jpg'), output)

	return yolo_string


def main():
	args = get_arg()
	if os.path.isdir(args.input_path):
	    types = os.path.join(args.input_path,'*.jpg'), os.path.join(args.input_path,'*.jpeg'), os.path.join(args.input_path,'*.png')
	    files_grabbed = []
	    for files in types:
	        files_grabbed.extend(sorted(glob.iglob(files)))
	elif os.path.isfile(args.input_path):
	    files_grabbed = [args.input_path]
	else:
	    raise ValueError("File PATH is NOT Valid")
#	print(args.input_path,files_grabbed)

	segment_model = instance_segmentation()
	segment_model.load_model("mask_rcnn_coco.h5")
	print('files_grabbed = ',files_grabbed)
	for image_path in files_grabbed:
		yolo_string = getYoloLabel(args, segment_model, image_path)
		print(image_path, yolo_string)

if __name__ == "__main__":
	main()
在命令列执行,指定图片所在文件夹 (input_path),辨识後的图片存储的文件夹 (output_image_path) ,存储yolo标签的文件夹(output_text_path),以及预设的物件名称 (yolo_label)。
python3 FishSegment.py --input_path ../image/ --output_image_path ../labels --output_text_path ../labels --yolo_label 0
最後建议安装 pipreqs 套件,用来产生执行 FishSegment.py 所需要的相关套件以及版本文件 requirements.txt,因为现在可以执行,可能过了几个月相关套件更新後就不能执行了,所以最好的方法就是把相关套件以及版次记录下来,这样就能确保这个档案可以运行。
pip3 install pipreqs
# 将 FishSegment.py 搬到一个空目录
mkdir sample
cp FishSegment.py sample/
pipreqs sample --encoding UTF-8
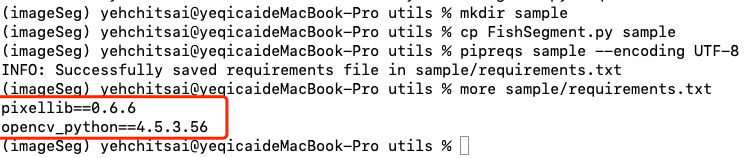
图 5、生成 requirements.txt 作为项目移植之用
参考资料
- Image Segmentation With 5 Lines 0f Code, https://towardsdatascience.com/image-segmentation-with-six-lines-0f-code-acb870a462e8
- Extraction of objects in videos, https://pixellib.readthedocs.io/en/latest/video_instance.html#extraction-of-objects-in-videos
- pipreqs 0.4.10, https://pypi.org/project/pipreqs/
- yolo-labeler 0.0.3, https://pypi.org/project/yolo-labeler/
- Automatic YOLO Labeler, https://github.com/abpanchal95/yolo-labeler
>>: Swift纯Code之旅 Day3. 「画面管理员 - TabbarController」
菜主管常有的迷思
分享过我对「什麽是管理」的定义後,在直接进入讨论「如何管理」前,我想花点时间,厘清几个没有实际管理...
[DAY28]GKE-Google Kubernetes Engine
GKE GKE是GOOGLE在GCP上面的k8s cluster服务,对於GCP使用者来说,GKE可...
伸缩自如的Flask [day 25] Flask with web cam
github: https://github.com/wilsonsujames/webcam/tr...
第21天~OKHttp
OKHttp -网路下载传输资料 开新档案- 找到网站 https://square.github....
Day 14. slate × Interfaces × Ref
相信有 React 开发经验的读者们对 Ref 这个词一定不陌生。 其实 slate 里头的 Re...