Vue出一个行事历 Calendar
前言:
此单元较为复杂,若元件观念较不熟悉的同学,请斟酌观看
这里会运用到props、emit、ES6、day.js
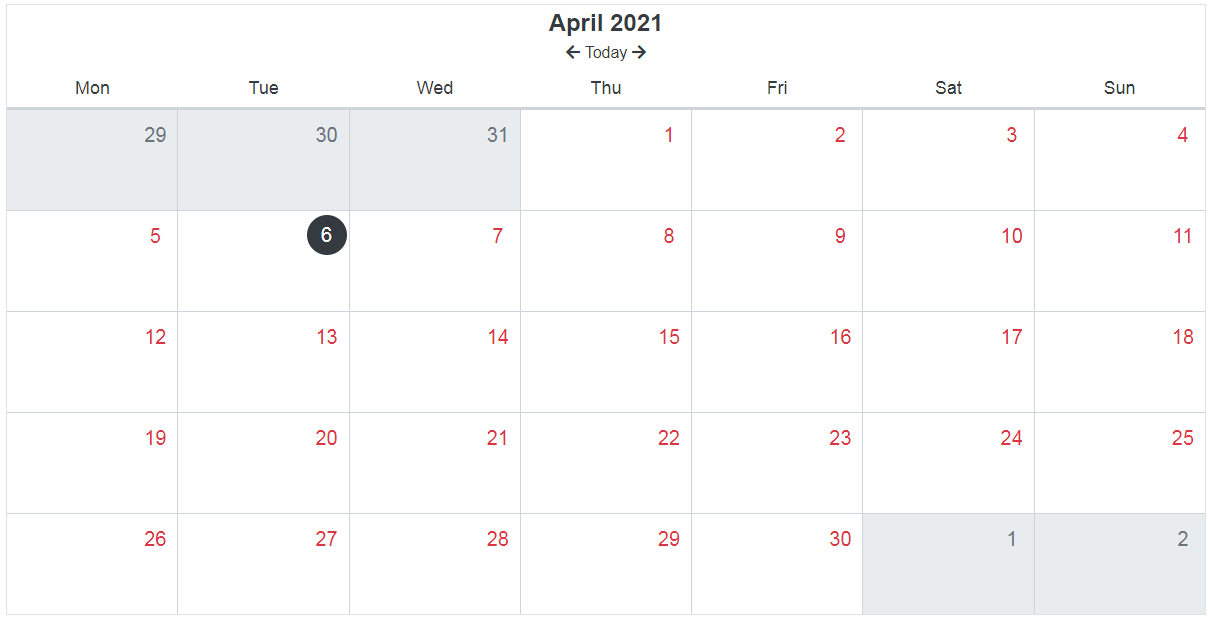
让我们先来观看成品图吧
首先我们将行事历切分为三个区块制作
分别为:
一、header

二、body

三、footer
首先,定义一个父层名为:result的父元件
并在data内定义一个名称,值为day.js
<script>
  export default {
      data () {
          return  {
              selectedDate: dayjs()
          }
      }
  }
</script>
接着在components创建一个名为pointer的子元件
并定义一个selectedMonth的function,format的输出格式可自订规则
将父层传进的的值「dayjs()」,透过props接收(props可自订验证规则,详请可参考这篇)
并定义验证规则:
type必须为「物件型别」、required必须为「true」
这个组件中就完成了表头的年、月份
<template>
  <div>
    <div class="XXXXX">{{ selectedMonth }}</div>
  </div>
</template>

<script>
export default {
  props: {
    selectedDate: {
      type: Object,
      required: true
    }
  },
  computed: {
    selectedMonth () {
      return this.selectedDate.format('MMMM YYYY')
    }
  }
}
</script>
下个步骤就是要制作切换月份的按钮!
先在父元件创立一个today的function,并定义format的输出格式
today () {
      console.log(dayjs().format('YYYY-MM-DD')) //string型别
      return dayjs().format('YYYY-MM-DD')
    }
创立一个名为dateSelected的子元件
将父元件的today及dayjs(),分别透过currentDate、selectedDate传入
接着开始定义上个月、当月、下个月的按钮,写法请参照下方程序码
定义完後使用$emit将newDate的值回传给父元件
<template>
  <div class="XXXXX">
    <div class="YYYYY">
      <span @click="selectedPre"><i class="fas fa-arrow-left"></i></span>
      <span @click="selectedCurrent">Today</span>
      <span @click="selectedNext"><i class="fas fa-arrow-right"></i></span>
    </div>
  </div>
</template>

<script>
import dayjs from 'dayjs'
export default {
  props: {
    currentDate: {
      type: String,
      required: true
    },
    selectedDate: {
      type: Object,
      required: true
    }
  },
  methods: {
    selectedPre () {
      const newDate = dayjs(this.selectedDate).subtract(1, 'month')
      this.$emit('dateSelected', newDate)
    },
    selectedCurrent () {
      const newDate = dayjs(this.currentDate)
      this.$emit('dateSelected', newDate)
    },
    selectedNext () {
      const newDate = dayjs(this.selectedDate).add(1, 'month')
      this.$emit('dateSelected', newDate)
    }
  }
}
</script>
父元件的code会呈现为:
<template>
  <div class="XXXXX">
     <Pointer :selected-date = "selectedDate"/>
     <DateSelected
       :current-date="today"
       :selected-date="selectedDate"
       @dateSelected="selDate"
     />
  </div>
</template>
<script>
export default {
    data () {
      return {
        selectedDate: dayjs()
      }
    },
    methods: {
      selDate (newDate) {
      this.selectedDate = newDate
    }
  },
  computed: {
    today () {
      return dayjs().format('YYYY-MM-DD')
    },
   getMonth () {
      return dayjs(this.selectedDate).daysInMonth() //取得当月的总天数
    },
    year () {
      return Number(this.selectedDate.format('YYYY')) //取得年份
    },
    month () {
      return Number(this.selectedDate.format('M')) //取得月份,从 1 开始
    },
  }
}
</script>
接着第二步骤的body就单纯了许多,因此就不多做解释了,直接附上程序码
<template>
  <div>
    <ol class="week">
      <li v-for="weekday in weekDates" :key="weekday">{{ weekday }}</li>
    </ol>
  </div>
</template>

<script>
const week = ['Mon', 'Tue', 'Wed', 'Thu', 'Fri', 'Sat', 'Sun']
export default {
  computed: {
    weekDates () {
      return week
    }
  }
}
</script>
终於完成了header和body的部分,先休息一下喝口水吧!因为复杂的要来了
第三步骤先引入day.js的Weekday插件
Weekday的功能是计算上周,指的是计算出上个礼拜的周一到周日。
当然也可计算本周或是下周,详细说明可参考这篇
import weekday from 'dayjs/plugin/weekday'
dayjs.extend(weekday)
在这边我们要分别定义三个计算式
一个是当月份,一个是上个月份,另一个是下个月份
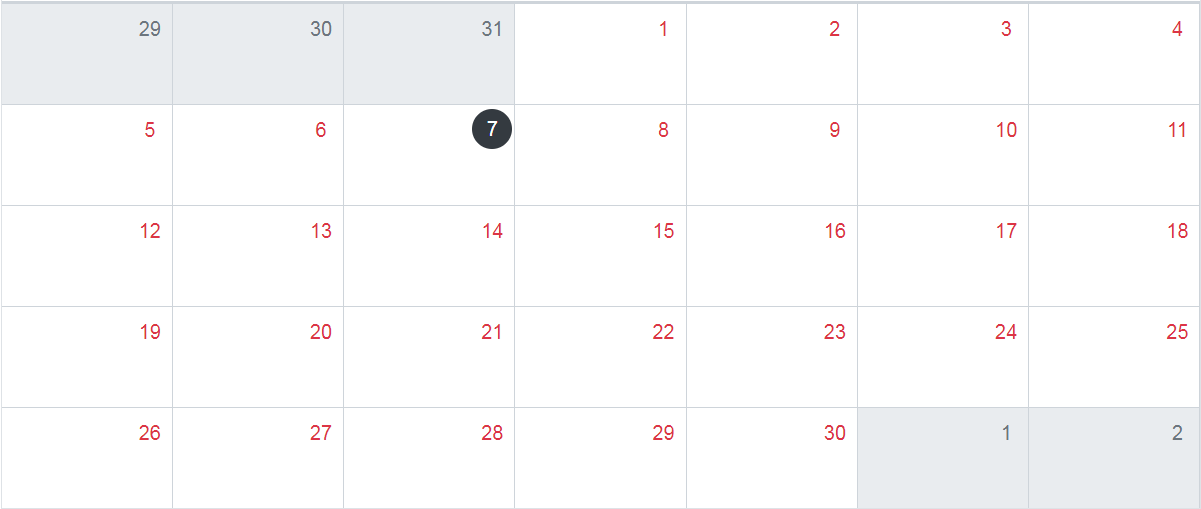
今日为2021/04/07,会以今日的日期分别console出结果给大家做写法的比对
首先,定义一个function取得当月份的天数(展开函式写法参考)
currentDays () {
      return [...Array(this.getMonth)].map((day, index) => {
        return {
          date: dayjs(`${this.year}-${this.month}-${index + 1}`).format('YYYY-MM-DD'),
          isMonth: true
        }
      })
    }
接着,在定义一个function取得下个月份的天数
程序码解析:
const nextWeek:
主要是计算每个月的最後一天是星期几。以本月为例,最後一天为星期五
const nextOfmonth:
主要为计算下个月份的1号。以本月为例,下个月的1号为周六,我们的月历是由周一排序到周日,而本月的最後一天为周五,因此在本月最後一周的周六、周日,就是下个月的1、2号。
const nextMonth:
{ $D:月份里的第一天, $M:月份, $W:下个月的第一天是星期几, $y:年份 }
nextmonthDay () {
      const nextWeek = this.getWeekday(`${this.year}-${this.month}-${this.currentDays.length}`)
          console.log('每月的最後一天是星期 :', nextWeek) //每月的最後一天是星期 : 5
      const nextMonth = dayjs(`${this.year}-${this.month}`).add(1, 'month')
          console.log(nextMonth) //注一
      const nextOfmonth = nextWeek ? 7 - nextWeek : nextWeek
          console.log('下个月的可见天数:', nextOfmonth) //下个月的可见天数:2
      return [...Array(nextOfmonth)].map((day, index) => {
        return {
          date: dayjs(`${nextMonth.year()}-${nextMonth.month() + 1}-${index + 1}`).format('YYYY-MM-DD'),
          isMonth: false
        }
      })
    }
结束了下个月当然还得做上个月的天数,是不是开始不奈烦了阿~
在定义一个取得上个月份天数的function
这里的做法与上一个差不多,因此就不多做解释了
premonthDate () {
      const firstWeek = this.getWeekday(this.currentDays[0].date)
        console.log('每月第一个工作日是星期 :', firstWeek) //每月第一个工作日是星期 : 4
      const prevMonth = dayjs(`${this.year}-${this.month}`).subtract(1, 'month')
      const lastMonth = firstWeek ? firstWeek - 1 : 6
        console.log('上个月的可见天数 :', lastMonth) //上个月的可见天数 : 3
      const prefirstDay = dayjs(this.currentDays[0].date).subtract(lastMonth, 'day').date()
        console.log('当月第一个星期一是 :', prefirstDay, '号') //当月第一个星期一是 : 29 号
      return [...Array(lastMonth)].map((day, index) => {
        return {
          date: dayjs(`${prevMonth.year()}-${prevMonth.month() + 1}-${prefirstDay + index}`).format('YYYY-MM-DD'),
          isMonth: false
        }
      })
    }
附上父组件的最终程序码给大家参考
<template>
  <div>
    <div class="xxxxxx">
      <div class="yyyyyy">
        <Pointer
          :selected-date = "selectedDate"
        />
        <DateSelected
          :current-date="today"
          :selected-date="selectedDate"
          @dateSelected="selDate"
        />
      </div>
        <WeekDate/>
        <ol class="zzzzzz">
          <MonthDate
            v-for="day in days"
            :key="day.date"
            :day="day"
            :is-today="day.date === today"
          />
        </ol>
    </div>
  </div>
</template>

<script>
import weekday from 'dayjs/plugin/weekday'
dayjs.extend(weekday)
export default {
  data () {
    return {
      selectedDate: dayjs()
    }
  },
  methods: {
    getWeekday (date) {
      return dayjs(date).weekday()
    },
    selDate (newDate) {
      this.selectedDate = newDate
    }
  },
  computed: {
    today () {
      return dayjs().format('YYYY-MM-DD')
    },
    getMonth () {
      return dayjs(this.selectedDate).daysInMonth()
    },
    year () {
      return Number(this.selectedDate.format('YYYY'))
    },
    month () {
      return Number(this.selectedDate.format('M'))
    },
    currentDays () {
      return [...Array(this.getMonth)].map((day, index) => {
        return {
          date: dayjs(`${this.year}-${this.month}-${index + 1}`).format('YYYY-MM-DD'),
          isMonth: true
        }
      })
    },
    nextmonthDay () {
      const nextWeek = this.getWeekday(`${this.year}-${this.month}-${this.currentDays.length}`)
      const nextMonth = dayjs(`${this.year}-${this.month}`).add(1, 'month')
      const nextOfmonth = nextWeek ? 7 - nextWeek : nextWeek
      return [...Array(nextOfmonth)].map((day, index) => {
        return {
          date: dayjs(`${nextMonth.year()}-${nextMonth.month() + 1}-${index + 1}`).format('YYYY-MM-DD'),
          isMonth: false
        }
      })
    },
    premonthDate () {
      const firstWeek = this.getWeekday(this.currentDays[0].date)
      const prevMonth = dayjs(`${this.year}-${this.month}`).subtract(1, 'month')
      const lastMonth = firstWeek ? firstWeek - 1 : 6
      const prefirstDay = dayjs(this.currentDays[0].date).subtract(lastMonth, 'day').date()
      return [...Array(lastMonth)].map((day, index) => {
        return {
          date: dayjs(`${prevMonth.year()}-${prevMonth.month() + 1}-${prefirstDay + index}`).format('YYYY-MM-DD'),
          isMonth: false
        }
      })
    },
    days () {
      return [
        ...this.premonthDate,
        ...this.currentDays,
        ...this.nextmonthDay
      ]
    }
  },
最後我们要将非本月的日期以及当天的日期赋予颜色以便区隔
因此再新增一个子组件,名为monthDate,透过props将v-for的day值传入即可
<template>
  <div>
    <li class="XXXXXX" :class="{'current': !day.isMonth, 'today': isToday}">
      <span>{{ isTag }}</span>
    </li>
  </div>
</template>
<script>
export default {
  props: {
    day: {
      type: Object,
      required: true
    },
    isMonth: {
      type: Boolean,
      default: false
    },
    isToday: {
      type: Boolean,
      default: false
    }
  },
  computed: {
    isTag () {
      return dayjs(this.day.date).format('D')
    }
  }
}
</script>
若有错误的地方欢迎批评指教 谢谢
Unity自主学习(十四):认识Unity介面(5)
昨天我们了解了游戏执行区以及场景编辑区中"Main Camera"物件对其的影响...
Ruby on Rails CRUD 之 R(Read)
CRUD 之 R(Read) 从资料表里读取资料也是很常⾒的操作,在读取的⽅法就比写入来得多样化,有...
html 多选题
昨天说了单选题,今天来说说多选题 多选题比单选题还要简单,逻辑上来说就是每个选项都只有勾与不勾两种状...
Day 02 React ?? Native ??
HI,到了第二天,感觉每天写一篇文章的感觉真的会有一种怠惰感,还是好好习惯吧 什麽是 React 先...
Thunkable学习笔记 2 - 加入Firebase登入功能(使用EMail)
Firebase提供现成的email/password验证功能供我们使用, thunkable提供s...