Day-27 使用StatefulSet
前言
前面我们先介绍了Pod, 控管Pod的ReplicaSet与管理ReplicaSet的Deployment,也在前面章节解说了专门用於守护进程的DaemonSet,接下来则讲述StatefulSet与其解决的问题。
What is StatefulSet ?
大家在使用Pod时一定会遇到一个问题,每种Pod有着许许多多的类别,并且每个种类的Pod都会有着一个以上的replica,但当其他Pod与外界在联系该种类的Pod时,无法识别它们。
或许在大部分情况之下,每个Pod都有着相同资料并执行着一样的任务,但还是会遇到某些情形每个Pod需要有能够识别彼此的识别证,就像是在Kafka中每个Node都是独一无二的。
基本上StatefulSet管理Pod的方式与Deployment无异,但唯一不同的地方只有在StatefulSet Controller会为每个Pod生成独一无二的识别资讯,并且这些资讯不会因为re-schedule而改变。

When to use StatefulSet ?
要如何判断何时该使用StatefulSet呢?
- 需要稳定且唯一的网路识别资讯
- 有状态的集群应用
- 需要稳定且持久的储存空间
- 部署时,Pod需要有顺序性地建立
也因此StatefulSet适合用来部署Kafka、MySQL、Redis与ZooKeeper等需要唯一识别身份与主机名的服务,至於其他无状态服务请使用deployment。
What we need for StatefulSet ?
- Kubernetes v1.5以前的版本并不支援StatefulSet,v1.9後才正式资源。
- Storage部分必须要绑定到PVC,并配对至特定Storage Class或是PV,确保Pod被删除後资料依然存在。(PV、PVC与Storage Class请参考Day-26 Kubernetes Storage)。
- 需要定义一个Headless Service与StatefuleSet进行配对,确保每个Pod都有其独一无二的network identify。(Headless Service请参照Day-25 DaemonSet的Headless Service章节)
How to write StatefulSet ?
这里我们以mongoDb为例,讲述一次StatefulSet。
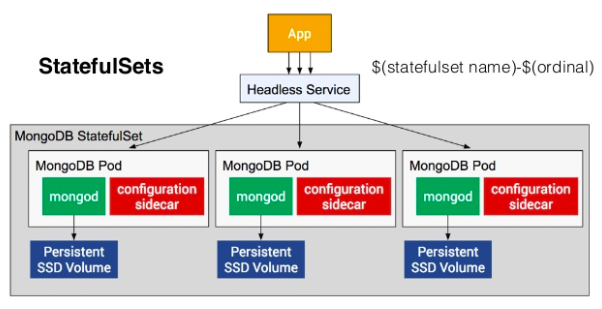
在Mongo Cluster当中,我们会需要
- 可以识别每个MongoDB Pod的StatefulSet
- MongoDB 所连结的PVC与PV/StorageClass
- 创建能够让每个Pod有着网路识别资讯的Headless Service。
Starting with PV and StorageClass
ssd storage class
ssd.yaml
kind: StorageClass
apiVersion: storage.k8s.io/v1beta1
metadata:
  name: fast
provisioner: kubernetes.io/gce-pd
parameters:
  type: pd-ssd
- provisioner: 储存卷分配器,这里必需选择你的储存卷是由谁分配。若是GKE请使用kubernetes.io/gce-pd,其他请参考下方表格。
- type: storage的种类,gce有提供pd-ssd、pd-standard两种
| Type | Provisioner | |
|---|---|---|
| AWS | kubernetes.io/aws-ebs | |
| GCE | kubernetes.io/gce-pd | |
| Glusterfs | kubernetes.io/glusterfs | |
| OpenStack Cinder | kubernetes.io/cinder | |
| vSphere | kubernetes.io/vsphere-volume | |
| Ceph RBD | kubernetes.io/rbd | |
| Quobyte | kubernetes.io/quobyte | |
| Azure disk | kubernetes.io/azure-disk | |
| Azure file | kubernetes.io/azure-file | |
| Portworx | kubernetes.io/portworx-volume | |
| ScaleIO | kubernetes.io/scaleio |
想知道更多详细资讯请参照 https://k8smeetup.github.io/docs/concepts/storage/storage-classes/#gce
hhd storage class
hhd.yaml
kind: StorageClass
apiVersion: storage.k8s.io/v1beta1
metadata:
  name: slow
provisioner: kubernetes.io/gce-pd
parameters:
  type: pd-standard
StatefulSet yaml
statefulset.yaml
apiVersion: apps/v1
kind: StatefulSet
metadata:
  name: mongo
spec:
  selector:
    matchLabels:
      role: mongo
      environment: test
  serviceName: "mongo"
  replicas: 3
  template:
    metadata:
      labels:
        role: mongo
        environment: test
    spec:
      terminationGracePeriodSeconds: 10
      containers:
        - name: mongo
          image: mongo:3.4
          command:
            - mongod
            - "--replSet"
            - rs0
            - "--bind_ip"
            - 0.0.0.0
            - "--smallfiles"
            - "--noprealloc"
          ports:
            - containerPort: 27017
          volumeMounts:
            - name: mongo-persistent-storage
              mountPath: /data/db
        - name: mongo-sidecar
          image: cvallance/mongo-k8s-sidecar
          env:
            - name: MONGO_SIDECAR_POD_LABELS
              value: "role=mongo,environment=test"
  volumeClaimTemplates:
  - metadata:
      name: mongo-persistent-storage
      annotations:
        volume.beta.kubernetes.io/storage-class: "fast"
    spec:
      accessModes: [ "ReadWriteOnce" ]
      resources:
        requests:
          storage: 100Gi
这边只讲述deployment章节未提及的部分,若需要复习者请参考
- kind: 必须指定为StatefulSet。
- spec.template.spec.terminationGracePeriodSeconds: 每个pod依顺序性删除时间隔时间。
- volumeClaimTemplates: 透过动态方式自动产生PVC,这里需要指定一个已经存在并且合法的storageClass。
HeadlessService yaml
headless-service.yaml
apiVersion: v1
kind: Service
metadata:
  name: mongo
  labels:
    name: mongo
spec:
  ports:
  - port: 27017
    targetPort: 27017
  clusterIP: None
  selector:
    role: mongo
Deployment
- 先创立所需的storage class
$ kubectl apply -f ssd.yaml
storageclass.storage.k8s.io/fast created

$ kubectl apply -f hhd.yaml
storageclass.storage.k8s.io/slow created
- 创建stateful set并且绑定storage class
$ kubectl apply -f statefulset.yaml
statefulset.apps/mongo created
- 最後则是创建headless service
$ kubectl apply -f headless-service.yaml
service/mongo created
-
我们可以透过GKE的控制台看到这些service都在创立,并且也显示在了前台
- storage class

- statefulset

- headless service

Check mongo cluster
我们先去cluster中第一个mongodb查看资讯
$ kubectl exec -it mongo-0 mongo
Defaulting container name to mongo.
Use 'kubectl describe pod/mongo-0 -n default' to see all of the containers in this pod.
MongoDB shell version v3.4.24
connecting to: mongodb://127.0.0.1:27017
MongoDB server version: 3.4.24
Welcome to the MongoDB shell.
For interactive help, type "help".
For more comprehensive documentation, see
        http://docs.mongodb.org/
Questions? Try the support group
        http://groups.google.com/group/mongodb-user
Server has startup warnings:
2020-10-10T12:54:28.505+0000 I STORAGE  [initandlisten]
2020-10-10T12:54:28.506+0000 I STORAGE  [initandlisten] ** WARNING: Using the XFS filesystem is strongly recommended with the WiredTiger storage engine
2020-10-10T12:54:28.506+0000 I STORAGE  [initandlisten] **          See http://dochub.mongodb.org/core/prodnotes-filesystem
2020-10-10T12:54:28.586+0000 I CONTROL  [initandlisten]
2020-10-10T12:54:28.586+0000 I CONTROL  [initandlisten] ** WARNING: Access control is not enabled for the database.
2020-10-10T12:54:28.586+0000 I CONTROL  [initandlisten] **          Read and write access to data and configuration is unrestricted.
2020-10-10T12:54:28.586+0000 I CONTROL  [initandlisten] ** WARNING: You are running this process as the root user, which is not recommended.
2020-10-10T12:54:28.587+0000 I CONTROL  [initandlisten]
> rs.initiate()
{
        "info2" : "no configuration specified. Using a default configuration for the set",
        "me" : "mongo-0:27017",
        "ok" : 1
}
rs0:OTHER> rs.conf()
{
        "_id" : "rs0",
        "version" : 1,
        "protocolVersion" : NumberLong(1),
        "members" : [
                {
                        "_id" : 0,
                        "host" : "mongo-0:27017",
                        "arbiterOnly" : false,
                        "buildIndexes" : true,
                        "hidden" : false,
                        "priority" : 1,
                        "tags" : {

                        },
                        "slaveDelay" : NumberLong(0),
                        "votes" : 1
                }
        ],
        "settings" : {
                "chainingAllowed" : true,
                "heartbeatIntervalMillis" : 2000,
                "heartbeatTimeoutSecs" : 10,
                "electionTimeoutMillis" : 10000,
                "catchUpTimeoutMillis" : 60000,
                "getLastErrorModes" : {

                },
                "getLastErrorDefaults" : {
                        "w" : 1,
                        "wtimeout" : 0
                },
                "replicaSetId" : ObjectId("5f81b283e49202849539609a")
        }
}
再来去第二个mongo db看看
kubectl exec -ti mongo-1 mongo
Defaulting container name to mongo.
Use 'kubectl describe pod/mongo-1 -n default' to see all of the containers in this pod.
MongoDB shell version v3.4.24
^[[Aconnecting to: mongodb://127.0.0.1:27017
MongoDB server version: 3.4.24
Welcome to the MongoDB shell.
For interactive help, type "help".
For more comprehensive documentation, see
        http://docs.mongodb.org/
Questions? Try the support group
        http://groups.google.com/group/mongodb-user
Server has startup warnings:
2020-10-10T12:55:06.160+0000 I STORAGE  [initandlisten]
2020-10-10T12:55:06.160+0000 I STORAGE  [initandlisten] ** WARNING: Using the XFS filesystem is strongly recommended with the WiredTiger storage engine
2020-10-10T12:55:06.160+0000 I STORAGE  [initandlisten] **          See http://dochub.mongodb.org/core/prodnotes-filesystem
2020-10-10T12:55:06.227+0000 I CONTROL  [initandlisten]
2020-10-10T12:55:06.227+0000 I CONTROL  [initandlisten] ** WARNING: Access control is not enabled for the database.
2020-10-10T12:55:06.227+0000 I CONTROL  [initandlisten] **          Read and write access to data and configuration is unrestricted.
2020-10-10T12:55:06.227+0000 I CONTROL  [initandlisten] ** WARNING: You are running this process as the root user, which is not recommended.
> rs.initiate()
{
        "info2" : "no configuration specified. Using a default configuration for the set",
        "me" : "mongo-1:27017",
        "ok" : 1
}
rs0:OTHER> rs.conf()
{
        "_id" : "rs0",
        "version" : 1,
        "protocolVersion" : NumberLong(1),
        "members" : [
                {
                        "_id" : 0,
                        "host" : "mongo-1:27017",
                        "arbiterOnly" : false,
                        "buildIndexes" : true,
                        "hidden" : false,
                        "priority" : 1,
                        "tags" : {

                        },
                        "slaveDelay" : NumberLong(0),
                        "votes" : 1
                }
        ],
        "settings" : {
                "chainingAllowed" : true,
                "heartbeatIntervalMillis" : 2000,
                "heartbeatTimeoutSecs" : 10,
                "electionTimeoutMillis" : 10000,
                "catchUpTimeoutMillis" : 60000,
                "getLastErrorModes" : {

                },
                "getLastErrorDefaults" : {
                        "w" : 1,
                        "wtimeout" : 0
                },
                "replicaSetId" : ObjectId("5f81b369ce23c2ce910e02d1")
        }
}
我们可以看到两个mongoDB有着不同的host与id,这也表示我们成功了。
Scaling MongoDb replica
当replica数目大於1时,statefulSet会与deployment不同,statefulSet中的pod会同步且有顺序的逐一产生。产生的流程如下:
- pod-0 —> pod-1 —> pod-2....etc,在每个pod後面都会加上sequence number并且按照顺序产生。
- 当要对 pod 进行 scale 时,predecessor 的状态必须是 Running & Ready,举例来说:若pod要从1个scale up成2个时,pod-0的状态必须是Running & Ready,pod-1才会开始create。
$ kubectl get pod
mongo-0                    2/2     Running   0          27m
mongo-1                    2/2     Running   0          26m
mongo-2                    2/2     Running   0          26m
$ kubectl scale --replicas=5 statefulset mongo
statefulset.apps/mongo scaled
$ kubectl get pod --watch
NAME                       READY   STATUS              RESTARTS   AGE
mongo-0                    2/2     Running             0          28m
mongo-1                    2/2     Running             0          27m
mongo-2                    2/2     Running             0          27m
mongo-3                    0/2     ContainerCreating   0          10s
mongo-3                    2/2     Running             0          16s
mongo-4                    0/2     Pending             0          0s
mongo-4                    0/2     Pending             0          0s
mongo-4                    0/2     Pending             0          5s
mongo-4                    0/2     ContainerCreating   0          5s
mongo-4                    2/2     Running             0          19s
我们可以发现当mongo statefulset scaling up时,pod数目确实会照顺序产生并运行。
Clean up Mongo Db
与产生相同,删除时也是有顺序性的,但是他会反性删除,意指从pod-2 —> pod-1 —> pod-0删除。
Using Mongo Db cluster
Each pod in a StatefulSet backed by a Headless Service will have a stable DNS name. The template follows this format: .
This means the DNS names for the MongoDB replica set are:
mongo-0.mongo
mongo-1.mongo
mongo-2.mongo
We can use these names directly in the connection string URI of our app.
Using a database is outside the scope of this post, however for this case, the connection string URI would be:
"mongodb://mongo-0.mongo,mongo-1.mongo,mongo-2.mongo:27017/dbname_?"
Github Repo
本篇章所有程序码将放在下面的github project当中的branch day-27
後记
这章节我们学会了运用StatefulSet,这也让我们以後想部署类似Kafka、ZooKeeper或是Cluster类型的Database都有了方法,并且配合着StorageClass与PVC来持续化地保存资料。
Reference
https://kubernetes.io/docs/concepts/workloads/controllers/statefulset/
<<: Day 27 - 上传档案 Carrierwave - 多个档案
>>: [Day 28] 利用CreateML训练的模型判断情绪(上)
(Day23) ES6 箭头函式
前言 跟变数一样 JavaScript 在 ES6 为函式新添加一种写法,他和传统函式有以下差异: ...
DAY17聚类演算法
昨天介绍完支持向量机,今天就要来介绍甚麽是分类和聚类: 通过将资料通过分类的方法分成不同的组别或者更...
Proxmox VE直通N卡Code43解决
N卡有毒,直通打完驱动后卡代码43,不能用,找了一圈只需要加上一行代码就能解决 先找到虚拟机文件位置...
虹语岚访仲夏夜-1(专业的小四篇)
R在旁边叫了我一声,「四先生,来看一下这个吧,我想到了。」 『这是啥?』 「地图啊......这是上...
【基础影像应用篇】DAY3.物件辨识模型建立流程
开始在今日的学习前,让我们先来笔记一下此章节的学习重点吧! MusesAI小精灵带您了解影像辨识的流...