[Day 25] Android Studio 七日陨石开发:一起来布局 App 介面!
前言
昨天我们成功的运行了自己做的App。
但我们还有2个步骤要做:
- 布局App元件
- 实作App功能
User Research (with/by myself)
今天要来布局App的元件(我以最简需求来制作)
一个影像辨识需要甚麽元件呢?
-
显示标题的文字框
由於我只打算做一个页面(不会切来切去)
所以标题只好放在最上面 -
显示影像的视窗
这不用多说吧? 就最基本的让user看到现在辨识的图片。 -
执行辨识的按钮**(否决)**
关於这点我想过两个方案,
第一个是有辨识按钮,在user拍照後再进行辨识。
第二个是没有辨识按钮,拍完照立刻辨识。
虽然感觉第二个方案的互动性变少了,
但是使用app久了,uesr会觉得多这步骤很麻烦,
所以把辨识按钮取消掉。 -
打开相机的按钮
打开相机+辨识的功能都合并在"拍照"按钮就好。 -
打开相簿的按钮
这个按钮我有点犹豫要不要放上去,
因为在使用者体验上,及时辨识才是需要的。
打开相簿用已经存在手机上的相片进行辨识好像只有我(测试人员)会用到。
但身为教学的文章,
多介绍一个打开相簿的功能好像也合理。 -
显示辨识结果的文字框
不显示结果是要使用者通灵吗?
结论:只需要1、2、4、5、6,共5个元件!
元件摆放方式
-
拖拉

-
写code
        <Button
            android:id="@+id/button"
            android:layout_width="wrap_content"
            android:layout_height="wrap_content"
            android:text="Button" />
这两个方式是相对应的,
你拖拉元件之後,code就会自动产生,
你写code之後,元件就会出现在UI上。
- 注意元件所在的层级,有时候拖拉会不小心把元件放在元件上。
元件介绍与布局
TextView
    <TextView
        android:id="@+id/tv_header"
        android:layout_width="wrap_content"
        android:layout_height="wrap_content"
        android:layout_marginTop="20dp"
        android:text="AI Face Expression Recognition"
        android:textSize="24sp"
        app:layout_constraintEnd_toEndOf="parent"
        app:layout_constraintHorizontal_bias="0.5"
        app:layout_constraintStart_toStartOf="parent"
        app:layout_constraintTop_toTopOf="parent" />
- android:id = 元件名称 (我取为tv_header)
- android:layout_width/layout_height = 元件宽度/高度 (wrap_content代表刚好包覆内容的大小)
- android:layout_marginTop = 距离最上面边界多远 (20dp) (延伸阅读: UI的单位好乱!)
- android:text = 显示的文字
- android:textSize = 文字的大小
ImageView
    <ImageView
        android:id="@+id/imageView"
        android:layout_width="360dp"
        android:layout_height="360dp"
        android:layout_marginTop="20dp"
        app:layout_constraintEnd_toEndOf="parent"
        app:layout_constraintHorizontal_bias="0.5"
        app:layout_constraintStart_toStartOf="parent"
        app:layout_constraintTop_toBottomOf="@+id/tv_header"
        app:srcCompat="@android:drawable/sym_def_app_icon" />
- app:layout_constraintEnd_toEndOf、constraintStart_toStartOf、constraintTop_toTopOf
这个系列比较复杂,化简一下就是:
- constraint
方向为限制元件位置,End代表右侧,Start代表左侧,Top代表上侧,Bottom代表下侧。 - to
方向Of为参考相对於另一个元件的位置。
例如app:layout_constraintTop_toBottomOf="@+id/tv_header"翻译成白话文就是:
「我约束ImageView元件的最上侧要贴近tv_header的最下侧」
- app:layout_constraintHorizontal_bias = 左右相对间距的百分比,预设是0.5。
- app:srcCompat="@android:drawable/sym_def_app_icon" = 从drawble中选取图片当作预览画面
Button (拍照)
<Button
        android:id="@+id/btn_photo"
        android:layout_width="wrap_content"
        android:layout_height="wrap_content"
        android:layout_marginTop="32dp"
        android:backgroundTint="@color/teal_700"
        android:text="用拍照辨识"
        android:textSize="16sp"
        app:icon="@android:drawable/ic_menu_camera"
        app:layout_constraintEnd_toStartOf="@+id/btn_album"
        app:layout_constraintHorizontal_bias="0.5"
        app:layout_constraintStart_toStartOf="parent"
        app:layout_constraintTop_toBottomOf="@+id/imageView" />
Button (相簿)
    <Button
        android:id="@+id/btn_album"
        android:layout_width="wrap_content"
        android:layout_height="wrap_content"
        android:layout_marginTop="32dp"
        android:backgroundTint="@color/teal_700"
        android:text="从相簿辨识"
        android:textSize="16sp"
        app:icon="@android:drawable/ic_menu_gallery"
        app:layout_constraintEnd_toEndOf="parent"
        app:layout_constraintHorizontal_bias="0.5"
        app:layout_constraintStart_toEndOf="@+id/btn_photo"
        app:layout_constraintTop_toBottomOf="@+id/imageView" />
ListView (辨识结果)
当我要显示的结果有很多个的时候,
TextView就不堪使用了,
ListView可以让我一次显示多笔资料在一个列表中。
    <ListView
        android:id="@+id/listView"
        android:layout_width="match_parent"
        android:layout_height="0dp"
        android:scrollbarStyle="insideInset"
        android:visibility="visible"
        app:layout_constraintBottom_toBottomOf="parent"
        app:layout_constraintTop_toBottomOf="@+id/btn_photo" />
结语
最後我的们UI介面就完成了!
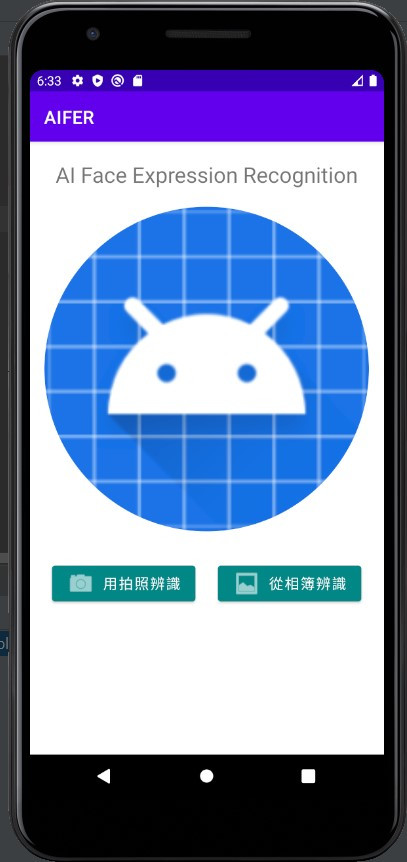
但现在看到的只是没有功能的外壳,
明天就来介绍如何让元件活起来吧~
<<: [Day25] Vue3 E2E Testing: Cypress 实战之 Todo MVC (上)
>>: EP 25 - [Ruby on Rails] 更新订单付款状态
Day24 read-write lock
前言 昨天讲完了 mutex, semaphore ,今天仍要继续朝着各种不同的 lock前进,昨天...
用 watch 搭配服用 immutable
在 《Clean Architecture》里第 6 章介绍 functional programm...
Outstanding ecommerce website design
只要编固定预算金额(不用一项一项说明),不要超过,如果可以省下的话,当福利金或拿去吃大餐,至少我们都...
[Day 21] 闭包 (Closure)是什麽?
前言 闭包的观念,其实就和前几天谈到的作用域、变数宣告和作用域的观念有关。只要有清楚知道其中差异,在...
[Android Studio 30天自我挑战] 变更Spinner字体及背景样式
Spinner选项的字体大小及背景都是可以更改的! 但Spinner的字体样式及背景无法像Textv...