[Android Studio 30天自我挑战] ListView 元件介绍
当遇到大量且有规律的资料就可以用ListView清单显示,例如:商品讯息,联络人...
ListView是可以上下滑动的清单列表,也可以做出各式各样的清单
ListView是继承AdapterView的类别,
但ListView仅是作为列表,用於装载显示数据(item),
然而item中的具体资料是由adapter来设定的。
这篇做一个利用ListView来显示列表
首先 先在activity_main.xml新增ListView
<?xml version="1.0" encoding="utf-8"?>
<LinearLayout xmlns:android="http://schemas.android.com/apk/res/android"
    xmlns:app="http://schemas.android.com/apk/res-auto"
    xmlns:tools="http://schemas.android.com/tools"
    android:layout_width="match_parent"
    android:layout_height="match_parent"
    android:orientation="vertical"
    tools:context=".MainActivity">
    <ListView
        android:id="@+id/listview"
        android:layout_width="match_parent"
        android:layout_height="match_parent" />

</LinearLayout>
接着在res/drawable下新增一个xml档来设计ListView的显示方式
<?xml version="1.0" encoding="utf-8"?>
<LinearLayout xmlns:android="http://schemas.android.com/apk/res/android"
    android:layout_width="match_parent"
    android:layout_height="match_parent"
    android:padding="16dp"
    android:orientation="horizontal">

    <ImageView
        android:layout_width="75dp"
        android:layout_height="75dp"
        android:src="@drawable/ic_launcher_background"
        android:id="@+id/image"/>

    <LinearLayout
        android:layout_width="match_parent"
        android:layout_height="wrap_content"
        android:orientation="vertical">

        <TextView
            android:id="@+id/otitle"
            android:layout_width="match_parent"
            android:layout_height="wrap_content"
            android:text="Title"
            android:textColor="#000"
            android:textStyle="bold"
            android:layout_margin="5dp"
            android:textSize="20dp"/>

        <TextView
            android:id="@+id/ttitle"
            android:layout_width="match_parent"
            android:layout_height="wrap_content"
            android:text="sec Title"
            android:textColor="#a9a9a9"
            android:textStyle="bold"
            android:layout_margin="5dp"
            android:textSize="15dp"/>

    </LinearLayout>

</LinearLayout>
画面设定好之後,将所需的图片放入res/drawable里
接着到MainActivity.java里面设定
package com.example.ittttt;
import androidx.annotation.NonNull;
import androidx.annotation.Nullable;
import androidx.appcompat.app.AppCompatActivity;
import android.content.Context;
import android.os.Bundle;
import android.view.LayoutInflater;
import android.view.View;
import android.view.ViewGroup;
import android.widget.AdapterView;
import android.widget.ArrayAdapter;
import android.widget.ImageView;
import android.widget.ListView;
import android.widget.TextView;
import android.widget.Toast;
public class MainActivity extends AppCompatActivity {
ListView listView;
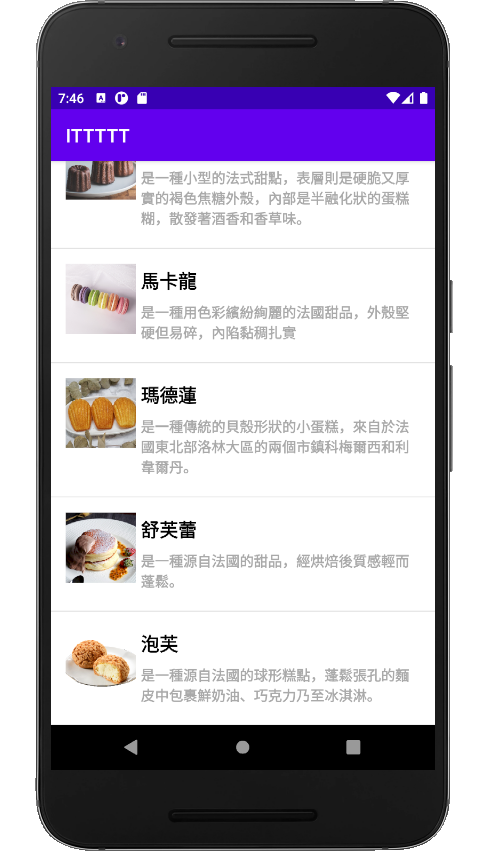
String Title[] = {"可丽露","马卡龙","玛德莲","舒芙蕾","泡芙"};
String sec[] = {"是一种小型的法式甜点,表层则是硬脆又厚实的褐色焦糖外壳,内部是半融化状的蛋糕糊,散发着酒香和香草味。",
"是一种用色彩缤纷绚丽的法国甜品,外壳坚硬但易碎,内陷黏稠扎实",
"是一种传统的贝壳形状的小蛋糕,来自於法国东北部洛林大区的两个市镇科梅尔西和利韦尔丹。",
"是一种源自法国的甜品,经烘焙後质感轻而蓬松。",
"是一种源自法国的球形糕点,蓬松张孔的面皮中包裹鲜奶油、巧克力乃至冰淇淋。"};
//将图片档放入image阵列里
int image[] = {R.drawable.coco,R.drawable.mar,R.drawable.der,R.drawable.su,R.drawable.pabu};
@Override
protected void onCreate(Bundle savedInstanceState) {
super.onCreate(savedInstanceState);
setContentView(R.layout.activity_main);
listView = findViewById(R.id.listview);
//新增一个Adapter
MyAdapter myAdapter = new MyAdapter(this,Title,sec,image);
listView.setAdapter(myAdapter);
}
class MyAdapter extends ArrayAdapter<String>{
Context context;
String rTitle[];
String rsec[];
int rimage[];
MyAdapter (Context context,String title[],String sec[],int image[]){
super(context,R.layout.row,R.id.otitle,title);
this.context = context;
this.rTitle = title;
this.rsec = sec;
this.rimage = image;
}
@NonNull
@Override
public View getView(int position, @Nullable View convertView, @NonNull ViewGroup parent) {
LayoutInflater layoutInflater = (LayoutInflater)getApplicationContext().getSystemService(Context.LAYOUT_INFLATER_SERVICE);
View row = layoutInflater.inflate(R.layout.row,parent,false);
ImageView images = row.findViewById(R.id.qimage);
TextView textView = row.findViewById(R.id.otitle);
TextView textView1 = row.findViewById(R.id.ttitle);
images.setImageResource(rimage[position]);
textView.setText(rTitle[position]);
textView1.setText(rsec[position]);
return row;
}
}
}
>>: 【从零开始的Swift开发心路历程-Day24】天气预报App实作Part3
22.移转 Aras PLM大小事-流程签核动态指派(1)
这一篇接续16.移转 Aras PLM大小事-系统使用者与角色 起初是想要将公司内的BPM专案请购的...
RxJS 工具类型 Operators (1) - tap / toArray / delay / delayWhen
今天要介绍的是「工具类型」的 Operators,也都不太困难,很好理解,继续轻松学习吧! tap ...
【Day 27】Design Patterns with Go I:Simple Factory / Factory / Abstract Factory
刚学一点 Go, 除了能够使用别人写好的 modules, 为了程序码的可扩充性,也需要理解 De...
Day 04 Mbed Simulator
Before running basic application using Mbed Simula...
【第三天 - Flutter Route 规划分享】
今日的程序码 => GitHub 前言 大家应该都知道 Flutter 的跳页都会分成 2 ...