Day 21 - 依 Home 前台页面分析拆解後,逐步建立後台功能 - GridView 事件应用 - ASP.NET Web Forms C#
=x= 🌵 建立 Yacht Manager - Content Page 後台页面。
Home 前台页面分析 :

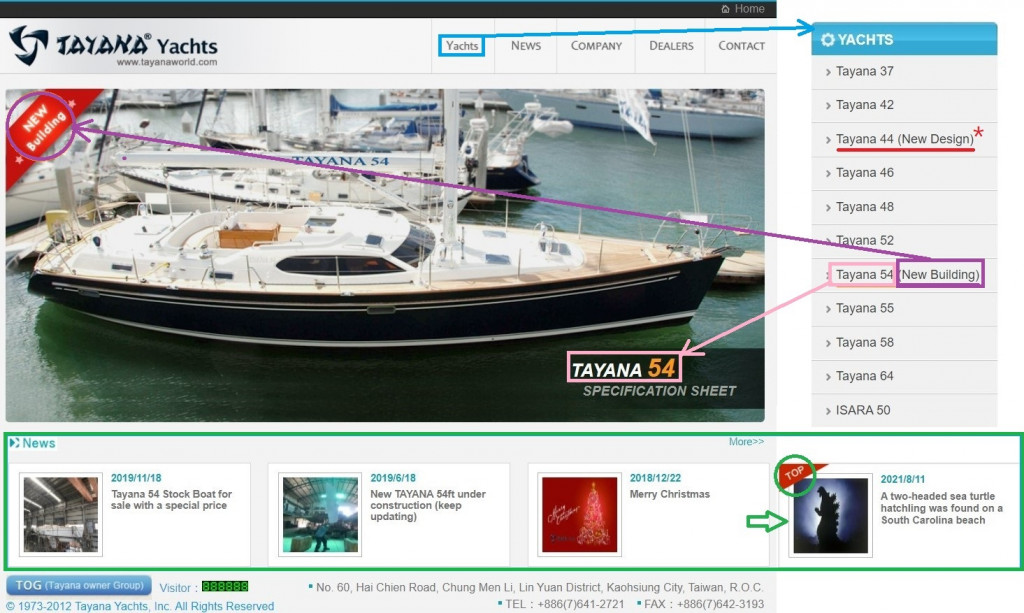
📌 在 Home 页面的轮播大图照片,可以知道每个游艇型号都会有一张图,图片右下角会对应更换游艇型号,而左上角会对应游艇型号是新建造就出现红色标签,游艇型号可从 Yachts 页面侧边栏看到全部游艇型号及特殊注记,点击侧边栏会发现如新闻列表页的模式,会在网址列出现网址传值是使用 GUID 随机码来对应资料;另外,在首页的轮播大图下方有 3 组新闻图卡,查看原始码可以发现有个 Top 标签,是用来加注焦点新闻的图标,效果可以参考上图右下区块。
🌵 游艇型号是新设计并没有配合对应的图标,可以自行拿新建造的图片修图後使用。
🌵 新闻图卡的 Top 标签,可以将 HTML 里的
style="display: none"拿掉就能看到效果。
Yacht Manager 後台页面介绍 :
-
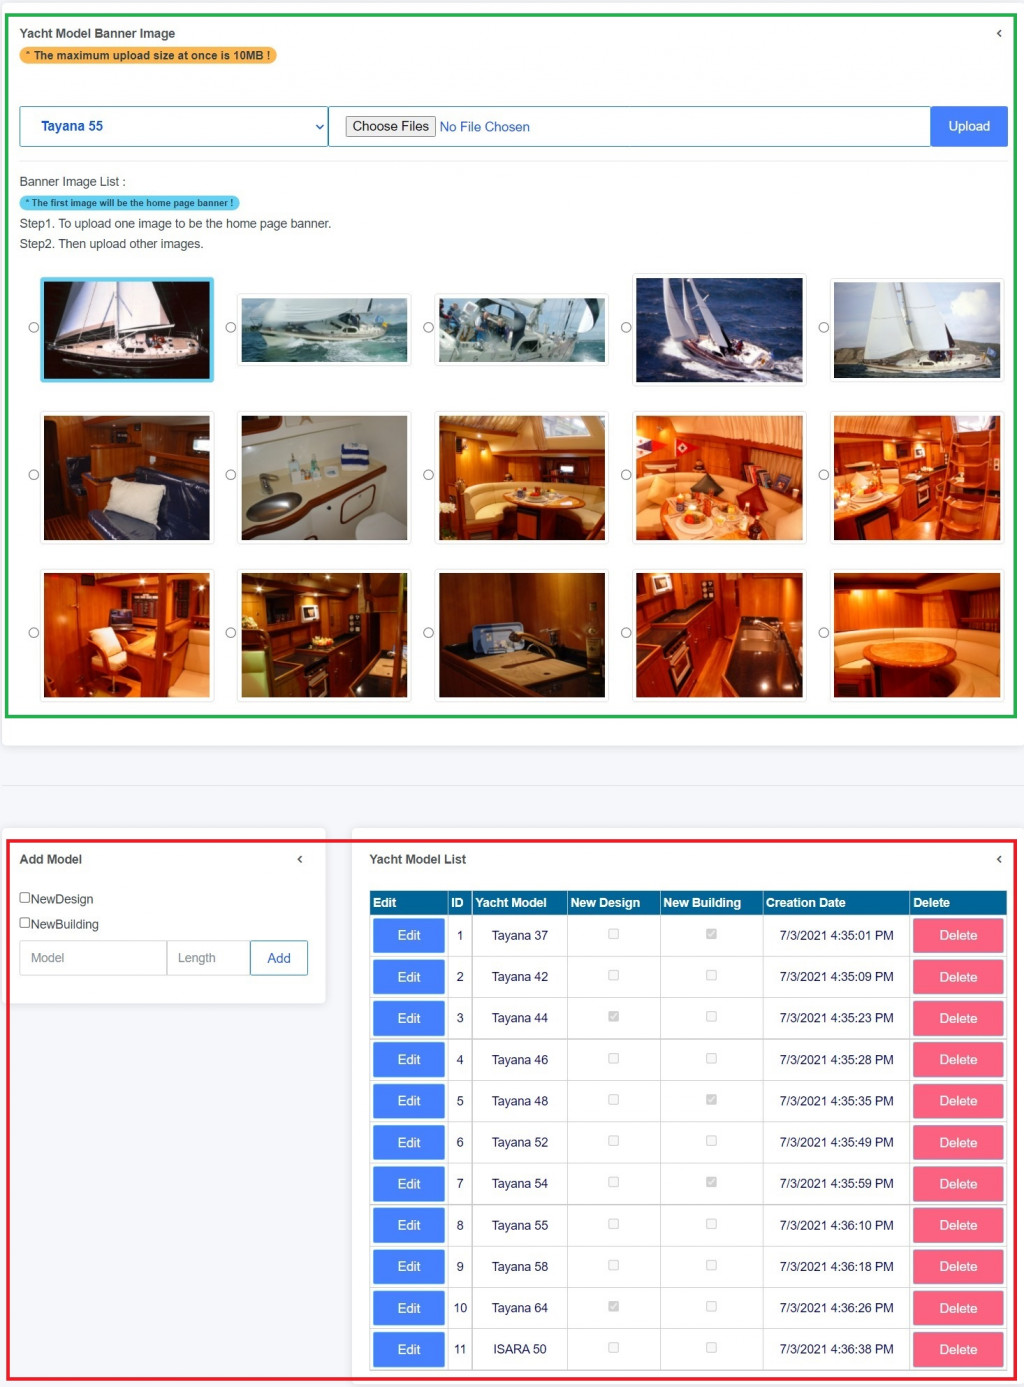
🧠 上半部 - 多图上传相簿功能并添加下拉式选单配合切换。
-
🧠 下半部 - 左侧含勾选项目及2个输入框的游艇型号添加区,右侧为游艇型号列表。
Yacht Manager 後台实作 :
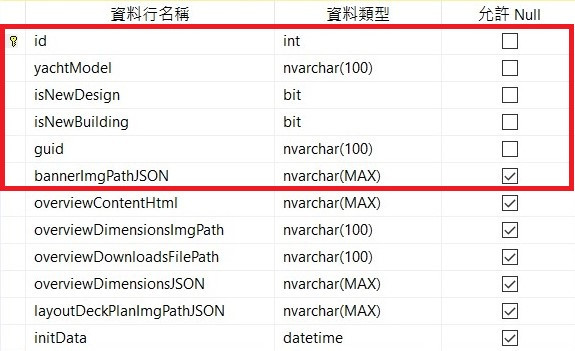
1. 建立游艇型号资料表,红色区域为首页关联相关资料
- 🌵 相关预设值请参考之前文章建立,下半部资料会在之後文章介绍。
2. 上半部 - 多图上传相簿功能并添加下拉式选单配合切换介面设计参考如下
<div class="input-group my-3">
    <asp:DropDownList ID="DropDownList1" runat="server" AutoPostBack="True" DataSourceID="SqlDataSource1" DataTextField="yachtModel" DataValueField="id" Width="50%" Font-Bold="True" class="btn btn-outline-primary dropdown-toggle" OnSelectedIndexChanged="DropDownList1_SelectedIndexChanged"></asp:DropDownList>
    <asp:SqlDataSource ID="SqlDataSource1" runat="server" ConnectionString="<%$ ConnectionStrings:TayanaYachtConnectionString %>" SelectCommand="SELECT [yachtModel], [id] FROM [Yachts]"></asp:SqlDataSource>
    <asp:FileUpload ID="imageUpload" runat="server" class="btn btn-outline-primary btn-block" AllowMultiple="True" />
    <asp:Button ID="UploadBtn" runat="server" Text="Upload" class="btn btn-primary" OnClick="UploadBtn_Click" />
</div>
<hr />
<h6>Banner Image List :</h6>
<h6><span class="badge badge-pill badge-success text-dark">* The first image will be the home page banner !</span></h6>
<h6>Step1. To upload one image to be the home page banner.</h6>
<h6>Step2. Then upload other images.</h6>
<asp:RadioButtonList ID="RadioButtonList" runat="server" class="my-3 mx-auto" AutoPostBack="True" CellPadding="10" RepeatColumns="5" RepeatDirection="Horizontal" OnSelectedIndexChanged="RadioButtonListH_SelectedIndexChanged" ></asp:RadioButtonList>
<asp:Button ID="DelImageBtn" runat="server" Text="Delete Image" type="button" class="btn btn-danger btn-sm" OnClientClick="return confirm('Are you sure you want to delete?')" Visible="False" OnClick="DelHImageBtn_Click" />
- 👀 DropDownList 控制项资料设定请参考 Day9 文章介绍。
3. 下半部 - 左侧含勾选项目及2个输入框的游艇型号添加区介面设计参考如下
<asp:CheckBox ID="CBoxNewDesign" runat="server" Text="NewDesign" Width="50%" />
<asp:CheckBox ID="CBoxNewBuilding" runat="server" Text="NewBuilding" Width="50%" />
<div class="input-group mb-3">
    <asp:TextBox ID="TBoxAddYachtModel" runat="server" type="text" class="form-control" placeholder="Model" Width="30%" ></asp:TextBox>
    <asp:TextBox ID="TBoxAddYachtLength" runat="server" type="text" class="form-control" placeholder="Length" ></asp:TextBox>
    <div class="input-group-append">
        <asp:Button ID="BtnAddYacht" runat="server" Text="Add" class="btn btn-outline-primary btn-block" OnClick="BtnAddYacht_Click" />
    </div>
</div>
-
🌵 游艇型号的数字其实是长度英尺的含意,是行业的惯性用语。
-
🌵 分开输入是因为其它页面会取出後面的数值,及控制游艇型号出现时的排版效果。
4. 下半部 - 右侧为游艇型号列表介面设计参考如下
<asp:GridView ID="GridView1" runat="server" AutoGenerateColumns="False" DataKeyNames="id" DataSourceID="SqlDataSource2" BackColor="White" BorderColor="#CCCCCC" BorderStyle="None" BorderWidth="1px" CellPadding="3" Width="100%" OnRowDeleted="DeletedModel" OnRowUpdated="UpdatedModel" OnRowDeleting="DeletingModel">
  <Columns>
      <asp:CommandField ButtonType="Button" CancelText="Cancel" DeleteText="Delete" EditText="Edit" HeaderText="Edit" InsertText="Insert" NewText="New" SelectText="Select" ShowEditButton="True"  ControlStyle-CssClass='btn btn-primary btn-block' ControlStyle-BorderColor="#66CCFF" ControlStyle-BorderStyle="Solid" ControlStyle-BorderWidth="1px" ControlStyle-ForeColor="White" >
      <ControlStyle BorderColor="#66CCFF" BorderWidth="1px" BorderStyle="Solid" CssClass="btn btn-primary btn-block" ForeColor="White"></ControlStyle>
      </asp:CommandField>
      <asp:BoundField DataField="id" HeaderText="ID" InsertVisible="False" ReadOnly="True" SortExpression="id" />
      <asp:BoundField DataField="yachtModel" HeaderText="Yacht Model" SortExpression="yachtModel" />
      <asp:CheckBoxField DataField="isNewDesign" HeaderText="New Design" SortExpression="isNewDesign" />
      <asp:CheckBoxField DataField="isNewBuilding" HeaderText="New Building" SortExpression="isNewBuilding" />
      <asp:BoundField DataField="initData" HeaderText="Creation Date" SortExpression="initData" InsertVisible="False" ReadOnly="True" />
      <asp:TemplateField HeaderText="Delete" ShowHeader="False">
          <ItemTemplate>
              <asp:LinkButton ID="BtnDeleteCountry" runat="server" CommandName="Delete" Text="Delete" OnClientClick="return confirm('Are you sure you want to delete?')" CausesValidation="False"></asp:LinkButton>
          </ItemTemplate>
          <ControlStyle BorderColor="#66CCFF" BorderStyle="Solid" BorderWidth="1px" CssClass="btn btn-danger btn-block" ForeColor="White" />
      </asp:TemplateField>
  </Columns>
  <FooterStyle BackColor="White" ForeColor="#000066" />
  <HeaderStyle BackColor="#006699" Font-Bold="True" ForeColor="White" />
  <PagerStyle BackColor="White" ForeColor="#000066" HorizontalAlign="Left" />
  <RowStyle ForeColor="#000066" />
  <SelectedRowStyle BackColor="#669999" Font-Bold="True" ForeColor="White" />
  <SortedAscendingCellStyle BackColor="#F1F1F1" />
  <SortedAscendingHeaderStyle BackColor="#007DBB" />
  <SortedDescendingCellStyle BackColor="#CAC9C9" />
  <SortedDescendingHeaderStyle BackColor="#00547E" />
</asp:GridView>
<asp:SqlDataSource ID="SqlDataSource2" runat="server" ConnectionString="<%$ ConnectionStrings:TayanaYachtConnectionString %>" SelectCommand="SELECT [id], [yachtModel], [isNewDesign], [isNewBuilding], [initData] FROM [Yachts]" DeleteCommand="DELETE FROM [Specification] WHERE [yachtModel_ID] = @id; DELETE FROM [Yachts] WHERE [id] = @id" UpdateCommand="UPDATE [Yachts] SET [yachtModel] = @yachtModel, [isNewDesign] = @isNewDesign, [isNewBuilding] = @isNewBuilding WHERE [id] = @id">
  <DeleteParameters>
      <asp:Parameter Name="id" Type="Int32" />
  </DeleteParameters>
  <UpdateParameters>
      <asp:Parameter Name="isNewBuilding" Type="Boolean" />
      <asp:Parameter Name="isNewDesign" Type="Boolean" />
      <asp:Parameter Name="yachtModel" Type="String" />
      <asp:Parameter Name="id" Type="Int32" />
  </UpdateParameters>
</asp:SqlDataSource>
-
🌵 OnRowDeleting 事件用来在删除的同时,先取得型号并用来删除相关图档及资料。
-
🌵 Command 加入同步删除关联资料的语法,可在制作後续页面时回头修改。
-
🌵 Parameter 需注意 CheckBoxField 的 Type 是 Boolean 类型。
-
👀 GridView 事件参考官网资料 : GridView 类别
5. 在页面後置程序码加入游艇型号 Add 按钮 OnClick 事件程序码如下
protected void BtnAddYacht_Click(object sender, EventArgs e)
{
    //插入空格区隔文字跟数字 (页面细项标题会用到)
    string yachtModelStr = TBoxAddYachtModel.Text + " " + TBoxAddYachtLength.Text;
    //产生 GUID 随机码 + 时间2位秒数 (加强避免重复)
    DateTime nowTime = DateTime.Now;
    string nowSec = nowTime.ToString("ff");
    string guidStr = Guid.NewGuid().ToString().Trim() + nowSec;
    //取得勾选项目
    string isNewDesign = CBoxNewDesign.Checked.ToString();
    string isNewBuilding = CBoxNewBuilding.Checked.ToString();

    //插入游艇型号基本资料
    SqlConnection connection = new SqlConnection(WebConfigurationManager.ConnectionStrings["TayanaYachtConnectionString"].ConnectionString);
    string sql = "INSERT INTO Yachts (yachtModel, isNewDesign, isNewBuilding, guid) VALUES (@yachtModelStr, @isNewDesign, @isNewBuilding, @guidStr)";
    SqlCommand command = new SqlCommand(sql, connection);
    command.Parameters.AddWithValue("@yachtModelStr", yachtModelStr);
    command.Parameters.AddWithValue("@isNewDesign", isNewDesign);
    command.Parameters.AddWithValue("@isNewBuilding", isNewBuilding);
    command.Parameters.AddWithValue("@guidStr", guidStr);
    connection.Open();
    command.ExecuteNonQuery();
    connection.Close();

    //画面渲染
    DropDownList1.DataBind();
    GridView1.DataBind();
    TBoxAddYachtModel.Text = "";
    TBoxAddYachtLength.Text = "";
    CBoxNewDesign.Checked = false;
    CBoxNewBuilding.Checked = false;
    DropDownList1.SelectedValue = yachtModelStr; //设定下拉选单选取项为新增项
    RadioButtonList.Items.Clear(); //新添加型号还没有任何图片,记得要清空画面
}
6. 加入游艇型号列表的 Delete 按钮 OnRowDeleting 事件程序码如下
protected void DeletingModel(object sender, GridViewDeleteEventArgs e)
{
    //在删除状态下先取得删除项的索引键栏位值
    string idStr = "";
    foreach (DictionaryEntry entry in e.Keys) {
        idStr = entry.Value.ToString();
    }

    //取出删除的游艇型号的组图资料
    string savePath = Server.MapPath("~/Tayanahtml/upload/Images/");
    SqlConnection connection = new SqlConnection(WebConfigurationManager.ConnectionStrings["TayanaYachtConnectionString"].ConnectionString);
    string sqlBannerImg = "SELECT bannerImgPathJSON FROM Yachts WHERE id = @idStr";
    SqlCommand command = new SqlCommand(sqlBannerImg, connection);
    command.Parameters.AddWithValue("@idStr", idStr);
    connection.Open();
    SqlDataReader reader = command.ExecuteReader();
    if (reader.Read()) {
        string loadJson = HttpUtility.HtmlDecode(reader["bannerImgPathJSON"].ToString());
        //反序列化JSON格式
        savePathList = JsonConvert.DeserializeObject<List<ImagePath>>(loadJson);
    }
    connection.Close();
    //删除组图实际图档
    for (int i = 0; i < savePathList.Count; i++) {
        File.Delete(savePath + savePathList[i].SavePath);
    }

        //以下为制作後续页面後需执行的程序码
    //取出删除的游艇型号的 Layout 组图资料
    string sqlLayoutImg = "SELECT layoutDeckPlanImgPathJSON FROM Yachts WHERE id = @idStr";
    SqlCommand command2 = new SqlCommand(sqlLayoutImg, connection);
    command2.Parameters.AddWithValue("@idStr", idStr);
    connection.Open();
    SqlDataReader reader2 = command2.ExecuteReader();
    if (reader2.Read()) {
        string loadJson = HttpUtility.HtmlDecode(reader2["layoutDeckPlanImgPathJSON"].ToString());
        //反序列化JSON格式
        savePathList = JsonConvert.DeserializeObject<List<ImagePath>>(loadJson);
    }
    connection.Close();
    //删除组图实际图档
    for (int i = 0; i < savePathList.Count; i++) {
        File.Delete(savePath + savePathList[i].SavePath);
    }

    //取出删除的游艇型号的 overview 规格图片资料
    string sqlDimImg = "SELECT overviewDimensionsImgPath FROM Yachts WHERE id = @idStr";
    SqlCommand command3 = new SqlCommand(sqlDimImg, connection);
    command3.Parameters.AddWithValue("@idStr", idStr);
    connection.Open();
    SqlDataReader reader3 = command3.ExecuteReader();
    if (reader3.Read()) {
        string imgPath = reader3["overviewDimensionsImgPath"].ToString();
        //删除实际图档
        if (!String.IsNullOrWhiteSpace(imgPath)) {
            File.Delete(savePath + imgPath);
        }
    }
    connection.Close();

    //取出删除的游艇型号的 overview 的 PDF 档案资料
    string sqlPDF = "SELECT overviewDownloadsFilePath FROM Yachts WHERE id = @idStr";
    SqlCommand command4 = new SqlCommand(sqlPDF, connection);
    command4.Parameters.AddWithValue("@idStr", idStr);
    connection.Open();
    SqlDataReader reader4 = command4.ExecuteReader();
    if (reader4.Read()) {
        string imgPath = reader4["overviewDownloadsFilePath"].ToString();
        //删除实际图档
        if (!String.IsNullOrWhiteSpace(imgPath)) {
            File.Delete(savePath + imgPath);
        }
    }
    connection.Close();
}
- 🌵 删除型号 Layout 组图之後相关删除图档程序码,可於之後页面制作完成後再添加。
7. 在 Page_Load 事件加入以下程序码载入相簿图片
//宣告 List 方便用 Add 依序添加图档资料
private List<ImagePath> savePathList = new List<ImagePath>();
protected void Page_Load(object sender, EventArgs e)
{
    if (!IsPostBack) {
        DropDownList1.DataBind(); //先绑定,图片才能取到型号
        loadImageList();
    }
}
8. 参考相簿功能文章建立相簿功能逻辑,loadImageList(); 为相簿功能中的读取图片功能
private void loadImageList()
{
    //取得下拉选单选取值
    string selModel_id = DropDownList1.SelectedValue;
    //连线资料库取得首页轮播图资料
    SqlConnection connection = new SqlConnection(WebConfigurationManager.ConnectionStrings["TayanaYachtConnectionString"].ConnectionString);
    string sqlLoad = "SELECT bannerImgPathJSON FROM Yachts WHERE id = @selModel_id";
    SqlCommand command = new SqlCommand(sqlLoad, connection);
    command.Parameters.AddWithValue("@selModel_id", selModel_id);
    connection.Open();
    SqlDataReader reader = command.ExecuteReader();
    if (reader.Read()) {
        string loadJson = HttpUtility.HtmlDecode(reader["bannerImgPathJSON"].ToString());
        //反序列化JSON格式
        savePathList = JsonConvert.DeserializeObject<List<ImagePath>>(loadJson);
    }
    connection.Close();
    if (savePathList?.Count > 0) {
        //预设第一张上传的图片为该游艇型号首页图片
        bool firstCheck = true;
        foreach (var item in savePathList) {
            if (firstCheck) {
                //替首张图片加上醒目色彩边框
                ListItem listItem = new ListItem($"<img src='/Tayanahtml/upload/Images/{item.SavePath}' alt='thumbnail' class='img-thumbnail bg-success' width='200px'/>", item.SavePath);
                RadioButtonList.Items.Add(listItem);
                firstCheck = false;
            }
            else {
                ListItem listItem = new ListItem($"<img src='/Tayanahtml/upload/Images/{item.SavePath}' alt='thumbnail' class='img-thumbnail' width='200px'/>", item.SavePath);
                RadioButtonList.Items.Add(listItem);
            }
        }
    }
    DelImageBtn.Visible = false; //删除钮有选择图片时才显示
}
-
🌵 SQL 语法的 WHERE 限制条件记得要改成下拉选单所选取的值,取值方法如下 :
DropDownList1.SelectedValue; -
👺 相簿管理相关功能请参考 Day12 文章,完成完整功能建立。
9. 加入游艇型号列表的 Delete 按钮 OnRowDeleted 事件程序码如下
protected void DeletedModel(object sender, GridViewDeletedEventArgs e)
{
    RadioButtonList.Items.Clear(); //清空图片选项
    DropDownList1.DataBind(); //刷新下拉选单
    loadImageList(); //取得图片选项
}
10. 加入游艇型号列表的 Updated 按钮 OnRowUpdated 事件程序码如下
protected void UpdatedModel(object sender, GridViewUpdatedEventArgs e)
{
    DropDownList1.DataBind(); //刷新下拉选单
}
11. 加入游艇型号下拉选单选择改变时的 OnSelectedIndexChanged 事件程序码如下
protected void DropDownList1_SelectedIndexChanged(object sender, EventArgs e)
{
    RadioButtonList.Items.Clear(); //清空图片选项
    loadImageList(); //取得图片选项
}
12. 模拟页面後测试功能,Yacht Manager 後台完成 ~
本日总结 :
📢 本日实作算是之前实作的整合版,只要整合之前实作过的功能就可以完成,需要注意的是删除游艇型号时,要一并删除型号相关的资料包含时计图档,而为了在删除型号时一并删除其它资料,所以要先取得删除的游艇型号,但如果取型号在一般的 OnRowDeleted 执行时,因为这时候型号已被删除所以无法取得,在查了微软官网的 GridView 事件後,发现可以把取型号的行为在删除进行中的 OnRowDeleting 事件里执行,并且执行相关资料删除的行为,算是新的知识点。
- 明日将介绍制作 Home Page - 轮播图後端的相关细节。
<<: Day. 27 Binary Tree Level Order Traversal
[Day 27] 中场休息 - 换边发球,heroku布署完整步骤
上一篇我们介绍完了aws如何一步一步把环境架起来 这一篇我们来顺便把前面heroku的坑也填上吧 这...
Day 21. Zabbix 自动化通知介绍
首先在介绍自动化通知之前,需要介绍是如何被触发的。 触发器的设定也是跟着套用样板时候被设定。 具体可...
【少女人妻的30天Elastic】Day 28 : App Search_API 介绍与应用_Analytics
Aloha!又是我少女人妻 Uerica!铁人赛终於快结束拉,没想到默默的坚持到快要终点了,我家狗...
[DAY 14] getRange 与 getDataRange
接下来说说我觉得非常好用的两个函数 getRange 与 getDataRange 这两个函数在取得...
[Day4] 执行环境与执行堆叠
在昨天内容中可以知道,JavaScript 采用了静态作用域,函式在定义时就已经确定作用域,而在产生...