Angular建立专案(三)(Day18)
还记得我们昨天说到的主程序区块吗 ?

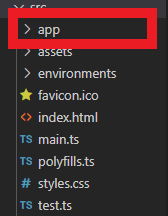
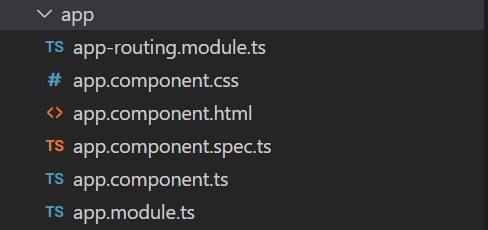
让我们把app资料夹打开来,可以看到里面的内容物长这样。

接着打开app.component.html,并且把里面的内容都清空。
打指令开启专案时,只会看到空白画面。
ng serve --open
此时在app.component.html加上
<ul>
<li>Test1</li>
<li>Test2</li>
</ul>
储存後,Vscode就会帮我们自动重新编译喔!
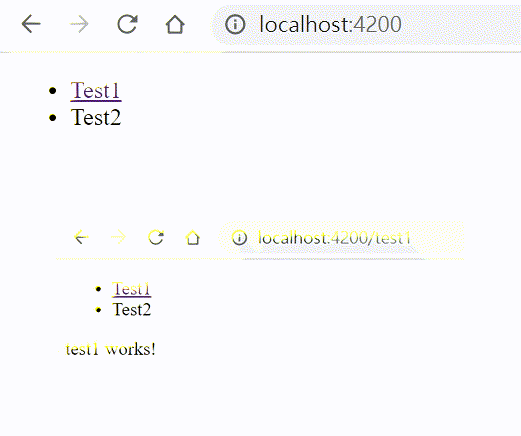
你会看到画面上出现

可以发现我们更改的结果已经显示在上面了
打开 app.component.ts档案
import { Component } from '@angular/core';

@Component({
  selector: 'app-root',
  templateUrl: './app.component.html',
  styleUrls: ['./app.component.css']
})
export class AppComponent {
  title = 'StockAngular';
}
此时你是否注意到Component这个字眼呢?
以下让我来说明Component的功用
Component:
Components are the main building block for Angular applications. Each component consists of:
An HTML template that declares what renders on the page
A Typescript class that defines behavior
A CSS selector that defines how the component is used in a template
Optionally, CSS styles applied to the template
从文件上可以看出,Angular对Component的定义就是必须包含至少三个元件
1.html模板(app.component.html)
2.一个ts档案定义这些元件的设定 (app.component.ts)
3.CSS selector: 当外面要引用这个组件时需要使用的名称定义,此处定义是app-root
打开index.html
<!doctype html>
<html lang="en">
<head>
  <meta charset="utf-8">
  <title>StockAngular</title>
  <base href="/">
  <meta name="viewport" content="width=device-width, initial-scale=1">
  <link rel="icon" type="image/x-icon" href="favicon.ico">
</head>
<body>
  <app-root></app-root> #由此引入appComponent
</body>
</html>
4.对template的css设定(可选)
这里其实体现了Angular跟传统前端不一样的地方。
传统情况我们写前端是DOM元素主导,而Angular框架则是交由组件来主导,
透过组件我们可以更好的降低程序之间的耦合性。
app-routing.module.ts:
import { NgModule } from '@angular/core';
import { RouterModule, Routes } from '@angular/router';

const routes: Routes = [];

@NgModule({
  imports: [RouterModule.forRoot(routes)],
  exports: [RouterModule]
})
export class AppRoutingModule { }
路由模组
顾名思义就是这个档案是负责管理你的网页打什麽网址会导到哪个组件去。
让我们先新建一个测试组件 Component-Test1
ng generate component Test1 #新增组件CLI指令 也可以简化成 ng g c Test1

CREATE src/app/test1/test1.component.html (20 bytes)
CREATE src/app/test1/test1.component.spec.ts (619 bytes)
CREATE src/app/test1/test1.component.ts (271 bytes)
CREATE src/app/test1/test1.component.css (0 bytes)
UPDATE src/app/app.module.ts (471 bytes) #帮我们自动在模组管理的类别中引入新的组件
可以发现 Angular CLI 会自动在app资料夹内再新增一个资料夹是test1,
里面新增的内容除了没有app-routing.module.ts&app.module.ts之外
其他都跟app资料夹里面的东西一样
此时让我们来设定Component-Test1的路由,打开app-routing.module.ts
import { NgModule } from '@angular/core';
import { RouterModule, Routes } from '@angular/router';
import { Test1Component } from './test1/test1.component';

const routes: Routes = [
  { path: 'test1', component: Test1Component } #新增路由配置
];

@NgModule({
  imports: [RouterModule.forRoot(routes)],
  exports: [RouterModule]
})
export class AppRoutingModule { }
接着是app.component.html
# routerLink:使元素成为路由连结,并透过router-outlet开启组件的模板
<ul>
<li><a routerLink="/test1">Test1</a></li>
<li>Test2</li>
</ul>

<router-outlet></router-outlet>
点下去就可以发现tes1 works的字样出现罗~!

从上述介绍可以知道,Angular会将各种应用模组化,将程序码依照功能分类成各式组件,各司其职的去执行,不但让功能好维护,也降低程序间的耦合性,那管理着这些模组的档案是什麽呢?
就是接着要介绍的 app.module.ts
import { NgModule } from '@angular/core';
import { BrowserModule } from '@angular/platform-browser';

import { AppRoutingModule } from './app-routing.module';
import { AppComponent } from './app.component';
import { Test1Component } from './test1/test1.component';

@NgModule({
  declarations: [
    AppComponent,
    Test1Component
  ],
  imports: [
    BrowserModule,
    AppRoutingModule
  ],
  providers: [],
  bootstrap: [AppComponent],
})
export class AppModule { }
NgModule:
NgModule metadata does the following:
- Declares which components, directives, and pipes belong to the module.
- Makes some of those components, directives, and pipes public so that other module's component >templates can use them.
- Imports other modules with the components, directives, and pipes that components in the >current module need.
- Provides services that other application components can use.
简单来说就是规范什麽样的组件、service.....在app模组可以使用或开放给其他模组也可以使用,并且也设定如果要使用app模组要先载入什麽东西。
那今天就先讲到这里了喔~~
<<: 17 - Visual Studio Code - 代码编辑器与它的插件
>>: 【day18】聊天室(上) X Realtime database
我最喜欢的五个认证
PMP 专案管理是组织中最基本的活动之一。作为计画(program)和投资组合(portfolio...
伸缩自如的Flask [day 26] Flask with ML
github: https://github.com/wilsonsujames/ML_on_web...
新零售行销模式案例,全通路时代来临该如何布局
新零售行销模式案例,全通路时代来临该如何布局,一直以来都在担任辅导顾问为中小企业解决网路行销问题但都...
用 Python 畅玩 Line bot - 13:MongoDB 操作
连接资料库与资料表 连接到对应的资料库与资料表: import pymongo myclient =...
Day21-Go档案处理
前言 Go 语言中的有关档案操作的工具,不可不提到标准函式库里边的io/ioutil 和 os pa...