多重影分身之术,让你的分身去做事情
影分身之术
网站正式上线运行时,会开始有使用者访问浏览,流量就会开始出现变化,当网站推广新活动或周年庆,就有可能出现庞大的流量访问网站,可能导致原来在ALB後面的机器或Container负荷不了庞大的流量,而出现网站挂掉的可能性。当然可以手动临时增加机器数量,但AWS还有提供更方便的服务,AutoScaling Group(ASG)可以根据CPU和Memory使用量,以及Request数量,进行增加、减少,可以减少手动时间,进而解决大量流量的问题。
昨天撰写的CDK,会继续使用,并且增加ASG这个服务
将Fargate Service加入ASG的设定,并设定最大与最小数量
scale_policy = svc.auto_scale_task_count(
    max_capacity=5,
    min_capacity=1
)
设定ASG触发规则,这里采用Request数量去增加和减少Container的数量
scale_policy.scale_on_request_count(
    "asgPolicy",
    requests_per_target=5,
    target_group=tg,
    scale_in_cooldown=core.Duration.seconds(60),
    scale_out_cooldown=core.Duration.seconds(60)
)
requests_per_target: 根据CloudWatch的规则,若ALB後面的target收到超过定义的requests数量,就进行扩增
cooldown: ASG冷却时间的设定,主要以机器在扩增时,因为大量的流量,而扩增不必要的机器,而导致不必要的花费。需要根据实务情况做设定
以上就是增加ASG的方法,接下来看实际情况
测试方法
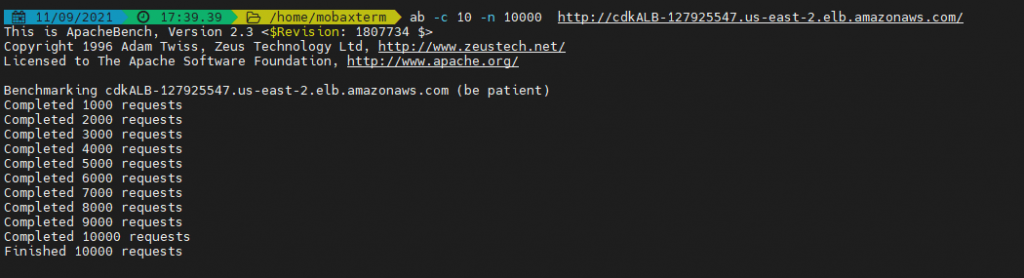
这里主要使用ApacheBench(ab)这个指令,来去测试网站的运行效能,进而模拟大量的Requests数量
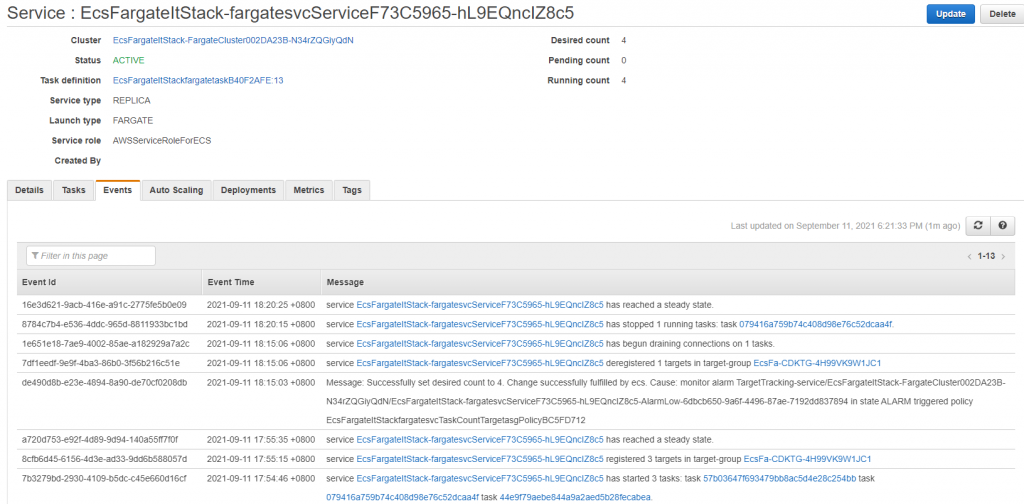
CloudWatch要触发Scale-out时候,要先从ok变成alarm,才会触发,在下方图片要触发需要3分钟内超过5个Requests才做触发
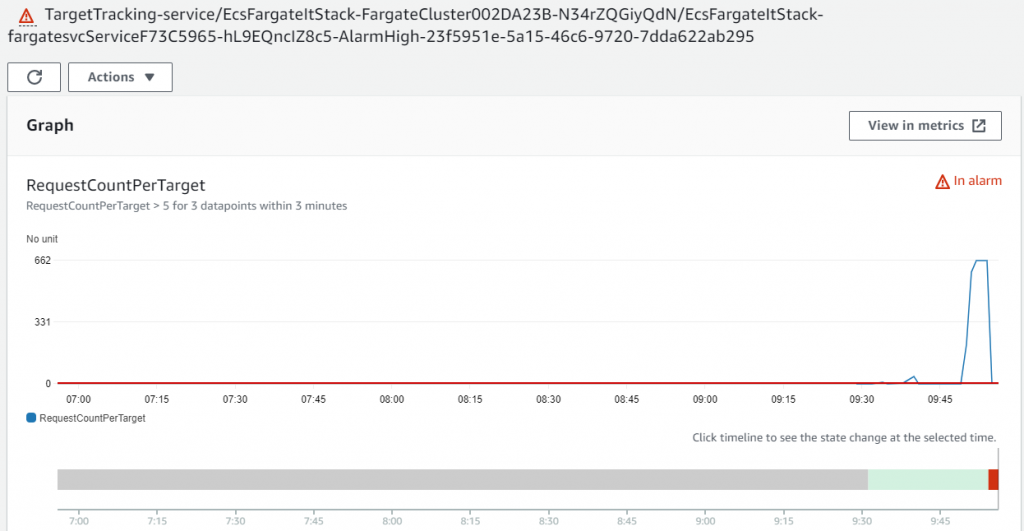
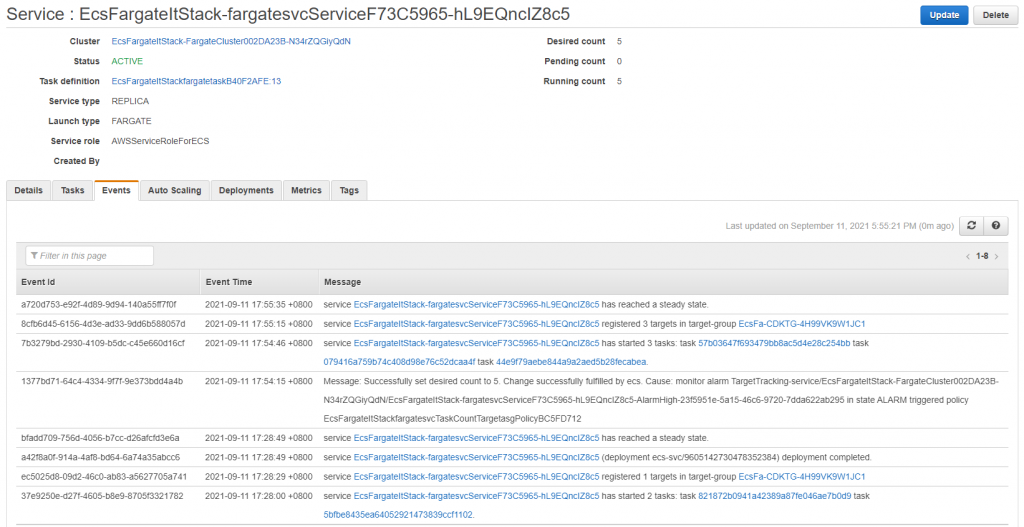
原先的Container数量为2,当遇到大量流量时,CloudWatch状态变更则触发扩增规则,就会扩增到适合的数量。但这边有设定上限值为5
CloudWatch要触发Scale-in减少机器数量时,需要将状态转为alarm时,才会触发ASG,下方图片规则是15分钟内requests数量不超过4.5,数量会慢慢减少到适合当前网站的流量
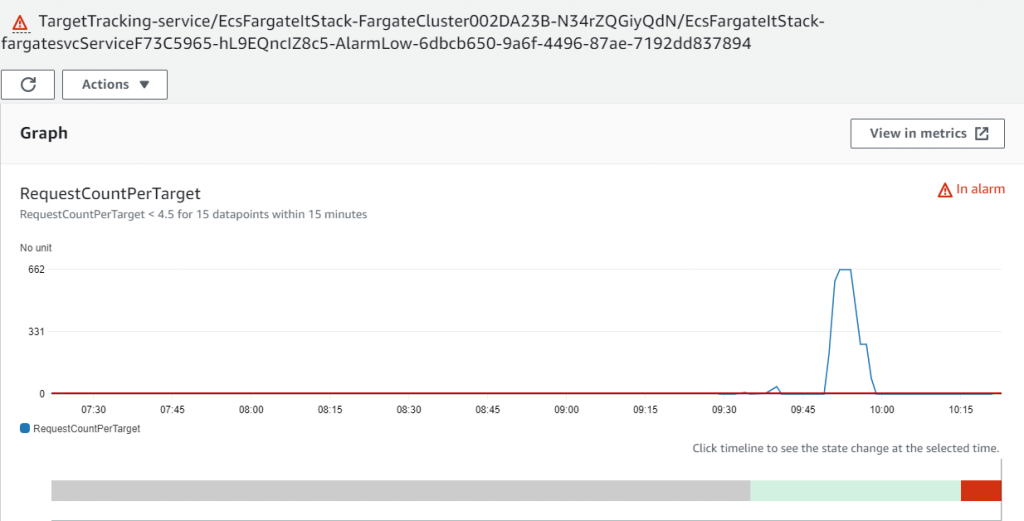
数量扩增到5个Containers,但当网站流量处於低迷的情况,就会触发缩减规则,慢慢减少机器/Container的数量,以符合当前流量。最终为减少到最低限制
结果
结论
ASG的扩增减少规则还有其他种类,以及步进的方式,都需要查看/设定CloudWatch的触发方式,这边就简单地揭露,可以更快的操作ASG,且也懂细节的奥妙
完整程序码
from aws_cdk import core as cdk
from aws_cdk import (
    aws_ec2 as ec2,
    aws_ecs as ecs,
    aws_elasticloadbalancingv2 as elbv2,
    core
    )

class EcsFargateItStack(cdk.Stack):

    def __init__(self, scope: cdk.Construct, construct_id: str, **kwargs) -> None:
        super().__init__(scope, construct_id, **kwargs)

        # The code that defines your stack goes here

        vpc = ec2.Vpc(self, "VPC",
        cidr="10.0.0.0/16",
        enable_dns_hostnames=True,
        enable_dns_support=True,
        max_azs=0,
        nat_gateways=1)

        public_subnet = ec2.Subnet(self, "public-subnet1",
        availability_zone="us-east-2a",
        cidr_block="10.0.10.0/24",
        vpc_id=vpc.vpc_id,
        map_public_ip_on_launch=True)

        public_subnet2 = ec2.Subnet(
            self,
            "PublicSubnet2",
            availability_zone="us-east-2b",
            cidr_block="10.0.20.0/24",
            vpc_id=vpc.vpc_id,
            map_public_ip_on_launch=True
        )

        public_subnet.add_default_internet_route(gateway_id=vpc.internet_gateway_id, gateway_attachment=vpc)
        public_subnet2.add_default_internet_route(gateway_id=vpc.internet_gateway_id, gateway_attachment=vpc)

        sg = ec2.SecurityGroup(self, "CDK-SG",
        vpc=vpc,
        description="cdk create security group",
        security_group_name="cdkSG")

        sg.add_ingress_rule(peer=ec2.Peer.any_ipv4(), connection=ec2.Port.tcp(80), description="cdk allow anywhere about HTTP protocol")

        alb = elbv2.ApplicationLoadBalancer(self, "CDK-ALB",
            vpc=vpc,
            internet_facing=True,
            vpc_subnets=ec2.SubnetSelection(
                subnets=[public_subnet, public_subnet2]
            ),
            security_group=sg,
            load_balancer_name="cdkALB"
        )

        tg = elbv2.ApplicationTargetGroup(
            self,
            "CDK-TG",
            port= 80,
            protocol=elbv2.ApplicationProtocol.HTTP,
            vpc=vpc
        )

        listener = alb.add_listener(
            "Listener",
            port=80,
            protocol=elbv2.ApplicationProtocol.HTTP,
            default_target_groups=[tg]
        )

        listener.add_target_groups(
            "CDK-addTG",
            target_groups=[tg]
        )


        cluster = ecs.Cluster(self, "Fargate-Cluster",
        enable_fargate_capacity_providers=True,
        vpc=vpc)

        task = ecs.FargateTaskDefinition(self, "fargate-task",
        cpu=1024,
        memory_limit_mib=2048,
        )

        task.add_container(id="app",
        image=ecs.ContainerImage.from_registry("johnson860312/awswebdb"),
        container_name="mycontainer",
        port_mappings=[
            ecs.PortMapping(container_port=80,
            host_port=80,
            protocol=ecs.Protocol.TCP)
        ],
        cpu=128,
        memory_reservation_mib=256
        )

        svc = ecs.FargateService(self, "fargate-svc",
            task_definition=task,
            cluster=cluster,
            security_groups=[sg],
            assign_public_ip=True,
            vpc_subnets=ec2.SubnetSelection(
                subnets=[public_subnet, public_subnet2]
            ),
            desired_count=2
        )

        scale_policy = svc.auto_scale_task_count(
            max_capacity=5,
            min_capacity=1
        )

        scale_policy.scale_on_request_count(
            "asgPolicy",
            requests_per_target=5,
            target_group=tg,
            scale_in_cooldown=core.Duration.seconds(60),
            scale_out_cooldown=core.Duration.seconds(60)
        )

        tg.add_target(svc)

        core.CfnOutput(self, "PublicDNS", value="http://" + listener.load_balancer.load_balancer_dns_name)
<<: 【Day 18】Google Apps Script - API 篇 - Spreadsheet Service - 电子试算表服务范例-新增标题
Day 06 Flex message simulator- 美化自己的chatbot
Flex message simulator- 美化自己的chatbot 虽然已经能让 Line c...
Day 10. Hashicorp Nomad: Job Priority
Hashicorp Nomad: Job Priority 在job预设的情况下,priority被...
popcat 如何使用 python 搭配 selenium 在浏览器上自动点击
popcat 有监於台湾在popcat中被泰国抢下金牌,无聊的我写了这一个咚咚 这次是使用 Pyth...
[Golang] Introduction of Functions
Declairing Functions We can use the func keyword t...
下个赌场更诱人
今天彼特币又喷了 台股跌、美股跌 其实有K棒的地方都可以用技术分析 ...