[Day 20] Facial Recognition: OpenCV + Dlib可以一次满足
想起小时候常看到的一个广告:三个愿望、一次满足!
前两天讲到的孪生网路,
提到一个概念:相似度 (similiarity)
藉由比对两张照片经过CNN处理後的输出,来判断是否为同一类别的照片 (或同一人)。
既然要使用CNN来处理图片,
是否有一种方式可以只使用电脑视觉二人组OpenCV + Dlib来达成呢?
让我们看下去!
本文开始
Dlib的作者Davis King,在官方部落格发表了一篇如何使用Dlib来做人脸辨识,
作者在资料清洗与标注 (也就是Deep Learning最最重要的工作 -- 资料准备)下了非常大的功夫,只为了提供一个足够强大的预训练模型。
模型的训练架构是使用triplet networks,
也就是与昨天的CNN网路 -- FaceNet的训练方式类似 (这个在後面会提到),
有兴趣了解细节的也很建议看看这篇由Adam Geitgey发表的人脸辨识原理Step-by-Step。
而使用的方式也非常简单,让我们开始动手做吧!
- 开启专案 (就是这个系列一直使用的专案),在
face_recognition目录下新增一个档案dlib_with_opencv.py - 在你的Python执行环境新增一个套件
face_recognition,这个套件是一个Dlib人脸辨识功能的扩充套件,方便我们後续开发使用- face_recognition (版本:0.3.0)
- 先打开在Day15实作的
load_dataset.py,我们修改程序码,新增一个函数load_images让其更有弹性:# 汇入必要套件 import ntpath import os import pickle from itertools import groupby import cv2 import numpy as np from imutils import paths # 汇入人脸侦测方法 (你可以依据喜好更换不同方法) from face_detection.opencv_dnns import detect def load_images(input_path, min_size=15): # 载入所有图片 image_paths = list(paths.list_images(input_path)) # 将图片属於"哪一个人"的名称取出 (如:man_1, man_2,...),并以此名称将图片分群 groups = groupby(image_paths, key=lambda path: ntpath.normpath(path).split(os.path.sep)[-2]) # 初始化结果 (images, names) images = [] names = [] # loop我们分群好的图片 for name, group_image_paths in groups: group_image_paths = list(group_image_paths) # 如果样本图片数小於15张,则不考虑使用该人的图片 (因为会造成辨识结果误差);可以尝试将下面两行注解看准确度的差异 if (len(group_image_paths)) < min_size: continue for imagePath in group_image_paths: # 将图片依序载入,取得人脸矩形框 img = cv2.imread(imagePath) # 更新结果 images.append(img) names.append(name) # 将结果转成numpy array,方便後续进行训练 images = np.array(images) names = np.array(names) return (images, names) def images_to_faces(input_path): """ 将资料集内的照片依序撷取人脸後,转成灰阶图片,回传後续可以用作训练的资料 :return: (faces, labels) """ # 判断是否需要重新载入资料 data_file = ntpath.sep.join([ntpath.dirname(ntpath.abspath(__file__)), "faces.pickle"]) if os.path.exists(data_file): with open(data_file, "rb") as f: (faces, labels) = pickle.load(f) return (faces, labels) (images, names) = load_images(input_path) # 初始化结果 (faces, labels) faces = [] labels = [] # loop我们分群好的图片 for (img, name) in zip(images, names): rects = detect(img) # loop各矩形框 for rect in rects: (x, y, w, h) = rect["box"] # 取得人脸ROI (注意在用阵列操作时,顺序是 (rows, columns) => 也就是(y, x) ) roi = img[y:y + h, x:x + w] # 将人脸的大小都转成50 x 50的图片 roi = cv2.resize(roi, (50, 50)) # 转成灰阶 roi = cv2.cvtColor(roi, cv2.COLOR_BGR2GRAY) # 更新结果 faces.append(roi) labels.append(name) # 将结果转成numpy array,方便後续进行训练 faces = np.array(faces) with open(data_file, "wb") as f: pickle.dump((faces, labels), f) return (faces, labels) - 打开
dlib_with_opencv.py,程序码与说明如下:import ntpath import sys # resolve module import error in PyCharm sys.path.append(ntpath.dirname(ntpath.dirname(ntpath.abspath(__file__)))) import argparse import os import pickle import time import cv2 import face_recognition from sklearn.model_selection import train_test_split from dataset.load_dataset import load_images from face_detection.dlib_hog_svm import detect as hog_detect from face_detection.dlib_mmod import detect as mmod_detect def main(): # 初始化arguments ap = argparse.ArgumentParser() ap.add_argument("-i", "--input", type=str, required=True, help="the input dataset path") ap.add_argument("-e", "--embeddings-file", type=str, required=True, help="the path to serialized db of facial embeddings") ap.add_argument("-d", "--detection-method", type=str, default="mmod", choices=["hog", "mmod"], help="the detection method to use") args = vars(ap.parse_args()) print("[INFO] loading dataset....") (faces, names) = load_images(args["input"], min_size=10) # 由於Dlib处理图片不同於OpenCV的BGR顺序,需要先转换成RGB顺序 faces = [cv2.cvtColor(face, cv2.COLOR_BGR2RGB) for face in faces] print(f"[INFO] {len(faces)} images in dataset") # 初始化结果 known_embeddings = [] known_names = [] # 先区分好我们的资料集 (trainX, testX, trainY, testY) = train_test_split(faces, names, test_size=0.25, stratify=names, random_state=9527) # 建立我们的人脸embeddings资料库 data = {} print("[INFO] serializing embeddings...") if os.path.exists(args["embeddings_file"]): with open(args["embeddings_file"], "rb") as f: data = pickle.load(f) else: start = time.time() for (img, name) in zip(trainX, trainY): # 侦测人脸位置 if args["detection_method"] == "mmod": rects = mmod_detect(img) else: rects = hog_detect(img) # 将我们侦测的结果(x, y, w, h)转为face_recognition使用的box格式: (top, right, bottom, left) boxes = [(rect[1], rect[0] + rect[2], rect[1] + rect[3], rect[0]) for rect in rects] embeddings = face_recognition.face_encodings(img, boxes) for embedding in embeddings: known_embeddings.append(embedding) known_names.append(name) print("[INFO] saving embeddings to file...") data = {"embeddings": known_embeddings, "names": known_names} with open(args["embeddings_file"], "wb") as f: pickle.dump(data, f) end = time.time() print(f"[INFO] serializing embeddings done, tooks {round(end - start, 3)} seconds") # 用已知的脸部资料库来辨识测试资料集的人脸 for (img, actual_name) in zip(testX, testY): # 这里我们直接用face_recognition来侦测人脸 boxes = face_recognition.face_locations(img, model="cnn") embeddings = face_recognition.face_encodings(img, boxes) # 辨识结果 names = [] for embedding in embeddings: matches = face_recognition.compare_faces(data["embeddings"], embedding) name = "unknown" # matches是一个包含True/False值的list,会比对所有资料库中的人脸embeddings if True in matches: # 判断哪一个人有最多matches matchedIdexs = [i for (i, b) in enumerate(matches) if b] counts = {} for i in matchedIdexs: name = data["names"][i] counts[name] = counts.get(name, 0) + 1 name = max(counts, key=counts.get) names.append(name) for ((top, right, bottom, left), name) in zip(boxes, names): cv2.rectangle(img, (left, top), (right, bottom), (0, 255, 0), 2) y = top - 8 if top - 8 > 8 else top + 8 cv2.putText(img, f"actual: {actual_name}", (left, y - 15), cv2.FONT_HERSHEY_SIMPLEX, 0.5, (0, 255, 255), 2) cv2.putText(img, f"predict: {name}", (left, y), cv2.FONT_HERSHEY_SIMPLEX, 0.5, (255, 0, 0), 2) img = cv2.cvtColor(img, cv2.COLOR_RGB2BGR) cv2.imshow("Result", img) cv2.waitKey(0) if __name__ == '__main__': main() - 在terminal输入
python face_recognition/dlib_with_opencv.py -i dataset/caltech_faces -e embeddings.pickle,输出的范例结果如下:
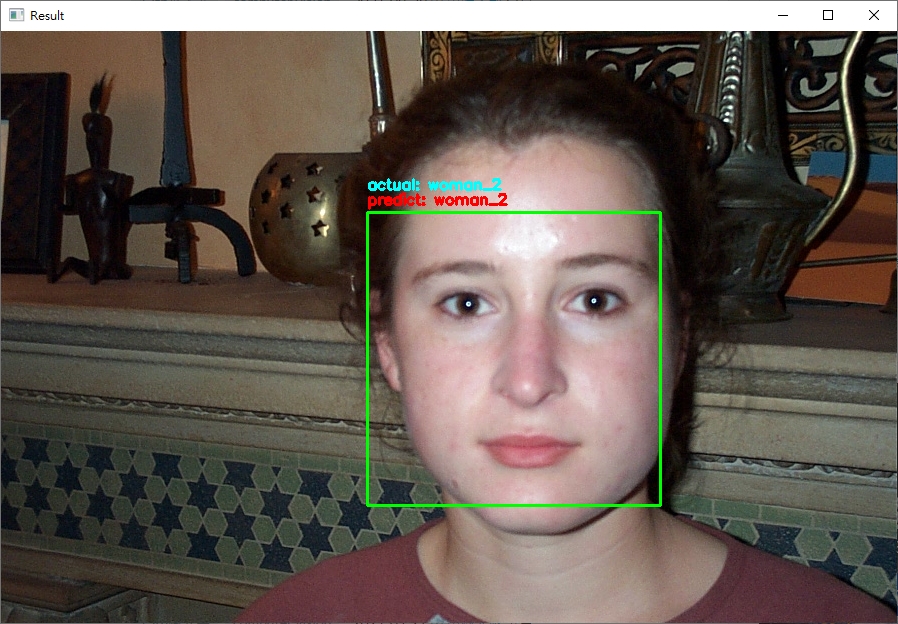
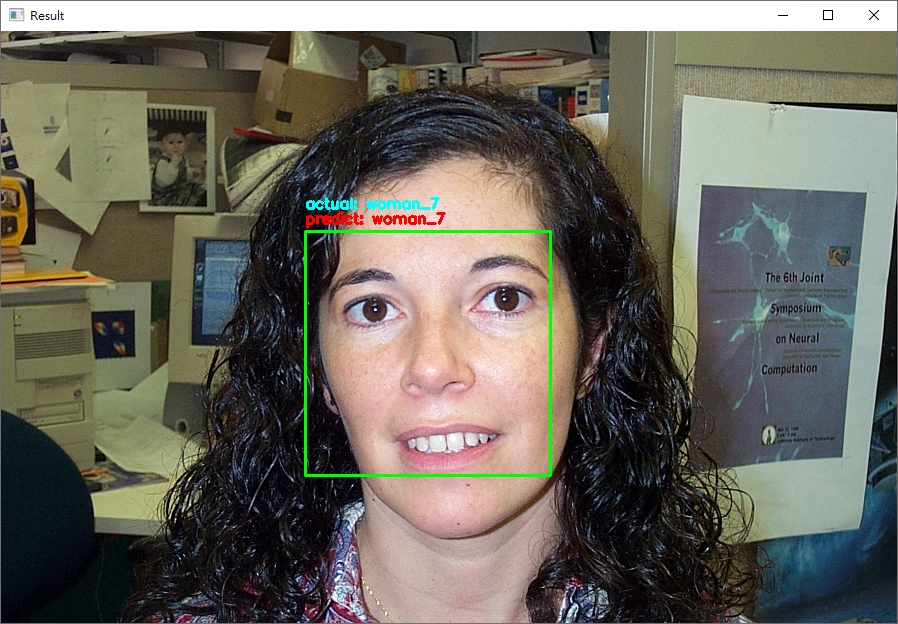
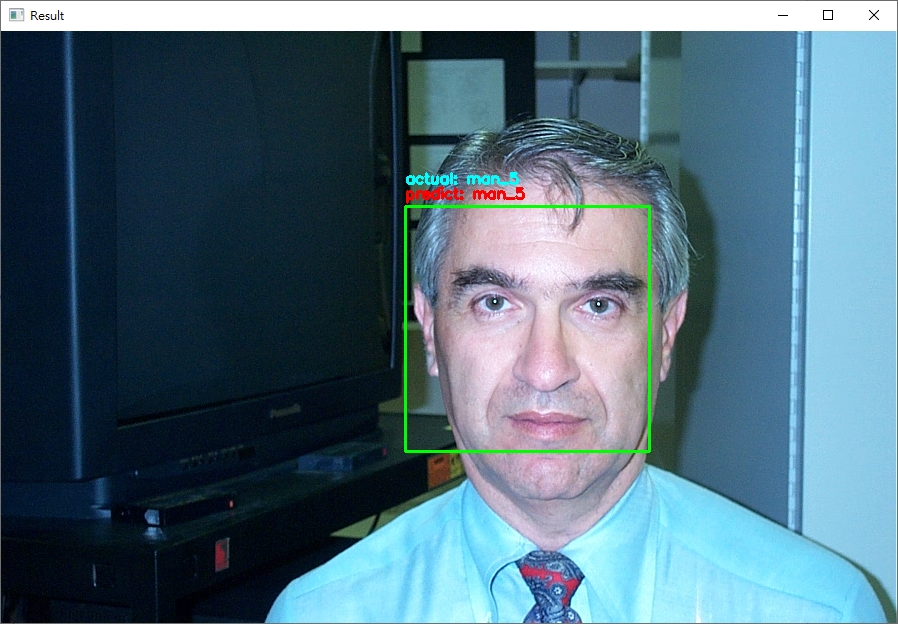
程序会把测试资料集全部跑过一遍 (约100多张图片);可以直接在terminal输入ctrl+c终止程序。
从结果来看,可以发现辨识的结果基本都是正确的! (无论照片中的人种与性别)。
看到这里,
其实我们一直都是用CALTECH的资料集,
那如果用我们自己的脸呢?
如果我想要即时辨识呢?
让我们,继续看下去。
加入新的照片与即时辨识
- 在
dataset/caltech_faces目录下新增一个目录,以及加入你要辨识的照片 (约10 - 15张即有很好的辨识结果) - 新增一个
dlib_with_opencv_realtime.py的档案,程序码内容如下:import ntpath import sys # resolve module import error in PyCharm sys.path.append(ntpath.dirname(ntpath.dirname(ntpath.abspath(__file__)))) import argparse import os import pickle import time import cv2 import face_recognition from imutils.video import WebcamVideoStream from dataset.load_dataset import load_images from face_detection.dlib_hog_svm import detect as hog_detect from face_detection.dlib_mmod import detect as mmod_detect def main(): # 初始化arguments ap = argparse.ArgumentParser() ap.add_argument("-i", "--input", type=str, required=True, help="the input dataset path") ap.add_argument("-e", "--embeddings-file", type=str, required=True, help="the path to serialized db of facial embeddings") ap.add_argument("-d", "--detection-method", type=str, default="mmod", choices=["hog", "mmod"], help="the detection method to use") args = vars(ap.parse_args()) print("[INFO] loading dataset....") (faces, names) = load_images(args["input"], min_size=10) # 由於Dlib处理图片不同於OpenCV的BGR顺序,需要先转换成RGB顺序 faces = [cv2.cvtColor(face, cv2.COLOR_BGR2RGB) for face in faces] print(f"[INFO] {len(faces)} images in dataset") # 初始化结果 known_embeddings = [] known_names = [] # 建立我们的人脸embeddings资料库 data = {} print("[INFO] serializing embeddings...") if os.path.exists(args["embeddings_file"]): with open(args["embeddings_file"], "rb") as f: data = pickle.load(f) else: start = time.time() for (img, name) in zip(faces, names): # 侦测人脸位置 if args["detection_method"] == "mmod": rects = mmod_detect(img) else: rects = hog_detect(img) # 将我们侦测的结果(x, y, w, h)转为face_recognition使用的box格式: (top, right, bottom, left) boxes = [(rect[1], rect[1] + rect[3], rect[0] + rect[2], rect[0]) for rect in rects] embeddings = face_recognition.face_encodings(img, boxes) for embedding in embeddings: known_embeddings.append(embedding) known_names.append(name) print("[INFO] saving embeddings to file...") data = {"embeddings": known_embeddings, "names": known_names} with open(args["embeddings_file"], "wb") as f: pickle.dump(data, f) end = time.time() print(f"[INFO] serializing embeddings done, tooks {round(end - start, 3)} seconds") # 启动WebCam vs = WebcamVideoStream().start() time.sleep(2.0) fps = vs.stream.get(cv2.CAP_PROP_FPS) print("Frames per second using cv2.CAP_PROP_FPS : {0}".format(fps)) while True: frame = vs.read() img = cv2.cvtColor(frame, cv2.COLOR_BGR2RGB) boxes = face_recognition.face_locations(img, model="cnn" if args["detection_method"] == "mmod" else "hog") embeddings = face_recognition.face_encodings(img, boxes) # 辨识结果 names = [] for embedding in embeddings: matches = face_recognition.compare_faces(data["embeddings"], embedding) name = "unknown" # matches是一个包含True/False值的list,会比对所有资料库中的人脸embeddings if True in matches: # 判断哪一个人有最多matches matchedIdexs = [i for (i, b) in enumerate(matches) if b] counts = {} for i in matchedIdexs: name = data["names"][i] counts[name] = counts.get(name, 0) + 1 name = max(counts, key=counts.get) names.append(name) for ((top, right, bottom, left), name) in zip(boxes, names): cv2.rectangle(img, (left, top), (right, bottom), (0, 255, 0), 2) y = top - 8 if top - 8 > 8 else top + 8 cv2.putText(img, f"{name}", (left, y), cv2.FONT_HERSHEY_SIMPLEX, 0.5, (255, 0, 0), 2) img = cv2.cvtColor(img, cv2.COLOR_RGB2BGR) cv2.imshow("Result", img) key = cv2.waitKey(1) & 0xFF if key == ord("q"): break if __name__ == '__main__': main() - 执行的结果如下 (我用我自己的人脸辨识):
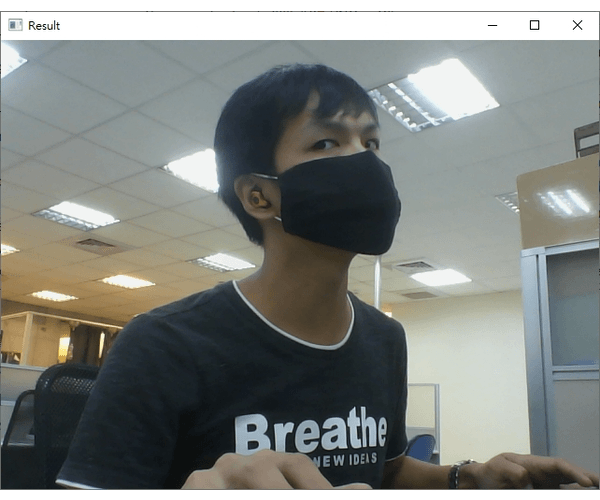
注意在辨识的过程中,我刻意将脸转个角度出现"unknown"字样;如果辨识的人脸不在资料库就显示"unknown"。
结论
- 今天所使用的套件:
- opencv
- dlib
- face_recognition
在座人脸辨识时,大部分复杂的工作这些套件都已经帮我们处理了,剩下的就是准备资料与做应用而已。
- 即使戴上口罩或是脸部与镜头有一个角度,使用OpenCV + Dlib的方法做人脸辨识基本上都还是可以成功侦测到人脸以及成功辨识这个人;主要的原因是
- 我们使用的人脸侦测是Dlib神经网路检测
- Dlib内建的人脸辨识模型准确率非常高 (在LFW脸部资料集的辨识率有99.38%)
- 如果今天你是使用没有支援GPU的Dlib版本,建议在启动参数中带入
-d hog来使用Dlib特徵检测侦测人脸
(由於face recognizer还是会吃一些资源,所以FPS可能还是没办法很高就是) - 在程序码的第33行,我们筛选掉小於10张照片的人脸,主要原因是因为
- 通常在做辨识会需要10 - 15张的照片,当然越多越好
- 我们判断是否为同一人使用的方法是直接比对有多少照片是相似的;於我们的使用的资料中,照片个数是不相同的,为了让张数不要差距太大而导致辨识结果偏差,所以将太少人脸的照片筛选掉
- 使用Dlib还是要不厌其烦地再说一次 -- 使用Dlib中的网路模型,无论是MMOD还是face recognizer,建议还是要使用有支援
GPU的Dlib来实作;否则你如果像我一样做即时应用会有很惨不忍赌的状况发生...
今天的内容就到这边,
希望你也可以用今天的方法建立一个属於自己的人脸辨识系统!
程序码传送门在这
<<: Day18 - 使用ViewBinding取代Kotlin Android Extension
[分享] verilog设计经验总结
先记下来: 1、不使用初始化语句; 2、不使用延时语句; 3、不使用循环次数不确定的语句,如:for...
Day30 测试写起乃 - 完赛感言!
终於来到第三十天了,来讲讲完赛感言吧! 其实这次是第二次参加铁人赛了,这次是不小心按到开赛所以根本没...
Day 14:Load testing
虽然在昨天有说到今天希望可以改善 dashboard,然而我在做到一半的时候突然惊觉...现在根本就...
Day 16 Azure cognitive service: Face recognition- 让你的机器人认得你
Azure face service: Face recognition- 让你的机器人认得你 人脸...
企划实现(22)
使用firebase简易资料库 在使用前要将专案连结至firebase 第一步:在firebase创...