【把玩Azure DevOps】Day15 Pipeline与Artifacts应用:覆写C#专案属性资讯(上传nuget package成功)
前面文章透过Pipeline上传nuget package到Artifact feed的时候因为产生的版本已经在之前上传过了,所以造成Pipeline最後执行失败。为了要解决这个问题,希望能够在Pipeline执行的时候自动覆写版本的资讯,利用Pipeline的BuildId或BuildNumber来代表Package的版本,因此在前一篇文章中也从Azure DevOps Extensions Marketplace中安装了「.Net Standard Project Property Reader and Writer」这个Extension,这篇文章就让我们用先前文章中失败的Yaml档内容来继续吧!
# Starter pipeline
# Start with a minimal pipeline that you can customize to build and deploy your code.
# Add steps that build, run tests, deploy, and more:
# https://aka.ms/yaml

trigger:
- none

pool:
  vmImage: ubuntu-latest

steps:
- task: DotNetCoreCLI@2
  displayName: Build C# Project
  inputs:
    command: 'build'
    projects: '$(ProjectName)/*.csproj'
    arguments: '-o $(Build.BinariesDirectory)'
- task: ArchiveFiles@2
  displayName: Zip output files
  inputs:
    rootFolderOrFile: '$(Build.BinariesDirectory)'
    includeRootFolder: false
    archiveType: 'zip'
    archiveFile: '$(Build.ArtifactStagingDirectory)/$(ProjectName)-$(Build.BuildId).zip'
    replaceExistingArchive: true
- task: PublishPipelineArtifact@1
  displayName: Publish files to pipeline artifacts
  inputs:
    targetPath: '$(Build.ArtifactStagingDirectory)'
    artifact: 'BuildOutputFiles'
    publishLocation: 'pipeline'
- task: DotNetCoreCLI@2
  displayName: Push Nuget package
  inputs:
    command: 'push'
    packagesToPush: '$(Build.BinariesDirectory)/*.nupkg'
    nuGetFeedType: 'internal'
    publishVstsFeed: '15523482-96ea-4d9f-83bf-a57fc10e79ce'
首先,我们先来看一下ModuleBase.csproj档案的内容:
<Project Sdk="Microsoft.NET.Sdk">

  <PropertyGroup>
    <TargetFramework>netcoreapp3.1</TargetFramework>
    <GeneratePackageOnBuild>true</GeneratePackageOnBuild>
    <Version>1.0.1</Version>
  </PropertyGroup>

</Project>
从上面的XML内容中可以看到版本是设定在Version这个名称的节点;另外,前面文章中设定Build专案时顺便产生nupkg的设定则是在GeneratePackageOnBuild这个节点中设定为true。
接下来我们从Task清单中找到PowerShell task:

在Type的部份选择Inline,接着在Script的内容部份输入cat $(ProjectName)/$(ProjectName).csproj,将csproj档案内容在Pipeline一开始执行的时候先输出一份,所以这个task将会插入到steps下面作为第一个task:
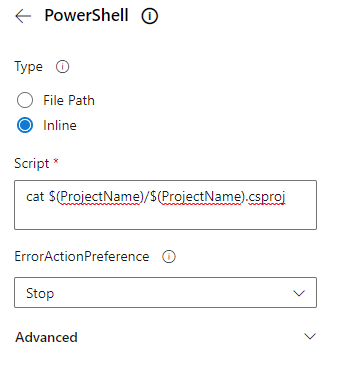
这样做的原因是可以在修改Version的前後看到档案内容的差异,也算是一种log的方式。
接下来从Task清单中找到下面这个Project Property To Environment Variable task:

第一个Path to csproj/vbproj file的属性设定同样设为$(ProjectName)/$(ProjectName).csproj,第二个Variable Prefix设为Proj,第三个则是选择Version选项:
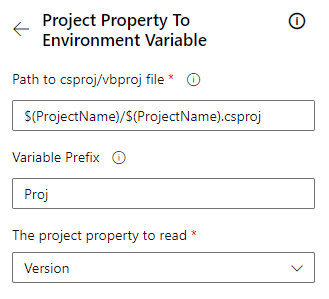
上面Task的设定会将csproj档案中的Version内容读取出来之後放在$(Proj.Version)里面,以便後续使用。
读取了Version资讯之後,再从Task清单中找到Write Project Property这个Task:

对照上面读取Version内容的Task设定,唯一不同的地方是第二个属性设为$(Proj.Version).$(Build.BuildId),也就是将刚才读出来的Version资讯後面加上Pipeline的BuildId,这样每次执行Pipeline所产生的档案版本就会不同:
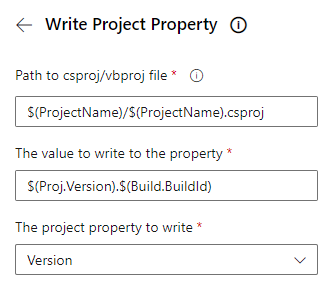
之後再将前面的PowerShell task复制一份插入在ProjectVarWriter task後面,这样就可以查看写入之後的内容是什麽。
另外,这个Extension的Task只能执行在Windows环境的Agent,所以还必须要将上面的vmImage设定改为windows-latest,最後完成的Yaml内容如下:
# Starter pipeline
# Start with a minimal pipeline that you can customize to build and deploy your code.
# Add steps that build, run tests, deploy, and more:
# https://aka.ms/yaml

trigger:
- none

pool:
  vmImage: windows-latest

steps:
- task: PowerShell@2
  displayName: Print csproj content
  inputs:
    targetType: 'inline'
    script: 'cat $(ProjectName)/$(ProjectName).csproj'
- task: ProjectVarReader@0
  displayName: Read version value
  inputs:
    searchPattern: '$(ProjectName)/$(ProjectName).csproj'
    variablePrefix: 'Proj'
    propertyName: 'Version'
- task: ProjectVarWriter@0
  displayName: Writer version value
  inputs:
    searchPattern: '$(ProjectName)/$(ProjectName).csproj'
    value: '$(Proj.Version).$(Build.BuildId)'
    propertyName: 'Version'
- task: PowerShell@2
  displayName: Print csproj content
  inputs:
    targetType: 'inline'
    script: 'cat $(ProjectName)/$(ProjectName).csproj'
- task: DotNetCoreCLI@2
  displayName: Build C# Project
  inputs:
    command: 'build'
    projects: '$(ProjectName)/$(ProjectName).csproj'
    arguments: '-o $(Build.BinariesDirectory)'
- task: ArchiveFiles@2
  displayName: Zip output files
  inputs:
    rootFolderOrFile: '$(Build.BinariesDirectory)'
    includeRootFolder: false
    archiveType: 'zip'
    archiveFile: '$(Build.ArtifactStagingDirectory)/$(ProjectName)-$(Build.BuildId).zip'
    replaceExistingArchive: true
- task: PublishPipelineArtifact@1
  displayName: Publish files to pipeline artifacts
  inputs:
    targetPath: '$(Build.ArtifactStagingDirectory)'
    artifact: 'BuildOutputFiles'
    publishLocation: 'pipeline'
- task: DotNetCoreCLI@2
  displayName: Push Nuget package
  inputs:
    command: 'push'
    packagesToPush: '$(Build.BinariesDirectory)/*.nupkg'
    nuGetFeedType: 'internal'
    publishVstsFeed: '15523482-96ea-4d9f-83bf-a57fc10e79ce'
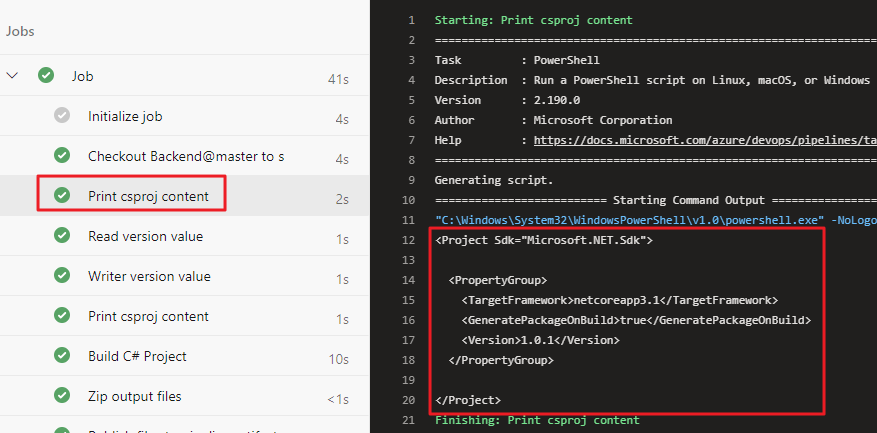
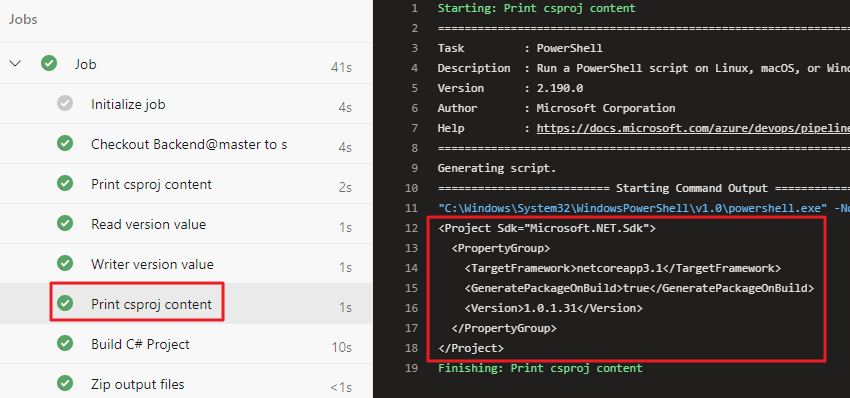
从Pipeline执行的log可以看到第一个PowerShell task log中的Version和第二个PowerShell task log中的Version不同,第二个印出的Version值是1.0.1.31:
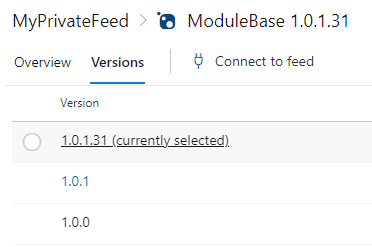
从Artifact feed(Private nuget)中也可以看到1.0.1.31的版本:
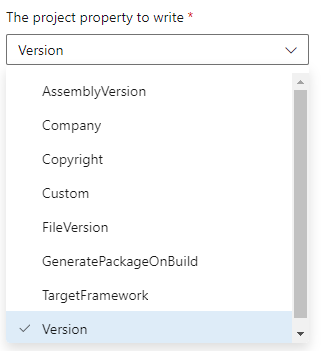
从下面的下拉选单中可以看到GeneratePackageOnBuild也在选项中,所以也可以透过这个方式从Pipeline中设定GeneratePackageOnBuild=true,因为预设建立的C# Project设定中是没有特别设定这个选项:
除此之外,还有一个Custom的选项,可以自行填入要设定的Property name,可以透过这个方式设定Authors、Description这些属性,因为在nuget package的也会使用到这些属性值,也可以将这些设为Variable让执行Pipeline的使用者输入这些内容。实际上的作法则是要看团队的习惯,不过一般来说这些不太会变动的内容应该也是要写在C#专案设定中才对。
上面的步骤在C# Project档案中已经有设定了Version值的情况下并不会有什麽问题,但是一般新建立的专案没有特别去设定版本号的话,其实csproj里面是不会有Version的内容的,也就是若没有设定Version值的时候在Build时候系统会预设为1.0.0,但是…
上面的Task在读取Version内容的时候实际上因为Version并不在档案内容中,所以在Proj.Version中将会是空的!
这下惨了…那写入的Version不就变成「.31」这样的内容?这是什麽奇怪的版本号码格式…
为了避免这样的问题,所以要设定另外一个预设值变数,在Yaml中的steps前面加入下面这段:
variables:
  version: '$(Proj.Version).$(Build.BuildId)'
  predefined_version: '1.0.0.$(Build.BuildId)'
增加了version、predefined_version两个变数,并且将写入Version值的那个Task设定中的value属性从’$(Proj.Version).$(Build.BuildId)’改为’$(version)’。
接下来要做的是判断ProjectVarReader读取到的Version值是不是空的,也就是判断Proj.Version的内容是不是空的,如果是空的,那麽就把predefined_version变数的内容设定到version变数中,这部份使用到的还是PowerShell task,yaml内容如下(插入在Writer之前):
- task: PowerShell@2
  displayName: Check version value
  inputs:
    targetType: 'inline'
    script: |
      echo "Proj.Version = $env:Proj_Version"
      if ([string]::IsNullOrWhiteSpace($env:Proj_Version))
      {
        echo '##vso[task.setvariable variable=version]$(predefined_version)'
      }
这边要特别提的就是在Pipeline中根据不同情况设定variable内容的技巧,也就是透过PowerShell的echo输出特别的字串格式「##vso[task.setvariable variable=变数名称]设定值」,变数名称就是在variables里面设定的变数,设定值的部份则是可以使用「$(变数名称)」再从别的变数中取得值,透过这个方式就可以将version这个变数内容更改为predefined_version所设定的内容。(注:在PowerShell中是透过环境变数来取得设定的变数值,并且点( . )会取代为底线( _ ),详细资讯可参考官方文件。)
最後完成的Yaml档内容:
# Starter pipeline
# Start with a minimal pipeline that you can customize to build and deploy your code.
# Add steps that build, run tests, deploy, and more:
# https://aka.ms/yaml

trigger:
- none

pool:
  vmImage: windows-latest

variables:
  version: '$(Proj.Version).$(Build.BuildId)'
  predefined_version: '1.0.0.$(Build.BuildId)'

steps:
- task: PowerShell@2
  displayName: Print csproj content
  inputs:
    targetType: 'inline'
    script: 'cat $(ProjectName)/$(ProjectName).csproj'
- task: ProjectVarReader@0
  displayName: Read version value
  inputs:
    searchPattern: '$(ProjectName)/$(ProjectName).csproj'
    variablePrefix: 'Proj'
    propertyName: 'Version'
- task: PowerShell@2
  displayName: Check version value
  inputs:
    targetType: 'inline'
    script: |
      echo "Proj.Version = $env:Proj_Version"
      if ([string]::IsNullOrWhiteSpace($env:Proj_Version))
      {
        echo '##vso[task.setvariable variable=version]$(predefined_version)'
      }
- task: ProjectVarWriter@0
  displayName: Writer version value
  inputs:
    searchPattern: '$(ProjectName)/$(ProjectName).csproj'
    value: '$(version)'
    propertyName: 'Version'
- task: ProjectVarWriter@0
  displayName: Set GeneratePackageOnBuild = true
  inputs:
    searchPattern: '$(ProjectName)/$(ProjectName).csproj'
    value: 'true'
    propertyName: 'GeneratePackageOnBuild'
- task: PowerShell@2
  displayName: Print csproj content
  inputs:
    targetType: 'inline'
    script: 'cat $(ProjectName)/$(ProjectName).csproj'
- task: DotNetCoreCLI@2
  displayName: Build C# Project
  inputs:
    command: 'build'
    projects: '$(ProjectName)/$(ProjectName).csproj'
    arguments: '-o $(Build.BinariesDirectory)'
- task: ArchiveFiles@2
  displayName: Zip output files
  inputs:
    rootFolderOrFile: '$(Build.BinariesDirectory)'
    includeRootFolder: false
    archiveType: 'zip'
    archiveFile: '$(Build.ArtifactStagingDirectory)/$(ProjectName)-$(Build.BuildId).zip'
    replaceExistingArchive: true
- task: PublishPipelineArtifact@1
  displayName: Publish files to pipeline artifacts
  inputs:
    targetPath: '$(Build.ArtifactStagingDirectory)'
    artifact: 'BuildOutputFiles'
    publishLocation: 'pipeline'
- task: DotNetCoreCLI@2
  displayName: Push Nuget package
  inputs:
    command: 'push'
    packagesToPush: '$(Build.BinariesDirectory)/*.nupkg'
    nuGetFeedType: 'internal'
    publishVstsFeed: '15523482-96ea-4d9f-83bf-a57fc10e79ce'
PS. 这个Extension有个限制是对於没有设定在csproj档案内容中的Property并不会增加并写入值,也就是说如果csproj里面没有设定Version,也就是Version节点不存在,那麽便不会写入值。(可以是<Version></Version>,但是不能没有)
<<: Day13 继续用 TailwindCSS 切版部落格文章内页样式
>>: 30-12 之 Domain Layer - Domain Model ( 未完成版 )
[想试试看JavaScript ] 阵列一些操作阵列好用的方法 map
之前介绍的方法 push、pop、shift、unshift、reverse、splice、sort...
AI ninja project [day 26] QLattice -- 基础回归
这次来看看QLattice来执行回归的功能, 我们想从Airbnb上待租房子的特徵,来预测房子租金的...
Day 02 | Laravel Livewire 基本介绍
Livewire 是 Laravel 的全端框架,能建立像 Vue 一样的动态页面的同时又能保有 L...
如何衡量程序的好与坏?浅谈时间复杂度
刷题的重点在於写出「好的」程序码 就如同前两天提到的,比起盲目地刷题更重视的是如何写出好的程序码品...
component
今天要介绍的是component 在一个网页中我们常会看到header、Footer、侧边拦等等,在...