[DAY17]认识Helm - The package manager for Kubernetes

Helm是寻找、分享和使用软件建构Kubernetes最佳的方案
前面几篇文章都会看到都是透过yaml档进行部署,如下方的语法所示
kubectl apply -f myfile.yaml
企业中不可能只有几个pod需要部署,微服务的架构底下,一个cluster里面上百个pod是很稀松平常的事情,
如果都是透过yaml进行部署,我想负责的同仁应该会很崩溃
为了解决这种太多人工重复行为的 aka 科技始终来自於惰性(?)
helm是什麽
helm使用chart来建构部署你的服务,chart的资料架构如下
your_app
├── Chart.yaml
├── charts # 里面放相依的chart设定档
├── templates # 样板
│   ├── NOTES.txt #
│   ├── _helpers.tpl # golang的template
│   ├── deployment.yaml # Kubernetes deployment
│   ├── hpa.yaml # Kubernetes hpa
│   ├── ingress.yaml # Kubernetes ingress
│   ├── service.yaml # Kubernetes service
│   ├── serviceaccount.yaml # Kubernetes serviceaccount
│   └── tests
│       └── test-connection.yaml
└── values.yaml # 把原本hardcode写死在yaml里面的value抽出来放到values.yaml上面,部署时才把values.yaml的值渲染到yaml上面。
helm有以下特点
- Manage Complexity : chart可以定义很复杂的应用程序。
- Easy Updates : 昇级很轻松。
- Simple Sharing : 很简单的部署到不同环境。
- Rollbacks : 要rollback版本很快速简单。
helm install
因为开发环境是mac,所以很简单的...
brew install helm
安装好後,可以执行helm指令看看,如果有正常show出资料就是安装成功了
helm
The Kubernetes package manager

Common actions for Helm:

- helm search:    search for charts
- helm pull:      download a chart to your local directory to view
- helm install:   upload the chart to Kubernetes
- helm list:      list releases of charts
.
.
.
etc
建立helm chart
helm create mytest
建立成功後可以看到chart的资料结构如下图
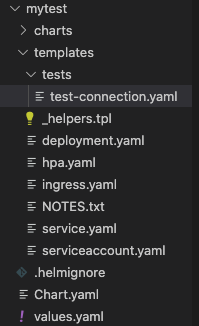
根据个人需求,没用到的yaml档可以删除掉没差。
templates/_helpers.tpl
先看这个档案,不然等等的deployment会一头雾水。
不一定要定义在_helpers.tpl,可以依需求直接定义在deployment里面也是可以的
define : 定义一个变数(?),可以让deployment呼叫使用
default : 如果没有A值,就回传B值
#如果values档案里面没有宣告nameOverride的值时,预设带chart的名称
default .Chart.Name .Values.nameOverride
if else : 这个就不解释了...
{{/*
Expand the name of the chart.
*/}}
{{- define "mytest.name" -}}
{{- default .Chart.Name .Values.nameOverride | trunc 63 | trimSuffix "-" }}
{{- end }}

### 这边有提到一个很重要的限制,k8s的name长度不能超过63位元
{{/*
Create a default fully qualified app name.
We truncate at 63 chars because some Kubernetes name fields are limited to this (by the DNS naming spec).
If release name contains chart name it will be used as a full name.
*/}}
{{- define "mytest.fullname" -}}
{{- if .Values.fullnameOverride }}
{{- .Values.fullnameOverride | trunc 63 | trimSuffix "-" }}
{{- else }}
{{- $name := default .Chart.Name .Values.nameOverride }}
{{- if contains $name .Release.Name }}
{{- .Release.Name | trunc 63 | trimSuffix "-" }}
{{- else }}
{{- printf "%s-%s" .Release.Name $name | trunc 63 | trimSuffix "-" }}
{{- end }}
{{- end }}
{{- end }}

#剩下的就先不列上来
templates/deployment.tpl
点开deployment.yaml来看,看到{{ }}的的区域都是使用Go的template的自定义区域,根据叙述决定资料来源是values.yaml还是_helpers.tpl
apiVersion: apps/v1
kind: Deployment
metadata:
  name: {{ include "mytest.fullname" . }} # mytest.fullname来自_helpers.tpl定义的变数
  labels:
    {{- include "mytest.labels" . | nindent 4 }} # nindent 4 缩排四个空白
spec:
  {{- if not .Values.autoscaling.enabled }} #如果没有要开启hpa时才会渲染这段叙述,资料来源为values.yaml
  replicas: {{ .Values.replicaCount }}
  {{- end }}
  selector:
    matchLabels:
      {{- include "mytest.selectorLabels" . | nindent 6 }}
  template:
    metadata:
      {{- with .Values.podAnnotations }}
      annotations:
        {{- toYaml . | nindent 8 }}
      {{- end }}
      labels:
        {{- include "mytest.selectorLabels" . | nindent 8 }}
    spec:
      {{- with .Values.imagePullSecrets }}
      imagePullSecrets:
        {{- toYaml . | nindent 8 }}
      {{- end }}
      serviceAccountName: {{ include "mytest.serviceAccountName" . }}
      securityContext:
        {{- toYaml .Values.podSecurityContext | nindent 8 }}
      containers:
        - name: {{ .Chart.Name }}
          securityContext:
            {{- toYaml .Values.securityContext | nindent 12 }}
          image: "{{ .Values.image.repository }}:{{ .Values.image.tag | default .Chart.AppVersion }}"
          imagePullPolicy: {{ .Values.image.pullPolicy }}
          ports:
            - name: http
              containerPort: 80
              protocol: TCP
          livenessProbe:
            httpGet:
              path: /
              port: http
          readinessProbe:
            httpGet:
              path: /
              port: http
          resources:
            {{- toYaml .Values.resources | nindent 12 }}
      {{- with .Values.nodeSelector }}
      nodeSelector:
        {{- toYaml . | nindent 8 }}
      {{- end }}
      {{- with .Values.affinity }}
      affinity:
        {{- toYaml . | nindent 8 }}
      {{- end }}
      {{- with .Values.tolerations }}
      tolerations:
        {{- toYaml . | nindent 8 }}
      {{- end }}
部署到k8s
#部署前记得要先确定目前k8s cluster是什麽喔
kubectl config current-context

helm install test1 ./mytest

NAME: test1
LAST DEPLOYED: Thu Sep 23 14:20:30 2021
NAMESPACE: default
STATUS: deployed
REVISION: 1
NOTES:
1. Get the application URL by running these commands:
  export POD_NAME=$(kubectl get pods --namespace default -l "app.kubernetes.io/name=mytest,app.kubernetes.io/instance=test1" -o jsonpath="{.items[0].metadata.name}")
  export CONTAINER_PORT=$(kubectl get pod --namespace default $POD_NAME -o jsonpath="{.spec.containers[0].ports[0].containerPort}")
  echo "Visit http://127.0.0.1:8080 to use your application"
  kubectl --namespace default port-forward $POD_NAME 8080:$CONTAINER_PORT

helm ls   #确认安装状态
NAME    NAMESPACE       REVISION        UPDATED                                 STATUS          CHART           APP VERSION
test1   default         1               2021-09-23 14:20:30.791658 +0800 CST    deployed        mytest-1.0.1    1.16.0
这时候如果status如果是deployed就表示部署成功了
接下来继续介绍helm的其他指令
<<: Day 25 - Rancher Fleet.yaml 档案探讨
Day.5 深入理解连结之Object file
目标文件格式 (Object file) 以文件的方式放在磁碟(Disk)中的 Object m...
[Day 16] 每个模型我全都要 - 堆叠法 (Stacking)
堆叠法 (Stacking) 今日学习目标 了解 Stacking 方法 堆叠法的学习机制为何? 利...
#24 JS: HTML DOM Events - Part 2
For the topic today, I can't fully understand the ...
Day10 NiFi - Templates, Labels & Funnel
今天我们要讲的东西有点多,要一次讲三个,分别是 Templates, Labels & Fu...
第4章:档案系统结构介绍
前言 从上一章节,我们学会了基本的登入与登出桌面环境,以及如何将终端机从桌面环境进行打开,还有基本的...