【Day8】EditProfileFragment X Storage上传照片
在昨天的Profile页面中,我们可以看到有照片的讯息,那我们今天主要要来做的就是~ 把手机相簿里面的照片传上去Firebase的 Storage,并且要转换成下次可以download的格式!
长成这样!
1.建立EditProfileFragment
继承BaseFragment,顺便把databinding设定好
2.接下来来看layout
dimen
<dimen name="edit_image_margin_top">50dp</dimen>
新增 string
	<string name="hint_enter_your_area">请输入您的居住区域</string>
    <string name="toolbar_title_edit_profile">修改资料</string>
    <string name="man">男性</string>
    <string name="female">女性</string>
	<string name="edit_user_detail_successful">修改资料完成!</string>
	<string name="update_user_profile_successful">上传图片成功!</string>
    <string name="hint_select_your_image">请选取照片!</string>
layout一样直接贴
<?xml version="1.0" encoding="utf-8"?>


<layout xmlns:android="http://schemas.android.com/apk/res/android"
    xmlns:tools="http://schemas.android.com/tools"
    xmlns:app="http://schemas.android.com/apk/res-auto">


    <androidx.constraintlayout.widget.ConstraintLayout
        android:layout_width="match_parent"
        android:layout_height="match_parent"
        tools:context=".ui.fragment.EditProfileFragment">


        <androidx.appcompat.widget.Toolbar
            android:id="@+id/toolbar_edit_profile_fragment"
            android:layout_width="match_parent"
            android:layout_height="?attr/actionBarSize"
            app:layout_constraintTop_toTopOf="parent"
            app:layout_constraintEnd_toEndOf="parent"
            android:background="@color/light_pewter_blue">

            <TextView
                android:layout_width="match_parent"
                android:layout_height="match_parent"
                android:text="@string/toolbar_title_edit_profile"
                android:textSize="@dimen/toolbar_textSize"
                android:gravity="center"
                android:textStyle="bold"
                android:textColor="@color/white">

            </TextView>

        </androidx.appcompat.widget.Toolbar>

        <ImageView
            android:id="@+id/iv_edit_profile_image"
            android:layout_width="@dimen/user_image_width_height"
            android:layout_height="@dimen/user_image_width_height"
            app:layout_constraintTop_toBottomOf="@id/toolbar_edit_profile_fragment"
            app:layout_constraintStart_toStartOf="parent"
            app:layout_constraintEnd_toEndOf="parent"
            android:layout_marginTop="@dimen/edit_image_margin_top">

        </ImageView>

        <ImageView
            android:id="@+id/iv_edit_profile_camera"
            android:layout_width="wrap_content"
            android:layout_height="wrap_content"
            android:src="@drawable/ic_baseline_photo_camera_24"
            app:layout_constraintBottom_toBottomOf="@id/iv_edit_profile_image"
            app:layout_constraintEnd_toEndOf="@id/iv_edit_profile_image">

        </ImageView>

        <com.google.android.material.textfield.TextInputLayout
            android:id="@+id/tip_edit_profile_fragment_name"
            android:layout_width="match_parent"
            android:layout_height="wrap_content"
            app:layout_constraintStart_toStartOf="parent"
            app:layout_constraintEnd_toEndOf="parent"
            android:layout_marginStart="@dimen/tip_margin_start_end"
            android:layout_marginEnd="@dimen/tip_margin_start_end"
            android:layout_marginTop="@dimen/tip_margin_top_bottom"
            app:layout_constraintTop_toBottomOf="@id/iv_edit_profile_camera"
            style="@style/Widget.MaterialComponents.TextInputLayout.OutlinedBox">

            <com.example.petsmatchingapp.utils.JFEditText
                android:id="@+id/ed_edit_profile_name"
                android:layout_width="match_parent"
                android:layout_height="wrap_content"
                android:padding="@dimen/edText_padding"
                android:textSize="@dimen/edText_textSize"
                android:hint="@string/hint_enter_your_name"/>

        </com.google.android.material.textfield.TextInputLayout>


        <com.google.android.material.textfield.TextInputLayout
            android:id="@+id/tip_edit_fragment_area"
            android:layout_width="match_parent"
            android:layout_height="wrap_content"
            app:layout_constraintStart_toStartOf="parent"
            app:layout_constraintEnd_toEndOf="parent"
            android:layout_marginStart="@dimen/tip_margin_start_end"
            android:layout_marginEnd="@dimen/tip_margin_start_end"
            android:layout_marginTop="@dimen/tip_margin_top_bottom"
            app:layout_constraintTop_toBottomOf="@id/tip_edit_profile_fragment_name"
            style="@style/Widget.MaterialComponents.TextInputLayout.OutlinedBox">

            <com.example.petsmatchingapp.utils.JFEditText
                android:id="@+id/ed_edit_area"
                android:layout_width="match_parent"
                android:layout_height="wrap_content"
                android:padding="@dimen/edText_padding"
                android:textSize="@dimen/edText_textSize"
                android:hint="@string/hint_enter_your_area">

            </com.example.petsmatchingapp.utils.JFEditText>

        </com.google.android.material.textfield.TextInputLayout>


        <RadioGroup
            android:id="@+id/radiogp_edit_profile_fragment"
            android:layout_width="match_parent"
            android:layout_height="40dp"
            app:layout_constraintTop_toBottomOf="@id/tip_edit_fragment_area"
            app:layout_constraintStart_toStartOf="parent"
            app:layout_constraintEnd_toEndOf="parent"
            android:layout_marginStart="@dimen/tip_margin_start_end"
            android:layout_marginEnd="@dimen/tip_margin_start_end"
            android:orientation="horizontal"
            android:layout_marginTop="20dp">

            <com.example.petsmatchingapp.utils.JFRadioButton
                android:id="@+id/rb_man"
                android:layout_width="0dp"
                android:layout_height="match_parent"
                android:layout_weight="1"
                android:button="@null"
                android:text="@string/man"
                android:layout_marginEnd="3dp"
                android:gravity="center"
                android:textColor="@color/white"
                android:background="@drawable/radio_button_background">

            </com.example.petsmatchingapp.utils.JFRadioButton>


            <com.example.petsmatchingapp.utils.JFRadioButton
                android:id="@+id/rb_female"
                android:layout_width="0dp"
                android:layout_height="match_parent"
                android:layout_weight="1"
                android:layout_marginEnd="3dp"
                android:button="@null"
                android:text="@string/female"
                android:gravity="center"
                android:textColor="@color/white"
                android:background="@drawable/radio_button_background">

            </com.example.petsmatchingapp.utils.JFRadioButton>

        </RadioGroup>


        <com.example.petsmatchingapp.utils.JFButton
            android:id="@+id/btn_edit"
            android:layout_width="match_parent"
            android:layout_height="wrap_content"
            android:layout_marginStart="@dimen/tip_margin_start_end"
            android:layout_marginEnd="@dimen/tip_margin_start_end"
            app:layout_constraintTop_toBottomOf="@id/radiogp_edit_profile_fragment"
            android:text="@string/edit"
            android:background="@drawable/button_background"
            android:foreground="?attr/selectableItemBackground"
            android:textColor="@android:color/white"
            android:layout_marginTop="20dp">

        </com.example.petsmatchingapp.utils.JFButton>


    </androidx.constraintlayout.widget.ConstraintLayout>
</layout>
好的,接下来我们会看到有几个红字,没关系,我们来解决它!
先从最简单的开始,我们发现我们需要一个相机的图像,所以我们透过new → vector asset,来新增一个camera的图像。
再过来,我们有一个RadioButton,首先我们透过之前自定义的方式,来新增我们的JFRadioButton!
可能会有人好奇,为什麽我们已经有了Button,为什麽要新增RadioButton,因为RadioButton是单选选项,我们等等也会新增按下按钮之後的样式,好让我们使用者更能够知道自己现在是按哪一个按钮!
class JFRadioButton(context: Context, attributeSet: AttributeSet): AppCompatRadioButton(context,attributeSet) {

    init {
        applyFont()
    }

    private fun applyFont() {
        val typeface: Typeface = Typeface.createFromAsset(context.assets,"jfopenhuninn.ttf")
        setTypeface(typeface)
    }
}
好的! 接下来我们还有一个需要解决的就是background的问题

我们需要当今天使用者点下某个Radiobutton之後,能够有样式的改变,不然我们不知道自己点了什麽就尴尬了~
所以我们就跟之前做button的background一样,我们要去 new一个drawable,但是这次我们不用 shape,我们在Root element的时候我们选择 selector
<?xml version="1.0" encoding="utf-8"?>
<selector xmlns:android="http://schemas.android.com/apk/res/android">

	//当按钮被按得时候
    <item android:state_checked="true">
        <shape android:shape="rectangle">
            //圆形角度
			<corners android:radius="10dp"/>
            //渐层
			<gradient android:startColor="@color/light_pewter_blue"
             android:endColor="@color/pewter_blue"/>

			//边框颜色
           <stroke android:color="@color/status_color"
                   //边框宽度
				   android:width="1dp">

           </stroke>
        </shape>

    </item>


    <item android:state_checked="false">
        <shape android:shape="rectangle">
            <corners android:radius="10dp"/>
            <gradient android:startColor="@color/light_pewter_blue"
                      android:endColor="@color/pewter_blue"/>

        </shape>

    </item>


</selector>
3.新增User的栏位
如果dataclass里面的资料,後来发现还需要新增某些栏位呢? 那之前的资料怎麽办呢? 没关系,我们透过update的功能,就可以不用让user重新办帐号了!
直接到 User,并且新增一个栏位,并给他初始值
data class User(
    val id: String = "",
    val name: String = "",
    val email: String = "",
    val password: String = "",
    val image: String = "",
    val gender: String = "",
	//新增这行
    val area: String =  "",
    val profileCompleted: Boolean = false
)
4.观察livedata,并且显示
跟昨天的文章一样,我们透过从 Firestore拿到的资料,并且存在livedata,我们去观察这个livedata是否有资料,如果有的话,就显示在EditText栏位
首先
private val accountViewModel: AccountViewModel by sharedViewModel()
来 onCreateViwe新增观察
accountViewModel.userDetail.observe(viewLifecycleOwner, Observer {
			//传入url跟imageView
            Constant.loadUserImage(it.image,binding.ivEditProfileImage)
		    //因为我们初始值是"",所以我们要判定假如它不是初始值才需要显示
			if (it.area != ""){
                binding.edEditArea.setText(it.area)
            }
            binding.edEditProfileName.setText(it.name)
如果userDetail里面的资料是男生,我们就让男生的RadioButton亮起来,反之亦然
            if (it.gender == Constant.MAN){
                binding.rbMan.isChecked = true
            }else{
                binding.rbFemale.isChecked = true
            }

        })
发现我们有红字,所以我们要到 Constant来新增
新增在Constant,可以帮助我们在update资料时,跟拿资料时,不会拼字拼错。减少一些不必要的错误。
const val MAN: String = "man"
const val FEMALE: String = "female"
5.从ProfileFragment导航到 EditProfileFragment
到 mobile_nav来新增我们刚创好的Fragment,并且连连看从ProfileFragment→EditProfileFragment,及EditProfileFragment→ProfileFragment
再过来回到ProfileFragment,我们需要新增点击事件! 我们在 onClick里面新增
binding.btnProfileFragmentGoEdit ->{
findNavController().navigate(R.id.action_profileFragment_to_editProfileFragment)
}
别忘了要在 onCreateView新增
binding.btnProfileFragmentGoEdit.setOnClickListener(this)
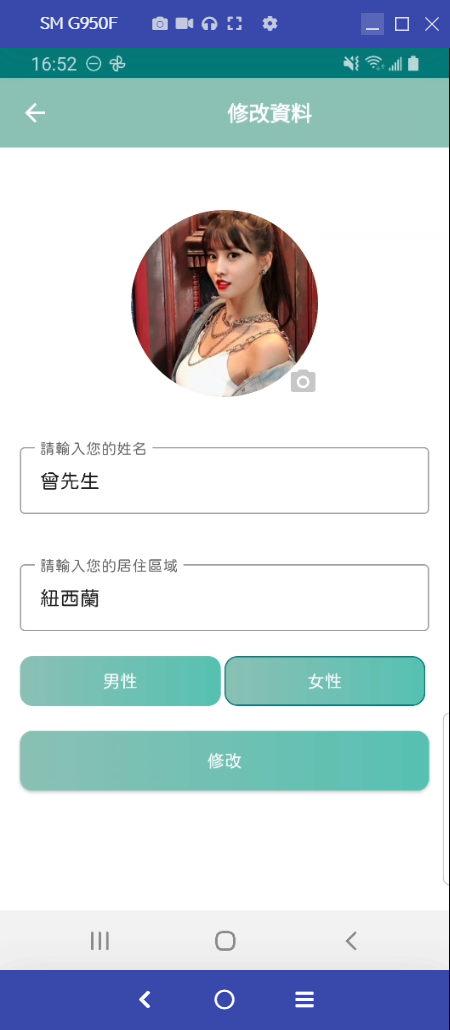
好的,那我们接下来就可以看到我们的资料啦,曾先生,以及因为现在area跟image没有资料,所以我们都是预设值。

6.update资料
接下来我们要用AccountViewModel来update资料,我们一样到AccountViewModel来新增以下的funtion
//传入 HashMap,HashMap 可以让我们根据key来塞入值
fun updateUserDetailToFireStore(mHashMap: HashMap<String,Any>, fragment: EditProfileFragment ){

        getCurrentUID()?.let {
            FirebaseFirestore.getInstance().collection(Constant.USER)
                .document(it)
                    .update(mHashMap)
                    .addOnSuccessListener {
                        fragment.editUserDetailSuccessful()
                    }
                    .addOnFailureListener {
                        fragment.editUserDetailFail(it.toString())
                    }
        }

    }
我们发现有几个红字,让我们来解决它,我们回到 EditProfileFragement,并新增以下
fun editUserDetailSuccessful(){
hideDialog()
showSnackBar(resources.getString(R.string.edit_user_detail_successful),false)
//这边记得要在拿一次UserDetail,不然我们的livedata不会更新,也就不会显示新的资料
accountViewModel.getUserDetail()
}

fun editUserDetailFail(e: String){
hideDialog()
showSnackBar(e,false)
}
好的! 接下来我们首先要先完成上传自己相簿的照片
步骤是,首先先把图片传到Storage,然後再把它改成改成下载的格式,再把它传入Firestore
7.上传照片
7.1.权限开启
想当然耳,开启我们相簿是非常隐私的事情,如果我们帅气的自拍照不需要我们同意就可以读取,那是多麽恐怖的一件事啊?
邀请权限会是长这样
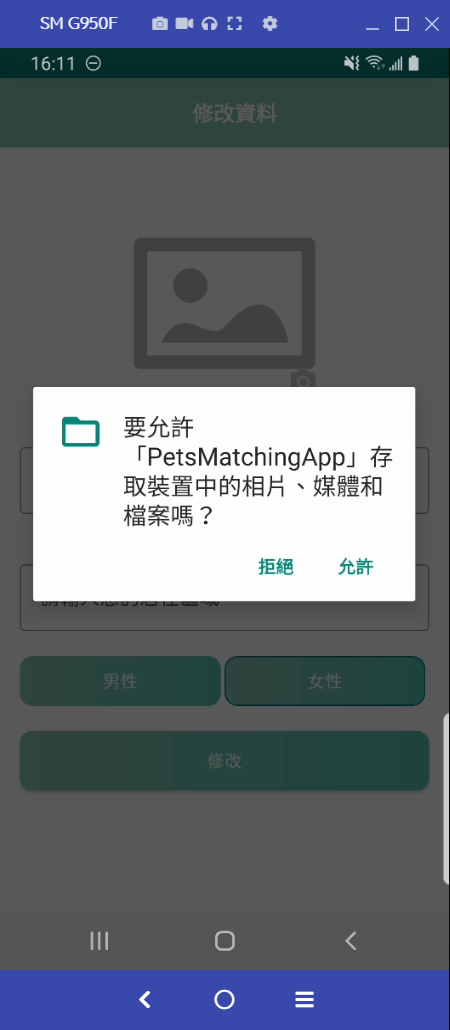
我们先去 manifest的新增以下权限
<uses-permission android:name="android.permission.READ_EXTERNAL_STORAGE" />
那我们还是需要让user去同意,所以我们设定当今天按下 camera的图片时,会先确认是否有权限,如果有才会执行去拿相簿,没有就询问
private fun checkPermission(){

		//check是否有权限,有的话就进相簿
        if (ContextCompat.checkSelfPermission(requireActivity(),android.Manifest.permission.READ_EXTERNAL_STORAGE) == PackageManager.PERMISSION_GRANTED){
        resultLauncher.launch(
         Intent(Intent.ACTION_PICK,MediaStore.Images.Media.EXTERNAL_CONTENT_URI)
            )
        }else{
			/没的话就去确认requestPermission
            requestPermission()
        }
    }
我们发现有几个地方是红字,所以我们要来解决它
我们先来新增要求权限
private fun requestPermission(){
        ActivityCompat.requestPermissions(requireActivity(), arrayOf(android.Manifest.permission.READ_EXTERNAL_STORAGE),Constant.REQUEST_CODE_READ)
    }
- 第一个参数我们丢activity
- 第二个参数我们丢permission,也就是我们在manifest刚刚放的权限
- 第三个参数我们丢requestCode,这个是让我们可以在override onPermissionReques这个funtion时候,可以判别的requestCode,因为这个是需要Int型态,所以我们要在Constant新增一组
//这个是值是可以自订的
const val REQUEST_CODE_READ = 1001
7.2.launch 读取相簿的Intent
目前onActivityResult已经弃用了,所以我们要更改成,首先我们在 class 下面先新增注册一个ActivityResult,再到想要发出 Intent的地方,透过这个resultLauncher来启动Intent。(也就是会在刚刚的checkPermission() 里面)
//大致上概念是跟onActivityResult一样,得到的值会是ActivityResult,因为我们Launch的是相簿的Intent,所以我们拿到的是Uri

private val resultLauncher = registerForActivityResult(ActivityResultContracts.StartActivityForResult()){ uri ->
        if (uri.resultCode == Activity.RESULT_OK){
			//一样透过data.data去拿到值
            val selectedUri = uri.data?.data
            if (selectedUri != null){
				//选完图片後,直接显示在我们的画面上
                Constant.loadUserImage(selectedUri,binding.ivEditProfileImage)
				//传入Storage
        accountViewModel.saveImageToFireStorage(requireActivity(),this,selectedUri)
            }
        }
    }
7.3.传入Storage
确认是否有implement FireStorage
implementation 'com.google.firebase:firebase-storage-ktx'
来到AccountViewModel,新增
//传入acitivty,让我们等等可以拿到档案的的格式
fun saveImageToFireStorage(activity: Activity, fragment: EditProfileFragment,uri: Uri){

//这边我们要先拿一个 Storage的Reference,并且後面的child我们把它指定成,user_image + 时间 + 档案的type
 val sdf: StorageReference = FirebaseStorage.getInstance().reference.child(Constant.USER_IMAGE + System.currentTimeMillis() + Constant.getFileExtension(activity, uri))
        //直接用 putFile就可以上传档案了
		sdf.putFile(uri)
                .addOnSuccessListener {
//上传成功後可以拿到 UploadTask.TaskSnapshot,我们要把它改成可以下载的Url
                    it.metadata?.reference?.downloadUrl
//成功後,我们再把它传入到 fragment,并且一起upda
                        ?.addOnSuccessListener {
                            fragment.saveImageSuccessful(it)
                        }
                        ?.addOnFailureListener {
                            fragment.saveImageFail(it.toString())
                        }
                }
                .addOnFailureListener {
                    fragment.editUserDetailFail(it.toString())
                }

    }
再过来去 Constant 新增以下
//指定 child的时候,新增叙述让我们了解是user照片,还是之後会上传的pet照片。
const val USER_IMAGE: String = "user_image"

//利用 MimeTypeMap去拿出图片uri的格式
fun getFileExtension(activity: Activity, uri: Uri): String?{
return MimeTypeMap.getSingleton().getExtensionFromMimeType(activity.contentResolver.getType(uri))
回到EditProfileFragment新增以下
fun saveImageSuccessful(uri: Uri){
showSnackBar(resources.getString(R.string.update_user_profile_successful),false)
//把它指定到我们的 mUri
mUri = uri.toString()

}

fun saveImageFail(e: String){
showSnackBar(e,true)
}
我们在class 下方新增以下,让我们可以赋值,一开始是null,然後再 saveImageSuccessful() 被呼叫时,我们把它赋予新值
var mUri: String? = null
7.4.确认资料格式
private fun validDataForm(): Boolean{
        return when{

            TextUtils.isEmpty(binding.edEditProfileName.text.toString().trim())  -> {
            showSnackBar(resources.getString(R.string.hint_enter_your_name),true)
                return false
            }
            TextUtils.isEmpty(binding.edEditArea.text.toString().trim()) -> {
             showSnackBar(resources.getString(R.string.hint_enter_your_area),true)
                return false
            }
//我这边是设定一定要有选取照片,不然不给过,但是实际时可以自己决定要不要有图片
 mUri.isNullOrBlank() && accountViewModel.userDetail.value?.image == "" -> {
 showSnackBar(resources.getString(R.string.hint_select_your_image),true)
                return false
            }
            else -> true

        }

    }
接下来我们来Constant来新增以下,好让我们不会有写错字导致没有match成功的可能性
	const val NAME: String = "name"
    const val AREA: String = "area"
    const val GENDER: String = "gender"
    const val IMAGE: String = "image"
    const val PROFILE_COMPLETED: String = "profileCompleted"
7.5.上传到 Firestore!
回到onClick
override fun onClick(v: View?) {
       when(v){
           binding.ivEditProfileCamera ->{
				//check我们的相簿读取权限
               checkPermission()
           }

           binding.btnEdit ->{
				//确认格式
               if (validDataForm()){
                   showDialog(resources.getString(R.string.please_wait))
					//我们透过key对value的方式来更新资料
                   val mHashMap = HashMap<String,Any>()
                   mHashMap[Constant.NAME] = binding.edEditProfileName.text.toString().trim()
                   //确认当今天mUri不是null时才把它放进 HashMap
					mUri?.let {
                       mHashMap[Constant.IMAGE] = it
                   }
                   var gender = ""
                  //判断user点选的RadioButton
				if (binding.rbMan.isChecked){
                       gender = Constant.MAN
                   }else{
                       gender = Constant.FEMALE
                   }

                   mHashMap[Constant.GENDER] = gender
				   //把Profile_completed改成 true
                   mHashMap[Constant.PROFILE_COMPLETED] = true
                       mHashMap[Constant.AREA]= binding.edEditArea.text.toString().trim()
                   accountViewModel.updateUserDetailToFireStore(mHashMap,this)

               }
           }
       }
    }
到 onCreateView新增以下
		binding.btnEdit.setOnClickListener(this)
        binding.ivEditProfileCamera.setOnClickListener(this)
新增返回键就结束这一回合!
binding.toolbarEditProfileFragment.setNavigationIcon(R.drawable.ic_baseline_arrow_back_24)
binding.toolbarEditProfileFragment.setNavigationOnClickListener {
            requireActivity().onBackPressed()
        }
成功如下啦!!

惨了,自己打完之後觉得有点害羞0.0
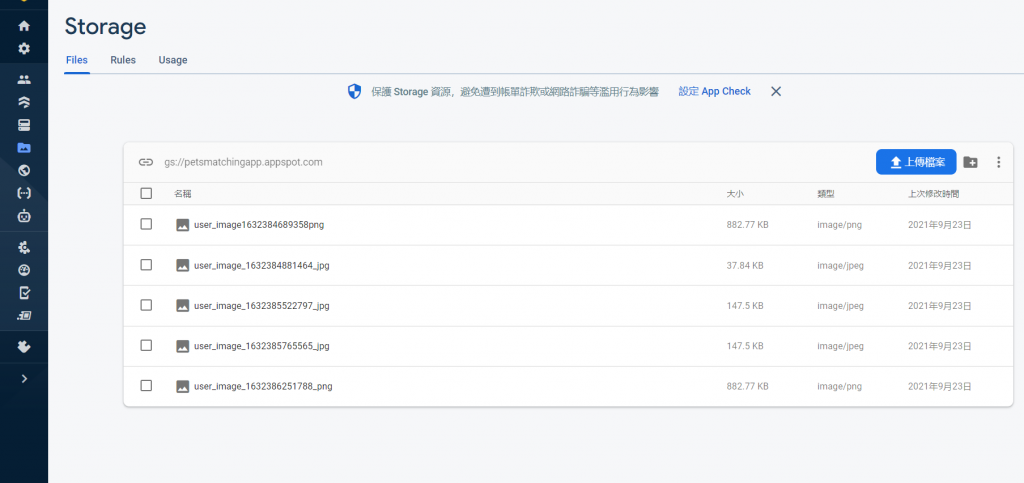
上传图片可以先去 Storage确认一下
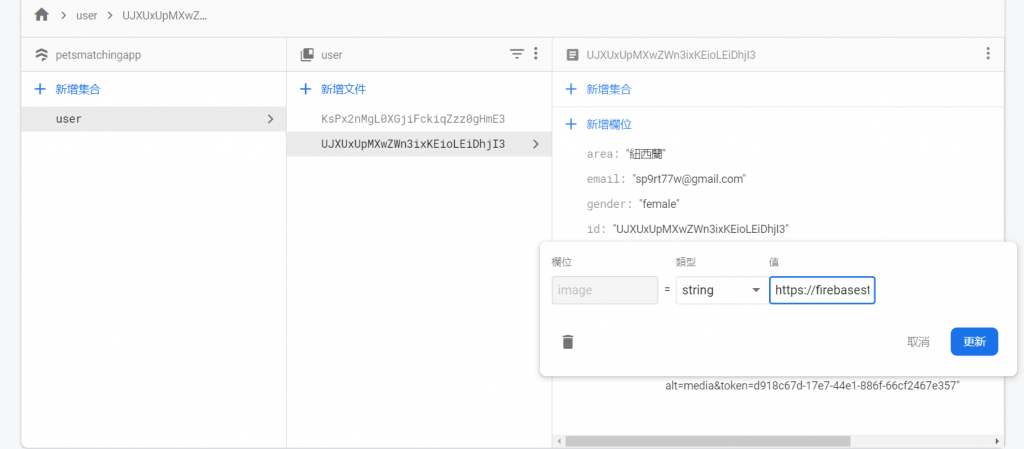
来看个 FireStore
>>: [Day 8]从零开始学习 JS 的连续-30 Days---阵列
冒险村01 - Begin from linter(1)
01 - Begin from linter : rails_best_practices 好的开始...
[Day-03] - Spring Framework Introduction
Abstract 在Spring Framework尚未被开发出来时,Java EE是以 Sun公司...
Multiple objects (上)
大家好,我是西瓜,你现在看到的是 2021 iThome 铁人赛『如何在网页中绘制 3D 场景?从 ...
了解内嵌、外嵌导入css方式
进入到css的环节,讲解如何使用内嵌、外嵌导入css的方式 要注意内嵌、外嵌使用方式不太一样 外嵌...
基於 SAML 的联合身份管理 (FIM) 以支持单点登录 (SSO)
来源:安全断言标记语言 (SAML) V2.0 技术概述 如上图所示: .一个用户可以在每个域中拥...