[Day10] Face Detection - 使用OpenCV & Dlib:OpenCV DNNs
本文开始
使用OpenCV DNNs方式来侦测人脸,虽然这个方式会使用到深度学习神经网路(框架为SSD (Single Shot Detector) + 基础CNN网路使用ResNet),但实际使用上不但简单,侦测人脸的速度也很快。
相关的框架与CNN网路架构说明不在这个系列的范围内 (怕讲不完...),有求知慾的邦友可以自行搜寻相关关键字。
前面提到过,使用OpenCV & Dlib来做人脸侦测,大概可以分为四种方式:
- OpenCV Haar cascades
- OpenCV deep neural networks (DNNs) <--
今天说这个 - Dlib HOG + Linear SVM
- Dlib max-margin object detector (MMOD)
今天要介绍第二种方式。
OpenCV DNNs
习惯上我喜欢称呼这个方法叫OpenCV神经网路检测,
在辨识速度不差、辨识准确度高於哈尔特徵检测外,也不用太多的参数调整需要介入。
如果是要做人脸侦测应用,一开始先使用这个方式来做,结果一定不会让你失望的。
开始实作吧!
- 在昨天Day9的专案下,同样在
face_detection目录下新增一个Python档案opencv_dnns.py

- 在新增的Python档案内输入以下内容 (相关程序码说明在注解内):
# 汇入必要套件 import argparse import time from os.path import exists from urllib.request import urlretrieve import cv2 import numpy as np from imutils.video import WebcamVideoStream prototxt = "deploy.prototxt" caffemodel = "res10_300x300_ssd_iter_140000.caffemodel" # 下载模型相关档案 if not exists(prototxt) or not exists(caffemodel): urlretrieve(f"https://raw.githubusercontent.com/opencv/opencv/master/samples/dnn/face_detector/{prototxt}", prototxt) urlretrieve( f"https://raw.githubusercontent.com/opencv/opencv_3rdparty/dnn_samples_face_detector_20170830/{caffemodel}", caffemodel) # 初始化模型 (模型使用的Input Size为 (300, 300)) net = cv2.dnn.readNetFromCaffe(prototxt=prototxt, caffeModel=caffemodel) # 定义人脸侦测函数方便重复使用 def detect(img, min_confidence=0.5): # 取得img的大小(高,宽) (h, w) = img.shape[:2] # 建立模型使用的Input资料blob (比例变更为300 x 300) blob = cv2.dnn.blobFromImage(cv2.resize(img, (300, 300)), 1.0, (300, 300), (104.0, 177.0, 123.0)) # 设定Input资料与取得模型预测结果 net.setInput(blob) detectors = net.forward() # 初始化结果 rects = [] # loop所有预测结果 for i in range(0, detectors.shape[2]): # 取得预测准确度 confidence = detectors[0, 0, i, 2] # 筛选准确度低於argument设定的值 if confidence < min_confidence: continue # 计算bounding box(边界框)与准确率 - 取得(左上X,左上Y,右下X,右下Y)的值 (记得转换回原始image的大小) box = detectors[0, 0, i, 3:7] * np.array([w, h, w, h]) # 将边界框转成正整数,方便画图 (x0, y0, x1, y1) = box.astype("int") rects.append({"box": (x0, y0, x1 - x0, y1 - y0), "confidence": confidence}) return rects def main(): # 初始化arguments ap = argparse.ArgumentParser() ap.add_argument("-c", "--confidence", type=float, default=0.5, help="minimum probability to filter detecteions") args = vars(ap.parse_args()) # 启动WebCam vs = WebcamVideoStream().start() time.sleep(2.0) start = time.time() fps = vs.stream.get(cv2.CAP_PROP_FPS) print("Frames per second using cv2.CAP_PROP_FPS : {0}".format(fps)) while True: # 取得当前的frame frame = vs.read() rects = detect(frame, args["confidence"]) # loop所有预测结果 for rect in rects: (x, y, w, h) = rect["box"] confidence = rect["confidence"] # 画出边界框 cv2.rectangle(frame, (x, y), (x + w, y + h), (0, 255, 0), 2) # 画出准确率 text = f"{round(confidence * 100, 2)}%" y = y - 10 if y - 10 > 10 else y + 10 cv2.putText(frame, text, (x, y), cv2.FONT_HERSHEY_SIMPLEX, 0.45, (0, 0, 255), 2) # 标示FPS end = time.time() cv2.putText(frame, f"FPS: {str(int(1 / (end - start)))}", (10, 30), cv2.FONT_HERSHEY_SIMPLEX, 0.7, (0, 0, 255), 2) start = end # 显示影像 cv2.imshow("Frame", frame) # 判断是否案下"q";跳离回圈 key = cv2.waitKey(1) & 0xff if key == ord('q'): break if __name__ == '__main__': main() - 在terminal输入
python face_detection/opencv_dnns.py,执行後的范例结果:
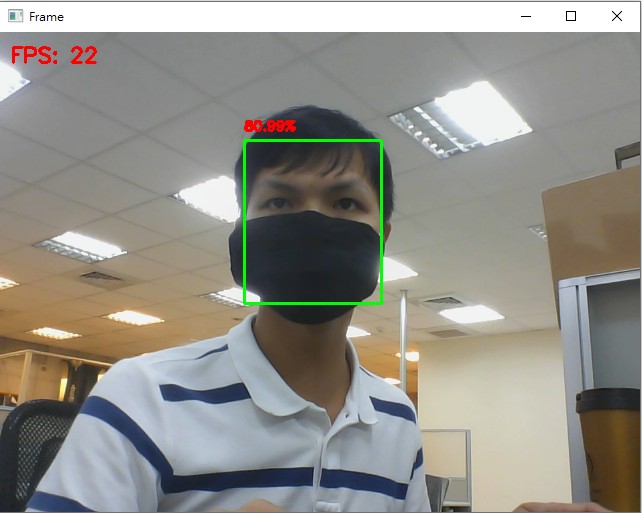
结论
- 比较昨天使用哈尔特徵检测方法的速度,虽然FPS有稍微下降 (约22 ~ 30),但准确度相差非常多 (即使戴上口罩也有50%以上的辨识准确度)
- 使用OpenCV的
dnn深度学习模型,基本上都要将Input转为blob:- 这个动作其实就是在做Computer Vision时常会提到的影像预处理 (Image Preprocessing)
- 转为blob函数
blobFromImage(image, scaleFactor, size, mean)的各个参数:- image:要用来分析的影像;注意影像的大小要与模型接受的Input Size相同 (300, 300)
- scaleFactor:影像做去均值後,要缩放的比例;这个模型训练时使用的是1.0
- mean:分别针对三种颜色(R, G, B)做影像去均值(mean substraction);这个模型训练时使用的是**(104.0, 177.0, 123.0)**
- 简单的说,当使用范例中的这个模型做人脸侦测时,图片预处理的参数都是根据原始模型训练得来;程序码44行对任何要辨识的影像都是一样的
- 唯一需要调整的argument:confidence,可以依据实际使用状况调整;当希望辨识的人脸准确率高,就将confidence调高,但相对辨识的结果数也比较少
参考程序码在这
明天见!
<<: [DAY08] 部署用 Designer 做好的 Pipiline 到 Web API
>>: [Day_9]资料储存容器 (2) - 串列(list)_(2)
【演算法】L1-4
L1 Convex Hull 解法:Divide-and-conquer One-Center Pr...
Day 13 Self-attention(七) Positional Encoding、self-attention和其他model的比较
Positional Encoding 如果依照前面讲到的,self-attention只有vect...
Day13_HTML语法10
单行文字方块(text) 让使用者输入单行的文字叙述,例如:姓名、地址、电话、信箱等等 使用<...
不容小觑的数据分析工具 - Excel:制作图表
当我们已经把资料整理好,且针对该次分析有结论和建议时,我们该怎麽将成果展现给主管和同事们呢?如果只是...
[Day19]-档案读取与写入
写入档案 写入空文件内 档案很大时分段写入 Shutil模组 档案或目录的复制、移动、更改和删除,...