Vue3 ( CLI + github ) -4
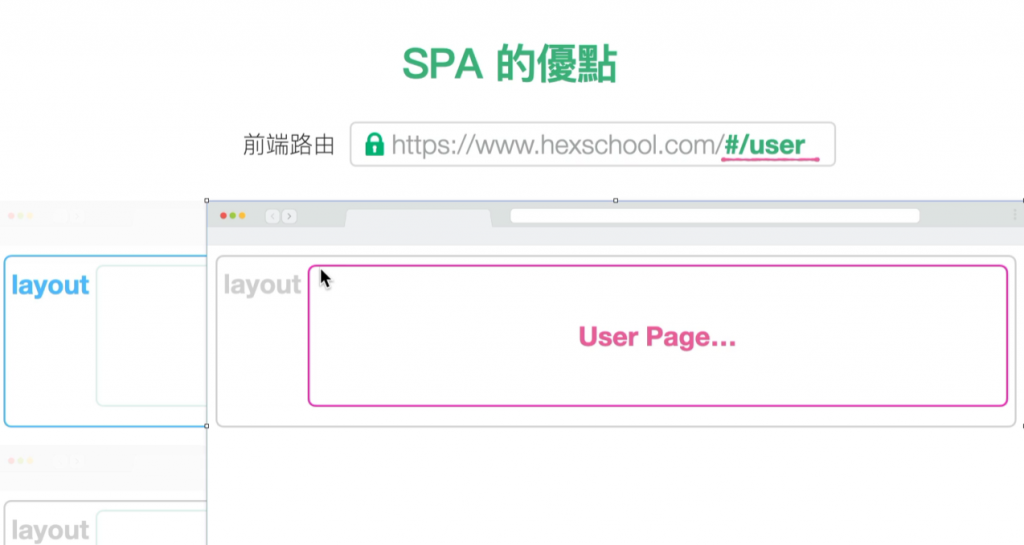
1.SAP
多一个#前端所管理的路由,只会渲染部分区域
2.环境安装 CLI
(1) 安装 Node.js (必要!!!!!)
参考 Gulp 课程:https://courses.hexschool.com/p/gulp 安装流程的部分均可直接预览 (1-3, 1-4)
Nodejs 官方网站连结: https://nodejs.org/en/
Vue Cli
英文:https://cli.vuejs.org/
中文:https://cli.vuejs.org/zh/guide/
Vue Cli 4.x 同时可建立 Vue 2.x 及 Vue 3.x 的环境,无论你是要开发 2 or 3 都仅需要安装当前版本的 Vue Cli 即可。
其它相关连结
以下为课程中会用到的相关连结
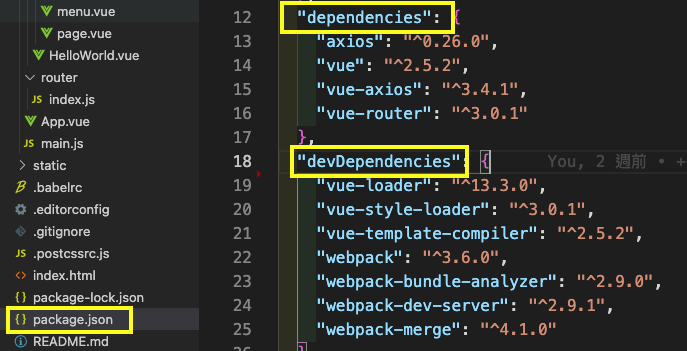
Vue Router https://next.router.vuejs.org/zh/index.html
Axios https://github.com/axios/axios
Vue Axios https://www.npmjs.com/package/vue-axios
课程中运用到的指令
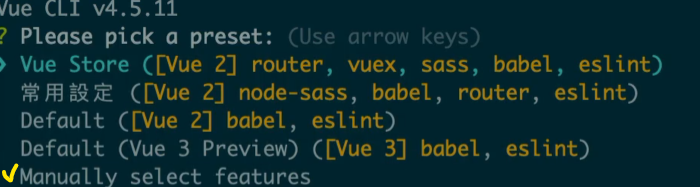
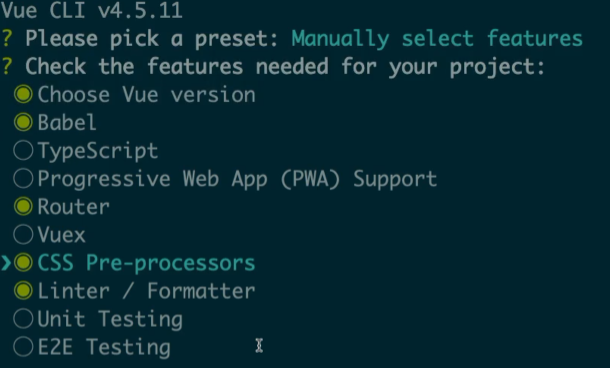
建立专案 vue create {{ 专案名称 }}
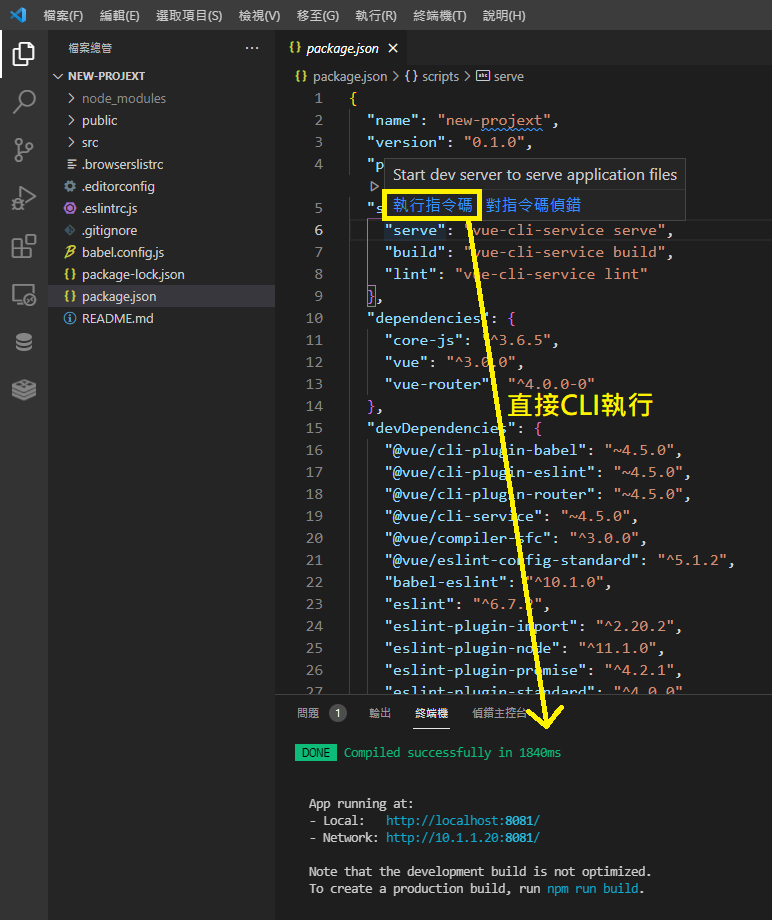
运行 Vue 开发环境 npm run serve
编译 Production 版本 npm run build
CLI 常用指令
通用指令 (Mac, Windows 共用)
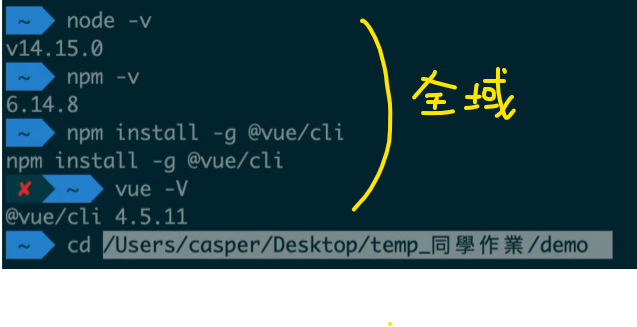
Nodejs 版本
node -v
npm 版本
npm -v
Windows 指令
回到资料夹顶端
cd\
回到上一层
cd..
进入资料夹路径
cd {{ 资料夹路径 }}
中断目前操作
ctrl + c
1.安装Node.js及Vue Cli
2.Cd後输入资料夹路径进入资料夹(小技巧:可以用拖曳的方式)
3.建立专案
vue create new-projext(专案名称)
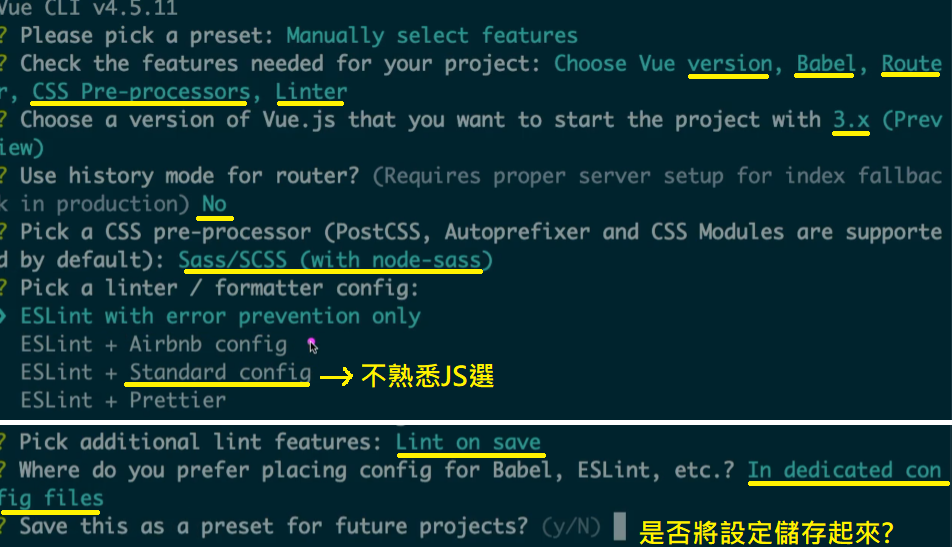
4.将刚刚新增的专案(new-projext)用VScode打开
5.Crtl + ~ 打开终端机
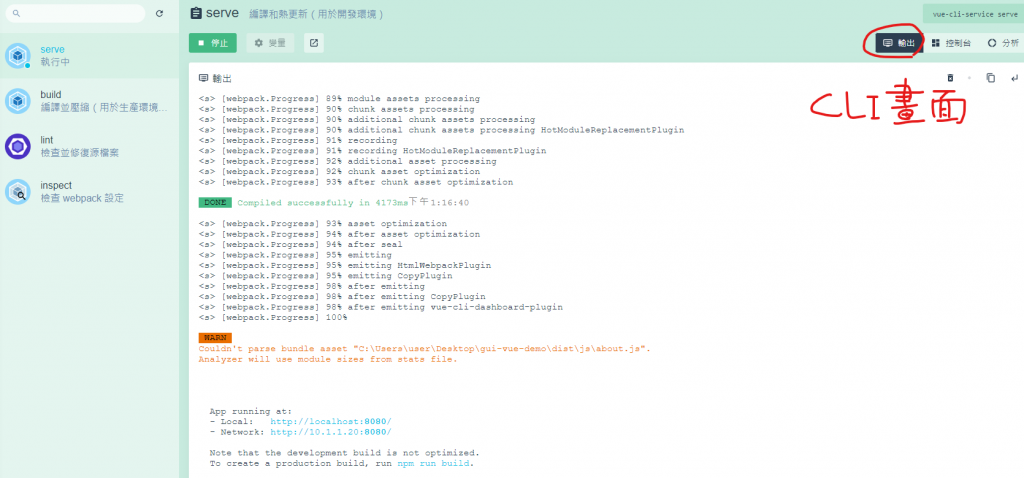
6.把环境及dist安装完毕
npm run serve
npm run build
7.建立完毕,会显示两个网址
- Local(本地电脑): http://localhost:8080/
- Network(同一个网域下才能一起看): http://10.1.1.20:8080/
注意
Cli 制作专案时,node/SASS.js + MAC 冲突
版本v-16尚未支援,需降版本安装
(1) 先删除node.js https://iter01.com/254694.html
(2) 至官方下载v-14版本 https://nodejs.org/en/download/releases/
下载pkg档 (节点-v14.18.3.pkg)
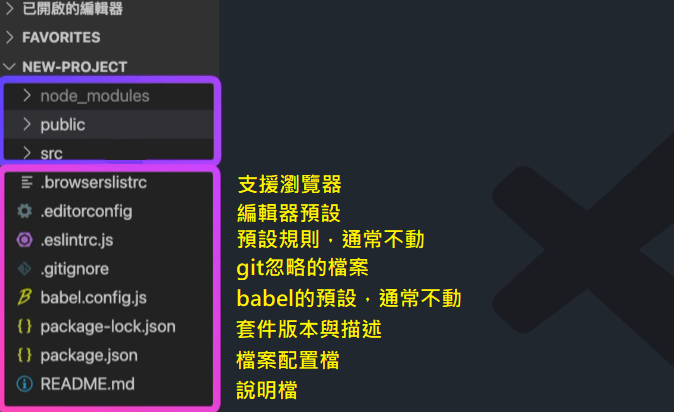
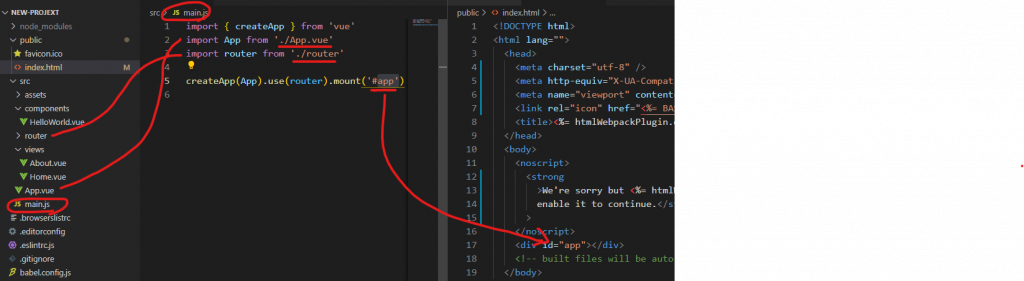
3.专案构造
等同 > npm run serve
src
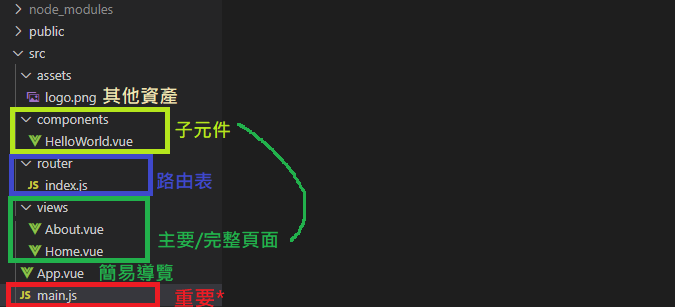
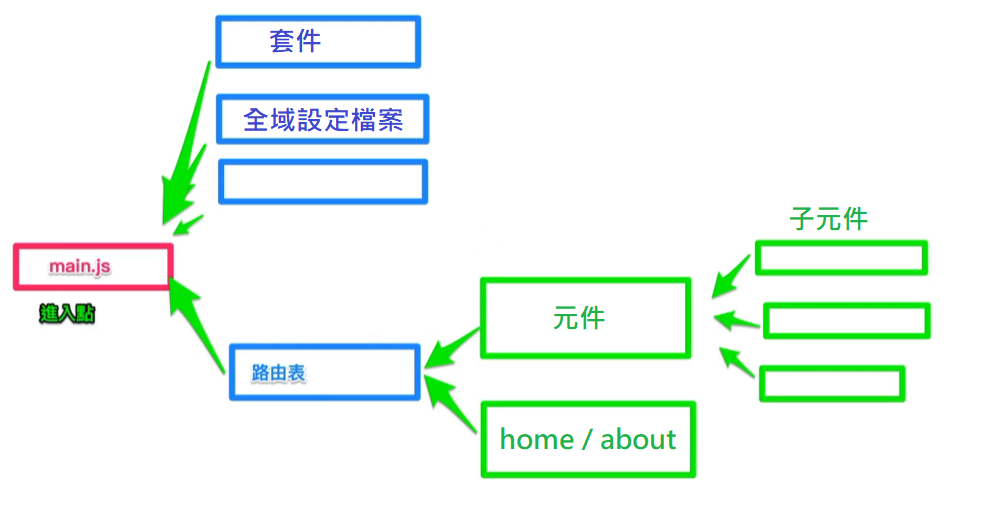
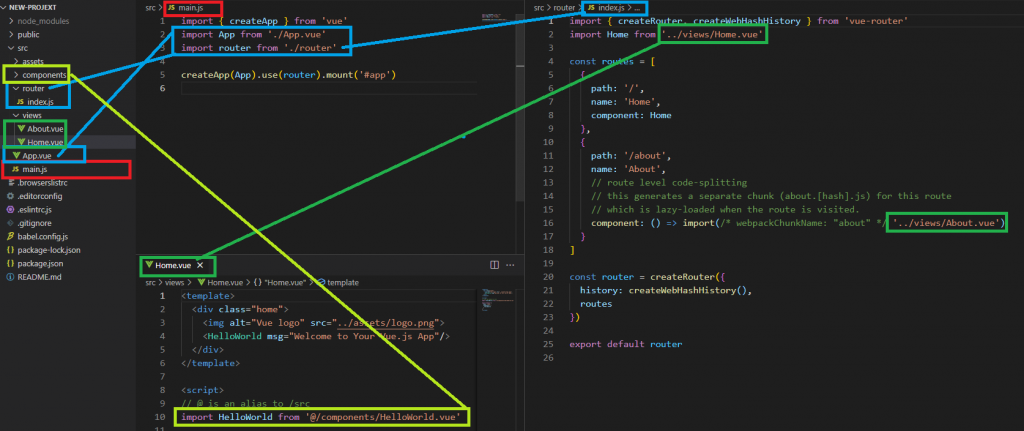
public、node_modules

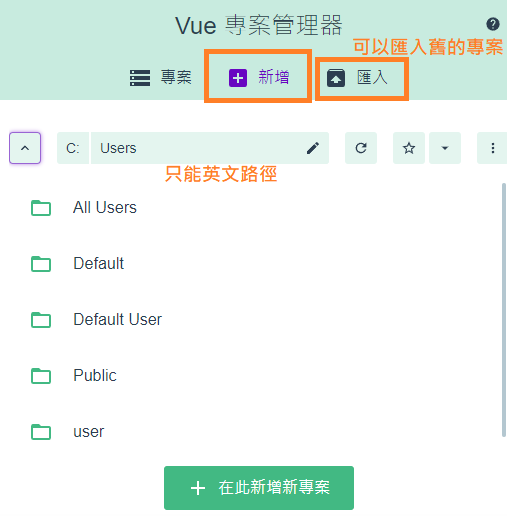
4.环境安装 GUI
(1)Crtl + ~ 打开终端机,并开启GUI介面
vue ui
(2)设定
记得路径选权限小的地方(上次直接在C槽下无法建立)
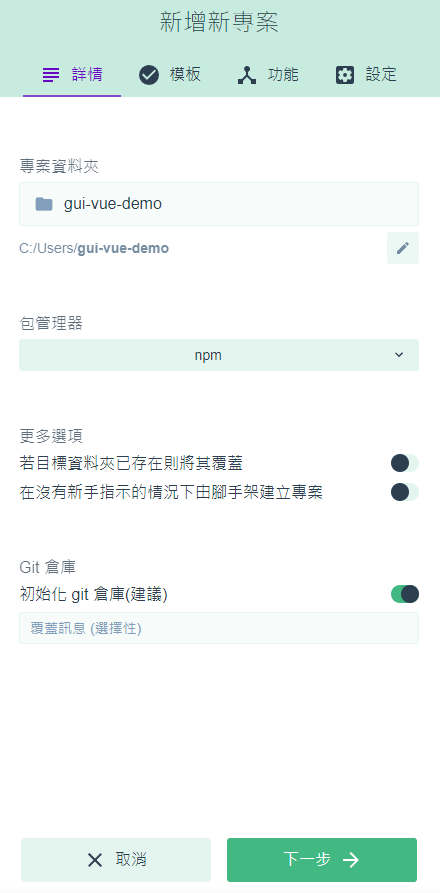

选项接下来跟前述相同
(3)插件
影响整体运作,通常建立专案就确定好了
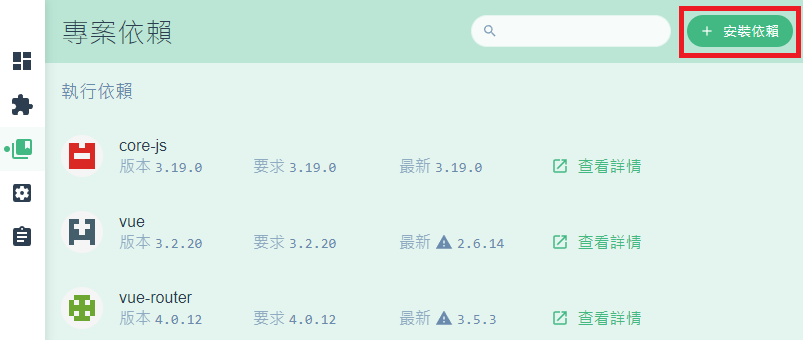
(4)依赖
辅助套件,点击右上搜寻欲安装的套件
bootstrap
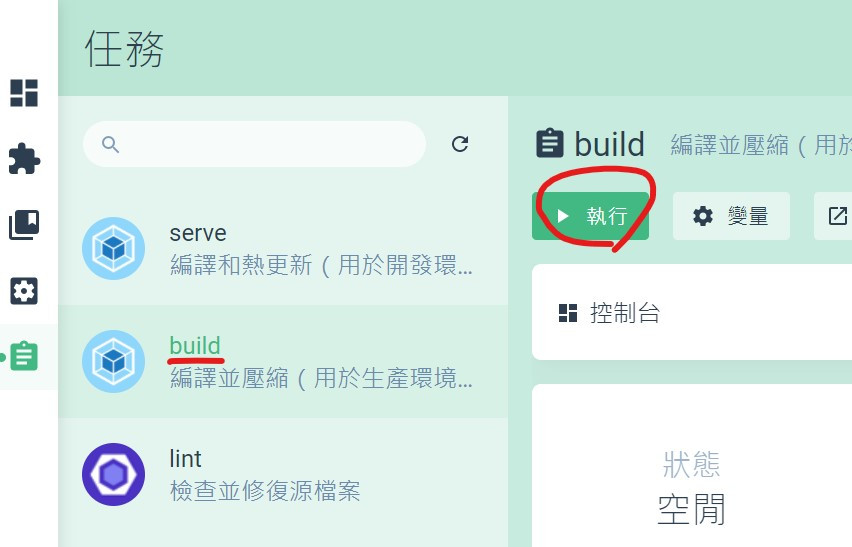
(5)任务 - serve
等同 npm run serve
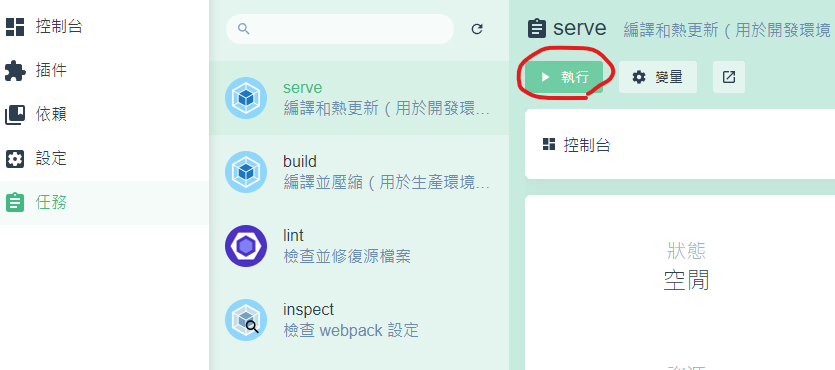
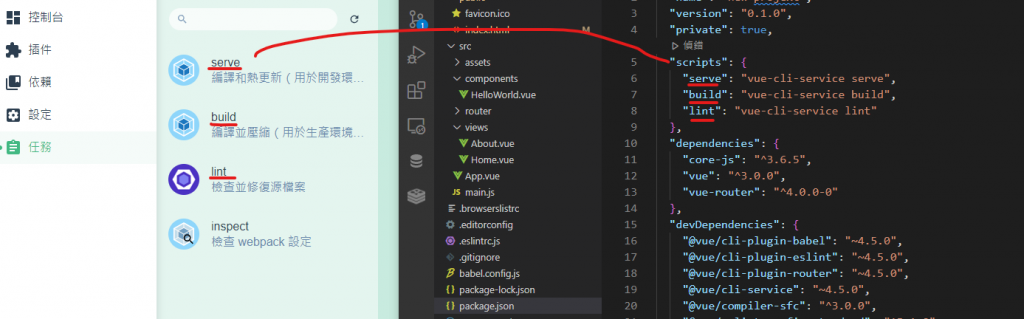
(5)任务 - build 编译
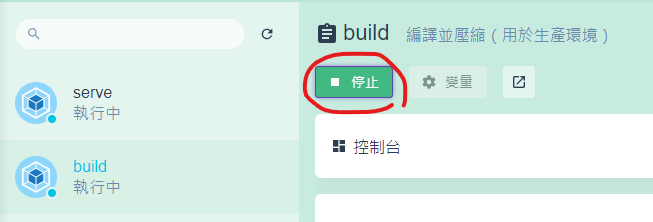
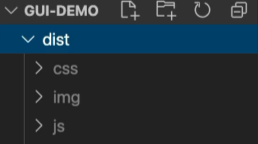
会出现dist
~CLI跟GUI创立专案,结果都会相同~
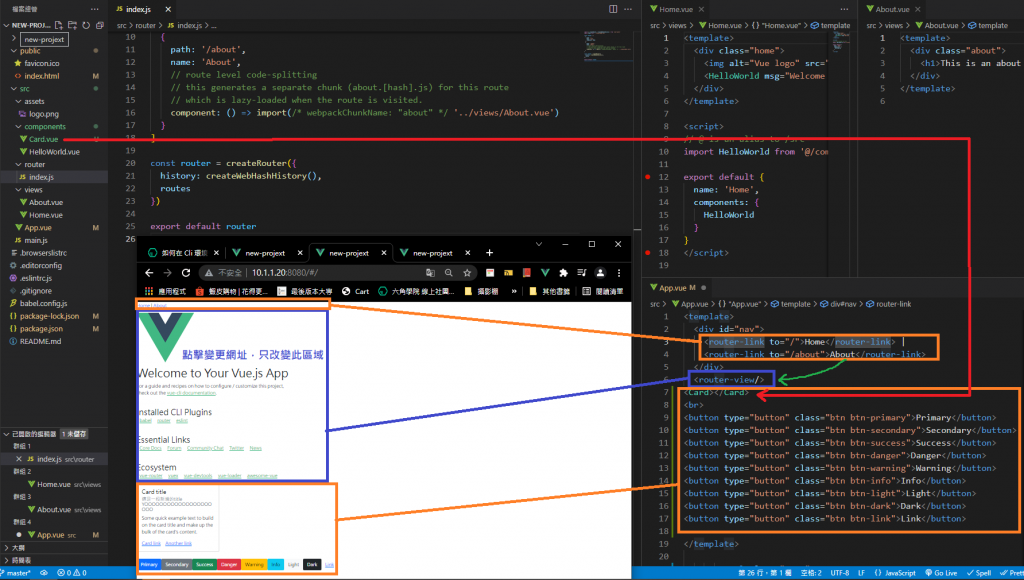
5.如何在 Cli 环境中加入 Vue 元件
同页面的增加
(1)抓Bs
https://getbootstrap.com/
npm install bootstrap
若serve正在跑的话 要先停止(ctrl+C)
(2)运行serve
npm run serve
(3) App.vue更改style 将Bs汇入
       <style lang="scss">
       @import "bootstrap";
       </style>
(4)并加入Bs的button,就会有样式了
<button type="button" class="btn btn-primary">Primary</button>
<button type="button" class="btn btn-secondary">Secondary</button>
<button type="button" class="btn btn-success">Success</button>
<button type="button" class="btn btn-danger">Danger</button>
<button type="button" class="btn btn-warning">Warning</button>
<button type="button" class="btn btn-info">Info</button>
<button type="button" class="btn btn-light">Light</button>
<button type="button" class="btn btn-dark">Dark</button>
<button type="button" class="btn btn-link">Link</button>
跨页面的增加(新增在page页面上)
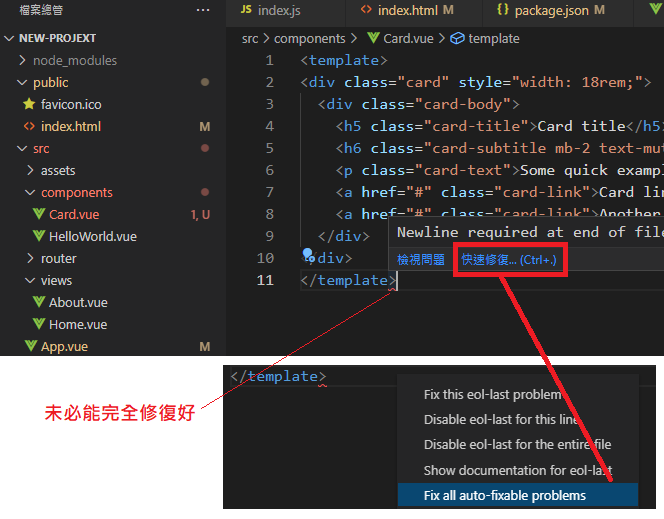
(1)在compoenent内新增Card.vue元件
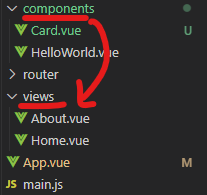
**元件,开头大写注意
(2)制作Bs Card的元件
https://getbootstrap.com/docs/5.1/components/card/
<template>
<div class="card" style="width: 18rem;">
  <div class="card-body">
    <h5 class="card-title">Card title</h5>
    <h6 class="card-subtitle mb-2 text-muted">Card subtitle</h6>
    <p class="card-text">Some quick example text to build on the card title and make up the bulk of the card's content.</p>
    <a href="#" class="card-link">Card link</a>
    <a href="#" class="card-link">Another link</a>
  </div>
</div>
</template>
快速修复(滑鼠指向,等一下,无须按按键)
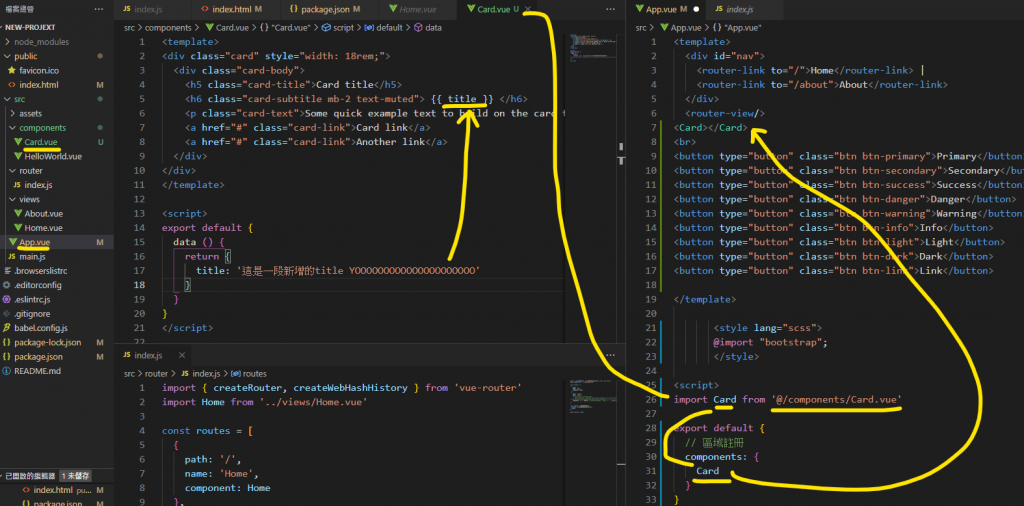
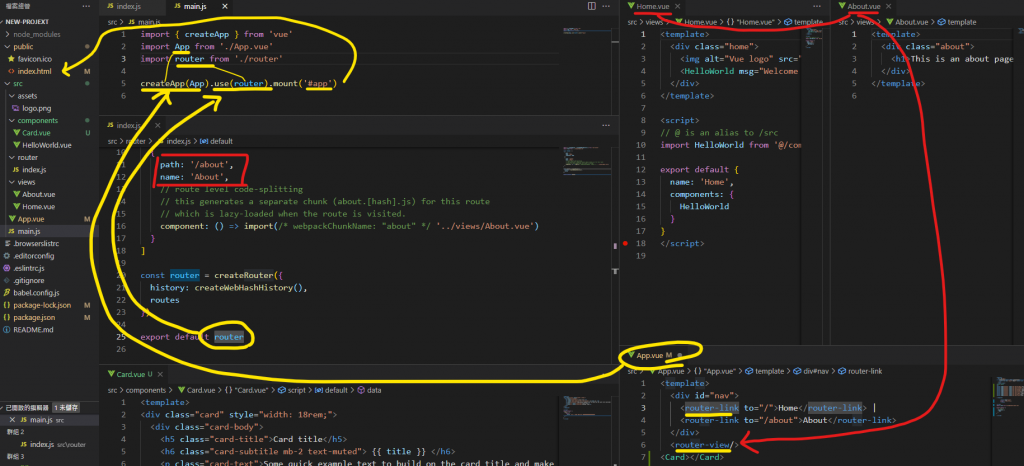
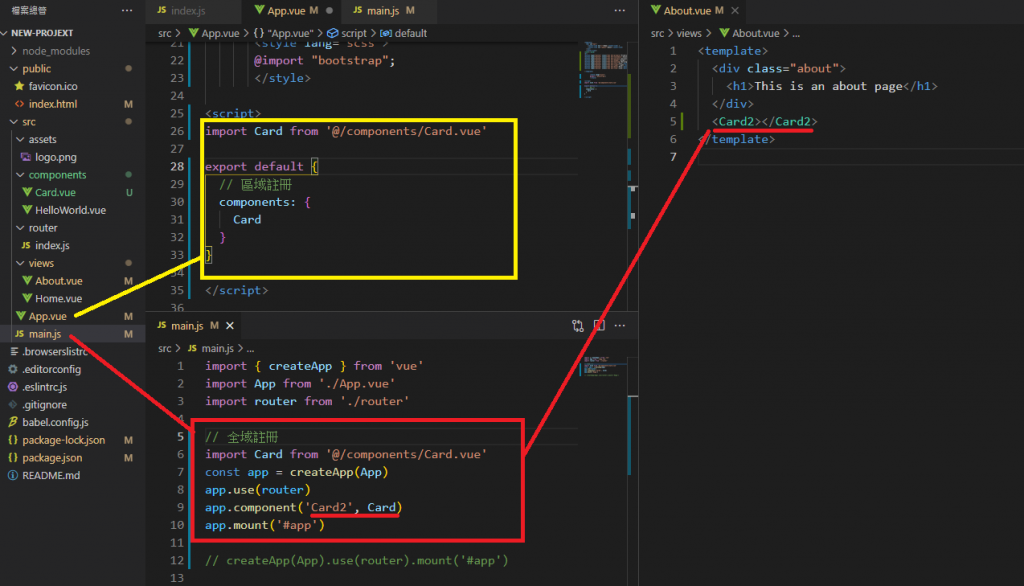
(3)App.vue 把卡片元件汇入,完成
@ = src
<Card></Card>
    <script>
    import Card from '@/components/Card.vue'

    export default {
      // 区域注册
      components: {
        Card
      }
    }
    </script>
以下试试看元件内增加data
(4)Card.vue
<h6 class="card-subtitle mb-2 text-muted"> {{ title }} </h6>
 <script>
export default {
  data () {
    return {
      title: '这是一段新增的title YOOOOOOOOOOOOOOOOOOOOO'
    }
  }
}
</script>
***服务器运作方式***
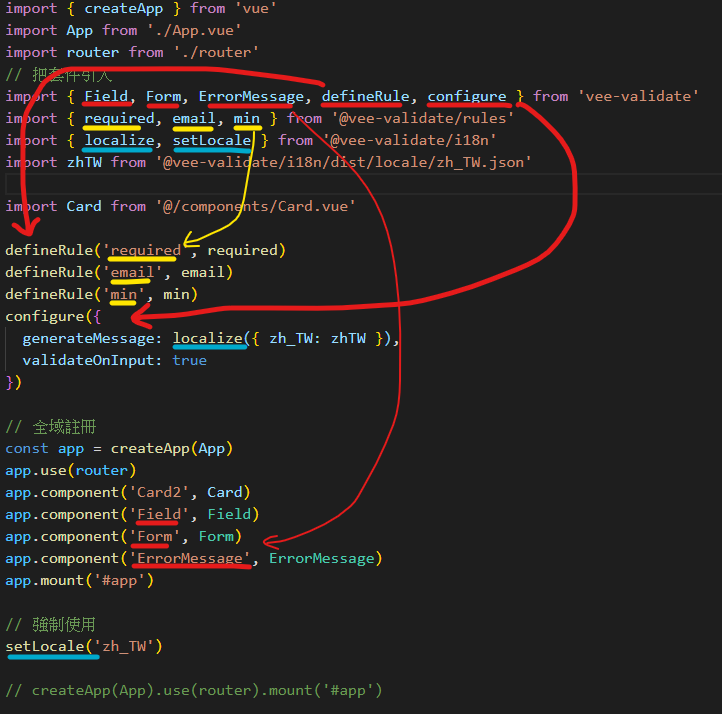
6.注册元件
区域 vs. 全域
7. Cli 中引入外部套件vee-validate
用途:检查表单内容是否有误
https://vee-validate.logaretm.com/v4/
同CDN
<!-- 步骤 1:加入 VeeValidation 相关资源 -->
<script src="https://cdnjs.cloudflare.com/ajax/libs/vee-validate/4.1.17/vee-validate.min.js"> </script>
<!-- 语言包 -->
<script src="https://cdn.jsdelivr.net/npm/@vee-validate/[email protected]/dist/vee-validate-i18n.min.js"></script>
<!-- 规则们 -->
<script src="https://cdn.jsdelivr.net/npm/@vee-validate/[email protected]/dist/vee-validate-rules.min.js"></script>

(1-1)安装vee-validate套件
npm install vee-validate@next --save
若serve正在跑的话 要先停止(ctrl+C)
(1-2)安装vee-validate套件
https://vee-validate.logaretm.com/v4/guide/global-validators#vee-validaterules
npm install @vee-validate/rules
(1-3)安装vee-validate套件
https://vee-validate.logaretm.com/v4/guide/i18n#using-vee-validatei18n
npm install @vee-validate/i18n
(2)可以直接汇入
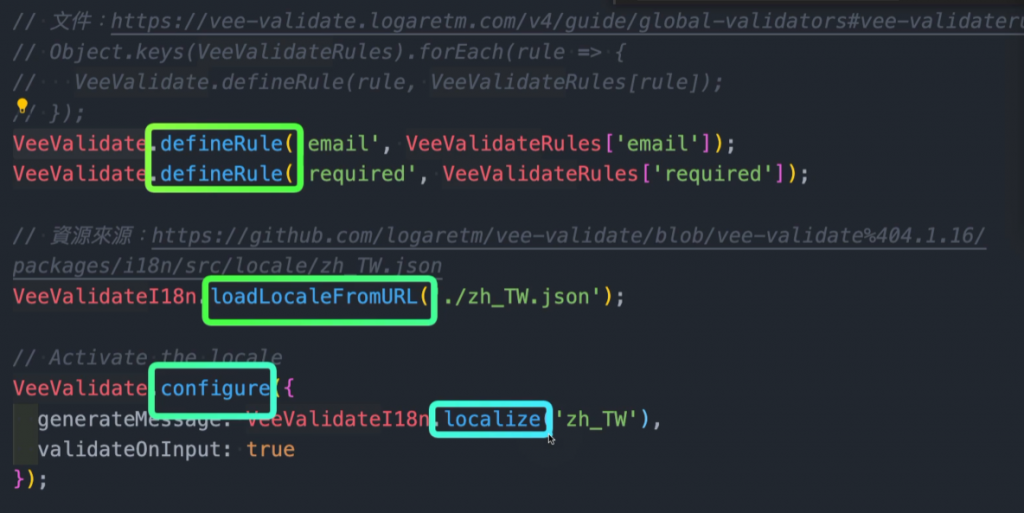
import { Field, Form, EorrorMessage, defineRule, configure } from 'vee-validate'
import { required, email, min } from '@vee-validate/rules'
import { localize, setLocale } from '@vee-validate/i18n'
import zhTW from '@vee-validate/i18n/dist/locale/zh_TW.json'

//制作
defineRule('required', required)
defineRule('email', email)
defineRule('min', min)
configure({
  generateMessage: localize({ zh_TW: zhTW }),
  validateOnInput: true
})

setLocale('zh_TW')
(3)运行serve
npm run serve
(4)home.vue
把之前的表单验证放进来
并把v-from、v-field标签改成Form、Field
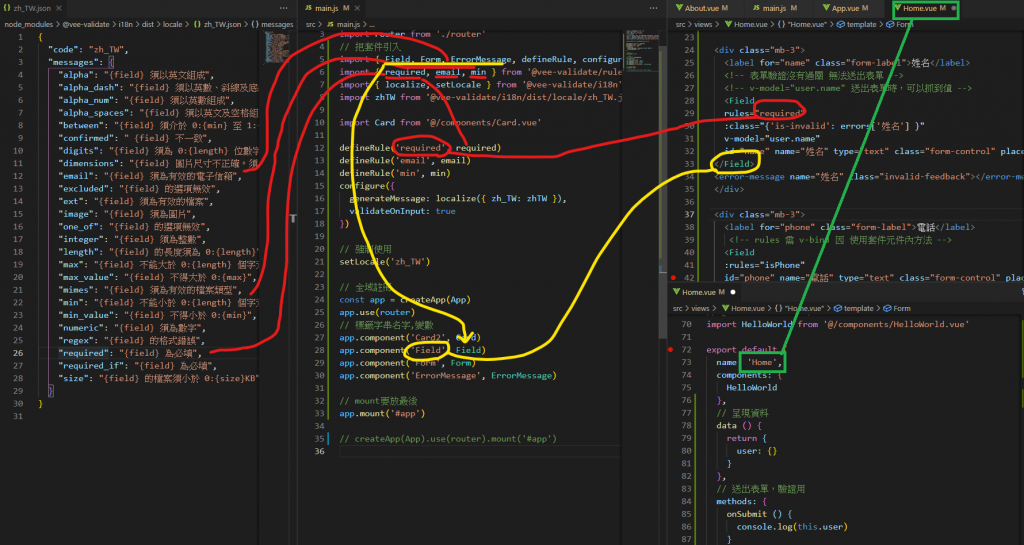
完成
8. Vue Cli 中环境变数基础观念
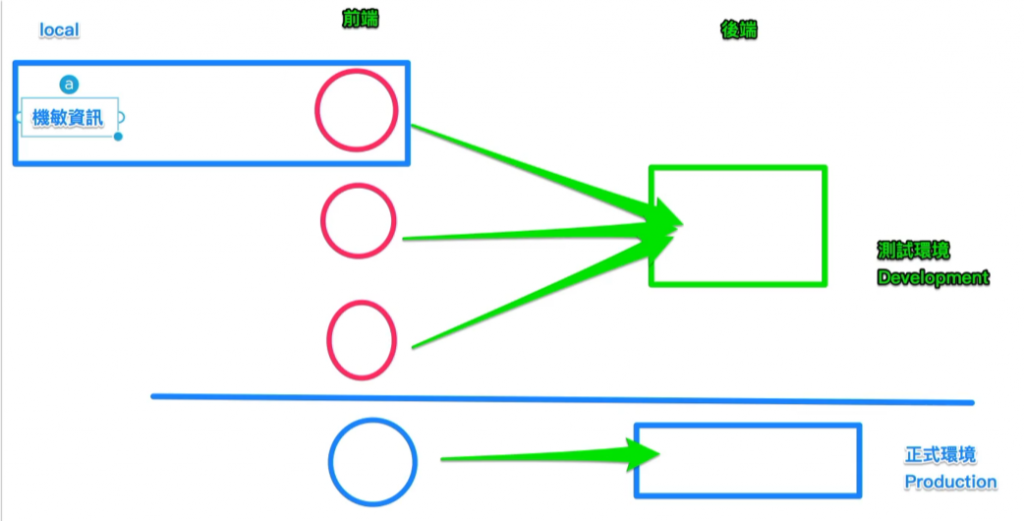
https://cli.vuejs.org/zh/guide/mode-and-env.html#%E6%A8%A1%E5%BC%8F
.env                # 在所有的环境中被载入
.env.local          # 在所有的环境中被载入,但会被 git 忽略
.env.[mode]         # 只在指定的模式中被载入
.env.[mode].local   # 只在指定的模式中被载入,但会被 git 忽略
(1).env
VUE_APP_NAME=嘿嘿吼吼吼
(2)App.vue 汇入
     {{name}}

      export default {
        data () {
          return {
            name: process.env.VUE_APP_NAME
          }
        },
      }
9.Vue Cli 编译设定档,变更网页显示路径
使用时机:
1.专案完成後,交给後端部属
2.部属在Github Pages
Github Pages 教学影片:https://www.youtube.com/watch?v=njlABvVRB68 59:34、1:04 开始
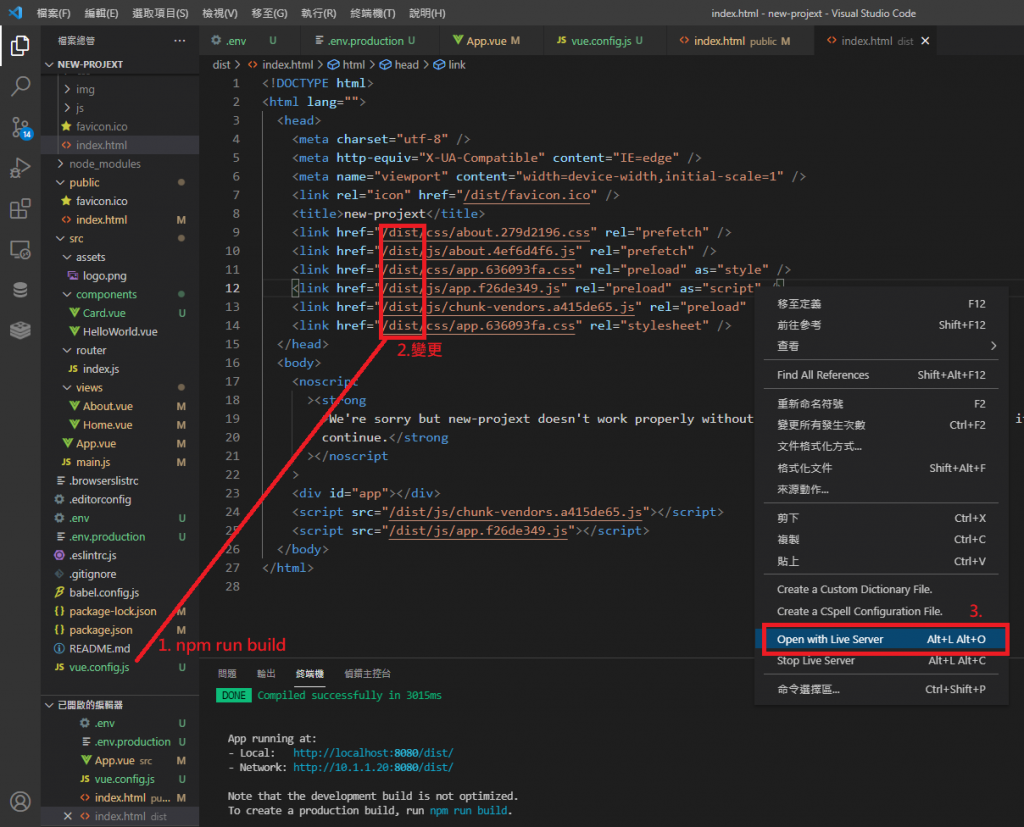
(1)编译
npm run build
(2)dist > index.html
用VScode打开dist目录,可以开启index.html
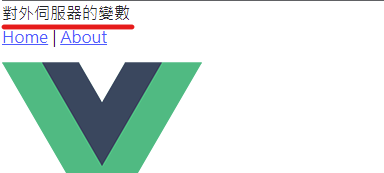
(3)新增对外服务器的变数 .env.production
VUE_APP_NAME=对外服务器的变数
(4)重新编译
此时请记得要关闭其他VScode视窗,有时视窗打开会写不进去
npm run build
(5)dist > index.html
用VScode打开dist目录,可以开启index.html
变更

https://crashoxo.github.io/Vue-git-demo/dist/index.html#/
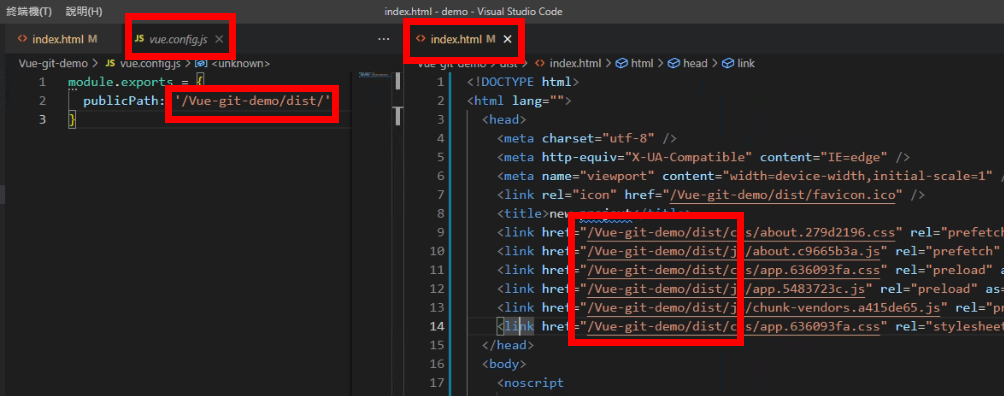
(6)设定对外开放的网页路径(从App.vue改为 dist > index.html)
可以直接使用以下方式改,前段为解释
6-1. 使用GUI介面
vue ui
6-2. 设定
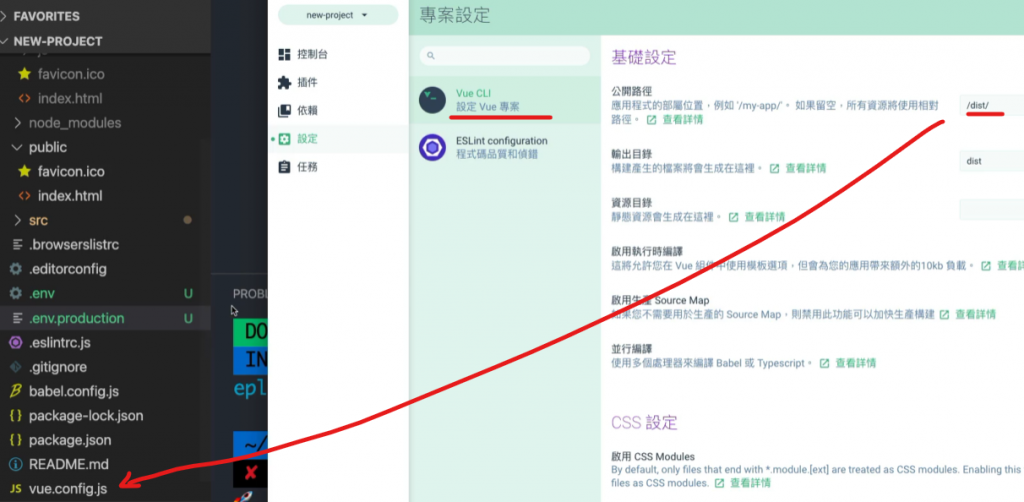
或自行手动写该vue.config.js档案
    module.exports = {
      publicPath: '/dist/'
    }
6-3. 重新编译
此时请记得要关闭其他VScode视窗,有时视窗打开会写不进去
npm run build
6-4 此时可以直接对dist > index.html 右键开启往右,并发现 对外服务器的变数
10.部属在Github Pages
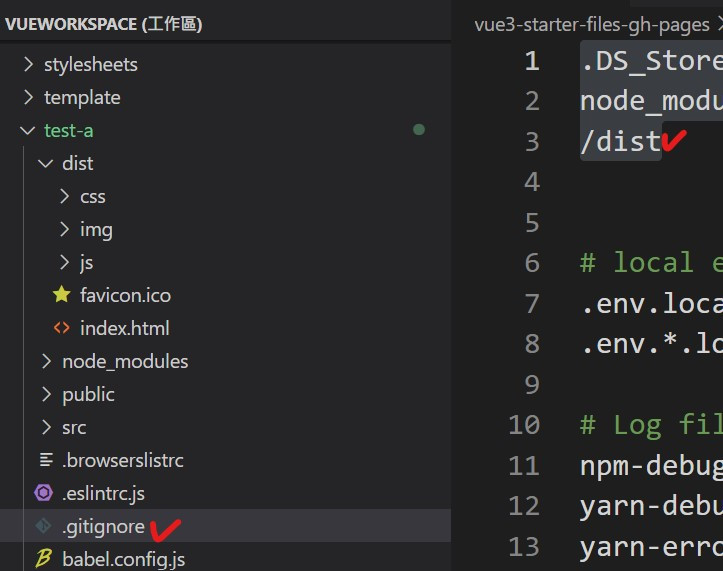
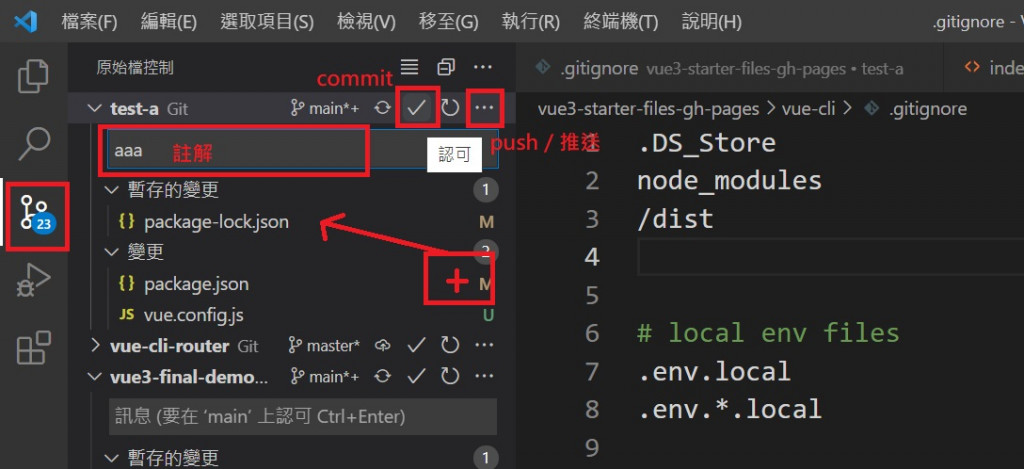
1.专案下.gitignore修改git阻挡的档案
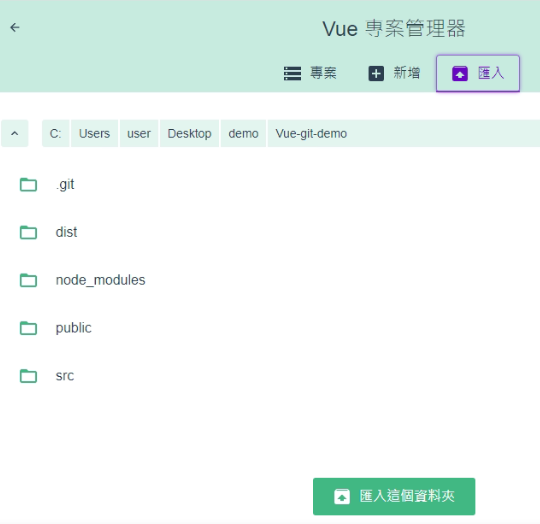
2.使用VUE GUI修改读取路径
2-1 汇入专案
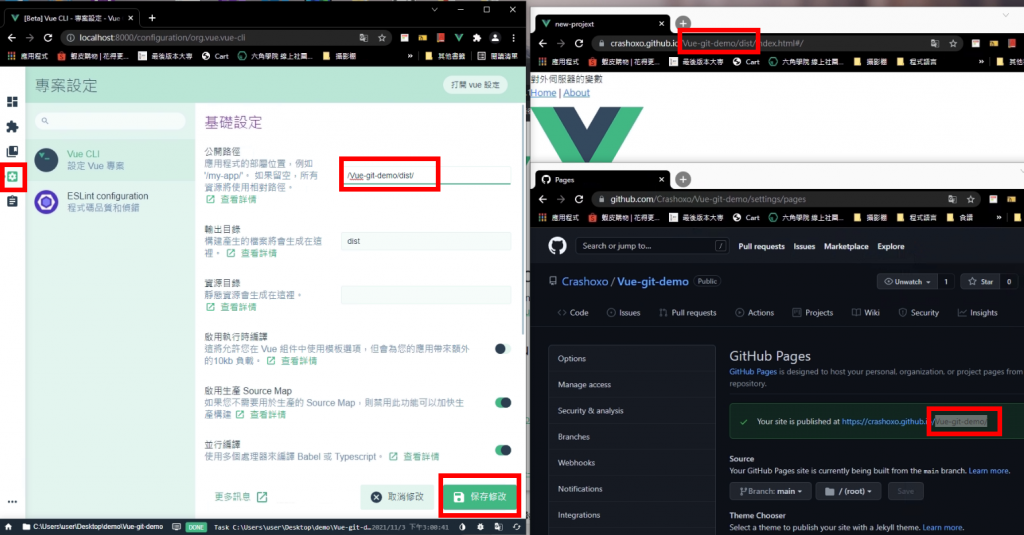
2-2 更改路径
注意github路径
目前只须 专案名称/dist/
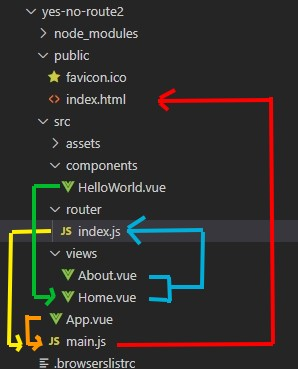
因main.js
const router = createRouter({
  history: createWebHashHistory(),  //# 模拟後端路径
  routes,
});
及 所有的网页都须透过 public > index.html渲染
<div id="app"></div>
2-3 部属build
同 > npm run build
会变更为
2-4 git上github
CLI内输入以下,让github与专案绑定

并上传
https://crashoxo.github.io/Vue-git-demo/dist/index.html#/
完成
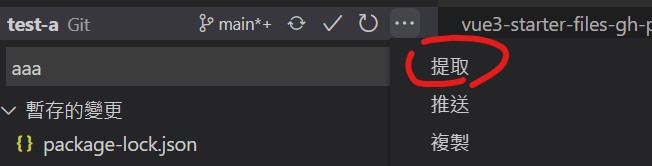
if合作时,从git抓取档案
Github的结论
9.为推倒过程,可以只看10.
1.跑Vue ui > 更改CLI路径 XXX(专案名称)/dist/ 并且 命名为dist > build
2.GitHub Desktop
3.路径出来後 通常後面+ /dist/#/ 就是路径
之後上传只需
- npm run build
- git
11. Cli 常见指令
(1) 如果套件装不下,使用sudo输入苹果电脑密码後安装
权限需求
sudo npm install [模组名称]
(2) 全域安装 -g
npm install [模组名称] -g
(少用,通常都放各专案内)
(路径为 /user/local/lib/node_modules )
(3) production、development
production (上线)依赖模组:
ex:Vue
npm install [模组名称] --save
development (开发)依赖模组:
ex:webpack
npm install [模组名称] --save-dev
(4) 移除 uninstall
npm uninstall [模组名称]
npm uninstall [模组名称] -g
(5) 更新套件:npm update 模组名称
npm update [模组名称]
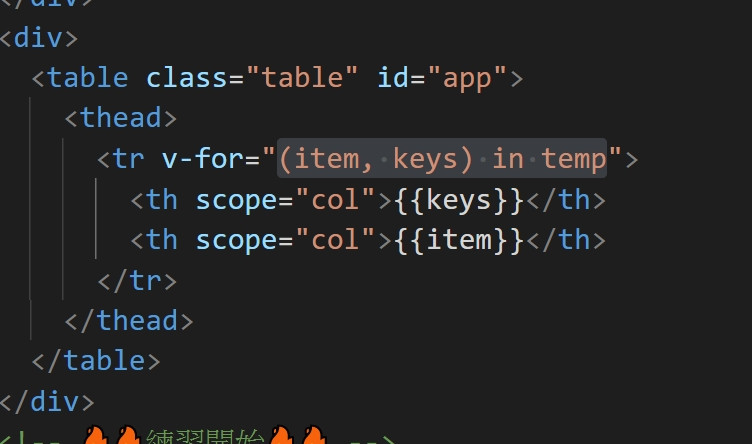
12. 阵列[] vs 物件{}
阵列[]
(item, keys) in temp
item=vaule ,keys=index
物件{}
(item, keys) in temp
keys=属性名称 item=属性值
ex: askPrice: "63248.86000000"
<<: EP 32: TopStore App with .NET Multi-platform App UI (MAUI)
框架在手,工作我有:MockK的简介?真的只是简介⋯⋯
随着考试的日子越来越接近,系里的气氛也越来越紧张。 「这麽一观察,系里选修这门课的人还真多。」诗忆看...
Day-23 Model 可以重复使用吗? 储存和读取 Model
总算,我们已经会建立自己独一无二的神经网路了~但,你有没有发现一个问题,我们的该不会每次要使用模型...
Day 04. Zabbix 可监控的服务、设备、应用
我把它分成使用基本款 (可安装 Agent)、通用款 (支援监控类通讯协定)、简易款 (无法安装 A...
Flutter体验 Day 6-Widget State
Widget状态管理 Widget 类别的原始码上有标注 @immutable,这个标注的意思是不可...
WordPress 适用响应式(RWD)浏览图片灯箱效果外挂-WP Lightbox 2
WP Lightbox 2 是一款支援图片灯箱效果,点图放大附关闭功能的外挂,适合在响应式网页上使用...